Review pull requests
Azure DevOps Services | Azure DevOps Server 2022 - Azure DevOps Server 2019
When you create a pull request (PR) and specify required/optional reviewers, Azure Repos will notify the reviewers that your PR is ready for review. All required reviewers must approve the changes in your PR before the changes can merge into the target branch. For PRs that change critical branches like the main branch, your team might have created branch policies that specify the reviewers or require a minimum number of reviewers. If branch policies add optional reviewers to your PR, you can keep them, require them, or remove them. If branch policies add required reviewers to your PR, you can't make them optional or remove them. For information about assigning reviewers through branch policies, see Automatically include code reviewers.
If you're reviewing a PR, try to give constructive feedback that's precise and easy to understand. For more information on review feedback, see Pull request feedback. This article describes how to review pull requests in Azure DevOps.
You can only review Azure DevOps PRs in the web portal by using your browser.
In this article you learn how to:
- Review changes
- Use comments
- Edit files
- Track reviewed files
- Vote on PR changes
- Complete a PR
In this article you learn how to:
- Review changes
- Use comments
- Vote on PR changes
Prerequisites
Repos must be enabled in your Azure DevOps project settings. If the Repos hub and associated pages don't display, see Turn an Azure DevOps service on or off to reenable Repos.
To review PRs, you must be a member of the Azure DevOps project the PR is in, with Basic access level or higher.
If you don't have a project, create one or sign up for free.
If you aren't a project member, get added.
Note
For public projects, users granted Stakeholder access have full access to Azure Repos.
Repos must be enabled in your Azure DevOps project settings. If the Repos hub and associated pages don't display, see Turn an Azure DevOps service on or off to reenable Repos.
To review PRs, you must be a member of the Azure DevOps project with Basic access level or higher. If you aren't a project member, get added.
- To learn more about permissions and access, see Default Git repository and branch permissions and About access levels.
You can manage PRs in Azure DevOps Services by using the Azure DevOps command line interface (CLI). The Azure DevOps CLI is available when you install the Azure CLI and the Azure DevOps extension. For a list of CLI commands to manage PRs, see the az repos pr commands.
Review changes
Pull requests let designated reviewers examine, discuss, and vote on proposed changes before those changes are applied to a target branch of a repo. Keep in mind that if development is carried out with the same files on different branches there may be a conflicting changes. In that case it is required to carefully analyze and resolve those conflicts. To do so, may require manually editing the file to correctly apply the changes from either source, target or both branches. Taking all changes from either source or target (which can be done by a single button click) may not be optimal and can result in loss of some required changes. This can be done using ADO tools, or it will be more convenient to use development tools (such as Visual Studio).
To learn more see Resolve merge conflicts.
The following steps describe how reviewers of PRs in Azure Repos can navigate through a PR to understand the proposed changes:
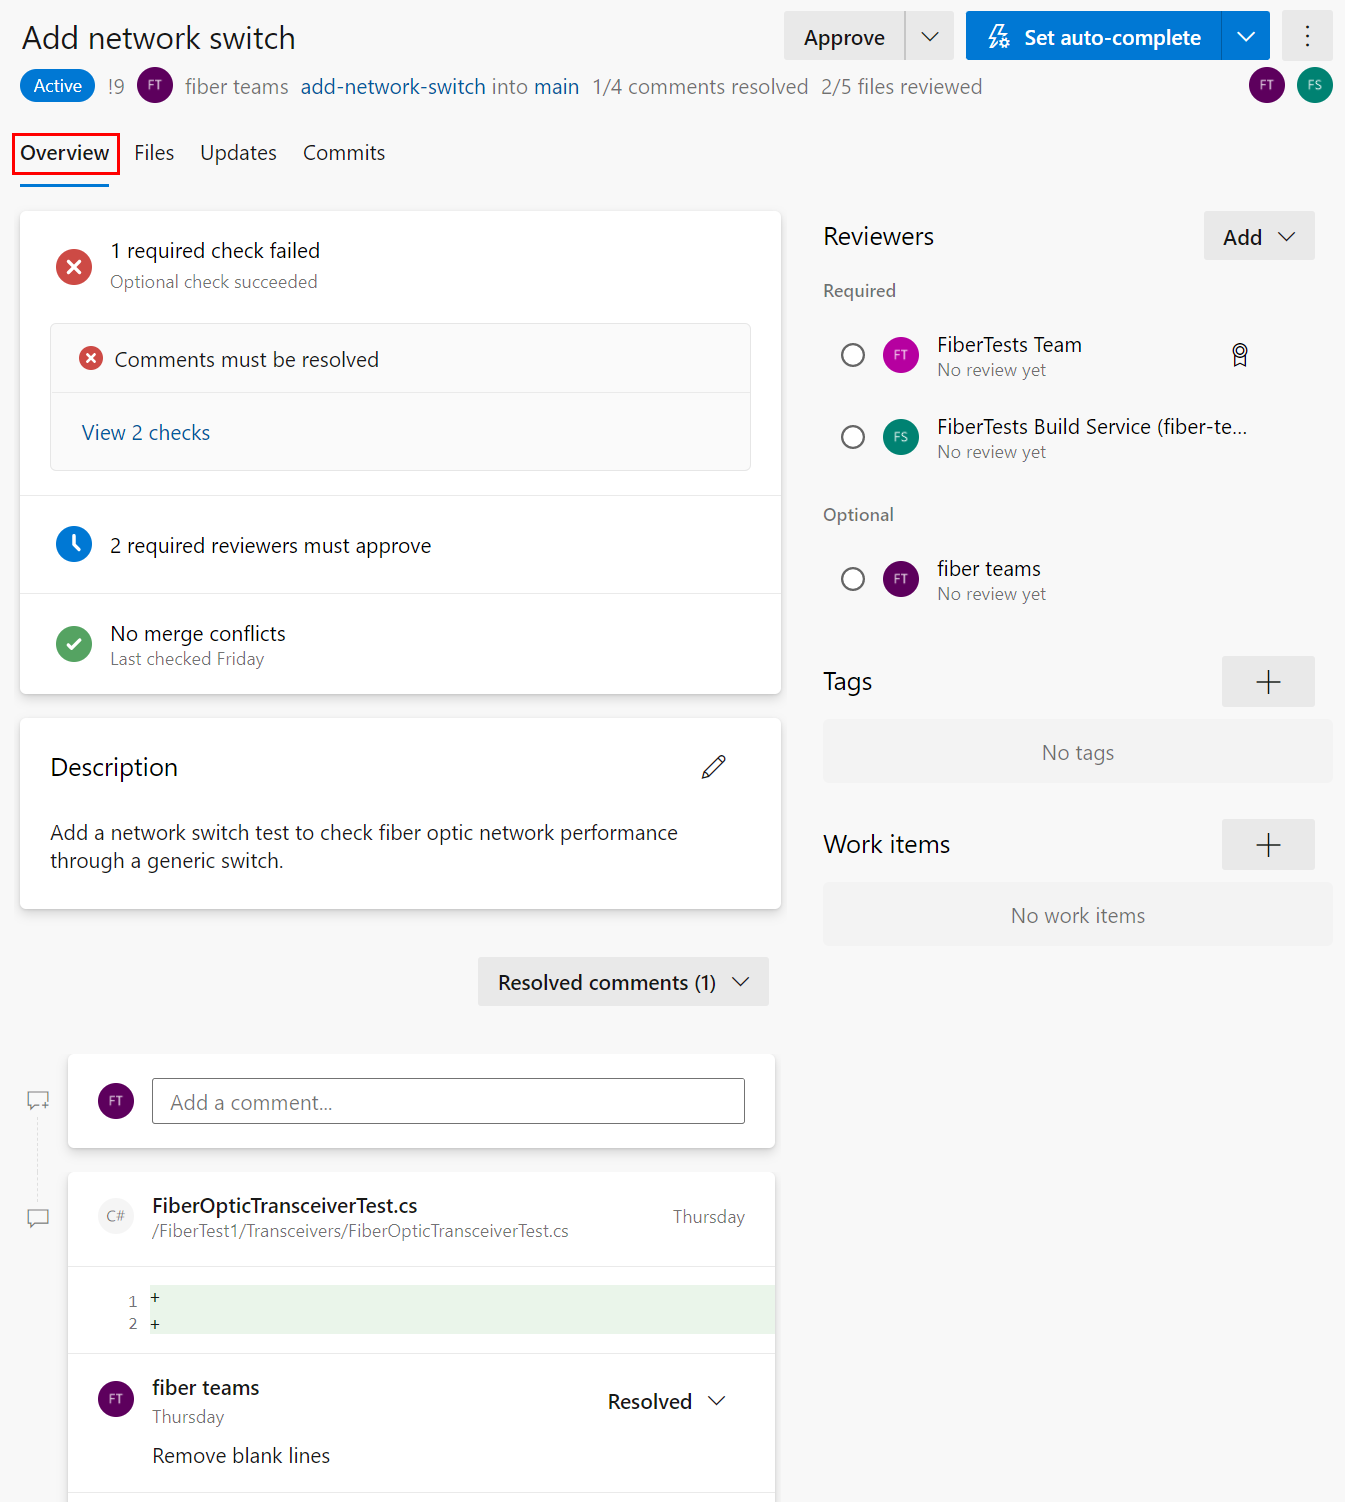
From your web browser, open the team project for your Azure DevOps organization. Choose Repo > Pull requests to list the PRs. A newly opened PR defaults to the Overview tab.
The Overview tab of a PR shows the title, description, reviewers, linked worked items, history, status, and comments. Read the PR description to see the proposed changes. View the comments to understand the issues raised by other reviewers.
Note
Each file is estimated for a number of modifications and is marked with a "+" sign or a "rename, edit" label next to its name. When a file has more than 50-percent changes, it is considered renamed. This is the default threshold for git repositories that cannot be changed.
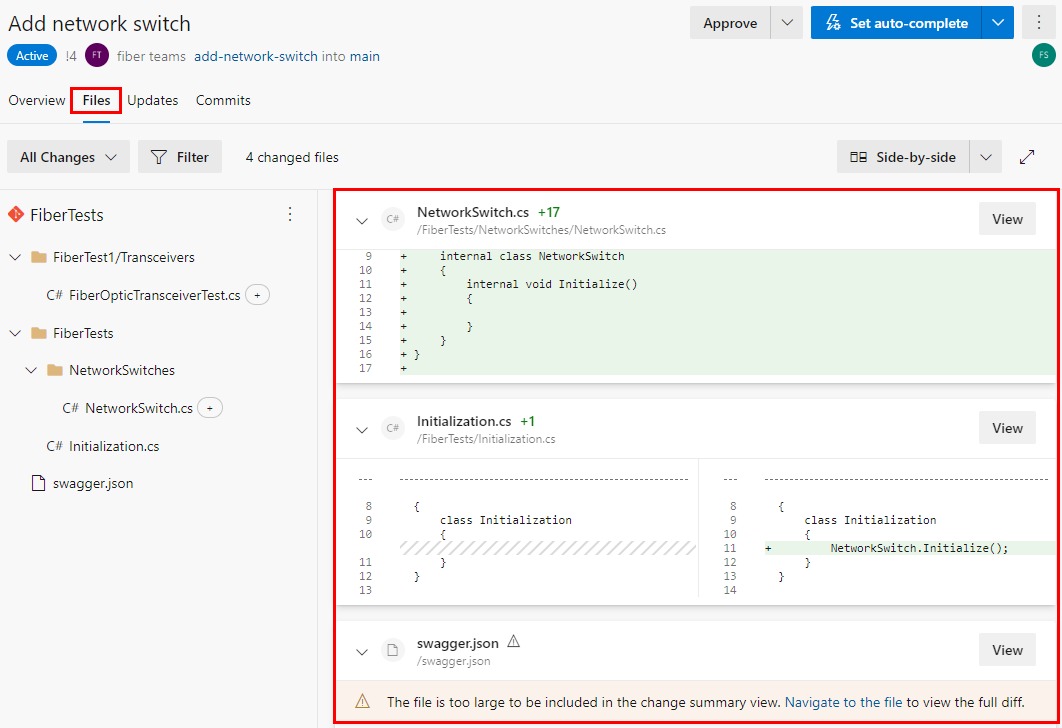
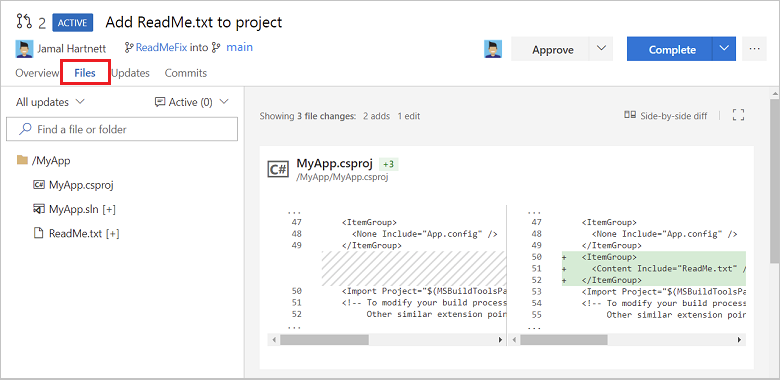
Select the Files tab to review all content changes in the PR's source branch. The initial view shows a summary view of all file changes. Choose the View button next to a file to view only that file's changes. If the file was modified, the View button opens a diff view. If the file was added or deleted, the View button opens a content pane.
Note
For performance reasons, the summary view won't show changes for a file that's larger than 0.5 MB.
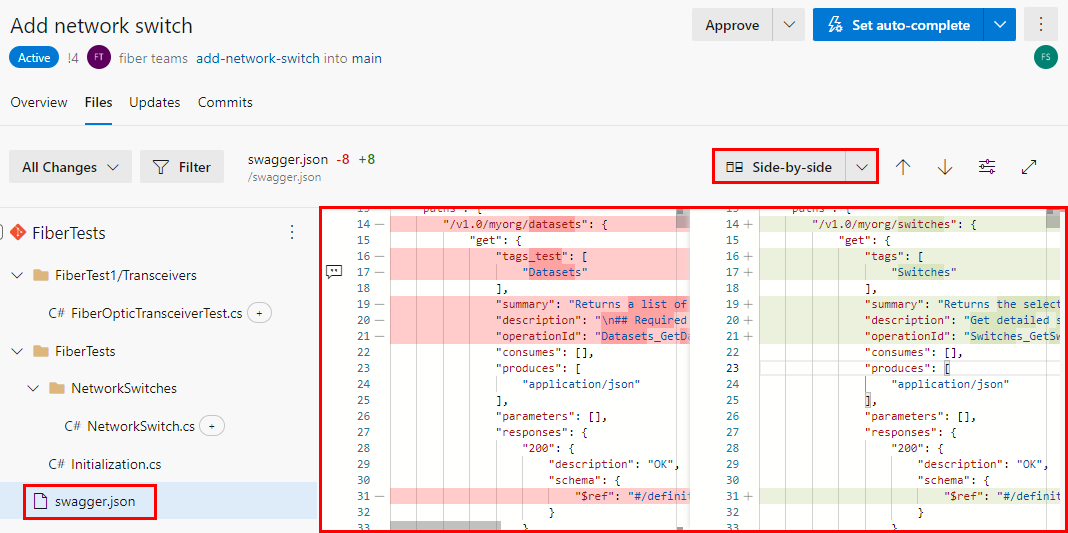
In a diff view for a file, you can select either a Side-by-side or Inline diff layout.
Tip
For any single file that's larger than 5 MB, the diff view shows truncated file content. For a diff view of the full content, download and review such files using a local diff tool.
Use the left-hand file tree to view another file, or select the root of the file tree to see a summary view of all file changes.
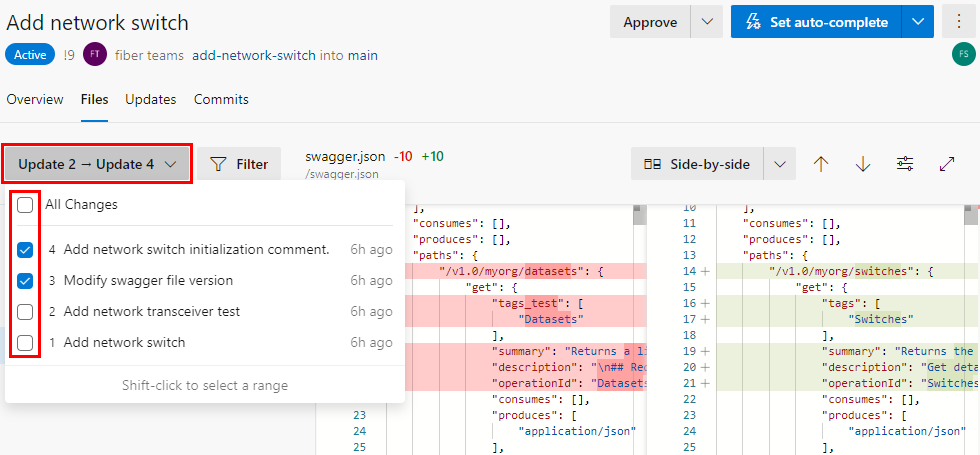
To review the changeset introduced by specific pushes to the source branch, select one or more changesets from the changes dropdown list. When you select one or more changesets, the diff view updates to show only the changes from the selected changesets. This feature is useful when changes have been pushed to the PR since your last review and you just want to see the new changes. The changes dropdown list names each changeset with the commit message from the final commit in each push operation.
Tip
Hold the Shift key when selecting multiple changesets from the changes dropdown list.
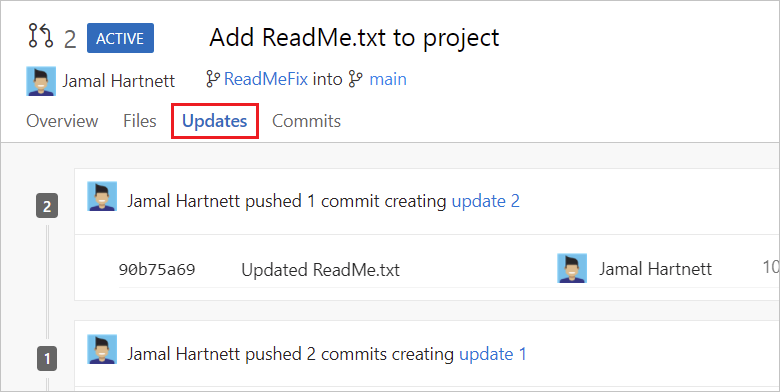
Choose the Updates tab to view all pushed changesets to ensure you haven't missed any source branch changes. The changesets are numbered and the most recent changeset appears at the top of the list. Each changeset shows the commits that were pushed in that push operation. A force-pushed changeset won't overwrite the changeset history and will show up in the changeset list same as any other changeset.

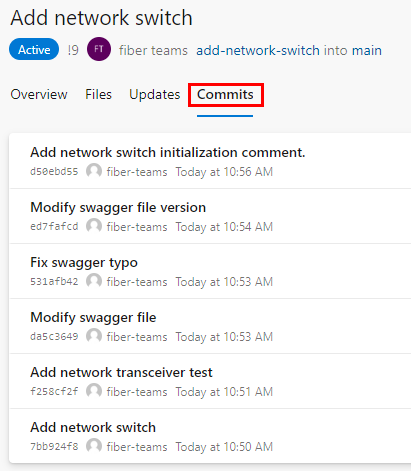
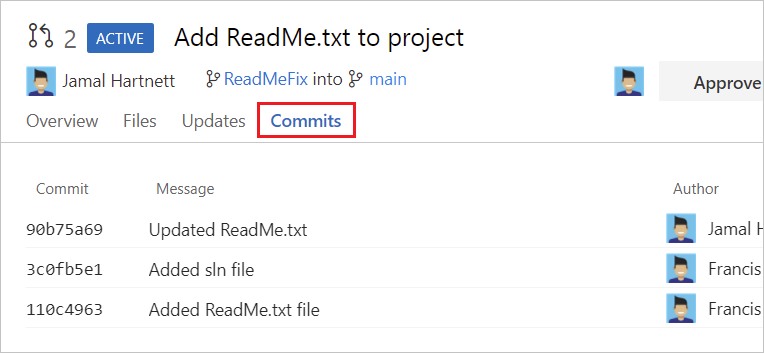
Choose the Commits tab to view the commit history of the source branch after it diverged from the target branch. The commit history in the Commits tab will be overwritten if the PR author force-pushes a different commit history, so the commits shown in the Commits tab might differ from the commits shown in the Updates tab.


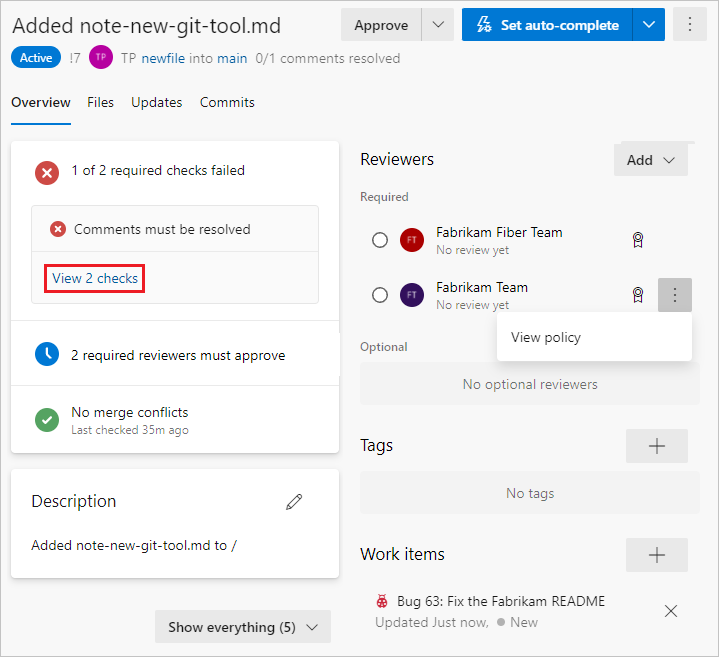
To give a quick picture of PR status, the PR Overview tab summarizes checks, requirements, and branch policies that the PR is passing or failing. In some cases, the summary shows a snippet of the failure message from a status check's log. The overview lists only failed policies, but you can see all the passed and failed policy checks by selecting View <n> checks.
On the PR Overview tab, you can review the PR description and comments to understand proposed changes and see issues other reviewers raised.
Review files
Select the PR Files tab to view the actual changes made to the source branch next to the target branch of the pull request.
Note
The different changes between Azure DevOps Pull request and Azure DevOps Branch compare is caused by the different comparison methods.
There are two comparison methods for git diff command: Two-dot (git diff A..B) and three-dot (git diff A...B). By default, Pull Requests show a three-dot diff while the Branch Comparison instead shows a two-dot diff.
For example:
      C---D---E branch
     /
A---B---F---G   master
Pull Requests: git diff branch...master will produce only C, D, E commits.
Branch Compare: git diff branch..master will produce C, D, E, F, G commits.
For more details, see three-dot-and-two-dot-git-diff-comparisons and git diff
Note
When viewing the difference for a single selected file, there's a file size limit of 5 MB. To view and diff files larger than 5 MB, you can download the file and view it using a local diff tool. When viewing the difference for a collection of files, the size limit for each file is 0.5 MB, for performance reasons.
Review updates
Review previous versions of the code from the All updates drop-down list.
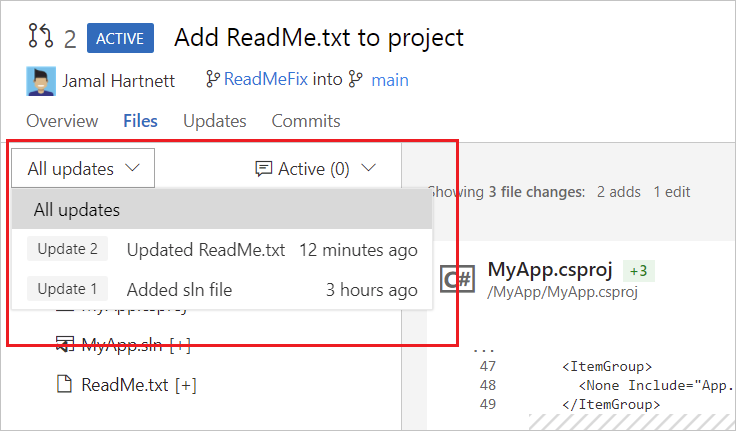
Every update to the branch adds a new version to the list and on the Updates tab of the PR. As you select different updates, the diff view updates to show the differences between the files in each version of the PR.
You can catch up with PR updates after being away from the PR by stepping through changes made since your last review.
Browse a list of changes from the author on the Updates tab.
View and select changes made in commits to the branch on the Commits tab.
Use comments
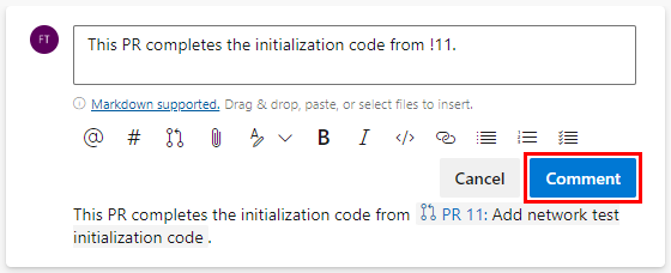
PR authors and reviewers can communicate with each other by adding and responding to PR comments. When you review a PR, use comments to point out issues with the proposed changes, suggest changes, and respond to previous comments. Aim for constructive feedback that's precise and easy to understand. Address recipients directly by using their @username. Reference work items by using #workitemID and other PRs by using !pullrequestID. Sometimes, PR authors create comments for themselves for documentation purposes.
Provide feedback in comments
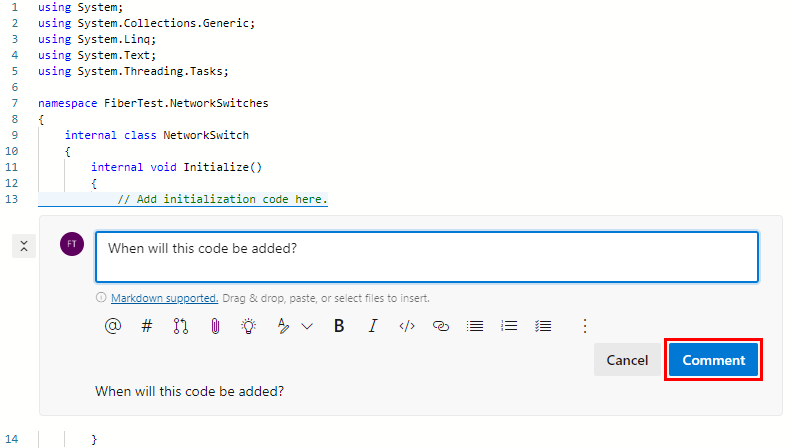
If your feedback applies to a specific line or range of lines in a file, add a comment at that location within the file:
In the Files tab of a PR, hover over the line you want to comment on and select the comment button
 to open an inline comment box. You can also select multiple lines and then select the comment button that appears when you hover over those lines.
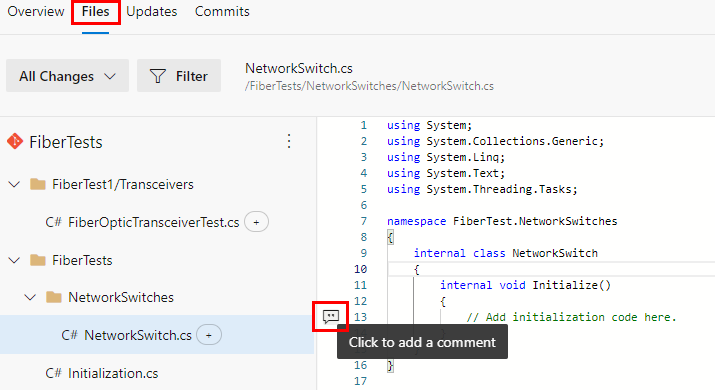
Enter your comment in the comment box and choose Comment.

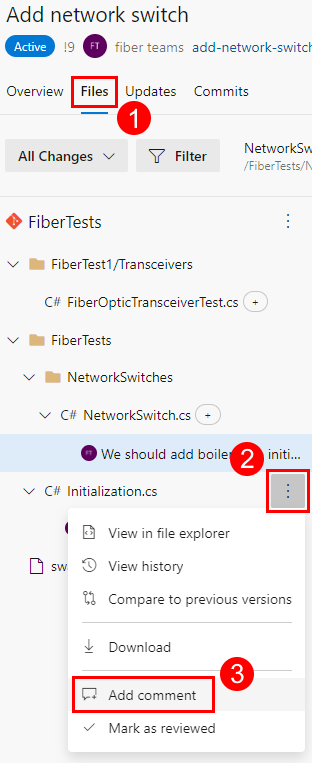
If your feedback applies to the entire file, add a file-level comment by selecting Add comment from the file options menu:
To provide general feedback unrelated to a specific file, add a comment in the Overview tab:
PR reviewers can also use comments to suggest changes to specific file lines, as described in the next section.
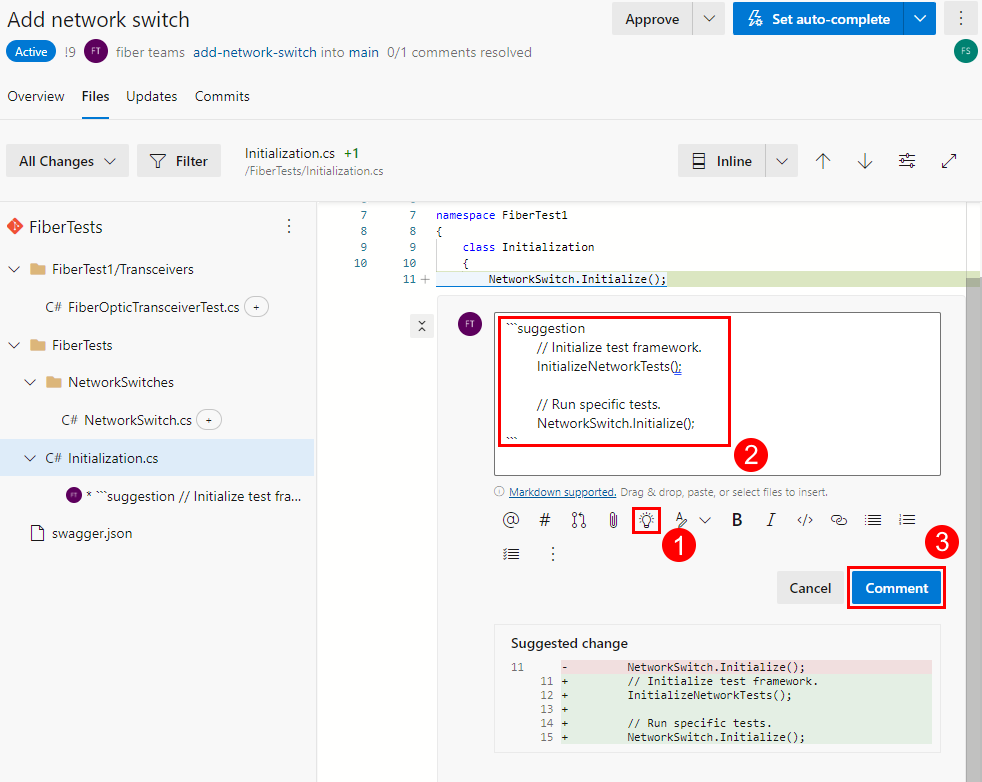
Suggest changes in comments
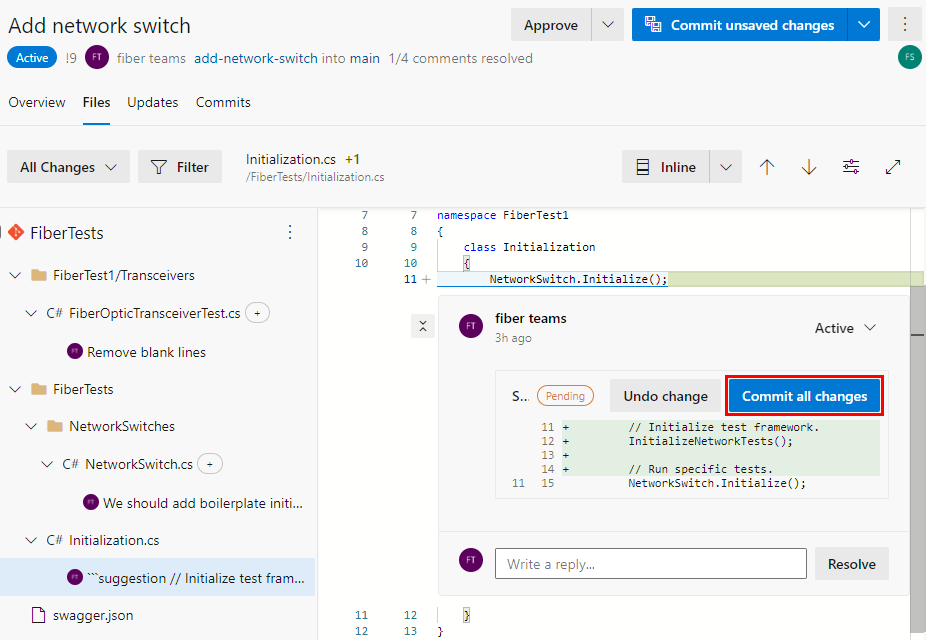
You can use comments to suggest replacement text for one or more lines in a file:
In the Files tab of a PR, hover over the line you want to comment on and select the comment button
to open an inline comment box. You can also select multiple lines and then select the comment button that appears when you hover over those lines. If accepted, your suggested content will replace the line or lines that your comment was added to.
Select the light bulb icon under the comment box to make your suggested changes in the comment box within a fenced code block, and then choose Comment. You won't see a light bulb icon if you add a comment to the original code (left-hand side) of a side-by-side diff view.

PR authors can accept your suggestion by:
Choosing Apply changes to stage the change in readiness for a commit.
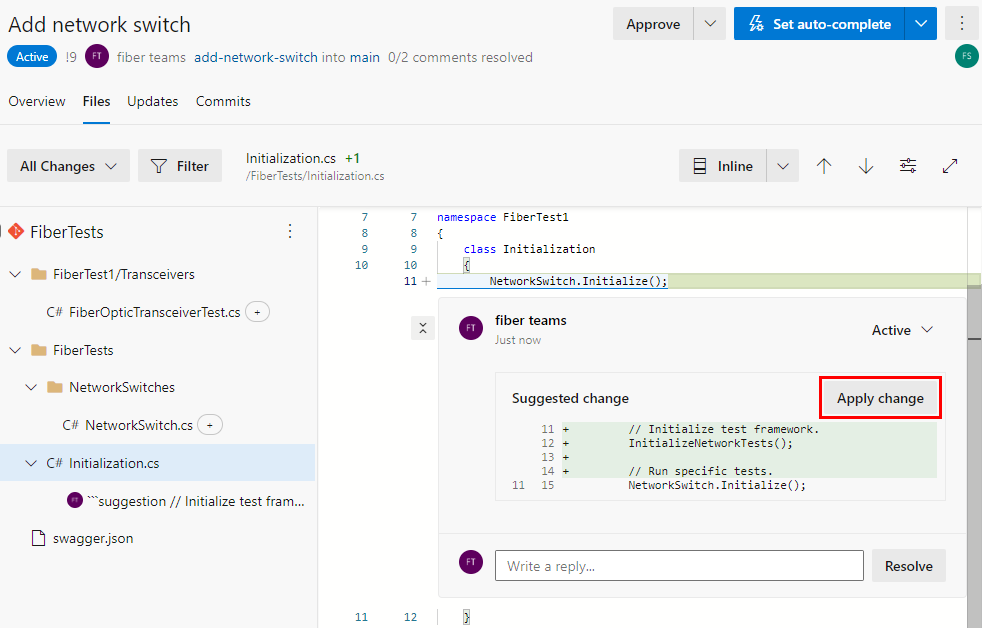
Choosing Commit all changes to commit all staged changes. PR authors can unstage a suggestion by choosing Undo change.


Edit or delete comments
You can edit or delete your comment by hovering over the comment and choosing the edit or delete icon:

Like comments
PR authors and reviewers can like their own or someone else's comment by hovering over the comment and choosing the thumbs-up icon:

Comments with likes show a filled in thumbs-up icon and the number of likes. Hover over the thumbs-up icon to see the list of people who liked the comment.

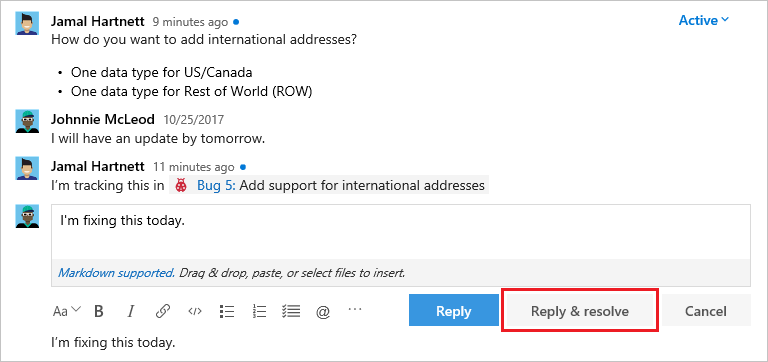
Reply to comments
PR authors should reply to comments to let the reviewers know how they're addressing feedback and suggestions:
To reply to a comment, type your response in the Write a reply field. Address recipients directly by using their
@username. Reference work items by using#workitemIDand other PRs by using!pullrequestID.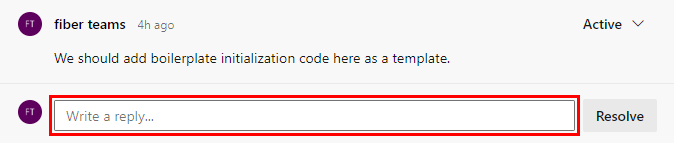
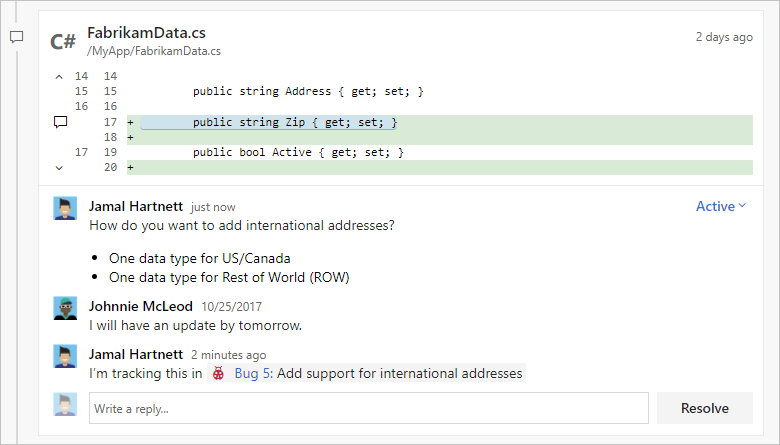
After entering your response, select Reply & resolve if your response is final. Otherwise, select Reply.
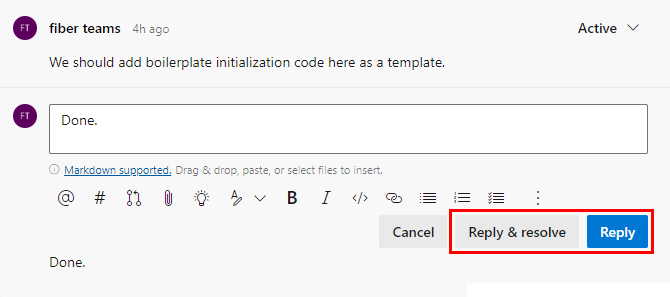
If you select Reply & resolve, the comment status will change to Resolved. PR authors can also directly change a comment's status, as described in the next section.
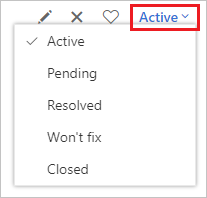
Change comment status
New comments initially have an Active status, which PR authors update during PR the review process to indicate how they addressed reviewer feedback and suggestions. PR authors can select a comment status from the status dropdown list:
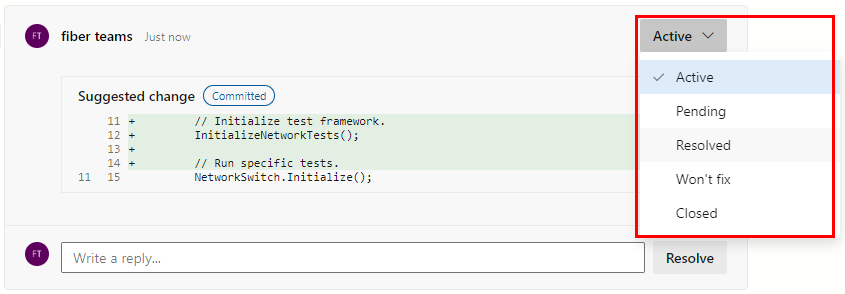
Active: the default status for new comments.
Pending: the issue in this comment is under review and awaits something else.
Resolved: the issue in this comment is addressed.
Won't fix: the issue in this comment is noted but won't be fixed.
Closed: the discussion in this comment is closed.
PR authors and reviewers can track PR progress by filtering on comment status, as described in the next section.
Add comments to a PR to make suggestions, reply to previous comments, and point out problems with the proposed changes.
Comment inline in the Files tab of a PR by hovering over the line you want to comment on and selecting the comment button
 .
.
Give feedback not tied to a specific code line by commenting on the Overview tab.
Address the author or other reviewers directly in your comments by using
@username, and reference work items by using#workitemID. You can also reference other PRs by using!pullrequestID.
Edit, delete, or like a comment
To edit or delete your comment, hover over the comment and select the pencil icon to edit the comment or the garbage icon to delete the comment.
To like your own or someone else's comment, hover over the comment and select the thumbs-up icon. Comments with likes show a filled in icon and the number of likes in the comment list. Hover over the icon to see the list of people who liked the comment.

Like a comment
To like a comment that you or someone else made, select the heart icon. Hover over the icon in comments to see the list of people who liked the comment.
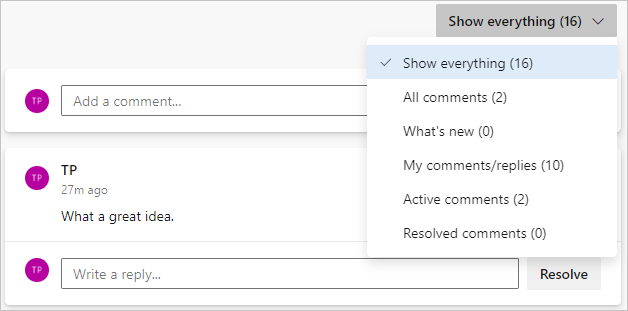
Filter comments
You can select which comments or updates show on the Overview tab by selecting a filter option from the comment filter dropdown list. For example, select the What's new filter option to see new comments and updates since you last opened the PR. Each filter option shows the number of items for its category.

You can select which comments and updates show on the Overview tab. Hiding some comments and updates gets them out of the way when reviewing code for the first time. You can also show only what's new since the last time you visited the PR.
To filter comments and updates, select the Show everything (n) button above the comment list, and select one of the filtering options. The view changes to show only the selected comments and updates. The button label changes to show the filtering criteria and the number of items shown.
Address comments
You can make quick updates to your branch directly from the Files tab in Code on the web.
Reply and resolve comments
Reply to comments and update comment status to let reviewers know how you're addressing their comments and suggestions.
- To resolve a comment without replying, select Resolve under the comment.
- To reply to the comment, type your response in the Write a reply field, and select Reply.
- To reply to and resolve the comment, type your response in the Write a reply field, and select Reply & resolve.
- Reply to specific reviewers by using
@usernamein the reply, and reference work items by using#workitemID. You can also reference other PRs by using!pullrequestID.
New comments start in Active status. Select Resolve or Reply & resolve to update comment status to Resolved.
More options are available in the comment resolution dropdown list:
- Active: The comment is still under review.
- Pending: The issue in this comment will be addressed, but isn't fixed yet.
- Resolved: The issue brought up in this comment is fixed.
- Won't fix: The suggestion in the comment is noted, but this PR won't address it.
- Closed: Discussion for this comment is closed.
To keep track of files that have already been reviewed, select More options next to a file in your PR, and then select Mark as reviewed.
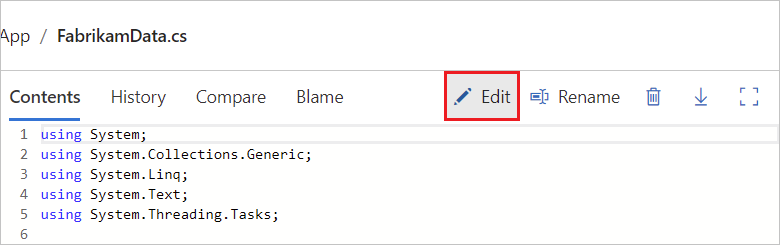
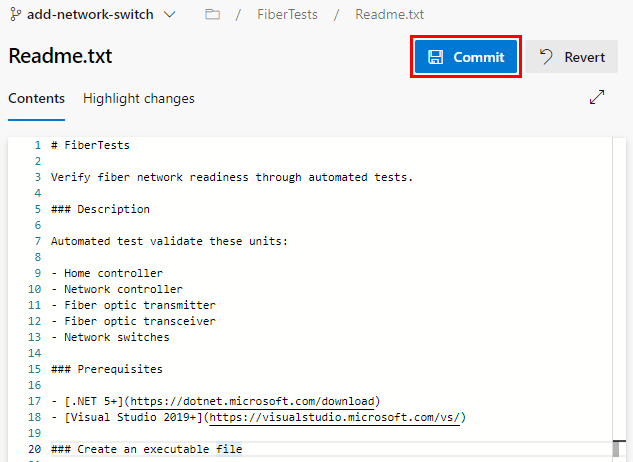
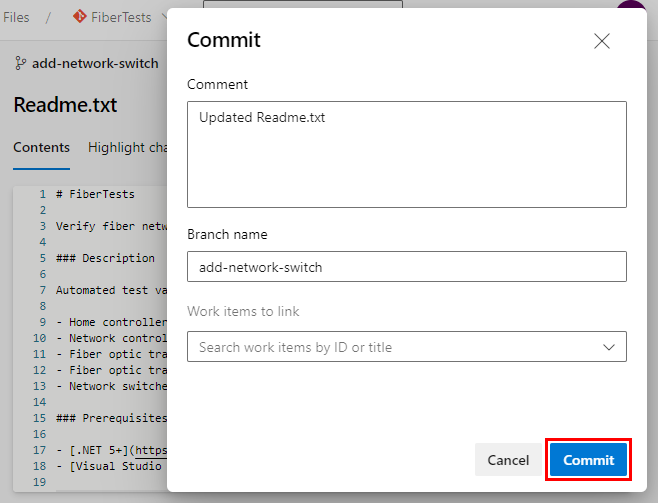
Edit files
For convenience, PR authors can edit files directly in Azure Repos. For example, you might have accepted a reviewer's suggested code change and want to make similar changes elsewhere.

Track reviewed files
PR reviewers can keep track of reviewed files by choosing Mark as reviewed from the file options menu, or by selecting the checkbox next to a file or folder:

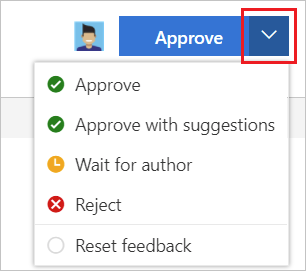
Vote on PR changes
PR reviewers can vote on a PR by selecting a vote option from the vote dropdown list. The reviewer icon on the PR page will show an indication of their vote.

The voting options are:
Approve: approves the proposed changes in the PR. This option is just a vote and doesn't approve the PR.
Approve with suggestions: approves the proposed changes in the PR with optional suggestions for improvement. This option is just a vote and doesn't approve the PR.
Wait for author: asks the author to review the reviewer comments. The PR author should let the reviewers know to re-review the code after the PR author has addressed the comments. If a required reviewer sets this vote option, the vote will block PR approval.
Reject: indicates that the changes aren't acceptable. When you choose this option, add a comment explaining why. If a required reviewer sets this vote option, the vote will block PR approval.
Reset feedback: clears your vote. The absence of a vote doesn't prevent a PR from being completed.
Use the button at upper right in the PR to vote on the PR changes. The default option is Approve, but you can select other options from the dropdown list:
- Approve: Approve the proposed changes in the PR.
- Approve with suggestions: Approve the PR, but provide optional suggestions for improvement.
- Wait for author: Don't approve the changes, and ask the author to review your comments. The author should let you know to review the code again after they address your concerns.
- Reject: The changes aren't acceptable. Leave a comment in the PR to explain why.
- Reset feedback: Remove your vote.
Complete a PR
PR authors can select a PR resolution option:

Complete: complete the PR now if all required reviewers have approved it and all required branch policies are met.
Set auto-complete: auto-complete the PR when all required reviewers approve it and all required branch policies are met.
Mark as draft: set the PR to draft status to indicates it's not ready for review. For a draft PR, you can select Publish to remove its draft status and mark it ready for review.
Abandon: close the PR. For an abandoned PR, you can select Reactivate to restore it.
For more information on completing a PR, see Complete the pull request.
Next steps
Related articles
Feedback
Coming soon: Throughout 2024 we will be phasing out GitHub Issues as the feedback mechanism for content and replacing it with a new feedback system. For more information see: https://aka.ms/ContentUserFeedback.
Submit and view feedback for