Build 3D scenes with 3D Scenes Studio (preview) for Azure Digital Twins
Azure Digital Twins 3D Scenes Studio (preview) is an immersive 3D environment, where business and front-line workers can consume and investigate operational data from their Azure Digital Twins solutions with visual context.
Prerequisites
To use 3D Scenes Studio, you'll need the following resources.
An Azure Digital Twins instance. For instructions, see Set up an instance and authentication.
- Obtain Azure Digital Twins Data Owner or Azure Digital Twins Data Reader access to the instance. For instructions, see Set up user access permissions.
- Take note of the host name of your instance to use later.
An Azure storage account. For instructions, see Create a storage account.
- Take note of the URL of your storage account to use later.
A private container in the storage account. For instructions, see Create a container.
- Take note of the name of your storage container to use later.
Permissions for your storage resources, including:
- At least Reader control plane access
- A data access role of Storage Blob Data Owner or Storage Blob Data Contributor
You can grant required roles at either the storage account level or the container level. For instructions and more information about permissions to Azure storage, see Assign an Azure role.
Configure CORS for your storage account (see details in the following sub-section).
Configure CORS
You'll need to configure CORS for your storage account, so that 3D Scenes Studio will be able to access your storage container.
These CORS headers are always required:
- Authorization
- x-ms-version
- x-ms-blob-type
These additional CORS headers are required if you're planning on using private links functionality:
- Content-Type
- Content-Length
- x-ms-copy-source
- x-ms-requires-sync
Below is the Azure CLI command that will set the methods, origins, and headers listed above for CORS in your storage account. The command contains one placeholder for the name of your storage account.
az storage cors add --services b --methods GET OPTIONS POST PUT --origins https://explorer.digitaltwins.azure.net --allowed-headers Authorization Content-Type Content-Length x-ms-version x-ms-blob-type x-ms-copy-source x-ms-requires-sync --account-name <your-storage-account>
Now you have all the necessary resources to work with scenes in 3D Scenes Studio.
Initialize your 3D Scenes Studio environment
In this section, you'll set the environment in 3D Scenes Studio and customize your scene for the sample graph that's in your Azure Digital Twins instance.
Navigate to the 3D Scenes Studio. The studio will open, connected to the Azure Digital Twins instance that you accessed last in the Azure Digital Twins Explorer.
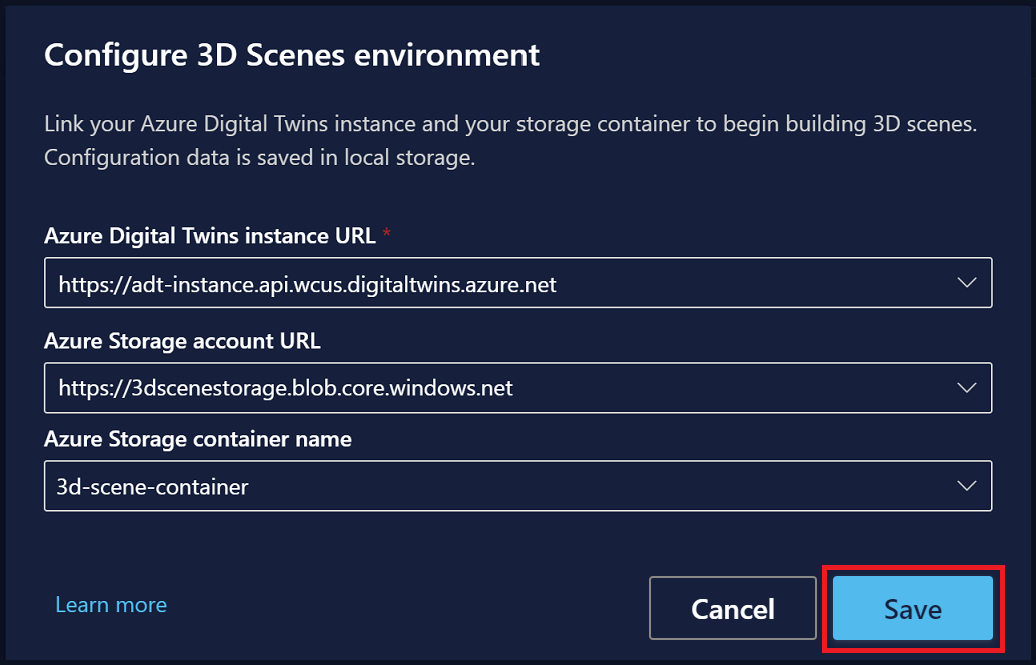
Select the Edit icon next to the instance name to configure the instance and storage container details.

The Azure Digital Twins instance URL should start with https://, followed by the host name of your instance from the Prerequisites section.
For the Azure Storage account URL, enter the URL of your storage container from the Prerequisites section. For the Azure Storage container name, enter the name of your storage container from the Prerequisites section.
Select Save.


Create, edit, and view scenes
The 3D representation of an environment in 3D Scenes Studio is called a scene. A scene consists of a 3D file and a configuration file that's created for you automatically.
To create a scene, start with a segmented 3D file in .GLTF or .GLB format. You can download and view a sample 3D file using this link: Download RobotArms.glb.
Tip
3D Scenes Studio supports animation. If you use a 3D model file that contains animations, they will play in the scene.
You can use 3D Scenes Studio with a 3D file that's already present in your storage container, or you can upload the file directly to 3D Scenes Studio, which will add it to the container automatically. Here are the steps to use a 3D file to create a new scene.
From the home page of 3D Scenes Studio, select the Add 3D scene button to start creating a new scene.
Enter a Name and Description for the scene.
If you want the scene to show up in globe view, toggle Show on globe to On. Enter Latitude and Longitude values for the scene.
Select one of the following tabs in the Link 3D file section:
- Choose file to enter the URL of a 3D file that's already in your storage container
- Upload file to upload a 3D file from your computer
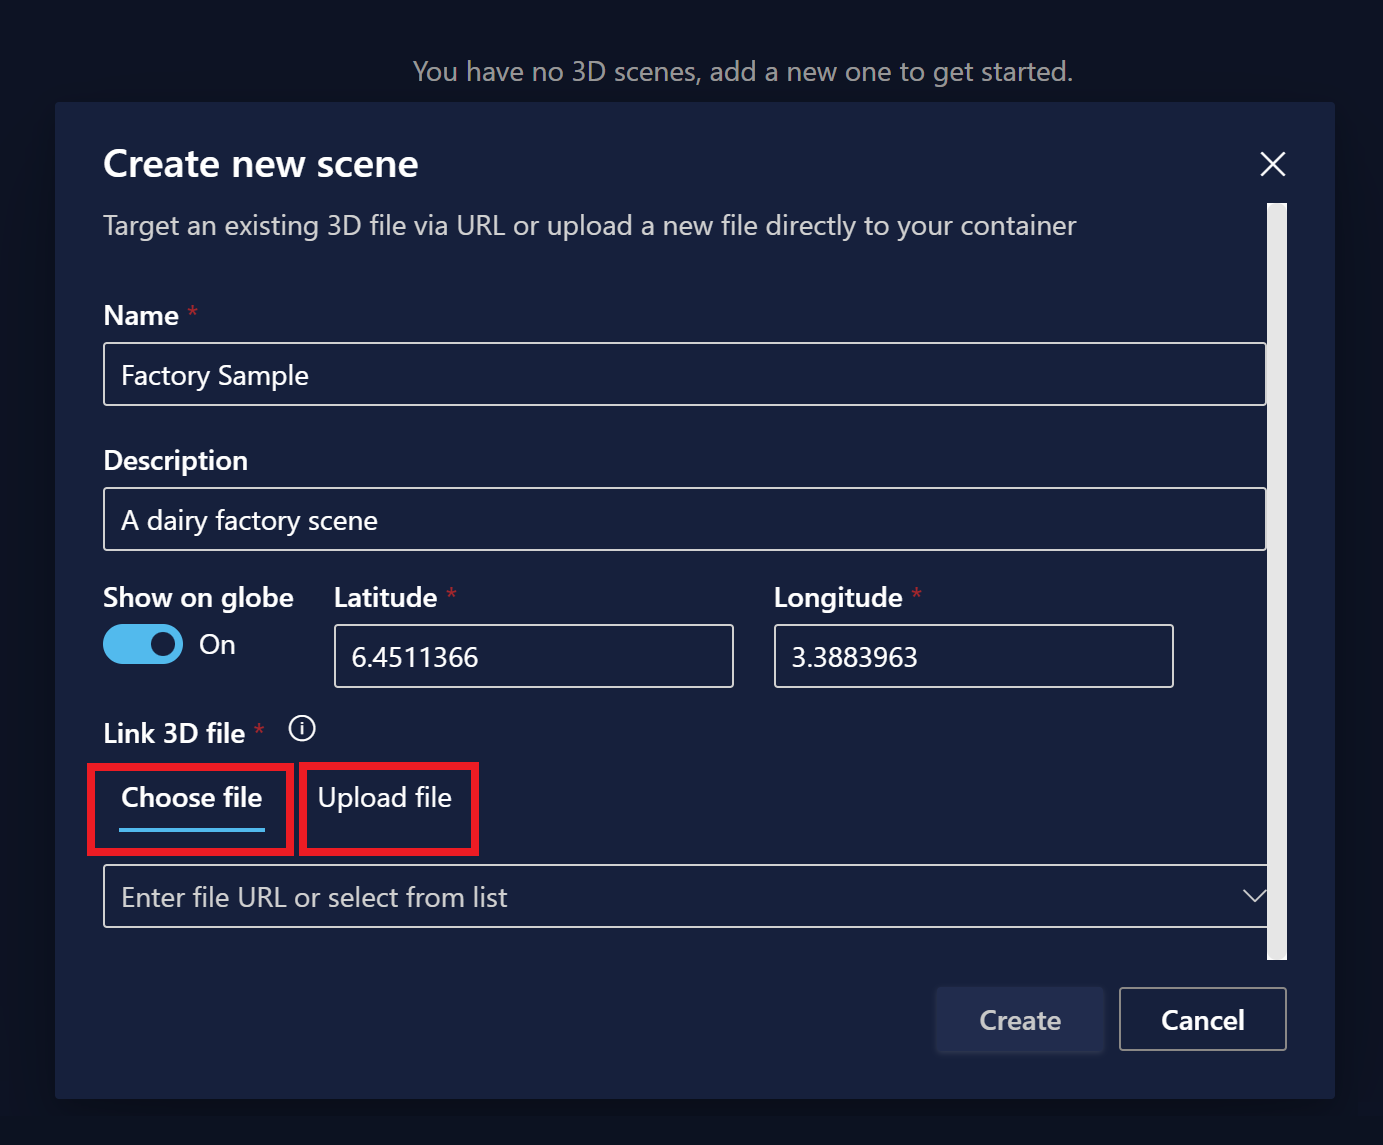
Select Create.

Edit scenes
To edit or delete a scene after it's been created, use the Actions icons next to the scene in the 3D Scenes Studio home page.

Editing a scene will reopen all of the scene properties you set while creating it, allowing you to change them and update the scene.
View scenes in globe view
The home page of 3D Scenes Studio shows a List view of your scenes.
You can also select Globe view to see your scenes placed visually on a globe.

The resulting globe view looks like this:

View scenes individually
You can select an individual scene from the home page to open it in Build mode. Here, you can see the 3D mesh for the scene and edit its elements and behaviors.

You can switch to View mode to enable filtering on specific elements and visualization of element behaviors that you've created.

You can view All properties of an element from here, as well as their values over time if data history is enabled on your instance. To view property history, select the Open data history explorer icon.

This will open the Data history explorer for the property. For more information about using the data history explorer, see Validate and explore historized properties.

Embed scenes in custom applications
The viewer component can also be embedded into custom applications outside of 3D Scenes Studio, and can work in conjunction with 3rd party components.
Here's an example of what the embedded viewer might look like in an independent application:

The 3D visualization component library is available in GitHub, in the iot-cardboard-js repository. This is an open source React component library for creating internet of things (IoT) web experiences.
For instructions on how to use the library to embed 3D experiences into custom applications, see the repository's wiki, Embedding 3D Scenes. You can also use the CRA IoT Cardboard sample, which deploys a Create React App template for the library, to get started building a custom app with an embedded viewer.
Add elements
An element is a self-defined set of 3D meshes that is linked to data on one or more underlying digital twins.
One way to create a new element is to select New element from the Elements tab in the Build view for a scene.

Alternatively, you can select a mesh component directly from the visualization and create a new element that is connected to it already.

This will open the New element panel where you can fill in element information.

Name and primary twin
A primary twin is the main digital twin counterpart for an element. You connect the element to a twin in your Azure Digital Twins instance so that the element can represent your twin and its data within the 3D visualization.
In the New element panel, the Primary twin dropdown list contains names of all the twins in the connected Azure Digital Twins instance. Next to this field, you can select the Inspect properties icon to view the twin data, or the Advanced twin search icon to find other twins by querying property values.

Select a twin to link to this element. This will automatically apply the digital twin ID ($dtId) as the element Name. You can rename the element if you want, to make it understandable for both builders and consumers of the 3D scene.
Tip
Azure Digital Twins Explorer can help you find the right twin to link to an element, by showing you a visual graph of your twins and letting you query for specific twin conditions.
Meshes
The Meshes tab is where you specify which components of the visual 3D mesh represent this element.
If you started element creation by selecting a mesh in the visualization, that mesh will already be filled in here. You can select meshes in the visualization now to add them to the element.

Behaviors
A behavior is a scenario for your scene. Select Add behavior on this tab. From there, you can either select an existing behavior to add it to this element, or select New behavior to enter the flow for creating a new behavior.

For more details on creating new behaviors, see Add behaviors.
Other twins
On the other twins tab, you can add secondary digital twin data sources for an element. You can add other twins to an element if the data on the primary twin won't be enough to define all the behaviors you want for the element, so you need access to the data of additional twins.

You can't add other twins during new element creation. For instructions on adding other twins, see Twins as a behavior option.
Once there are other twins added to the element, you'll be able to view and modify them on this tab.
Add behaviors
A behavior is a scenario for your scene that will leverage particular data on the related element's digital twin to drive viewer visualizations.
One way to create a new behavior is to select New behavior from the Behaviors tab of the Build view for a scene.

Alternatively, you can select an element from the Elements tab, and create a new behavior from that element's Behaviors tab.
This will open the New behavior panel where you can fill in behavior information.

Name and scene layers
Start by choosing a Display name for the behavior.
Tip
Choose a name that will be clear to end users that will be viewing the scene, because this behavior name will be displayed as part of the scene visualization.
For the Scene layers dropdown menu, you can add this behavior to an existing layer or create a new layer to help organize this behavior. For more information on layers, see Manage layers.
Elements
In the Elements tab, select which elements this behavior should target.
If you started the behavior creation process from a specific element, that element will already be selected here. Otherwise, you can choose elements here for the first time.

Twins
On the Twins tab, you can modify the set of twins whose data is available to this behavior. This includes the targeted elements' primary twins, and any additional twins.
You can add secondary digital twin data sources for an element. After configuring other twins, you'll be able to use properties from those twins in your behavior expressions for this element. You should only add other twins when there are additional twins with data beyond your primary twin that you want to leverage in your visual rules and widgets for this behavior.
To add a new twin data source, select Add twin and Create twin.

This will open a New twin panel where you can name the additional twin and select a twin from your Azure Digital Twins instance to map.

Tip
Azure Digital Twins Explorer can help you see twins that might be related to the primary twin for this element. You can query your graph using SELECT * FROM digitaltwins WHERE $dtId="<primary-twin-id>, and then use the double-click expansion feature to explore related twins.
Visual rules
In the Visual rules tab, you can configure data-driven overlays on your elements to indicate their health or status in the viewer.
To create a rule, start by selecting Add Rule.

Choose a Display name for the rule.
Next, choose whether the rule is dependent on a Single property or a Custom (advanced) property expression. For a Single property, you'll get a dropdown list of numeric properties on the primary twin. For Custom (advanced), you'll get a text box where you can write a custom JavaScript expression using one or more properties. The result of your expression must match the result type that you specify in the Type field. For more information about writing custom expressions, see Use custom (advanced) expressions.
Note
If you can't select a property from the dropdown list because the list is not responding, this might mean there's an error in some model in your instance. For example, having non-unique enum values in the attributes of a model will break this feature. If this happens, review your model definitions and make sure all properties are valid.
Once you've defined your property expression, select Add condition to define the conditional visual effects.

In the Add condition options, enter a Label for the condition in the visualization.
Then, set the Values to identify value boundaries for the condition (the exact selection will change depending on the property type). For numerical properties, the min of each value range is inclusive, and the max is exclusive.
Under Actions, define what happens in the scene visualization when the condition is met. You can use Mesh coloring to control the color of the property expression in the viewer, or Badge to display a badge of a certain color and icon when the condition for the property expression is met.

When you're done, select Save.
Widgets
Widgets are managed on the Widgets tab. Widgets are data-driven visuals that provide additional context and data, to help you understand the scenario that the behavior represents. Configuring widgets will help you make sure the right data is discoverable when a certain condition is active.
Select Add widget to bring up the Widget library, where you can select from different type of available widgets.

Here are the types of widget that you can create:
Gauge: For representing numerical data points visually
Enter a Display name and Unit of measure, then choose whether the gauge reflects a Single property or a Custom (advanced) property expression. For a Single property, you'll get a dropdown list of numeric properties on the primary twin. For Custom (advanced), you'll get a text box where you can write a custom JavaScript expression using one or more properties. The expression should have a numeric outcome. For more information about writing custom expressions, see Use custom (advanced) expressions.
Once you've defined your property expression, set value ranges to appear in certain colors on the gauge. The min of each value range is inclusive, and the max is exclusive.

Note
If you can't select a property from the dropdown list because the list is not responding, this might mean there's an error in some model in your instance. For example, having non-unique enum values in the attributes of a model will break this feature. If this happens, review your model definitions and make sure all properties are valid.
Link: For including externally referenced content via a linked URL
Enter a Label and destination URL.
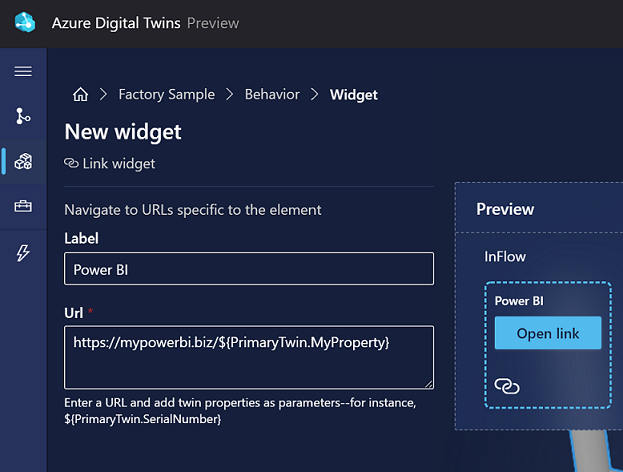
Link URLs can also include calculation expressions with this syntax:
${<calculation-expression>}. The screenshot above contains an expression for accessing a property of the primary twin. Expressions will be computed and displayed dynamically in the viewer.Value: For directly displaying twin property values
Enter a Display name and select a Property expression that you want to display. This can be a Single property of the primary twin, or a Custom (advanced) property expression. Custom expressions should be JavaScript expressions using one or more properties of the twin, and you'll select which outcome type the expression will produce. If your custom property expression outputs a string, you can also use JavaScript's template literal syntax to include a dynamic expression in the string output. Format the dynamic expression with this syntax:
${<calculation-expression>}. Then, wrap the whole string output with backticks (`). For more information about writing custom expressions, see Use custom (advanced) expressions.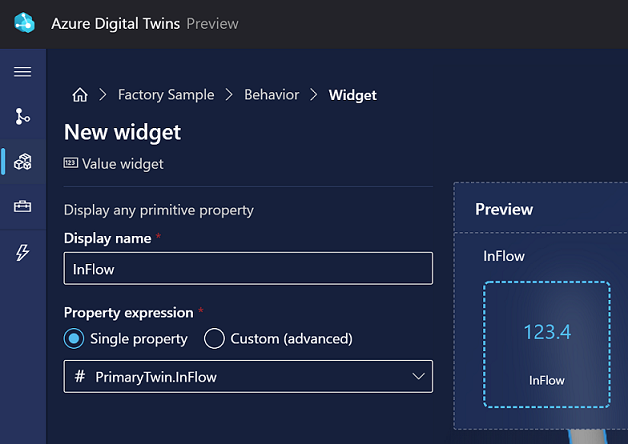
Note
If you can't select a property from the dropdown list because the list is not responding, this might mean there's an error in some model in your instance. For example, having non-unique enum values in the attributes of a model will break this feature. If this happens, review your model definitions and make sure all properties are valid.
Below is an example of a value widget that checks if the
InFlowvalue of the primary twin exceeds 99. If so, it outputs a string with an expression containing the twin's$dtId. Otherwise, there will be no expression in the output, so no backticks are required.Here's the value expression:
PrimaryTwin.InFlow > 99 ? `${PrimaryTwin.$dtId} has an InFlow problem` : 'Everything looks good'. The computed result of the expression (the$dtId) will be shown in the widget in the viewer.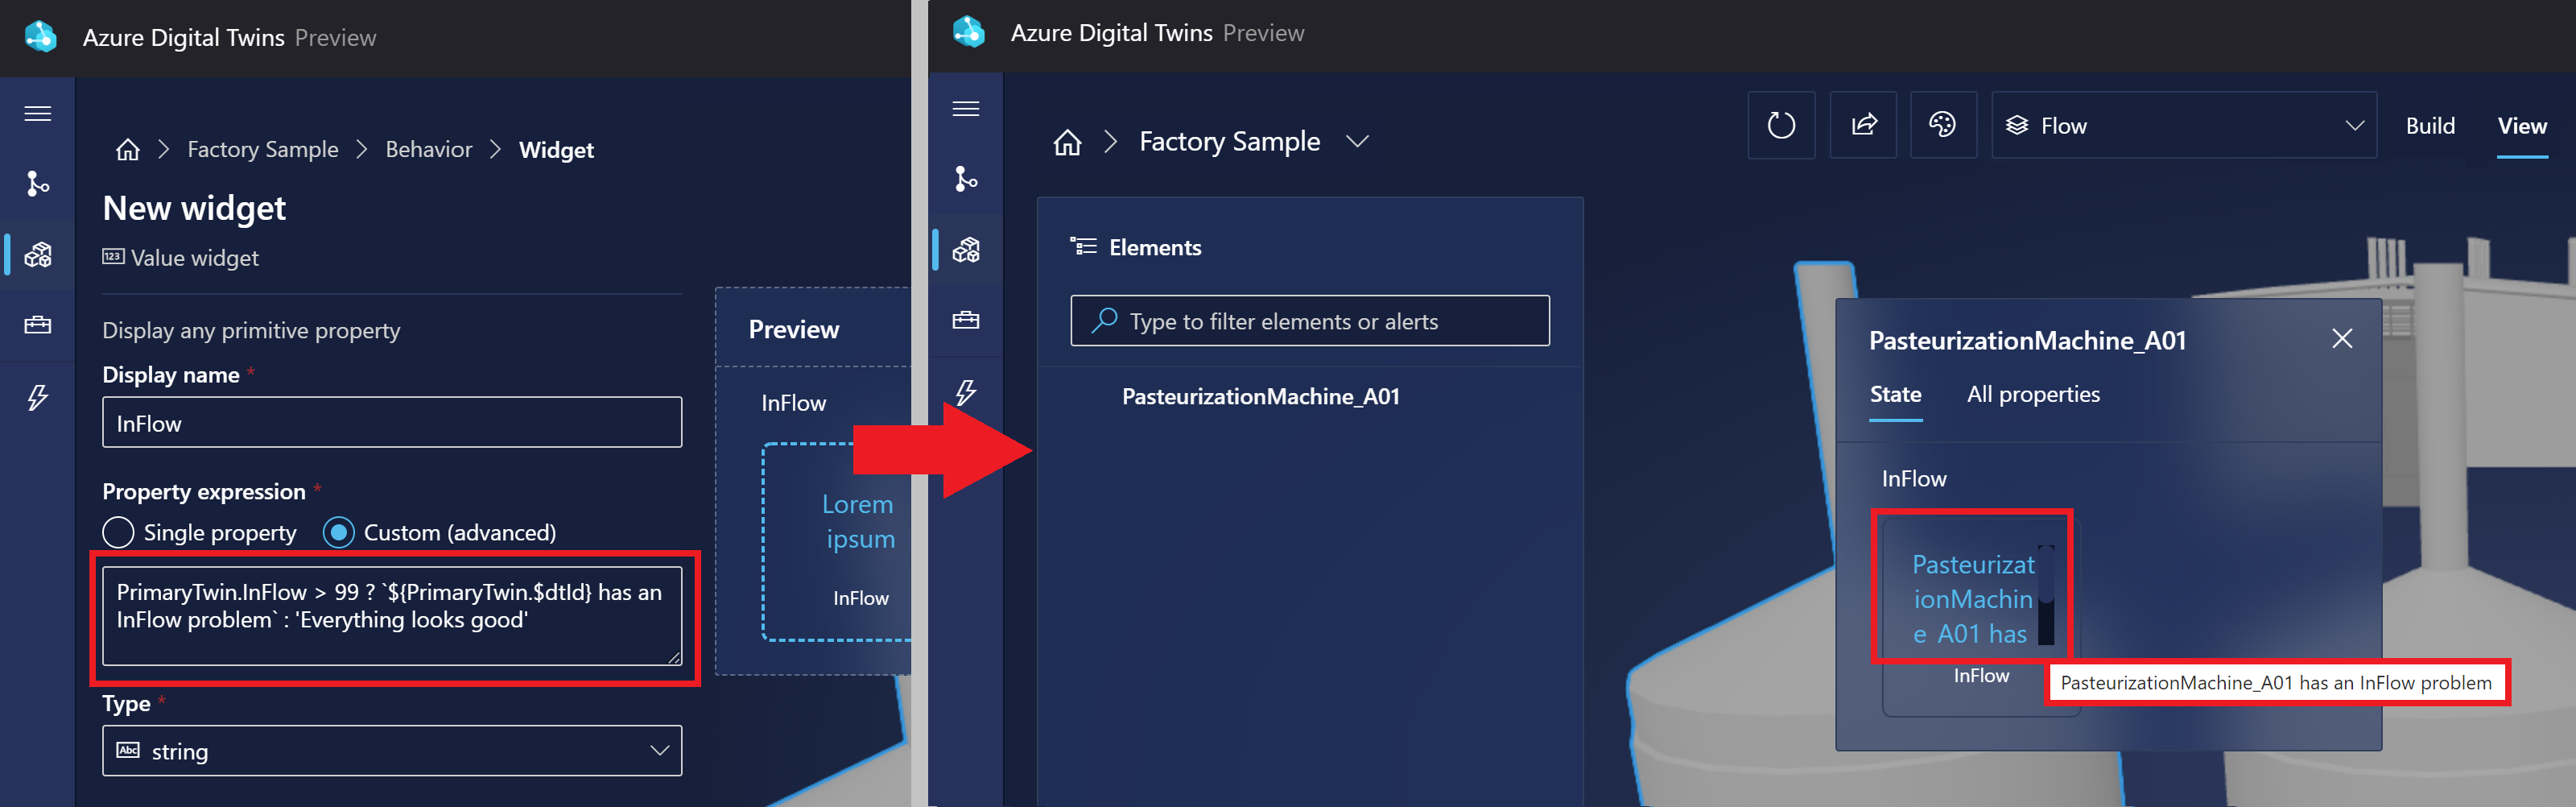
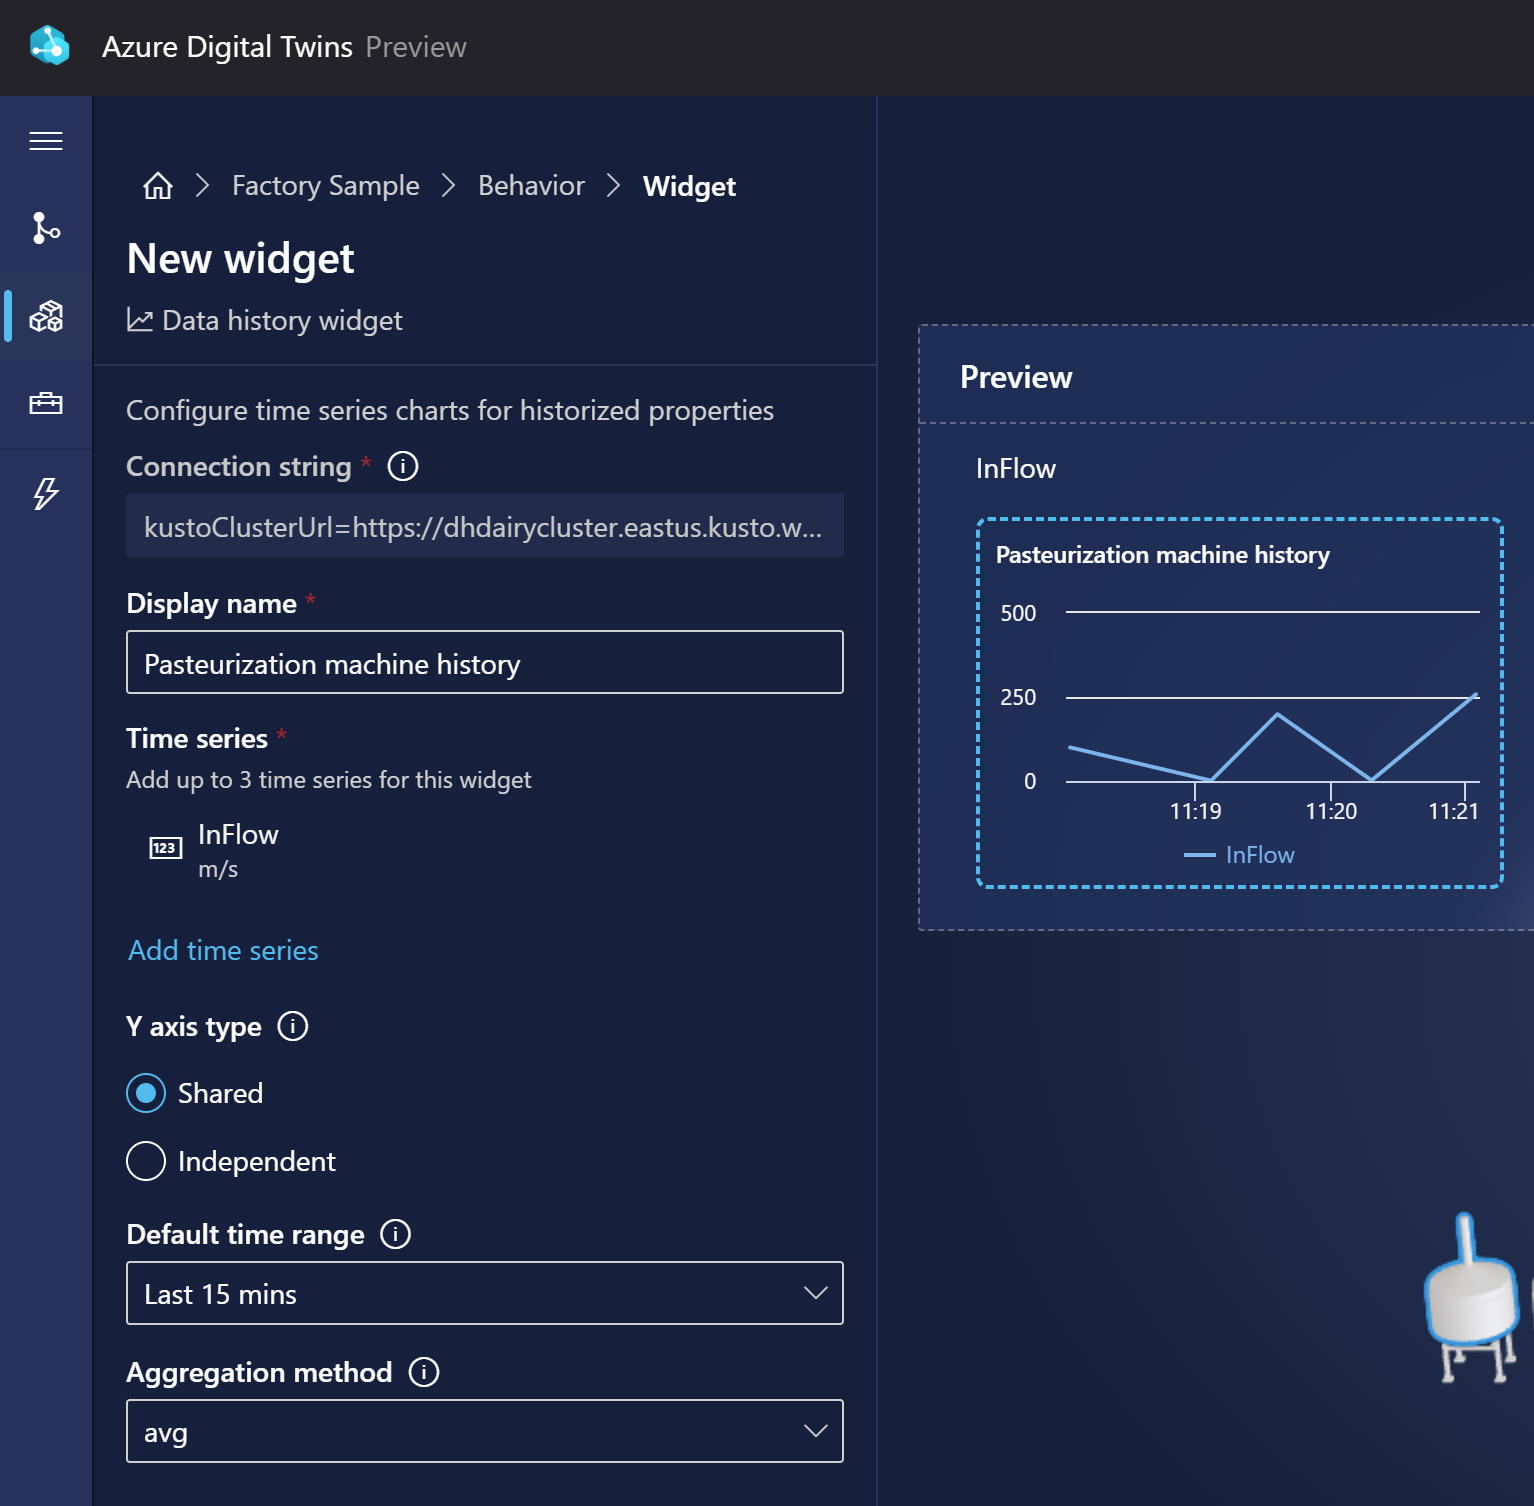
Data history: For displaying property values over time. This widget works with Azure Digital Twins' data history feature, so it's only available if you've enabled data history for the instance being used in this 3D scene. Once a data history connection exists for the instance, you'll be able to display that data with this widget.
The widget will fill the Connection string field automatically, by targeting data in the Azure Data Explorer instance that's already connected to this Azure Digital Twins instance.
Enter a Display name, and add one or more time series datasets based on properties of the primary twin. You can also customize how the time series data appears in the widget chart.
Note
If you can't select a property from the dropdown list because the list is not responding, this might mean there's an error in some model in your instance. For example, having non-unique enum values in the attributes of a model will break this feature. If this happens, review your model definitions and make sure all properties are valid.


Use custom (advanced) expressions
While defining visual rules and widgets in your behaviors, you may want to use custom expressions to define a property condition.

These expressions use the JavaScript language, and allow you to use one or more properties of associated twins to define custom logic. The result of your expression must match the result type that you specify in the Type field.
The following chart indicates which JavaScript operators are supported in 3D Scenes Studio custom expressions.
| Operator type | Supported? |
|---|---|
| Assignment operators | No |
| Comparison operators | Yes |
| Arithmetic operators | Yes |
| Bitwise operators | Yes |
| Logical operators | Yes |
| String operators | Yes |
| Conditional (ternary) operator | Yes |
| Command operator | No |
| Unary operators | No |
| Relational operators | No |
Manage layers
You can create layers in your scene to help organize your behaviors. Layers act like tags on the behaviors, enabling you to define which behaviors need to be seen together, thus creating custom views of your scene for different roles or tasks.
One way to create layers is to use the Scene layers button in the Build view for a scene.

Selecting New layer will prompt you to enter a name for the new layer you want to create.
Alternatively, you can create layers while creating or modifying a behavior. The behavior pane is also where you can add the behavior to a layer you've already created.

When looking at your scene in the viewer, you can use the Select layers button to choose which layers show up in the visualization. Behaviors that aren't part of any layer are grouped under Default layer.

Configure minimum refresh rate
You can manually configure the minimum refresh rate for the 3D scene viewer, to exercise some control over how often data is pulled and the resulting impact on performance. You can configure the minimum refresh rate to be anywhere between 10 seconds and one hour.
In the builder for a scene, select the Scene configuration button.

Use the dropdown list to select a refresh rate option.
While looking at the scene in the viewer, you can hover over the Refresh button to see the refresh rate setting and the time of the last refresh. You can also select it to refresh the scene manually.

Modify theme
In either the builder or viewer for a scene, select the Theme icon to change the style, object colors, and background color of the display.

Share your environment
A 3D Scenes Studio environment is formed from a unique pairing of an Azure Digital Twins instance and an Azure storage container. You can share your entire environment with someone, including all of your scenes, or share a specific scene.
To share your environment with someone else, start by giving them the following permissions to your resources:
- Azure Digital Twins Data Reader access (or greater) on the Azure Digital Twins instance
- Storage Blob Data Reader access (or greater) to the storage container
- Storage Blob Data Reader will allow them to view your scenes.
- Storage Blob Data Owner or Storage Blob Data Contributor will allow them to edit your scenes.
Then, follow the instructions in the rest of this section to share either your entire environment or a specific scene.
Share general environment
Once someone has the required permissions, there are two ways to give them access to your entire environment. You can do either of the following things:
Use the Share button on the 3D Scenes Studio homepage to copy the URL of your 3D Scenes Studio environment. (The URL includes the URLs of both your Azure Digital Twins instance and your storage container.)

Share it with the recipient, who can paste this URL directly into their browser to connect to your environment.
Share the URL of your Azure Digital Twins instance and the URL of your Azure storage container that you used when initializing your 3D Scenes Studio environment. The recipient can access 3D Scenes Studio and initialize it with these same URL values to connect to your same environment.

After this, the recipient can view and interact with your scenes in the studio.
Share a specific scene
You can also share your environment with a link directly to a specific scene. To share a specific scene, open the scene in View mode.
Use the Share scene icon to generate a link to your scene. You can choose whether you want to link to preserve your current layer and element selections.

When the recipient pastes this URL into their browser, the specified scene will open in the viewer, with any chosen layers or elements selected.
Note
When a scene is shared with someone in this way, the recipient will also be able to leave this scene and view other scenes in your environment if they choose.
Next steps
Try out 3D Scenes Studio with a sample scenario in Get started with 3D Scenes Studio.
Or, visualize your Azure Digital Twins graph differently using Azure Digital Twins Explorer.
Feedback
Coming soon: Throughout 2024 we will be phasing out GitHub Issues as the feedback mechanism for content and replacing it with a new feedback system. For more information see: https://aka.ms/ContentUserFeedback.
Submit and view feedback for