Quickstart - Get started with a sample scenario in Azure Digital Twins Explorer
This quickstart is an introduction to Azure Digital Twins, showing how Azure Digital Twins represents data and demonstrating what it's like to interact with a digital twin graph of a physical building. You'll use the Azure portal site and the Azure Digital Twins Explorer, which is a tool for visualizing and interacting with Azure Digital Twins data in a web browser.
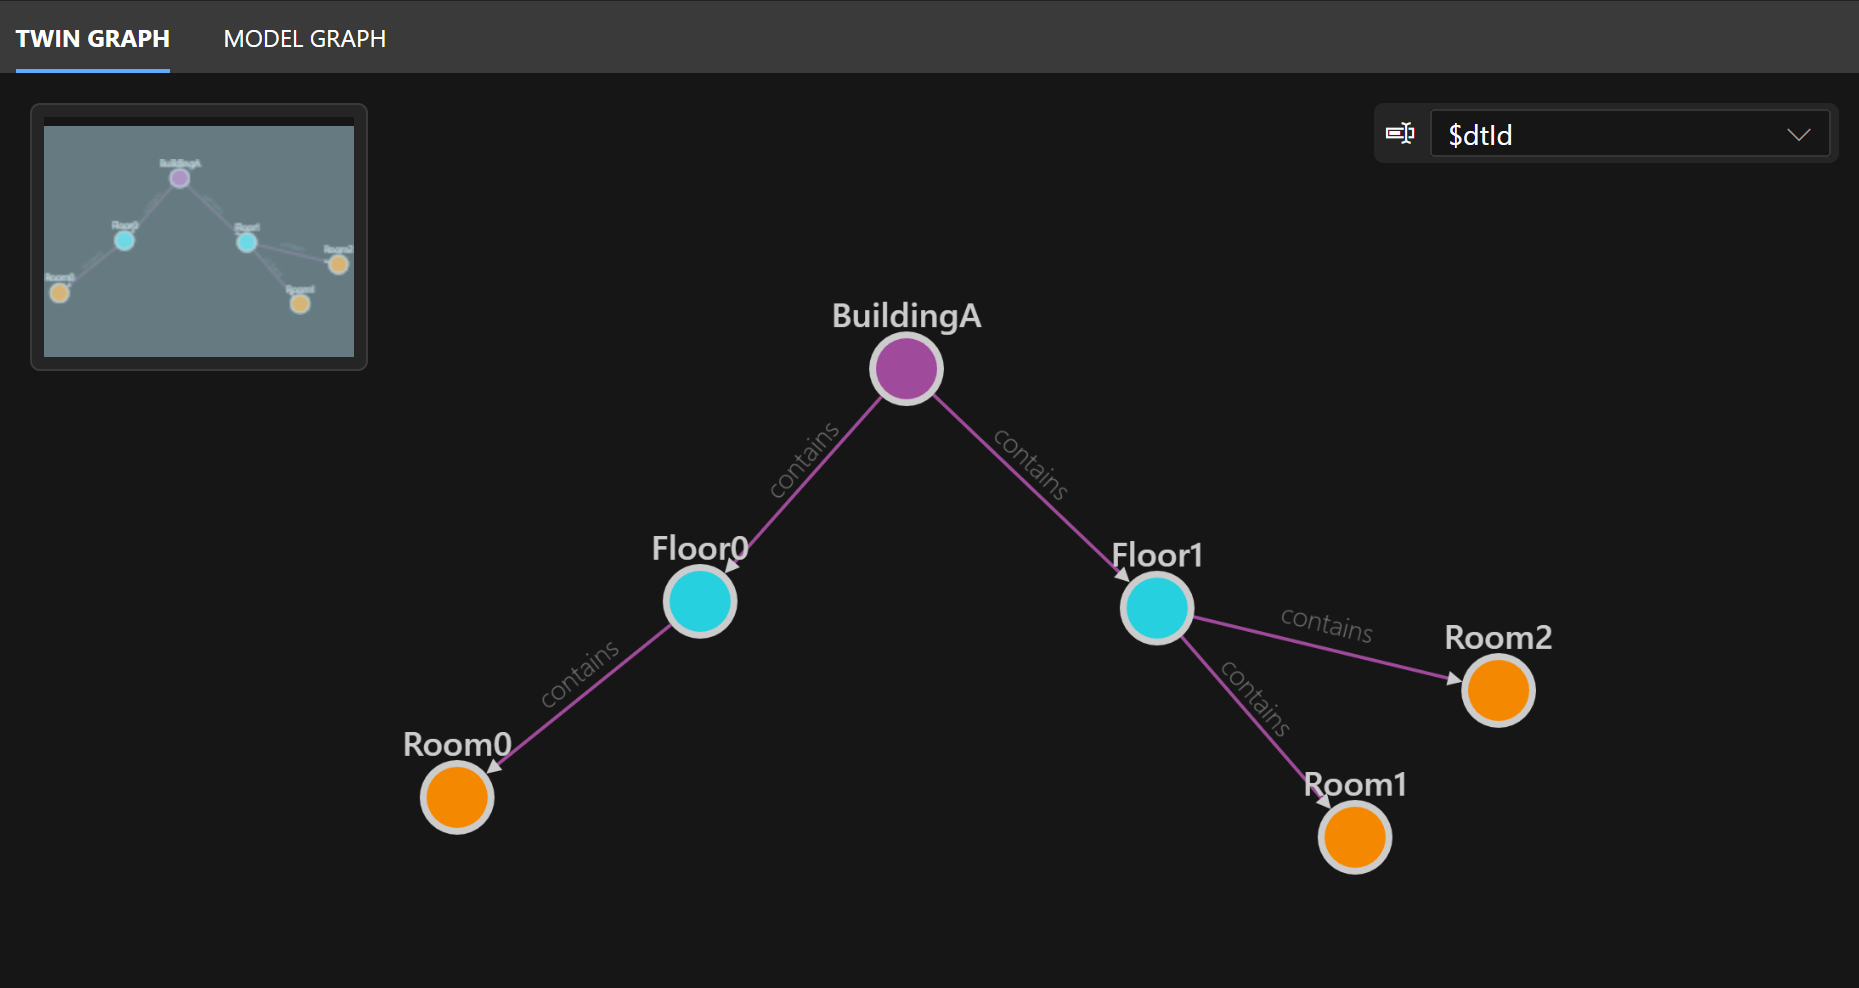
In this quickstart, you'll look at pre-built sample models that digitally define the concepts of a Building, a Floor, and a Room, and use these model definitions to create digital twins that represent specific floors and rooms from a physical building. These individual twins will be connected into a virtual twin graph that reflects their relationships to each other, forming a complete digital representation of the sample building. The graph you'll be working with represents a building that contains two floors, and each floor contains rooms. The graph will look like this image:
Here are the steps you'll use to explore the graph in this article:
- Create an Azure Digital Twins instance, and open it in Azure Digital Twins Explorer.
- Upload pre-built models and graph data to construct the sample scenario. Add one more twin manually.
- Simulate changing IoT data, and query the graph to see results.
- Review your learnings from the experience.
Note
For simplicity, this quickstart does not cover setting up a live data flow from IoT devices inside the modeled environment, or from other data sources. To set up a simulated end-to-end data flow that drives your twin graph, move ahead to the tutorials: Connect an end-to-end solution. For more information on data flow between services and integrating Azure Digital Twins into a wider IoT solution, see Data ingress and egress.
Prerequisites
You'll need an Azure subscription to complete this quickstart. If you don't have one already, create one for free now.
You'll also need to download the materials for the sample graph used in the quickstart. Use the instructions below to download the required files. Later, you'll follow more instructions to upload them to Azure Digital Twins.
Model files. Navigate to each link below, right-click anywhere on the screen, and select Save as in your browser's right-click menu. Use the Save As window to save the file somewhere on your machine.
- Building.json: This is a model file that digitally defines a building. It specifies that buildings can contain floors.
- Floor.json: This is a model file that digitally defines a floor. It specifies that floors can contain rooms.
- Room.json: This is a model file that digitally defines a room. It has a temperature property.
buildingScenario.xlsx: This spreadsheet contains the data for a sample twin graph, including five digital twins representing a specific building with floors and rooms. The twins are based off the generic models, and connected with relationships indicating which elements contain each other. Depending on your browser settings, selecting this link may download the buildingScenario.xlsx file automatically to your default download location, or it may open the file in your browser with an option to download. Here is what that download option looks like in Microsoft Edge:


Tip
These files are from the Azure Digital Twins Explorer repository in GitHub. You can visit the repo for other sample files, explorer code, and more.
Set up Azure Digital Twins
The first step in working with Azure Digital Twins is to create an Azure Digital Twins instance that will hold all your graph data. In this section, you'll create an instance of the service, and open it in Azure Digital Twins Explorer.
Create an Azure Digital Twins instance
In this section, you'll create a new instance of Azure Digital Twins using the Azure portal. Navigate to the portal and log in with your credentials.
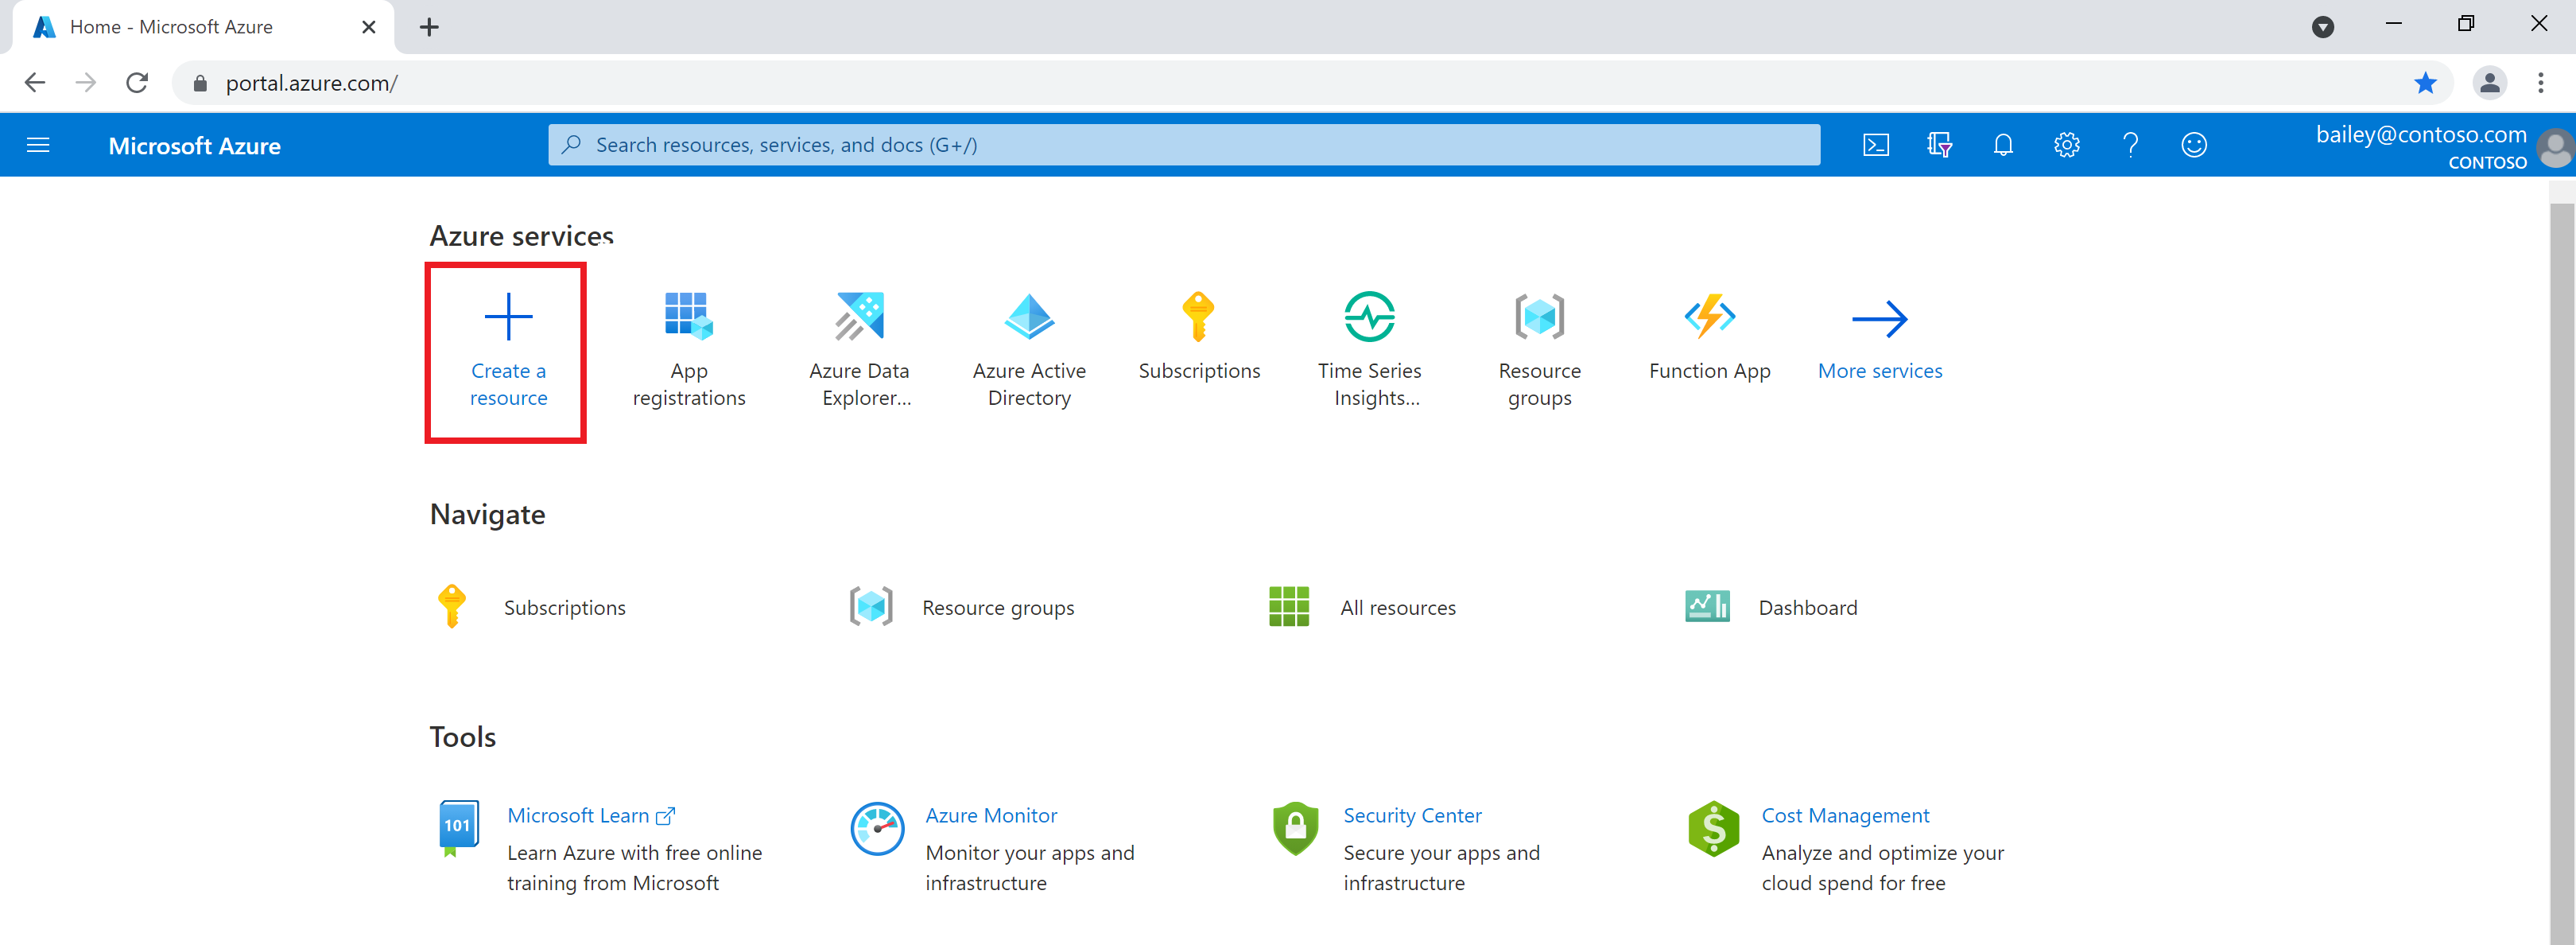
Once in the portal, start by selecting Create a resource in the Azure services home page menu.
Search for azure digital twins in the search box, and choose the Azure Digital Twins service from the results.
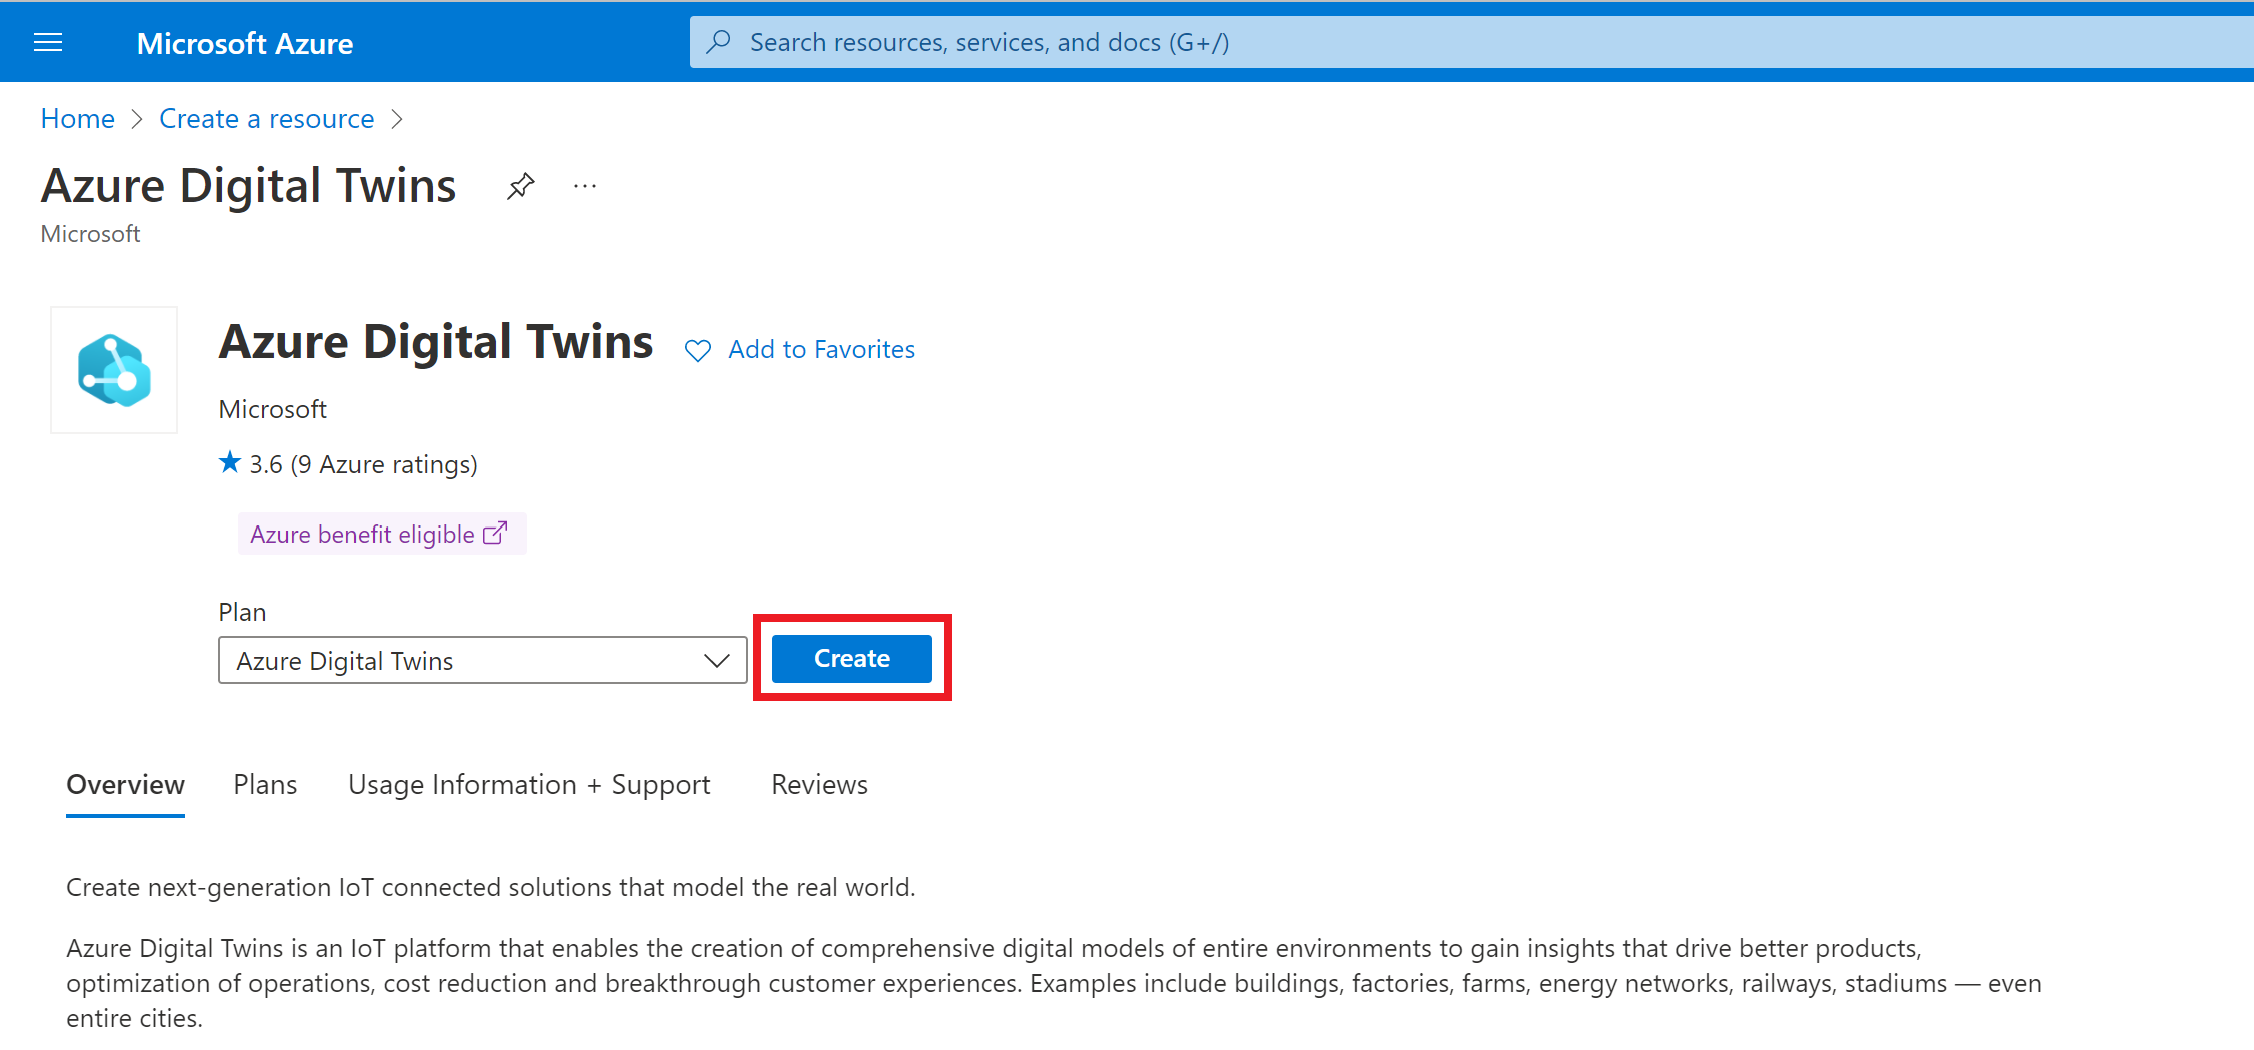
Leave the Plan field set to Azure Digital Twins and select the Create button to start creating a new instance of the service.
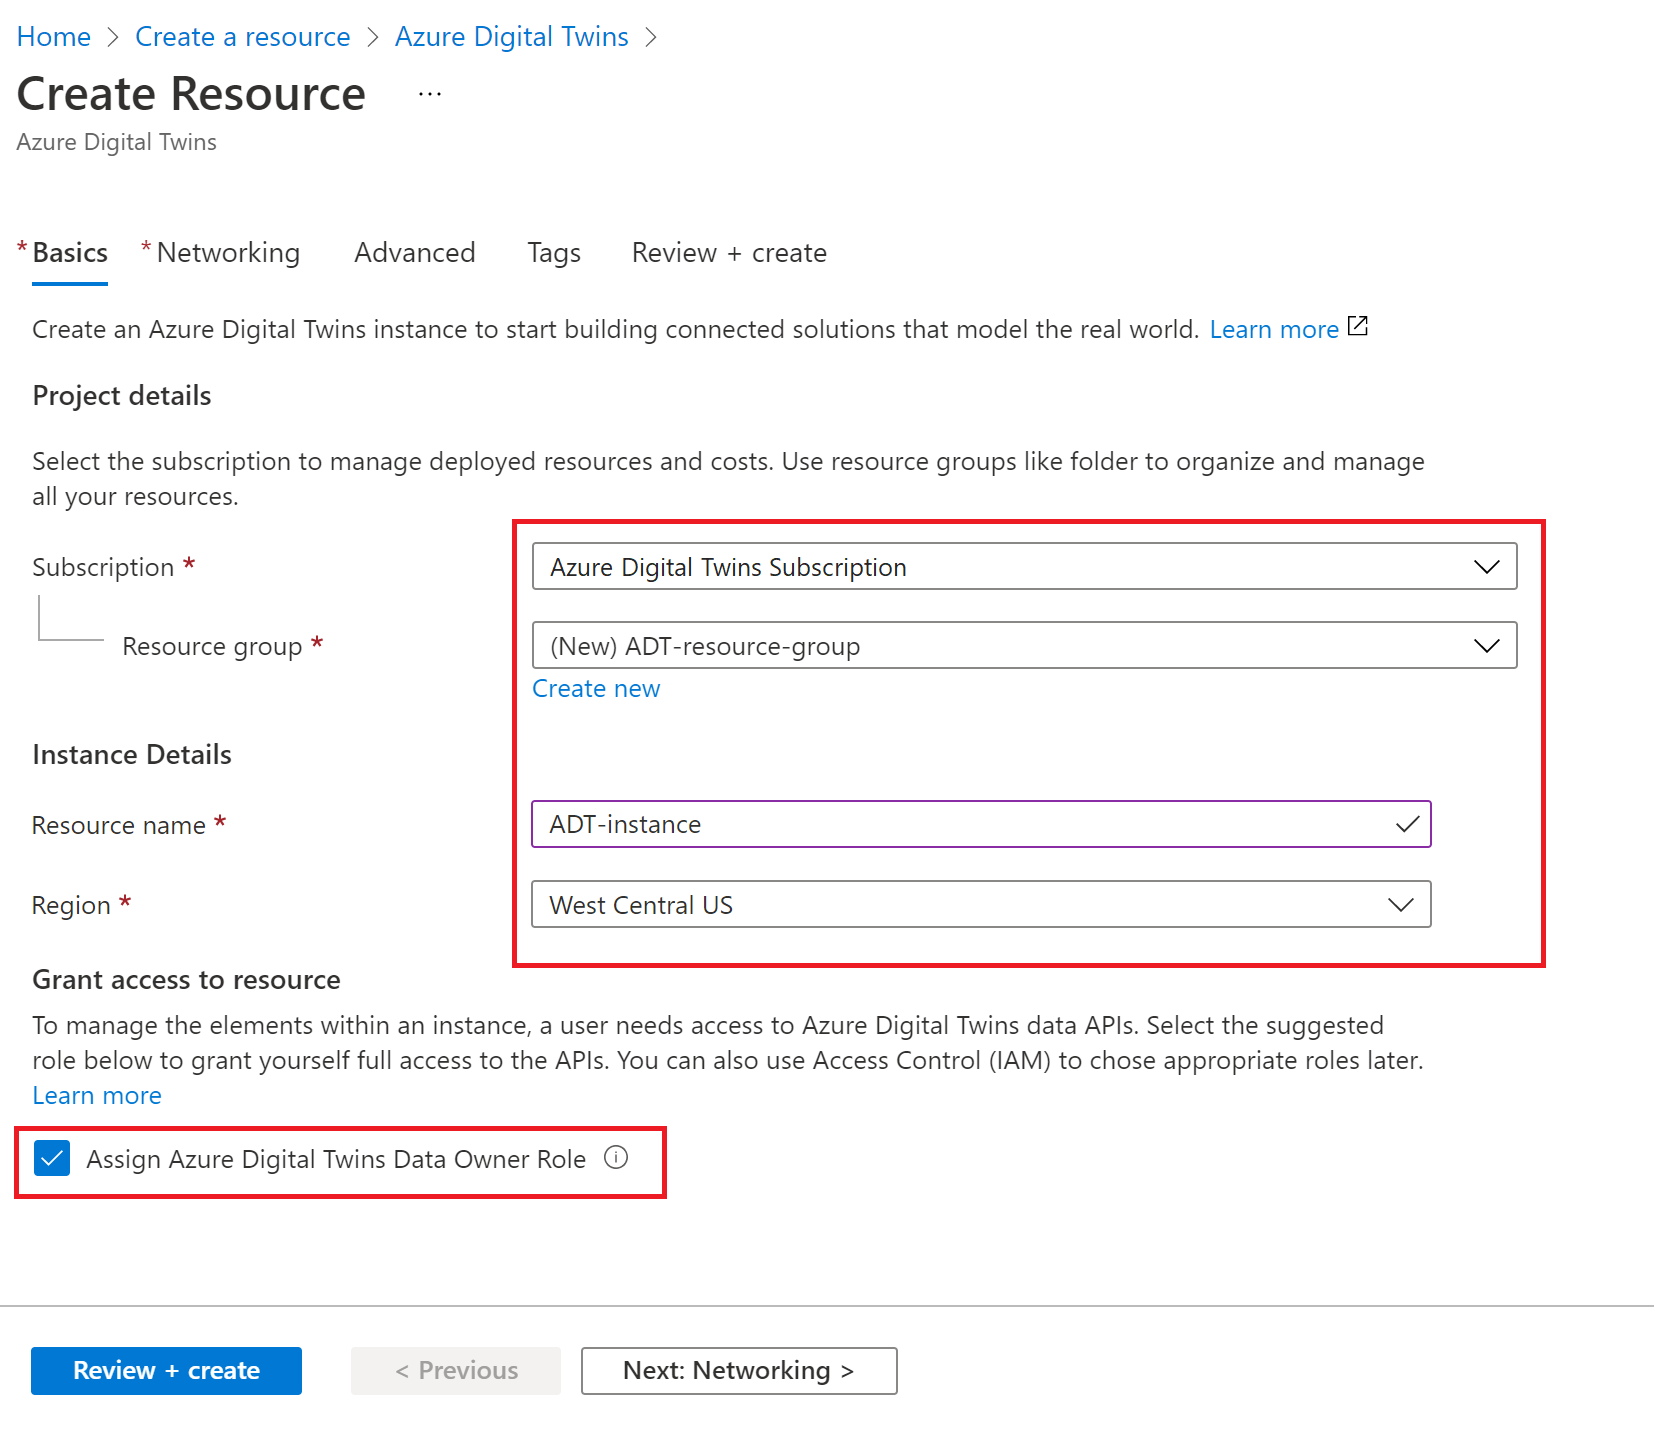
Fill in the fields on the Basics tab of setup, including your Subscription, Resource group, a Resource name for your new instance, and Region. Check the Assign Azure Digital Twins Data Owner Role box to give yourself permissions to manage data in the instance.
Note
If the Assign Azure Digital Twins Data Owner Role box is greyed out, it means you don't have permissions in your Azure subscription to manage user access to resources. You can continue creating the instance in this section, and then should have someone with the necessary permissions assign you this role on the instance before completing the rest of this quickstart.
Common roles that meet this requirement are Owner, Account admin, or the combination of User Access Administrator and Contributor.
Select Review + Create to finish creating your instance.
You will see a summary page showing the details you've entered. Confirm and create the instance by selecting Create.
This will take you to an Overview page tracking the deployment status of the instance.

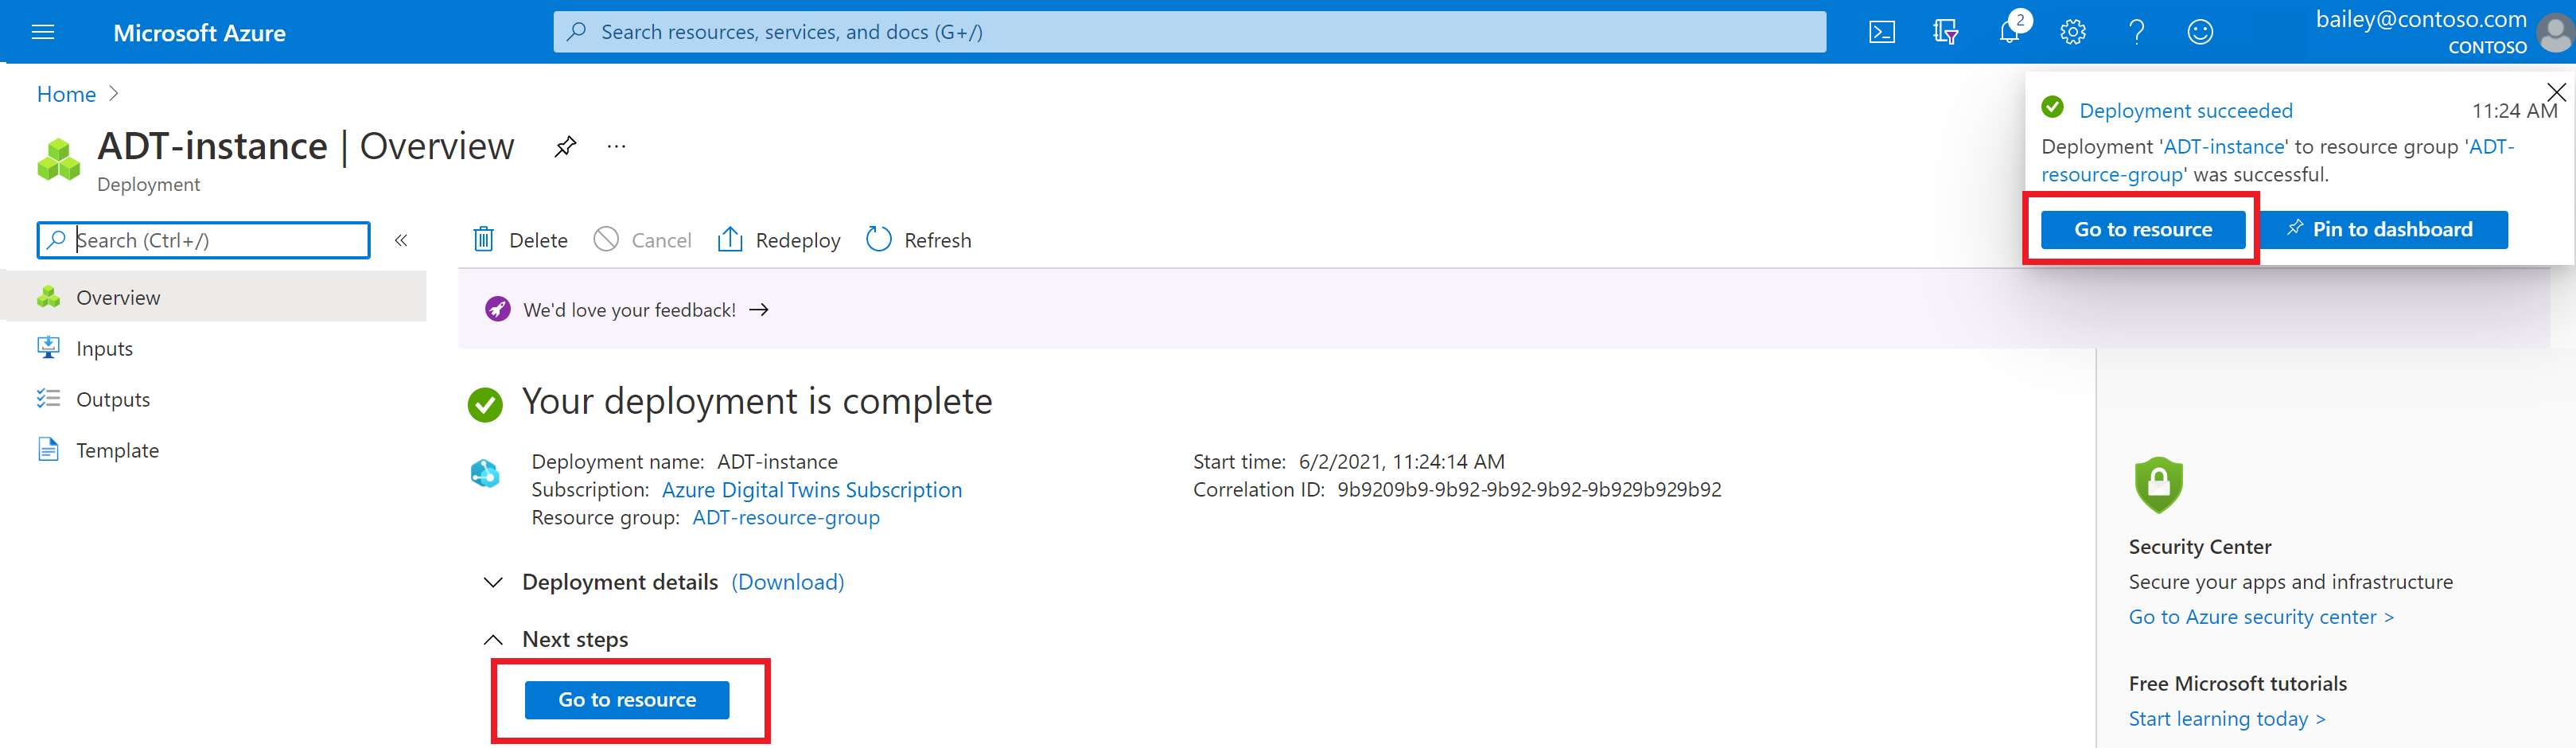
Wait for the page to say that your deployment is complete.
Open instance in Azure Digital Twins Explorer
After deployment completes, use the Go to resource button to navigate to the instance's Overview page in the portal.
Next, select the Open Azure Digital Twins Explorer (preview) button.

This will open Azure Digital Twins Explorer in a new tab. If this is your first time using the Explorer, you'll see a welcome modal summarizing its key features.
Azure Digital Twins Explorer might automatically connect to your instance. If not, you'll see the following screen asking you to specify an Azure Digital Twins URL. (If you don't see this box on your screen, Azure Digital Twins Explorer has already completed this step automatically.)

If you see this box, enter https:// into the field, followed by the host name of your instance (this can be found back on the instance's Overview page in the portal). These values together make up the instance URL. Select Save to connect to your instance.
Note
The hosted Azure Digital Twins Explorer can only access Azure Digital Twins instances with public access enabled. If you're using Private Link to restrict access to your instance through a private endpoint, you can use Azure functions to deploy the Azure Digital Twins Explorer codebase privately in the cloud. For instructions on how to do this, see Azure Digital Twins Explorer: Running in the cloud.
Build out the sample scenario
Next, you'll use Azure Digital Twins Explorer to set up the sample models and twin graph. You'll start by importing the model files and the twin graph file that you downloaded to your machine in the Prerequisites section. Then, you'll finish the scenario by creating one more twin manually.
Models
The first step in creating an Azure Digital Twins graph is to define the vocabulary for your environment. Models are generic definitions for each type of entity that exists in your environment. This sample building scenario contains a building, floors, and rooms, so you'll need one model definition describing what a Building is, one model definition describing what a Floor is, and one model definition describing what a Room is. Later, you can create digital twins that are instances of these models, representing specific buildings, floors, and rooms.
Models for Azure Digital Twins are written in Digital Twin Definition Language (DTDL), a data object language similar to JSON-LD. Each model describes a single type of entity in terms of its properties, relationships, and components.
For this quickstart, the model files have already been written for you. You downloaded Building.json, Floor.json, and Room.json in the Prerequisites section, and now you'll upload them to your Azure Digital Twins instance using Azure Digital Twins Explorer.
Upload the models (.json files)
In Azure Digital Twins Explorer, follow these steps to upload the Building, Floor, and Room models (the .json files you downloaded earlier).
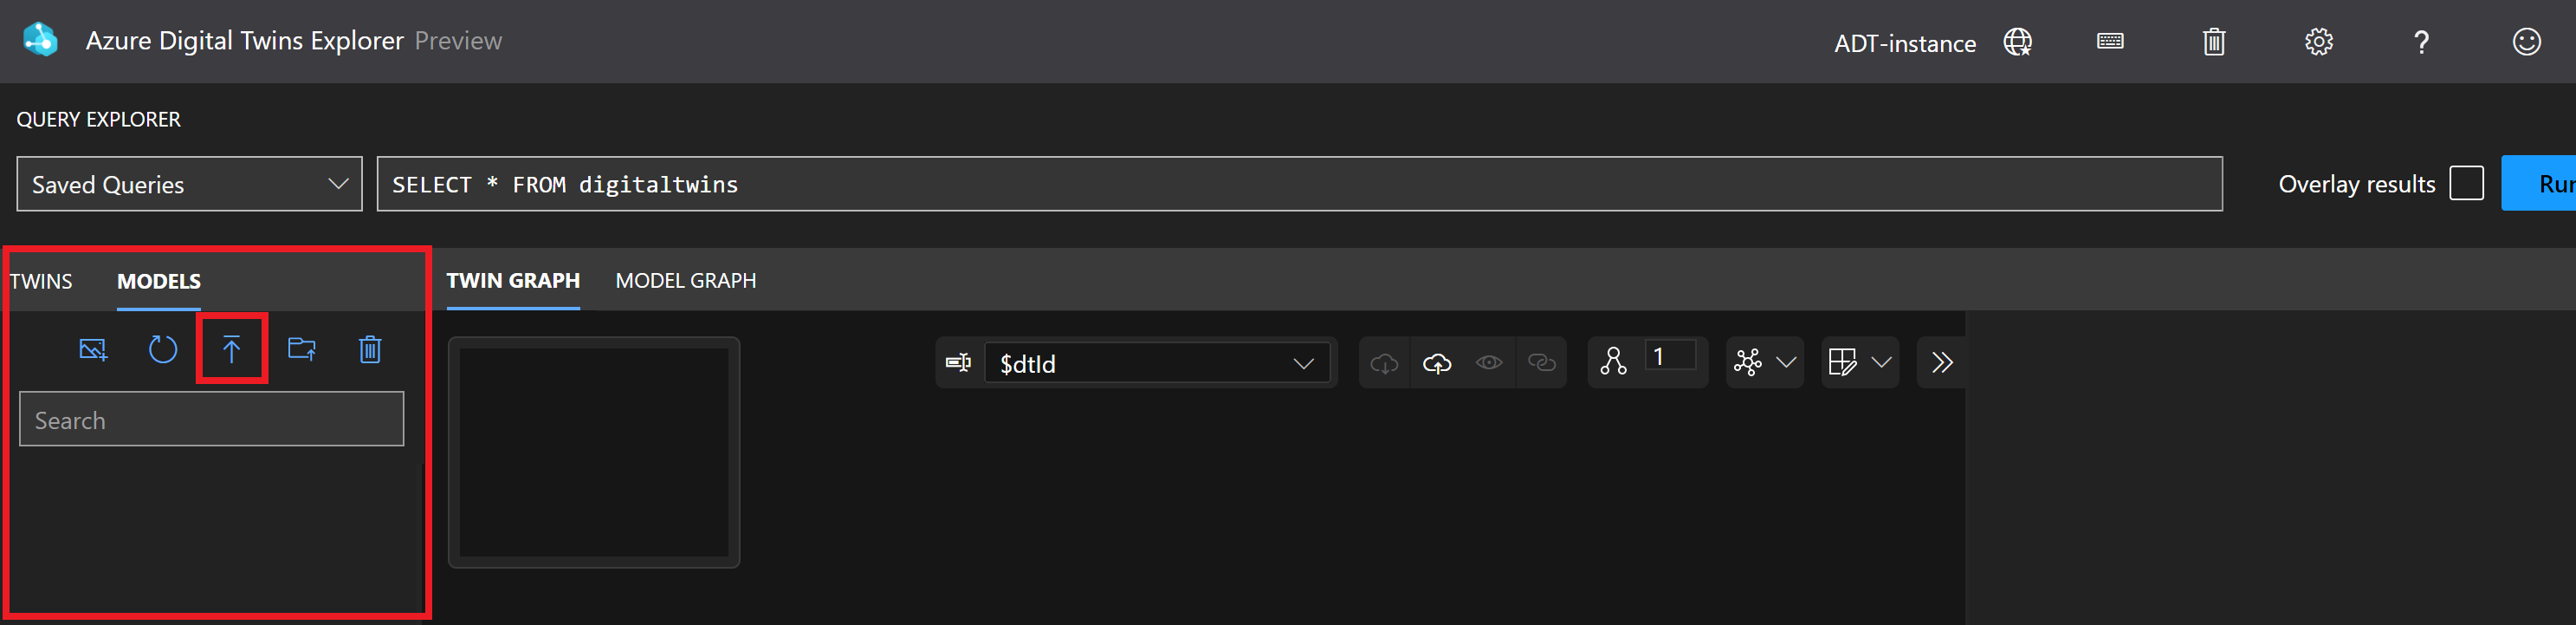
In the Models panel, select the Upload a Model icon that shows an arrow pointing upwards.
In the Open window that appears, navigate to the folder containing the downloaded .json files on your machine.
Select Building.json, Floor.json, and Room.json, and select Open to upload them all at once.

Azure Digital Twins Explorer will upload these model files to your Azure Digital Twins instance. They should show up in the Models panel and display their friendly names and full model IDs.
You can select View Model from any of the models' options to see the DTDL code that defines each model type.

Twins and the twin graph
Now that some model definitions have been uploaded to your Azure Digital Twins instance, you can use these definitions to create digital twins for the elements in your environment.
Every digital twin in your solution represents an entity from the physical environment. You can create many twins based on the same model type, like multiple room twins that all use the Room model. In this quickstart, you'll need a digital twin for the building, and a digital twin for each floor and room in the building. The twins will be connected with relationships into a twin graph that represents the full building environment.
In this section, you'll upload a pre-created graph containing a building twin, two floor twins, and two room twins.
Import the graph (.xlsx file)
In Azure Digital Twins Explorer, follow these steps to import the sample graph (the .xlsx file you downloaded earlier).
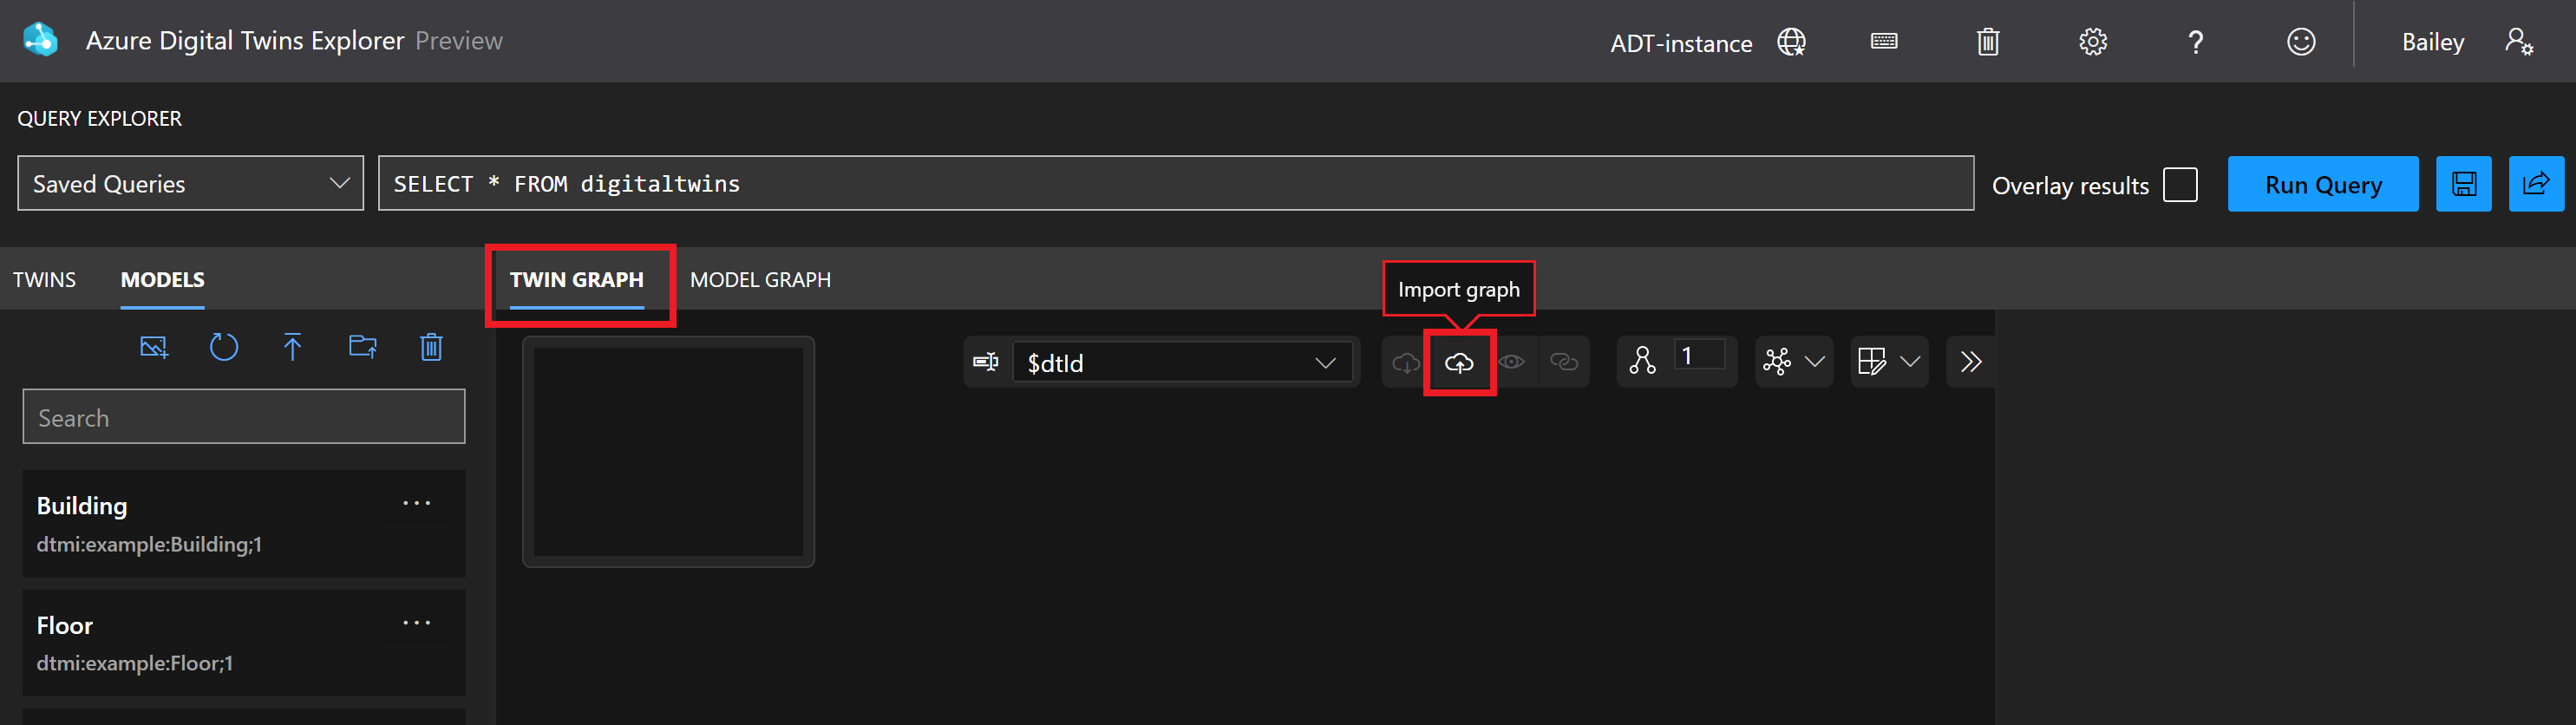
In the Twin Graph panel, select the Import Graph icon that shows an arrow pointing into a cloud.
In the Open window, navigate to the buildingScenario.xlsx file you downloaded earlier. This file contains twin and relationship data for the sample graph. Select Open.
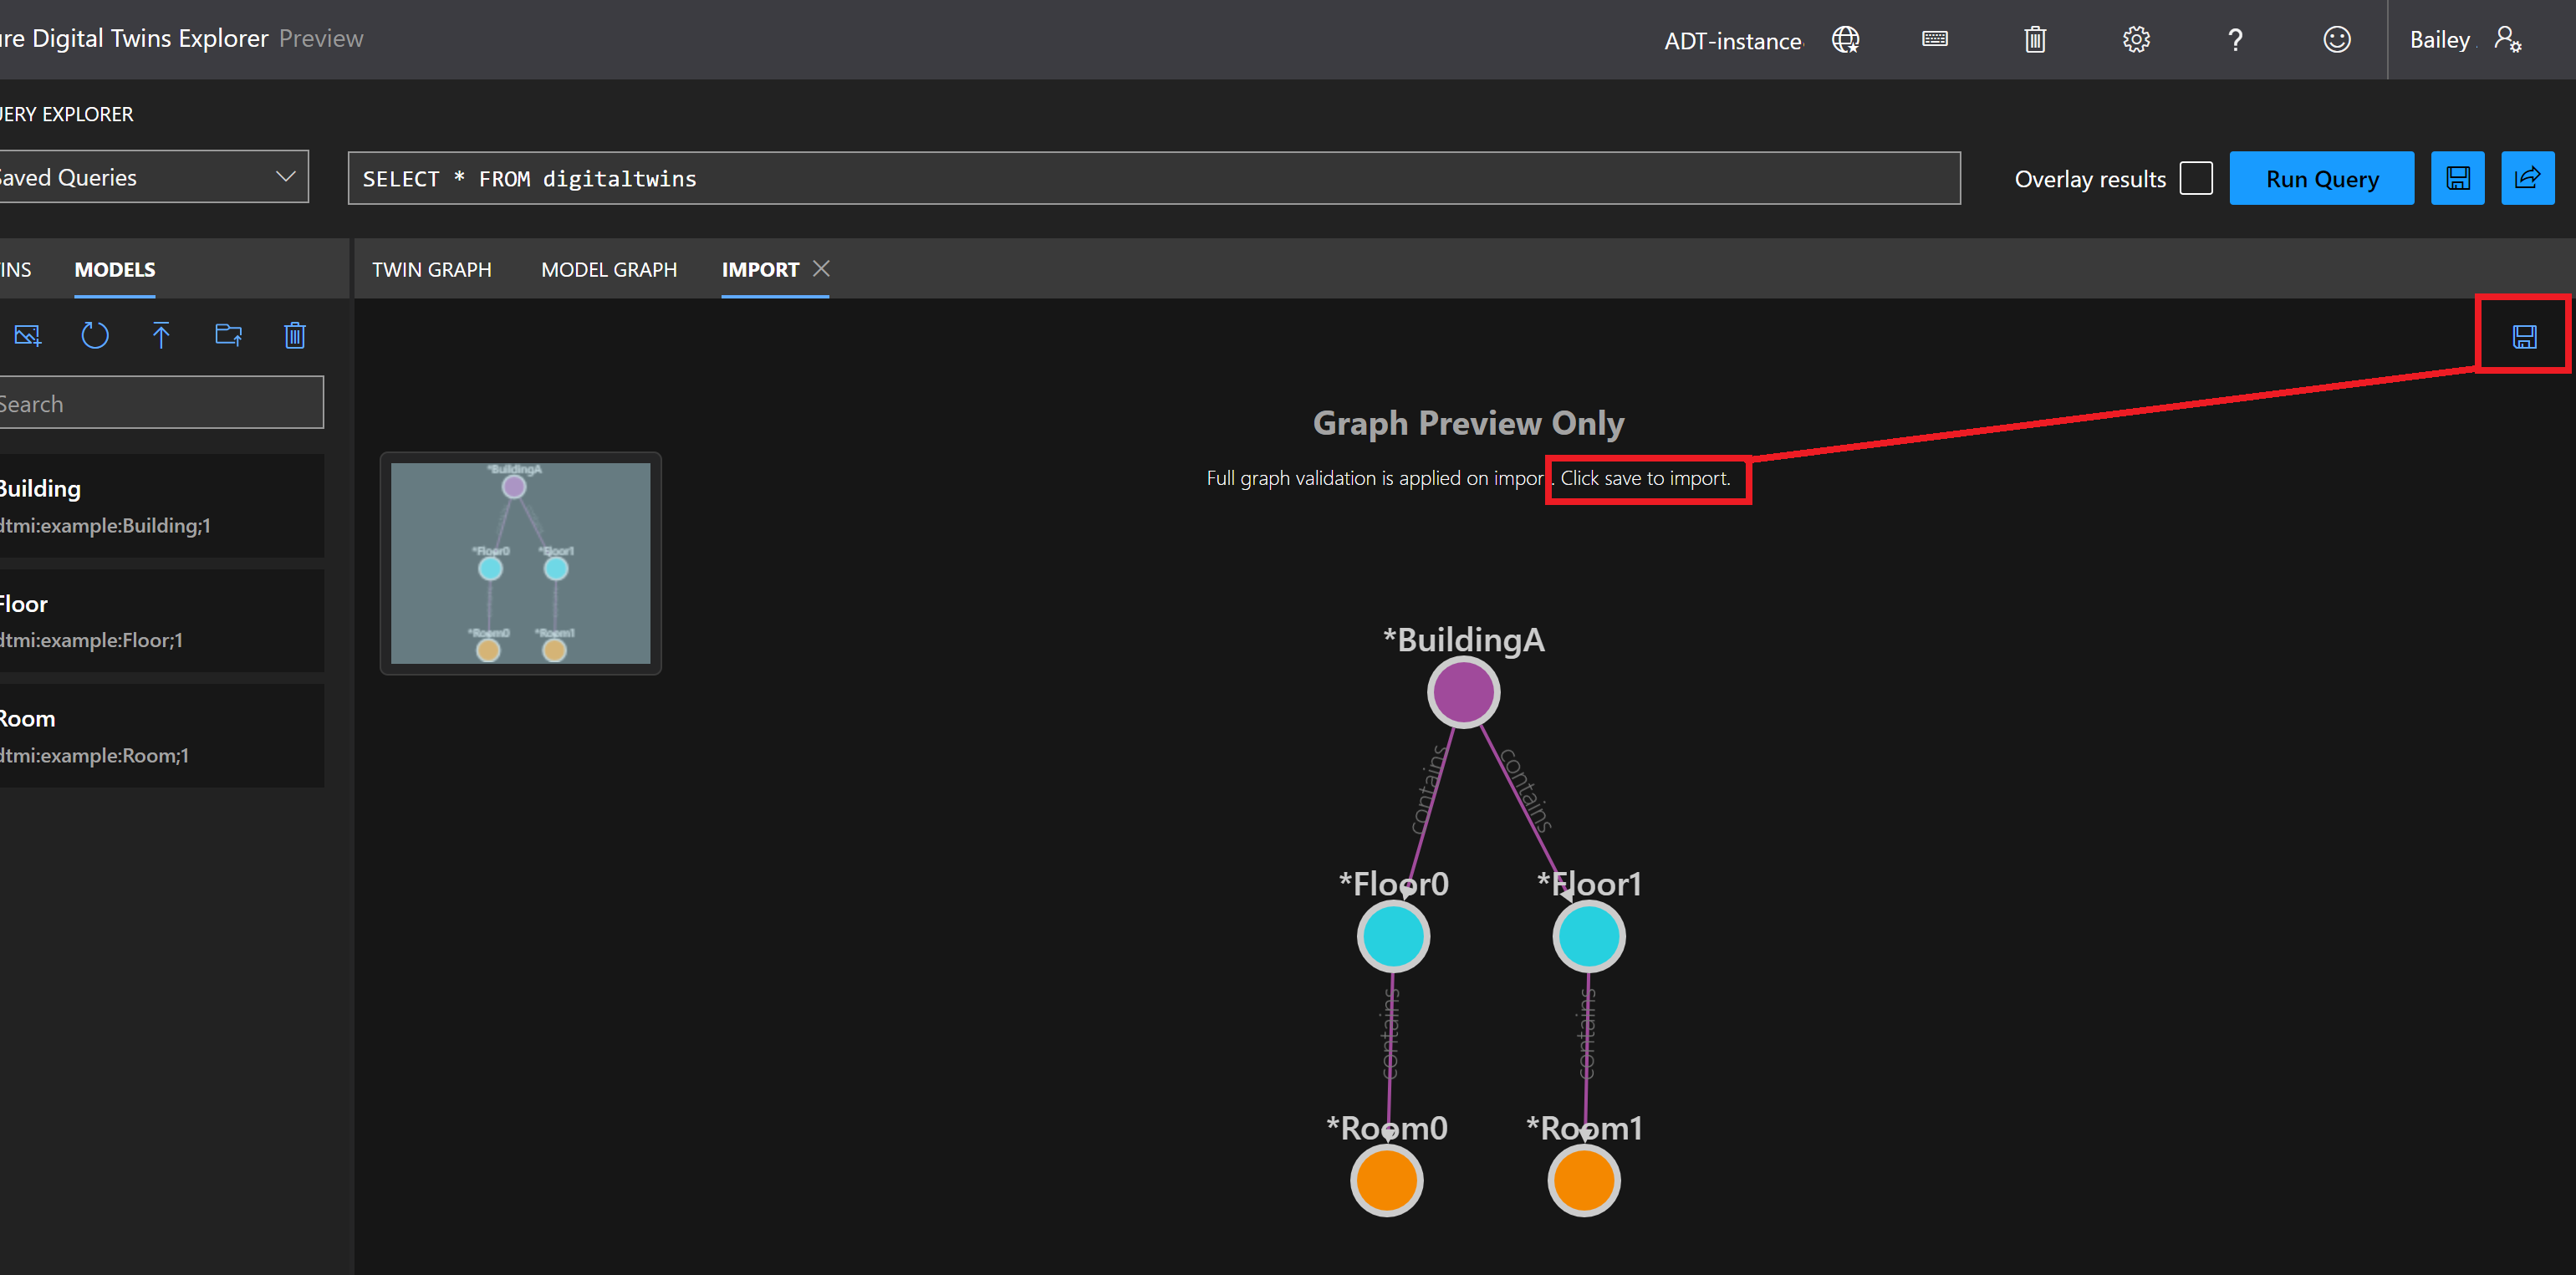
After a few seconds, Azure Digital Twins Explorer opens an Import view that shows a preview of the graph to be loaded.
To finish importing the graph, select the Save icon in the upper-right corner of the graph preview panel.
Azure Digital Twins Explorer will use the uploaded file to create the requested twins and relationships between them. Make sure you see the following dialog box indicating that the import was successful before moving on.
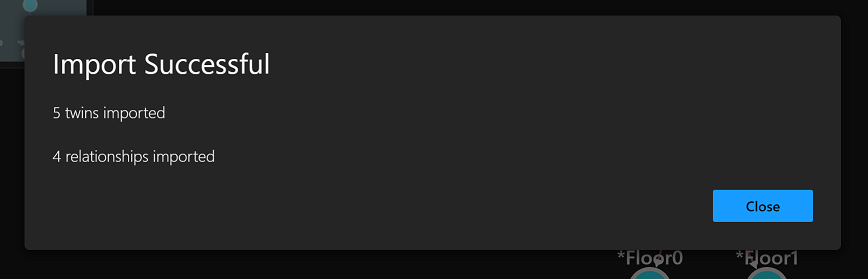
Select Close.
The graph has now been uploaded to Azure Digital Twins Explorer, and the Twin Graph panel will reload. It will appear empty.
To see the graph, select the Run Query button in the Query Explorer panel, near the top of the Azure Digital Twins Explorer window.


This action runs the default query to select and display all digital twins. Azure Digital Twins Explorer retrieves all twins and relationships from the service. It draws the graph defined by them in the Twin Graph panel. Now you can see the uploaded graph of the sample scenario.
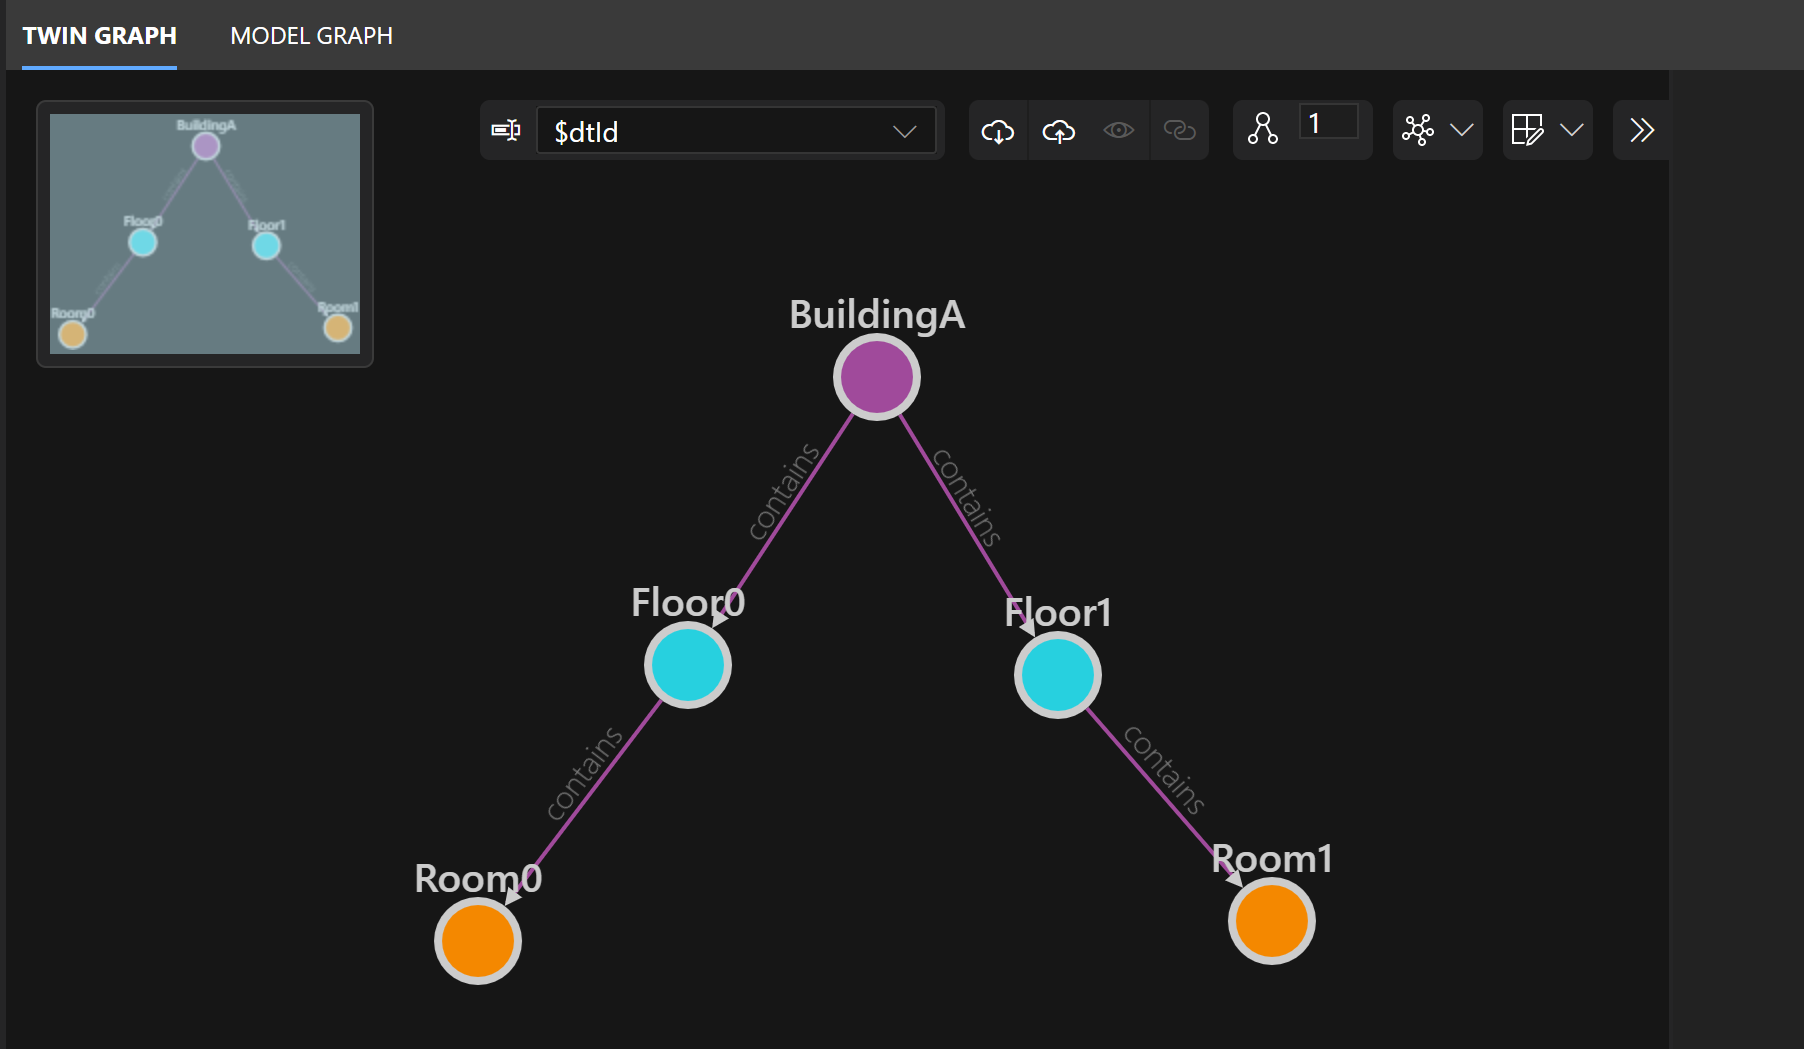
The circles (graph "nodes") represent digital twins. The lines represent relationships. The BuildingA twin "contains" the Floor0 and Floor1 twins, the Floor0 twin "contains" Room0, and the Floor1 twin "contains" Room1. If you're using a mouse, you can click and drag in the graph to move around elements.
Add another twin
You can continue to edit the structure of a digital twin graph after it's been created. Imagine that another room has recently been constructed on Floor1 of this example building. In this section, you'll add a new twin to the graph, to represent the new room.
Start by selecting the model that defines the type of twin you want to create. In the Models panel on the left, open the options menu for the Room model. Select Create a Twin to create a new instance of this model type.

Enter Room2 for the New Twin name and select Save. This will create a new digital twin, which is not yet connected by relationships to the rest of the graph.
Next, you'll add a relationship to show that Floor1 contains Room2. Use the CTRL/CMD or SHIFT keys to simultaneously select Floor1 and Room2 in the graph. When both twins are selected, right-click Room2 and choose Add relationships.

This will open a Create Relationship dialog that's pre-filled with the details of a "contains" relationship from Floor1 to Room2. Select Save.

Now Room2 is connected in the graph. If you're using a mouse, you can click and drag twins in the graph to arrange them into a configuration that you like.
View twin properties
You can select a twin to see a list of its properties and their values in the Twin Properties panel.
Here are the properties of Room0. Notice that Room0 has a temperature of 70.

Here are the properties of Room1. Notice that Room1 has a temperature of 80.

Room2 doesn't have values set for its properties yet, since this twin was created manually. To set its property values, edit the fields so that humidity is 50 and temperature is 72. Select the Save icon.

Query changing IoT data
In Azure Digital Twins, you can query your twin graph to answer questions about your environment, using the SQL-style Azure Digital Twins query language. One way to query the twins in your graph is by their properties. Querying based on properties can help answer questions about—or identify outliers in—your environment. In a fully connected, data-driven scenario, the properties of your twins will change frequently in response to IoT data from the sensors in your environment, or other connected data sources. In this quickstart, you'll change the values manually to simulate a changing sensor reading.
Start by running a query to see how many twins in your environment have a temperature above 75. Run the following query in the Query Explorer panel.
SELECT * FROM DIGITALTWINS T WHERE T.Temperature > 75
Recall from viewing the twin properties earlier that Room0 has a temperature reading of 70, Room1 has a temperature reading of 80, and Room2 has a temperature reading of 72. The building and floor twins don't have a temperature property at all. For these reasons, only Room1 shows up in the results here.

Tip
Other comparison operators (<,>, =, or !=) are also supported in queries. You can try plugging these operators, different values, or different twin properties into the query to try out answering your own questions.
Edit temperature data
In a fully connected Azure Digital Twins solution, the twins in your graph receive live updates from real IoT devices and other data sources, and update their properties automatically to stay synchronized with your real-world environment. For simplicity in this quickstart, you'll use Azure Digital Twins Explorer here to manually set the temperature reading of Room0 to 76.
First, rerun the following query to select all digital twins. This will display the full graph again in the Twin Graph panel.
SELECT * FROM DIGITALTWINS
Select Room0 to bring up its property list in the Twin Properties panel.
Change the temperature value from 70 to 76, and select the Save icon to update the temperature.

After a successful property update, you'll see a Patch Information box showing the patch code that was used behind the scenes with the Azure Digital Twins APIs to make the update.

Close the patch information.
Query to see the new result
To see the new temperature for Room0 reflected in the graph, rerun the query from earlier to get all the twins in the environment with a temperature above 75.
SELECT * FROM DIGITALTWINS T WHERE T.Temperature > 75
Now that the temperature of Room0 has been changed from 70 to 76, both Room0 and Room1 should show up in the result.

Review and contextualize learnings
In this quickstart, you created an Azure Digital Twins instance and used Azure Digital Twins Explorer to populate it with a sample scenario. You also added a digital twin manually.
Then, you explored the graph, including...
- Using a query to answer a question about the scenario.
- Editing a property on a digital twin.
- Running the query again to see how the answer changed as a result of your update.
The intent of this exercise is to demonstrate how you can use the Azure Digital Twins graph to answer questions about your environment, especially as IoT environments continue to change.
In this quickstart, you made the temperature update manually. It's common in Azure Digital Twins to connect digital twins to real IoT devices so that they receive updates automatically, based on device telemetry data. You can also connect other data sources, integrating data from different systems and defining your own logic for how twins are updated. In this way, you can build a live graph that always reflects the real state of your environment. You can use queries to get information about what's happening in your environment in real time.
You can also export Azure Digital Twins data to historical tracking, data analytics, and AI services to enable greater insights and perform environment simulations. Integrating Azure Digital Twins into your IoT solutions can help you more effectively track the past, control the present, and predict the future.
Clean up resources
To clean up after this quickstart, choose which Azure Digital Twins resources you want to remove, based on what you want to do next.
- If you plan to continue through the Azure Digital Twins quickstarts and tutorials, you can reuse the instance in this quickstart for those articles, and you don't need to remove it.
If you want to continue using the Azure Digital Twins instance from this article, but clear out all of its models, twins, and relationships, run the following az dt job deletion CLI command:
az dt job deletion create -n <name-of-Azure-Digital-Twins-instance> -yIf you only want to delete some of these elements, you can use the az dt twin relationship delete, az dt twin delete, and az dt model delete commands to selectively delete only the elements you want to remove.
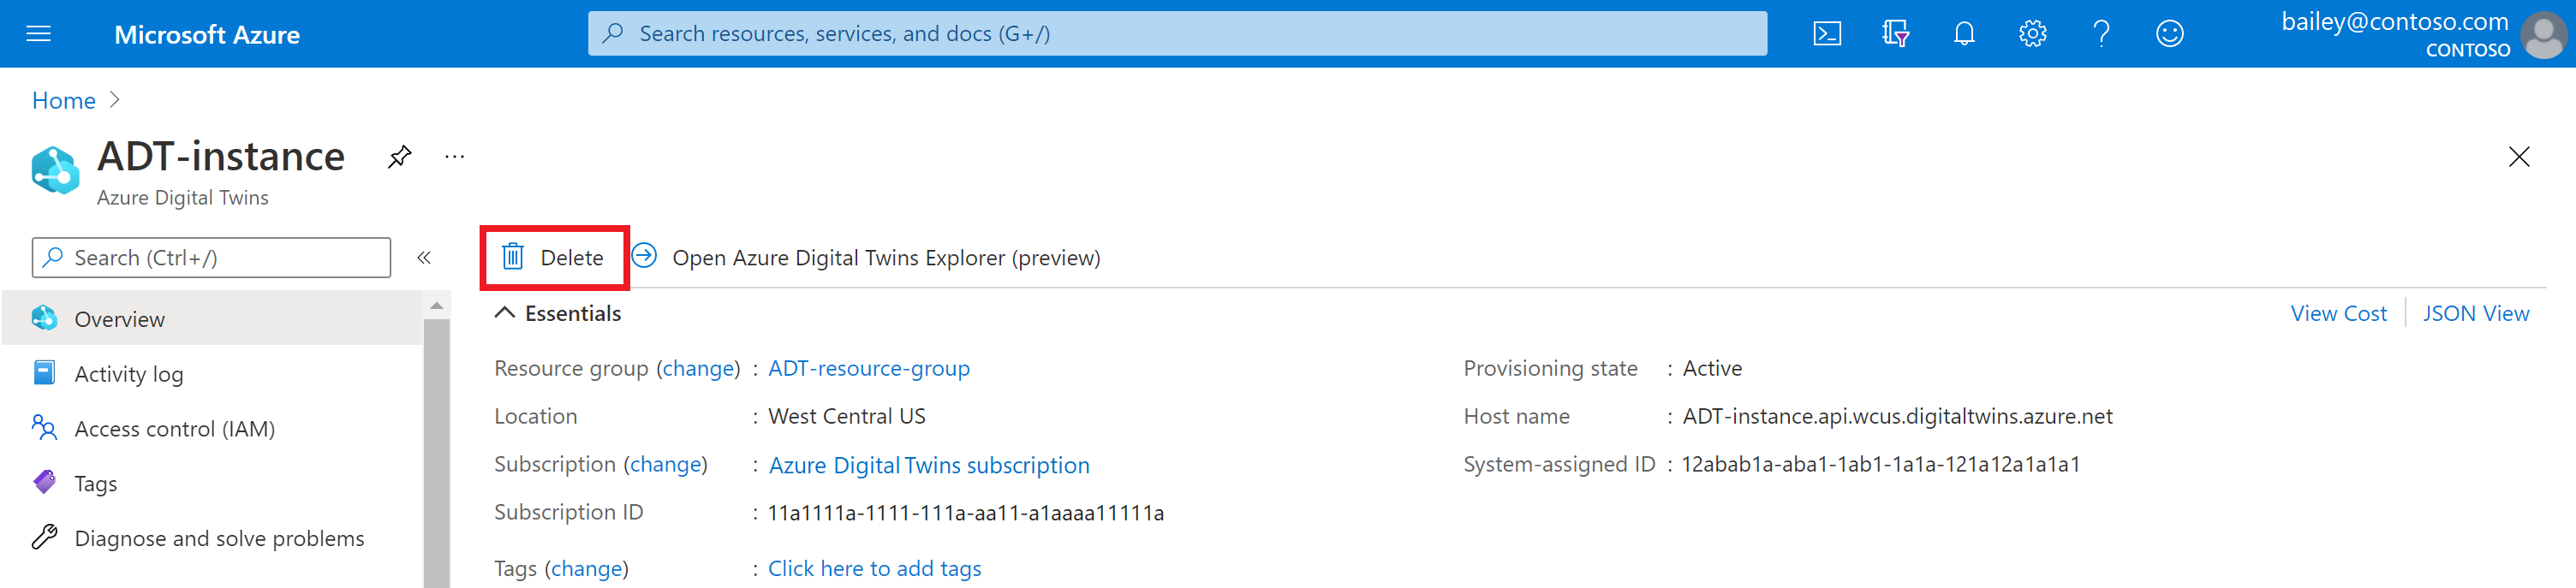
If you don't need your Azure Digital Twins instance anymore, you can delete it using the Azure portal.
Navigate back to the instance's Overview page in the portal. (If you've already closed that tab, you can find the instance again by searching for its name in the Azure portal search bar and selecting it from the search results.)
Select Delete to delete the instance, including all of its models and twins.
You may also want to delete the sample project files from your local machine.
Next steps
Move on to the next quickstart to visualize an Azure Digital Twins scenario in a 3D environment.
Or, skip ahead to the tutorials to dive deeper into the SDKs, twin graph creation, and event flow setup.
Feedback
Coming soon: Throughout 2024 we will be phasing out GitHub Issues as the feedback mechanism for content and replacing it with a new feedback system. For more information see: https://aka.ms/ContentUserFeedback.
Submit and view feedback for