Quickstart: Create an Azure Front Door Standard/Premium - Azure CLI
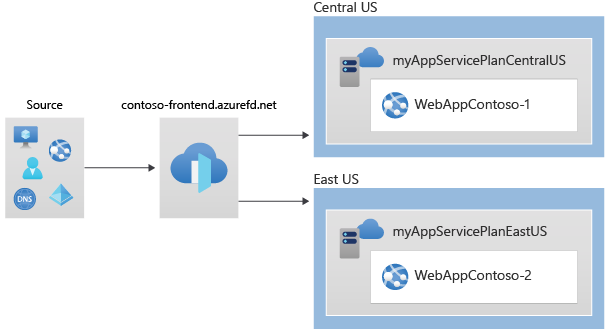
In this quickstart, you learn how to create an Azure Front Door Standard/Premium profile using Azure CLI. You create this profile using two Web Apps as your origin, and add a WAF security policy. You can then verify connectivity to your Web Apps using the Azure Front Door endpoint hostname.
Note
For web workloads, we highly recommend utilizing Azure DDoS protection and a web application firewall to safeguard against emerging DDoS attacks. Another option is to employ Azure Front Door along with a web application firewall. Azure Front Door offers platform-level protection against network-level DDoS attacks. For more information, see security baseline for Azure services.
If you don't have an Azure subscription, create an Azure free account before you begin.
Prerequisites
Use the Bash environment in Azure Cloud Shell. For more information, see Quickstart for Bash in Azure Cloud Shell.

If you prefer to run CLI reference commands locally, install the Azure CLI. If you're running on Windows or macOS, consider running Azure CLI in a Docker container. For more information, see How to run the Azure CLI in a Docker container.
If you're using a local installation, sign in to the Azure CLI by using the az login command. To finish the authentication process, follow the steps displayed in your terminal. For other sign-in options, see Sign in with the Azure CLI.
When you're prompted, install the Azure CLI extension on first use. For more information about extensions, see Use extensions with the Azure CLI.
Run az version to find the version and dependent libraries that are installed. To upgrade to the latest version, run az upgrade.
Create a resource group
In Azure, you allocate related resources to a resource group. You can either use an existing resource group or create a new one.
Run az group create to create resource groups.
az group create --name myRGFD --location centralus
Create an Azure Front Door profile
In this step, you create the Azure Front Door profile that your two App services use as your origin.
Run az afd profile create to create an Azure Front Door profile.
Note
If you want to deploy Azure Front Door Standard instead of Premium substitute the value of the sku parameter with Standard_AzureFrontDoor. You won't be able to deploy managed rules with WAF Policy, if you choose Standard SKU. For detailed comparison, view Azure Front Door tier comparison.
az afd profile create \
    --profile-name contosoafd \
    --resource-group myRGFD \
    --sku Premium_AzureFrontDoor
Create two instances of a web app
In this step, you create two web app instances that run in different Azure regions for this tutorial. Both the web application instances run in Active/Active mode, so either one can service traffic. This configuration differs from an Active/Stand-By configuration, where one acts as a failover.
Create app service plans
Before you can create the web apps you need two app service plans, one in Central US and the second in East US.
Run az appservice plan create to create your app service plans.
az appservice plan create \
    --name myAppServicePlanCentralUS \
    --resource-group myRGFD \
    --location centralus
az appservice plan create \
    --name myAppServicePlanEastUS \
    --resource-group myRGFD \
    --location eastus
Create web apps
Once the app service plans have been created, run az webapp create to create a web app in each of the app service plans in the previous step. Web app names have to be globally unique.
az webapp create \
    --name WebAppContoso-01 \
    --resource-group myRGFD \
    --plan myAppServicePlanCentralUS
az webapp create \
    --name WebAppContoso-02 \
    --resource-group myRGFD \
    --plan myAppServicePlanEastUS
Make note of the default host name of each web app so you can define the backend addresses when you deploy the Front Door in the next step.
Create an Azure Front Door
Create a Front Door profile
Run az afd profile create to create an Azure Front Door profile.
Note
If you want to deploy an Azure Front Door Standard instead of Premium substitute the value for the sku parameter with Standard_AzureFrontDoor. You won't be able to deploy managed rules with WAF Policy, if you choose Standard SKU. For detailed comparison, view Azure Front Door tier comparison.
az afd profile create \
    --profile-name contosoafd \
    --resource-group myRGFD \
    --sku Premium_AzureFrontDoor
Add an endpoint
In this step, you create an endpoint in your Front Door profile. In Front Door Standard/Premium, an endpoint is a logical grouping of one or more routes that are associated with domain names. Each endpoint is assigned a domain name by Front Door, and you can associate endpoints with custom domains by using routes. Front Door profiles can also contain multiple endpoints.
Run az afd endpoint create to create an endpoint in your profile.
az afd endpoint create \
    --resource-group myRGFD \
    --endpoint-name contosofrontend \
    --profile-name contosoafd \
    --enabled-state Enabled
For more information about endpoints in Front Door, see Endpoints in Azure Front Door.
Create an origin group
Create an origin group that defines the traffic and expected responses for your app instances. Origin groups also define how origins get evaluated by health probes, which you can define in this step.
Run az afd origin-group create to create an origin group that contains your two web apps.
az afd origin-group create \
    --resource-group myRGFD \
    --origin-group-name og \
    --profile-name contosoafd \
    --probe-request-type GET \
    --probe-protocol Http \
    --probe-interval-in-seconds 60 \
    --probe-path / \
    --sample-size 4 \
    --successful-samples-required 3 \
    --additional-latency-in-milliseconds 50
Add an origin to the group
Add both of your app instances created earlier as origins to your new origin group. Origins in Front Door refer to applications that Front Door retrieves contents from when caching isn't enabled or when a cache gets missed.
Run az afd origin create to add your first app instance as an origin to your origin group.
az afd origin create \
    --resource-group myRGFD \
    --host-name webappcontoso-01.azurewebsites.net \
    --profile-name contosoafd \
    --origin-group-name og \
    --origin-name contoso1 \
    --origin-host-header webappcontoso-01.azurewebsites.net \
    --priority 1 \
    --weight 1000 \
    --enabled-state Enabled \
    --http-port 80 \
    --https-port 443
Repeat this step and add your second app instances as an origin to your origin group.
az afd origin create \
    --resource-group myRGFD \
    --host-name webappcontoso-02.azurewebsites.net \
    --profile-name contosoafd \
    --origin-group-name og \
    --origin-name contoso2 \
    --origin-host-header webappcontoso-02.azurewebsites.net \
    --priority 1 \
    --weight 1000 \
    --enabled-state Enabled \
    --http-port 80 \
    --https-port 443
For more information about origins, origin groups and health probes, see Origins and origin groups in Azure Front Door
Add a route
Add a route to map the endpoint that you created earlier to the origin group. This route forwards requests from the endpoint to your origin group.
Run az afd route create to map your endpoint to the origin group.
az afd route create \
    --resource-group myRGFD \
    --profile-name contosoafd \
    --endpoint-name contosofrontend \
    --forwarding-protocol MatchRequest \
    --route-name route \
    --https-redirect Enabled \
    --origin-group og \
    --supported-protocols Http Https \
    --link-to-default-domain Enabled
To learn more about routes in Azure Front Door, see Traffic routing methods to origin.
Create a new security policy
Azure Web Application Firewall (WAF) on Front Door provides centralized protection for your web applications, defending them against common exploits and vulnerabilities.
In this tutorial, you create a WAF policy that adds two managed rules. You can also create WAF policies with custom rules
Create a WAF policy
Run az network front-door waf-policy create to create a new WAF policy for your Front Door. This example creates a policy that is enabled and in prevention mode.
Note
Managed rules will only work with Front Door Premium tier. You can opt for Standard tier to use onlu custom rules.
az network front-door waf-policy create \
    --name contosoWAF \
    --resource-group myRGFD \
    --sku Premium_AzureFrontDoor \
    --disabled false \
    --mode Prevention
Note
If you select Detection mode, your WAF doesn't block any requests.
To learn more about WAF policy settings for Front Door, see Policy settings for Web Application Firewall on Azure Front Door.
Assign managed rules to the WAF policy
Azure-managed rule sets provide an easy way to protect your application against common security threats.
Run az network front-door waf-policy managed-rules add to add managed rules to your WAF Policy. This example adds Microsoft_DefaultRuleSet_2.1 and Microsoft_BotManagerRuleSet_1.0 to your policy.
az network front-door waf-policy managed-rules add \
    --policy-name contosoWAF \
    --resource-group myRGFD \
    --type Microsoft_DefaultRuleSet \
    --action Block \
    --version 2.1
az network front-door waf-policy managed-rules add \
    --policy-name contosoWAF \
    --resource-group myRGFD \
    --type Microsoft_BotManagerRuleSet \
    --version 1.0
To learn more about managed rules in Front Door, see Web Application Firewall DRS rule groups and rules.
Create the security policy
Now apply these two WAF policies to your Front Door by creating a security policy. This setting applies the Azure-managed rules to the endpoint that you defined earlier.
Run az afd security-policy create to apply your WAF policy to the endpoint's default domain.
Note
Substitute 'mysubscription' with your Azure Subscription ID in the domains and waf-policy parameters. Run az account subscription list to get Subscription ID details.
az afd security-policy create \
    --resource-group myRGFD \
    --profile-name contosoafd \
    --security-policy-name contososecurity \
    --domains /subscriptions/mysubscription/resourcegroups/myRGFD/providers/Microsoft.Cdn/profiles/contosoafd/afdEndpoints/contosofrontend \
    --waf-policy /subscriptions/mysubscription/resourcegroups/myRGFD/providers/Microsoft.Network/frontdoorwebapplicationfirewallpolicies/contosoWAF
Test the Front Door
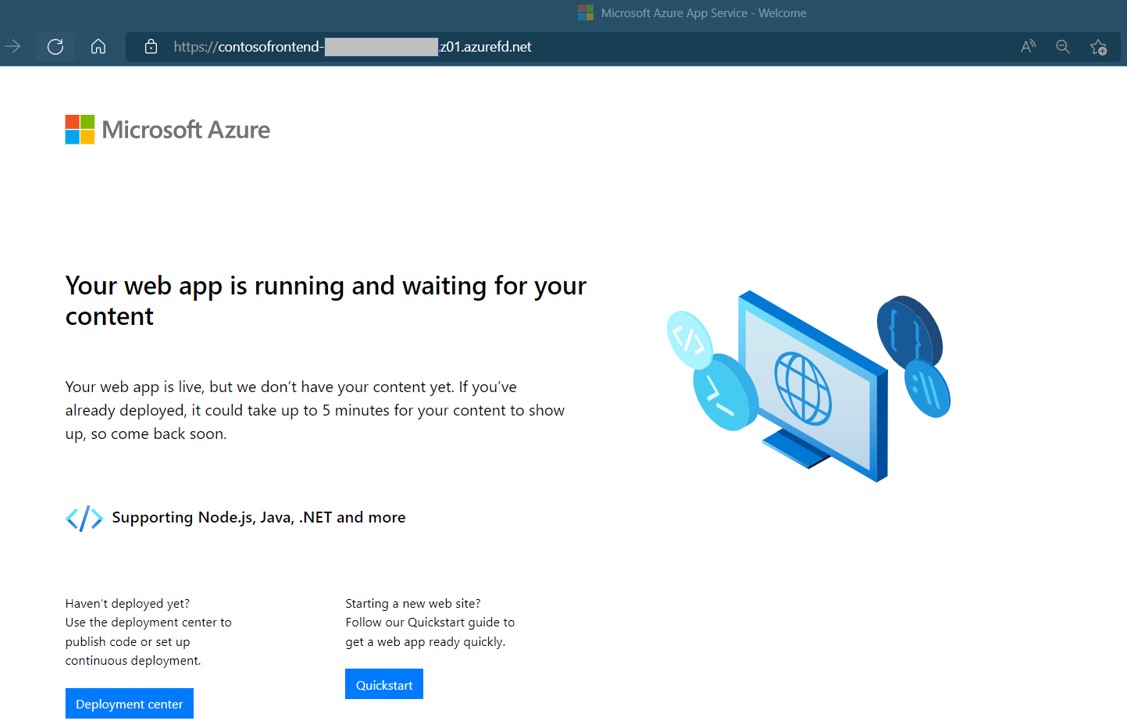
When you create the Azure Front Door Standard/Premium profile, it takes a few minutes for the configuration to be deployed globally. Once completed, you can access the frontend host you created.
Run az afd endpoint show to get the hostname of the Front Door endpoint.
az afd endpoint show --resource-group myRGFD --profile-name contosoafd --endpoint-name contosofrontend
In a browser, go to the endpoint hostname: contosofrontend-<hash>.z01.azurefd.net. Your request automatically gets routed to the least latent Web App in the origin group.
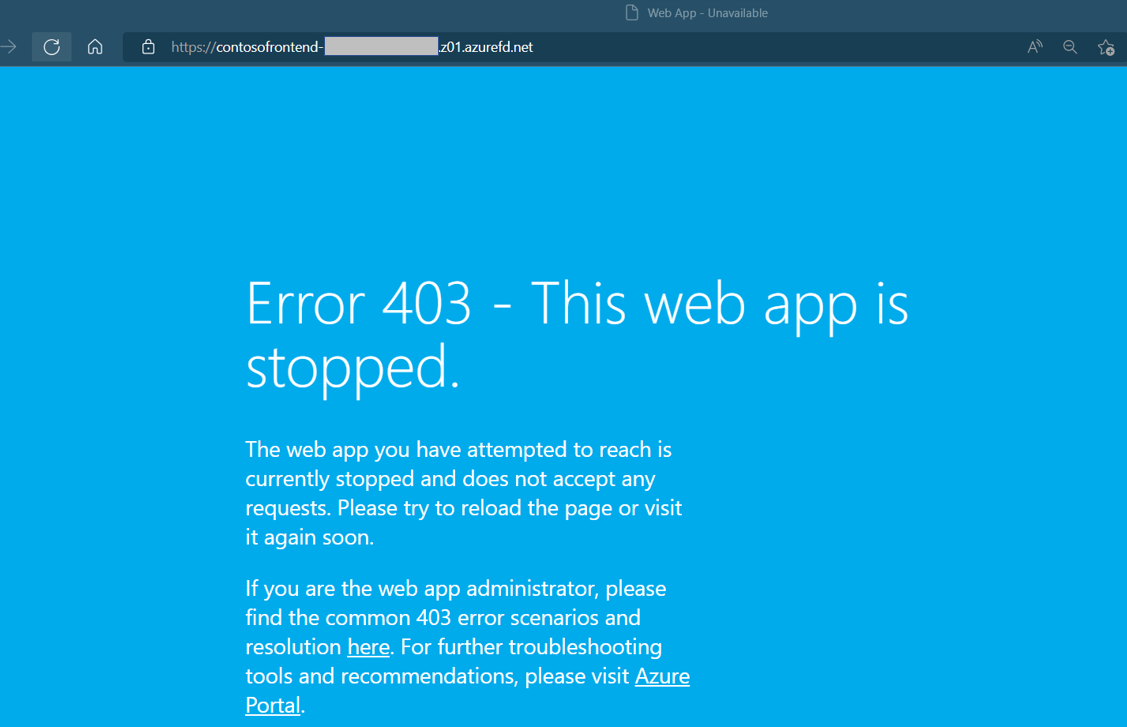
To test instant global failover, we use the following steps:
Open a browser and go to the endpoint hostname:
contosofrontend-<hash>.z01.azurefd.net.Stop one of the Web Apps by running az webapp stop
az webapp stop --name WebAppContoso-01 --resource-group myRGFDRefresh your browser. You should see the same information page.
Tip
There is a little bit of delay for these actions. You might need to refresh again.
Find the other web app, and stop it as well.
az webapp stop --name WebAppContoso-02 --resource-group myRGFDRefresh your browser. This time, you should see an error message.
Restart one of the Web Apps by running az webapp start. Refresh your browser and the page go back to normal.
az webapp start --name WebAppContoso-01 --resource-group myRGFD
Clean up resources
When you don't need the resources for the Front Door, delete both resource groups. Deleting the resource groups also deletes the Front Door and all its related resources.
Run az group delete:
az group delete --name myRGFD
Next steps
Advance to the next article to learn how to add a custom domain to your Front Door.
Feedback
Coming soon: Throughout 2024 we will be phasing out GitHub Issues as the feedback mechanism for content and replacing it with a new feedback system. For more information see: https://aka.ms/ContentUserFeedback.
Submit and view feedback for