Quickstart: Define and assign a blueprint in the portal
Important
On July 11, 2026, Blueprints (Preview) will be deprecated. Migrate your existing blueprint definitions and assignments to Template Specs and Deployment Stacks. Blueprint artifacts are to be converted to ARM JSON templates or Bicep files used to define deployment stacks. To learn how to author an artifact as an ARM resource, see:
In this tutorial, you learn to use Azure Blueprints to do some of the common tasks related to creating, publishing, and assigning a blueprint within your organization. This skill helps you define common patterns to develop reusable and rapidly deployable configurations, based on Azure Resource Manager (ARM) templates, policy, and security.
Prerequisites
- If you don't have an Azure subscription, create a free account before you begin.
- To create blueprints, your account needs the following permissions:
- Microsoft.Blueprint/blueprints/write - Create a blueprint definition
- Microsoft.Blueprint/blueprints/artifacts/write - Create artifacts on a blueprint definition
- Microsoft.Blueprint/blueprints/versions/write - Publish a blueprint
Create a blueprint
The first step in defining a standard pattern for compliance is to compose a blueprint from the available resources. Let's create a blueprint named MyBlueprint to configure role and policy assignments for the subscription. Then you add a resource group, an ARM template, and a role assignment on the resource group.
Select All services in the left pane. Search for and select Blueprints.
Select Blueprint definitions, and then select + Create blueprint.
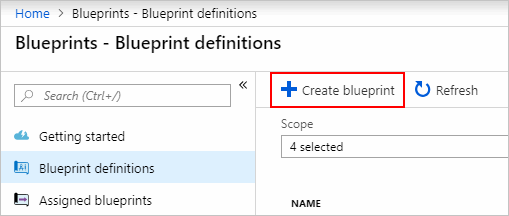
Or, select Getting started > Create to go straight to creating a blueprint.
Select Start with blank blueprint from the card at the top of the built-in blueprints list.
Provide a blueprint name, such as MyBlueprint. (You can use up to 48 letters and numbers, but no spaces or special characters.) Leave Blueprint description blank for now.
In the Definition location box, select the ellipsis on the right. Then select the management group or subscription where you want to save the blueprint, and choose Select.
Verify that the information is correct. The Blueprint name and Definition location fields can't be changed later. Then select Next : Artifacts at the bottom of the page, or the Artifacts tab at the top of the page.
Add a role assignment at the subscription level:
Under Subscription, select + Add artifact. The Add artifact window opens on the right side of the browser.
For Artifact type, select Role assignment.
For Role, select Contributor. Leave the Add user, app or group box with the check box that indicates a dynamic parameter.
Select Add to add this artifact to the blueprint.

Note
Most artifacts support parameters. A parameter that's assigned a value during blueprint creation is a static parameter. If the parameter is assigned during blueprint assignment, it's a dynamic parameter. For more information, see Blueprint parameters.
Add a policy assignment at the subscription level:
Under the role assignment artifact, select + Add artifact.
For Artifact type, select Policy assignment.
Change Type to Built-in. In Search, enter tag.
Change focus out of Search for the filtering to occur. Select Append a tag and its value to resource groups.
Select Add to add this artifact to the blueprint.
Select the row of the policy assignment Append a tag and its value to resource groups.
The window to provide parameters to the artifact as part of the blueprint definition opens. You can set the parameters for all assignments (static parameters) based on this blueprint, instead of during assignment (dynamic parameters). This example uses dynamic parameters during blueprint assignment, so leave the defaults and select Cancel.
Add a resource group at the subscription level:
Under Subscription, select + Add artifact.
For Artifact type, select Resource group.
Leave the Artifact display name, Resource Group Name, and Location boxes blank. Make sure that the check box is checked for each parameter property to make them dynamic parameters.
Select Add to add this artifact to the blueprint.
Add a template under the resource group:
Under ResourceGroup, select + Add artifact.
For Artifact type, select Azure Resource Manager template. Set Artifact display name to StorageAccount, and leave Description blank.
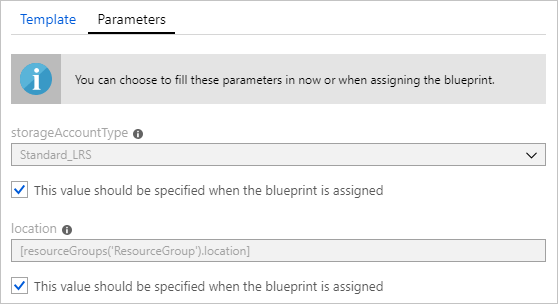
On the Template tab in the editor box, paste the following ARM template. After you paste the template, select the Parameters tab, and note that the template parameters
storageAccountTypeandlocationwere detected. Each parameter was automatically detected and populated, but configured as a dynamic parameter.Important
If you're importing the template, ensure that the file is only JSON and doesn't include HTML. When you're pointing to a URL on GitHub, ensure that you have selected RAW to get the pure JSON file, and not the one wrapped with HTML for display on GitHub. An error occurs if the imported template is not purely JSON.
{
    "$schema": "https://schema.management.azure.com/schemas/2015-01-01/deploymentTemplate.json#",
    "contentVersion": "1.0.0.0",
    "parameters": {
        "storageAccountType": {
            "type": "string",
            "defaultValue": "Standard_LRS",
            "allowedValues": [
                "Standard_LRS",
                "Standard_GRS",
                "Standard_ZRS",
                "Premium_LRS"
            ],
            "metadata": {
                "description": "Storage Account type"
            }
        },
        "location": {
            "type": "string",
            "defaultValue": "[resourceGroup().location]",
            "metadata": {
                "description": "Location for all resources."
            }
        }
    },
    "variables": {
        "storageAccountName": "[concat('store', uniquestring(resourceGroup().id))]"
    },
    "resources": [{
        "type": "Microsoft.Storage/storageAccounts",
        "name": "[variables('storageAccountName')]",
        "location": "[parameters('location')]",
        "apiVersion": "2018-07-01",
        "sku": {
            "name": "[parameters('storageAccountType')]"
        },
        "kind": "StorageV2",
        "properties": {}
    }],
    "outputs": {
        "storageAccountName": {
            "type": "string",
            "value": "[variables('storageAccountName')]"
        }
    }
}
Clear the storageAccountType check box, and note that the dropdown list contains only values included in the ARM template under
allowedValues. Select the box to set it back to a dynamic parameter.Select Add to add this artifact to the blueprint.
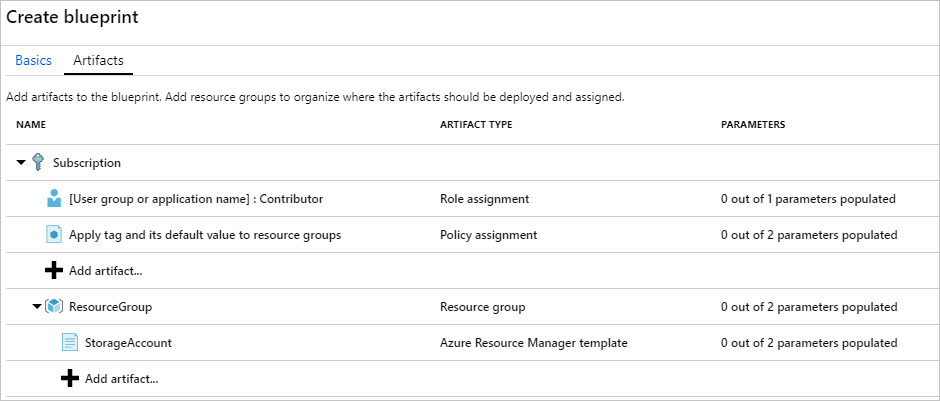
Your completed blueprint should look similar to the following. In the Parameters column, notice that each artifact has x out of y parameters populated. The dynamic parameters are set during each assignment of the blueprint.
Now that you've added all planned artifacts, select Save Draft at the bottom of the page.
Edit a blueprint
In Create a blueprint, you didn't provide a description or add the role assignment to the new resource group. You can fix both by following these steps:
Select Blueprint definitions from the page on the left.
In the list of blueprints, select and hold (or right-click) the one that you previously created. Then select Edit blueprint.
In Blueprint description, provide some information about the blueprint and the artifacts that compose it. In this case, enter something like: This blueprint sets tag policy and role assignment on the subscription, creates a ResourceGroup, and deploys a resource template and role assignment to that ResourceGroup.
Select Next : Artifacts at the bottom of the page, or the Artifacts tab at the top of the page.
Add a role assignment under the resource group:
Under ResourceGroup, select + Add artifact.
For Artifact type, select Role assignment.
Under Role, select Owner, and clear the check box under the Add user, app or group box.
Search for and select a user, app, or group to add. This artifact uses a static parameter set, the same in every assignment of this blueprint.
Select Add to add this artifact to the blueprint.

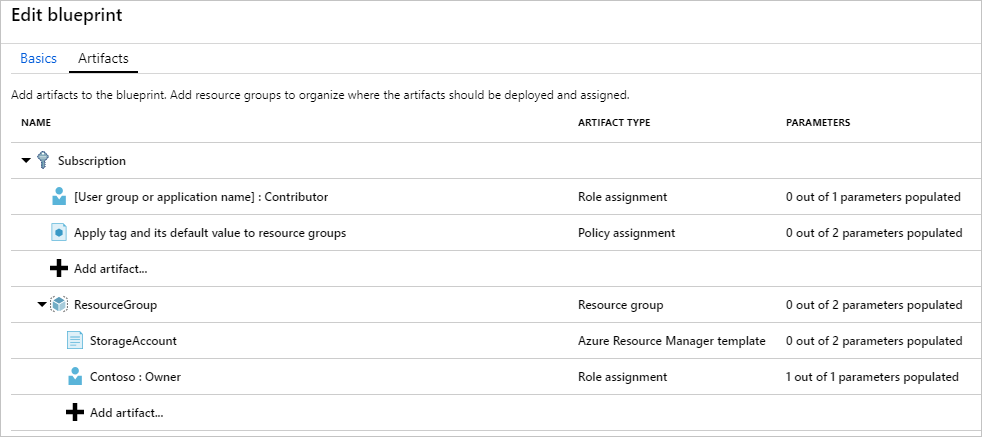
Your completed blueprint should look similar to the following. Notice that the newly added role assignment shows 1 out of 1 parameters populated. That means it's a static parameter.
Select Save Draft now that it has been updated.
Publish a blueprint
Now that you've added all the planned artifacts to the blueprint, it's time to publish it. Publishing makes the blueprint available to be assigned to a subscription.
Select Blueprint definitions from the page on the left.
In the list of blueprints, select and hold (or right-click) the one you previously created. Then select Publish blueprint.
In the pane that opens, provide a Version (letters, numbers, and hyphens with a maximum length of 20 characters), such as v1. Optionally, enter text in Change notes, such as First publish.
Select Publish at the bottom of the page.
Assign a blueprint
After you publish a blueprint, you can assign it to a subscription. Assign the blueprint that you created to one of the subscriptions under your management group hierarchy. If the blueprint is saved to a subscription, it can only be assigned to that subscription.
Select Blueprint definitions from the page on the left.
In the list of blueprints, select and hold (or right-click) the one that you previously created (or select the ellipsis). Then select Assign blueprint.
On the Assign blueprint page, in the Subscription dropdown list, select the subscriptions to which you want to deploy this blueprint.
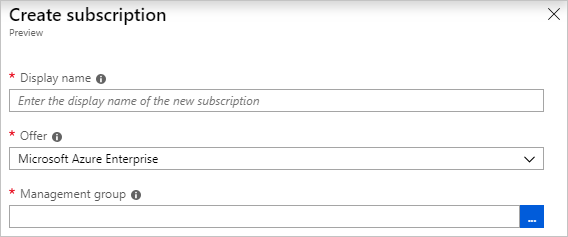
If there are supported Enterprise offerings available from Azure Billing, a Create new link is activated under the Subscription box. Follow these steps:
Select the Create new link to create a new subscription instead of selecting existing ones.
For Display name, enter a name for the new subscription.
For Offer, select the available offer from the dropdown list.
For Management group, select the ellipsis to choose the management group that the subscription will be a child of.
Select Create at the bottom of the page.
Important
The new subscription is created immediately after you select Create.
Note
An assignment is created for each subscription that you select. You can make changes to a single subscription assignment at a later time, without forcing changes on the remainder of the selected subscriptions.
For Assignment name, provide a unique name for this assignment.
In Location, select a region for the managed identity and subscription deployment object to be created in. Azure Blueprints uses this managed identity to deploy all artifacts in the assigned blueprint. To learn more, see Managed identities for Azure resources.
For the Blueprint definition version dropdown list selection of Published versions, leave the v1 entry as it is. (The default is the most recently published version.)
For Lock Assignment, leave the default of Don't Lock. For more information, see Blueprints resource locking.
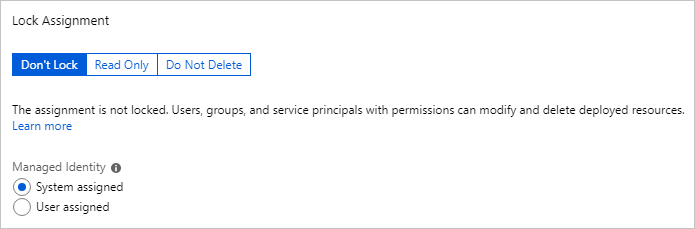
Under Managed Identity, leave the default of System assigned.
For the subscription-level role assignment [User group or application name] : Contributor, search for and select a user, app, or group.
For the subscription-level policy assignment, set Tag Name to CostCenter, and set Tag Value to ContosoIT.
For ResourceGroup, provide a name of StorageAccount and a location of East US 2 from the dropdown list.
Note
For each artifact that you added under the resource group during blueprint definition, that artifact is indented to align with the resource group or object that you'll deploy it with. Artifacts that either don't take parameters, or have no parameters to be defined at assignment, are listed only for contextual information.
On the ARM template StorageAccount, select Standard_GRS for the storageAccountType parameter.
Read the information box at the bottom of the page, and then select Assign.
Track deployment of a blueprint
When you assign a blueprint to one or more subscriptions, two things happen:
- The blueprint is added to the Assigned blueprints page for each subscription.
- The process of deploying all the artifacts defined by the blueprint begins.
Now that you've assigned the blueprint to a subscription, verify the progress of the deployment:
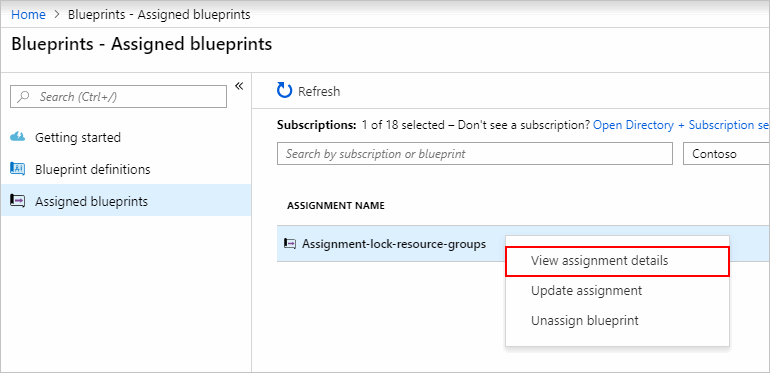
Select Assigned blueprints from the page on the left.
In the list of blueprints, select and hold (or right-click) the one that you previously assigned. Then select View assignment details.
On the Blueprint assignment page, validate that all artifacts were successfully deployed, and that there were no errors during the deployment. If errors occurred, see Troubleshooting blueprints for steps to determine what went wrong.
Clean up resources
Unassign a blueprint
If you no longer need a blueprint assignment, remove it from a subscription. The blueprint might have been replaced by a newer blueprint with updated patterns, policies, and designs. When a blueprint is removed, the artifacts assigned as part of that blueprint are left behind. To remove a blueprint assignment, follow these steps:
Select Assigned blueprints from the page on the left.
In the list of blueprints, select the blueprint that you want to unassign. Then select Unassign blueprint at the top of the page.
Read the confirmation message, and then select OK.
Delete a blueprint
Select Blueprint definitions from the page on the left.
Right-click the blueprint that you want to delete, and select Delete blueprint. Then select Yes in the confirmation dialog box.
Note
Deleting a blueprint in this method also deletes all published versions of the selected blueprint. To delete a single version, open the blueprint, and select the Published versions tab. Then select the version that you want to delete, and then select Delete This Version. Also, you can't delete a blueprint until you've deleted all blueprint assignments of that blueprint definition.
Next steps
In this quickstart, you created, assigned, and removed a blueprint with Azure portal. To learn more about Azure Blueprints, continue to the blueprint lifecycle article.
Feedback
Coming soon: Throughout 2024 we will be phasing out GitHub Issues as the feedback mechanism for content and replacing it with a new feedback system. For more information see: https://aka.ms/ContentUserFeedback.
Submit and view feedback for