Use Apache Spark Structured Streaming with Apache Kafka and Azure Cosmos DB
Learn how to use Apache Spark Structured Streaming to read data from Apache Kafka on Azure HDInsight, and then store the data into Azure Cosmos DB.
Azure Cosmos DB is a globally distributed, multi-model database. This example uses an Azure Cosmos DB for NoSQL database model. For more information, see the Welcome to Azure Cosmos DB document.
Spark structured streaming is a stream processing engine built on Spark SQL. It allows you to express streaming computations the same as batch computation on static data. For more information on Structured Streaming, see the Structured Streaming Programming Guide at Apache.org.
Important
This example uses Spark 2.4 on HDInsight 4.0.
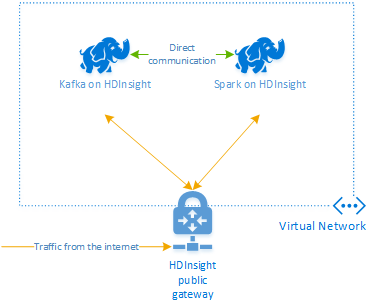
The steps in this document create an Azure resource group that contains both a Spark on HDInsight and a Kafka on HDInsight cluster. These clusters are both located within an Azure Virtual Network, which allows the Spark cluster to directly communicate with the Kafka cluster.
When you are done with the steps in this document, remember to delete the clusters to avoid excess charges.
Create the clusters
Apache Kafka on HDInsight doesn't provide access to the Kafka brokers over the public internet. Anything that talks to Kafka must be in the same Azure virtual network as the nodes in the Kafka cluster. For this example, both the Kafka and Spark clusters are located in an Azure virtual network. The following diagram shows how communication flows between the clusters:
Note
The Kafka service is limited to communication within the virtual network. Other services on the cluster, such as SSH and Ambari, can be accessed over the internet. For more information on the public ports available with HDInsight, see Ports and URIs used by HDInsight.
While you can create an Azure virtual network, Kafka, and Spark clusters manually, it's easier to use an Azure Resource Manager template. Use the following steps to deploy an Azure virtual network, Kafka, and Spark clusters to your Azure subscription.
Use the following button to sign in to Azure and open the template in the Azure portal.

The Azure Resource Manager template is located in the GitHub repository for this project (https://github.com/Azure-Samples/hdinsight-spark-scala-kafka-cosmosdb).
This template creates the following resources:
A Kafka on HDInsight 4.0 cluster.
A Spark on HDInsight 4.0 cluster.
An Azure Virtual Network, which contains the HDInsight clusters. The virtual network created by the template uses the 10.0.0.0/16 address space.
An Azure Cosmos DB for NoSQL database.
Important
The structured streaming notebook used in this example requires Spark on HDInsight 4.0. If you use an earlier version of Spark on HDInsight, you receive errors when using the notebook.
Use the following information to populate the entries on the Custom deployment section:
Property Value Subscription Select your Azure subscription. Resource group Create a group or select an existing one. This group contains the HDInsight cluster. Azure Cosmos DB Account Name This value is used as the name for the Azure Cosmos DB account. The name can only contain lowercase letters, numbers, and the hyphen (-) character. It must be between 3-31 characters in length. Base Cluster Name This value is used as the base name for the Spark and Kafka clusters. For example, entering myhdi creates a Spark cluster named spark-myhdi and a Kafka cluster named kafka-myhdi. Cluster Version The HDInsight cluster version. This example is tested with HDInsight 4.0, and may not work with other cluster types. Cluster Login User Name The admin user name for the Spark and Kafka clusters. Cluster Login Password The admin user password for the Spark and Kafka clusters. Ssh User Name The SSH user to create for the Spark and Kafka clusters. Ssh Password The password for the SSH user for the Spark and Kafka clusters. 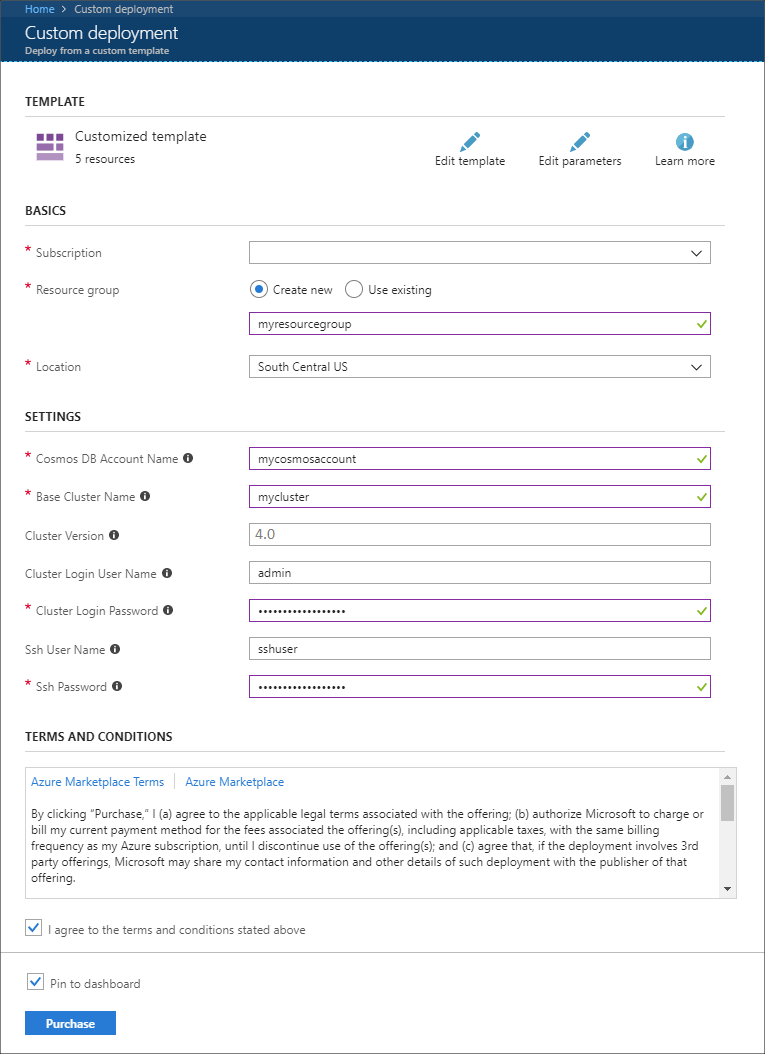
Read the Terms and Conditions, and then select I agree to the terms and conditions stated above.
Finally, select Purchase. It may take up to 45 minutes to create the clusters, virtual network, and Azure Cosmos DB account.
Create the Azure Cosmos DB database and collection
The project used in this document stores data in Azure Cosmos DB. Before running the code, you must first create a database and collection in your Azure Cosmos DB instance. You must also retrieve the document endpoint and the key used to authenticate requests to Azure Cosmos DB.
One way to do this is to use the Azure CLI. The following script will create a database named kafkadata and a collection named kafkacollection. It then returns the primary key.
#!/bin/bash

# Replace 'myresourcegroup' with the name of your resource group
resourceGroupName='myresourcegroup'
# Replace 'mycosmosaccount' with the name of your Azure Cosmos DB account name
name='mycosmosaccount'

# WARNING: If you change the databaseName or collectionName
#          then you must update the values in the Jupyter Notebook
databaseName='kafkadata'
collectionName='kafkacollection'

# Create the database
az cosmosdb sql database create --account-name $name --name $databaseName --resource-group $resourceGroupName

# Create the collection
az cosmosdb sql container create --account-name $name --database-name $databaseName --name $collectionName --partition-key-path "/my/path" --resource-group $resourceGroupName

# Get the endpoint
az cosmosdb show --name $name --resource-group $resourceGroupName --query documentEndpoint

# Get the primary key
az cosmosdb keys list --name $name --resource-group $resourceGroupName --type keys
The document endpoint and primary key information is similar to the following text:
# endpoint
"https://mycosmosaccount.documents.azure.com:443/"
# key
"YqPXw3RP7TsJoBF5imkYR0QNA02IrreNAlkrUMkL8EW94YHs41bktBhIgWq4pqj6HCGYijQKMRkCTsSaKUO2pw=="
Important
Save the endpoint and key values, as they are needed in the Jupyter Notebooks.
Get the notebooks
The code for the example described in this document is available at https://github.com/Azure-Samples/hdinsight-spark-scala-kafka-cosmosdb.
Upload the notebooks
Use the following steps to upload the notebooks from the project to your Spark on HDInsight cluster:
In your web browser, connect to the Jupyter Notebook on your Spark cluster. In the following URL, replace
CLUSTERNAMEwith the name of your Spark cluster:https://CLUSTERNAME.azurehdinsight.net/jupyterWhen prompted, enter the cluster login (admin) and password used when you created the cluster.
From the upper right side of the page, use the Upload button to upload the Stream-taxi-data-to-kafka.ipynb file to the cluster. Select Open to start the upload.
Find the Stream-taxi-data-to-kafka.ipynb entry in the list of notebooks, and select Upload button beside it.
Repeat steps 1-3 to load the Stream-data-from-Kafka-to-Cosmos-DB.ipynb notebook.
Load taxi data into Kafka
Once the files have been uploaded, select the Stream-taxi-data-to-kafka.ipynb entry to open the notebook. Follow the steps in the notebook to load data into Kafka.
Process taxi data using Spark Structured Streaming
From the Jupyter Notebook home page, select the Stream-data-from-Kafka-to-Cosmos-DB.ipynb entry. Follow the steps in the notebook to stream data from Kafka and into Azure Cosmos DB using Spark Structured Streaming.
Next steps
Now that you've learned how to use Apache Spark Structured Streaming, see the following documents to learn more about working with Apache Spark, Apache Kafka, and Azure Cosmos DB:
Feedback
Coming soon: Throughout 2024 we will be phasing out GitHub Issues as the feedback mechanism for content and replacing it with a new feedback system. For more information see: https://aka.ms/ContentUserFeedback.
Submit and view feedback for