Quickstart: Deploy the MedTech service using an Azure Resource Manager template
To implement infrastructure as code for your Azure solutions, use Azure Resource Manager templates (ARM templates). The template is a JavaScript Object Notation (JSON) file that defines the infrastructure and configuration for your project. The template uses declarative syntax, which lets you state what you intend to deploy without having to write the sequence of programming commands to create it. In the template, you specify the resources to deploy and the properties for those resources.
In this quickstart, learn how to:
- Open an ARM template in the Azure portal.
- Configure the ARM template for your deployment.
- Deploy the ARM template.
Tip
To learn more about ARM templates, see What are ARM templates?
Prerequisites
To begin your deployment and complete the quickstart, you must have the following prerequisites:
An active Azure subscription account. If you don't have an Azure subscription, see Subscription decision guide.
Owner or Contributor and User Access Administrator role assignments in the Azure subscription. For more information, see What is Azure role-based access control (Azure RBAC)?
The Microsoft.HealthcareApis and Microsoft.EventHub resource providers registered with your Azure subscription. To learn more about registering resource providers, see Azure resource providers and types.
When you have these prerequisites, you're ready to configure the ARM template by using the Deploy to Azure button.
Review the ARM template
The ARM template used to deploy the resources in this quickstart is available at Azure Quickstart Templates by using the azuredeploy.json file on GitHub.
Use the Deploy to Azure button
To begin deployment in the Azure portal, select the Deploy to Azure button:
.
Configure the deployment
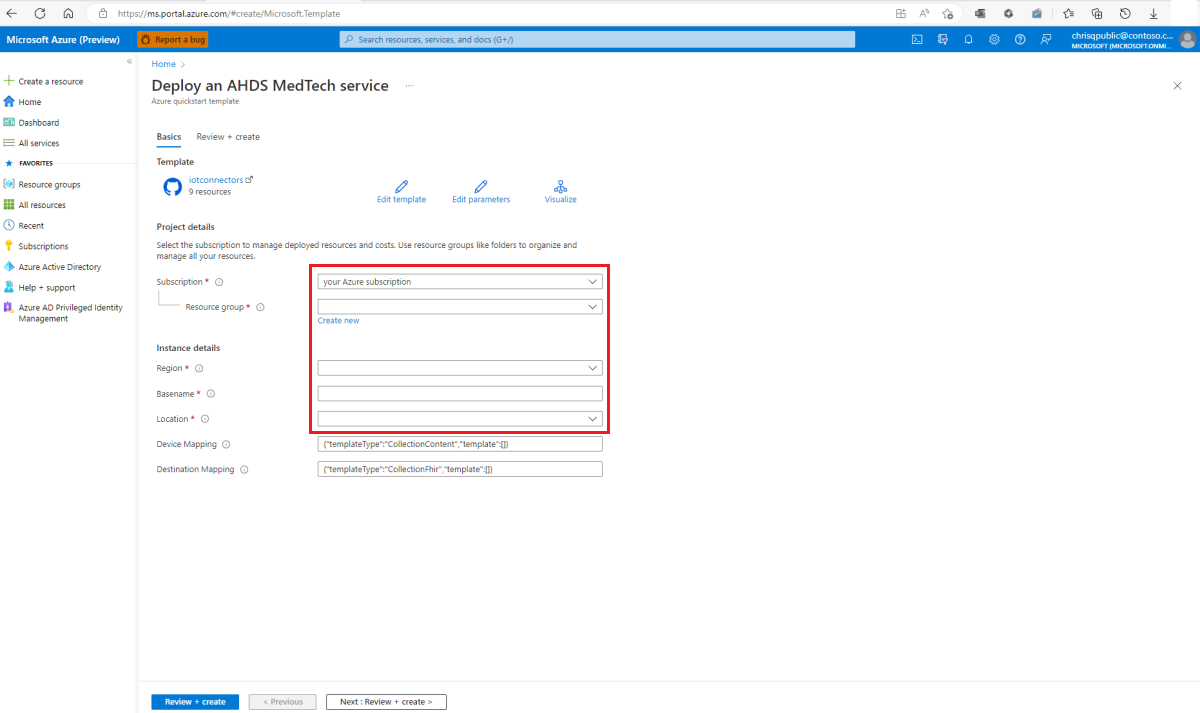
In the Azure portal, on the Basics tab of the Azure Quickstart Template, select or enter the following information for your deployment:
Subscription - The Azure subscription to use for the deployment.
Resource group - An existing resource group, or you can create a new resource group.
Region - The Azure region of the resource group that's used for the deployment. Region autofills by using the resource group region.
Basename - A value that's appended to the name of the Azure resources and services that are deployed.
Location - Use the drop-down list to select a supported Azure region for the Azure Health Data Services (the value could be the same or different region than your resource group).
Device Mapping - Leave the default values for this quickstart.
Destination Mapping - Leave the default values for this quickstart.
To validate your configuration, select Review + create.

In Review + create, check the template validation status. If validation is successful, the template displays Validation Passed. If validation fails, fix the detail that's indicated in the error message, and then select Review + create again.

After a successful validation, to begin the deployment, select Create.

In a few minutes, the Azure portal displays the message that your deployment is completed.

Important
If you're going to allow access from multiple services to the event hub, it's required that each service has its own event hub consumer group.
Consumer groups enable multiple consuming applications to have a separate view of the event stream, and to read the stream independently at their own pace and with their own offsets. For more information, see Consumer groups.
Examples:
Two MedTech services accessing the same event hub.
A MedTech service and a storage writer application accessing the same event hub.

Review deployed resources and access permissions
When deployment is completed, the following resources and access roles are created in the ARM template deployment:
Event Hubs namespace and event hub. In this deployment, the event hub is named devicedata.
Event hub consumer group. In this deployment, the consumer group is named $Default.
Azure Event Hubs Data Sender role. In this deployment, the sender role is named devicedatasender and can be used to provide access to the device event hub using a shared access signature (SAS). To learn more about authorizing access using a SAS, see Authorizing access to Event Hubs resources using Shared Access Signatures.
Health Data Services workspace.
Health Data Services FHIR® service.
Health Data Services MedTech service with the system-assigned managed identity enabled and granted the following access roles:
For the event hub, the Azure Event Hubs Data Receiver access role is assigned in the Access control section (IAM) of the event hub.
For the FHIR service, the FHIR Data Writer access role is assigned in the Access control section (IAM) of the FHIR service.
Important
In this quickstart, the ARM template configures the MedTech service to operate in Create mode. A patient resource and a device resource are created for each device that sends data to your FHIR service.
To learn about the MedTech service resolution types Create and Lookup, see Configure the Destination tab.
Post-deployment mappings
After you have successfully deployed an instance of the MedTech service, you'll still need to provide conforming and valid device and FHIR destination mappings.
To learn about the device mapping, see Overview of the MedTech service device mapping.
To learn about the FHIR destination mapping, see Overview of the MedTech service FHIR destination mapping.
Next steps
Choose a deployment method for the MedTech service
Overview of the MedTech service device data processing stages
Frequently asked questions about the MedTech service
Note
FHIR® is a registered trademark of HL7 and is used with the permission of HL7.
Feedback
Coming soon: Throughout 2024 we will be phasing out GitHub Issues as the feedback mechanism for content and replacing it with a new feedback system. For more information see: https://aka.ms/ContentUserFeedback.
Submit and view feedback for