How to connect devices through an IoT Edge transparent gateway
An IoT Edge device can act as a gateway that provides a connection between other devices on a local network and your IoT Central application. You use a gateway when the device can't access your IoT Central application directly.
IoT Edge supports the transparent and translation gateway patterns. This article summarizes how to implement the transparent gateway pattern. In this pattern, the gateway passes messages from the downstream device through to the IoT Hub endpoint in your IoT Central application. The gateway doesn't manipulate the messages as they pass through. In IoT Central, each downstream device appears as child to the gateway device:
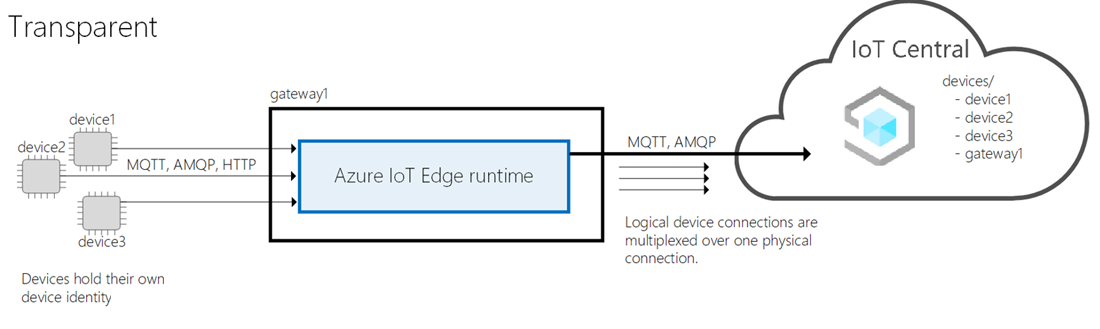
For simplicity, this article uses virtual machines to host the downstream and gateway devices. In a real scenario, the downstream device and gateway would run on physical devices on your local network.
This article shows how to implement the scenario by using the IoT Edge 1.4 runtime.
Prerequisites
To complete the steps in this article, you need:
An active Azure subscription. If you don't have an Azure subscription, create a free account before you begin.
An IoT Central application created from the Custom application template. To learn more, see Create an IoT Central application.
To follow the steps in this article, download the following files to your computer:
- Thermostat device model (thermostat-1.json) - this file is the device model for the downstream devices.
- Transparent gateway manifest (EdgeTransparentGatewayManifest.json) - this file is the IoT Edge deployment manifest for the gateway device.
Import deployment manifest
Every IoT Edge device needs a deployment manifest to configure the IoT Edge runtime. To import a deployment manifest for the IoT Edge transparent gateway:
Navigate to Edge manifests.
Select + New, enter a name for the deployment manifest such as Transparent gateway and then upload the EdgeTransparentGatewayManifest.json file you downloaded previously.
Select Create to save the deployment manifest in your application.
Add device templates
Both the downstream devices and the gateway device can use device templates in IoT Central. IoT Central lets you model the relationship between your downstream devices and your gateway so you can view and manage them after they're connected. A device template isn't required to attach a downstream device to a gateway.
To create a device template for a downstream device, create a standard device template that models the capabilities of your device. The example shown in this article uses the thermostat device model you downloaded.
To create a device template for a downstream device:
Create a device template and choose IoT device as the template type.
On the Customize page of the wizard, enter a name such as Thermostat for the device template.
After you create the device template, select Import a model. Select a model such as the thermostat-1.json file you downloaded previously.
To generate some default views for the thermostat, select views and then choose Generate default views.
Publish the device template.
To create a device template for an IoT Edge transparent gateway device:
Create a device template and choose Azure IoT Edge as the template type.
On the Customize page of the wizard, enter a name such as Edge Gateway for the device template.
On the Customize page of the wizard, check This is a gateway device.
On the Review page, select Create.
On the Create a model page, select Custom model.
Add an entry in Relationships to the downstream device template.
The following screenshot shows the Relationships page for an IoT Edge gateway device with downstream devices that use the Thermostat device template:

The previous screenshot shows an IoT Edge gateway device template with no modules defined. A transparent gateway doesn't require any modules because the IoT Edge runtime forwards messages from the downstream devices directly to IoT Central. If the gateway itself needs to send telemetry, synchronize properties, or handle commands, you can define these capabilities in the root component or in a module.
Add any required cloud properties and views before you publish the gateway and downstream device templates.
Add the devices
When you add the devices to your IoT Central application, you can define the relationship between the downstream devices and the transparent gateway.
To add the devices:
Navigate to the devices page in your IoT Central application.
Add an instance of the transparent gateway IoT Edge device. When you add the device, make sure that you select the Transparent gateway deployment manifest. In this article, the gateway device ID is
edgegateway.Add one or more instances of the downstream device. In this article, the downstream devices are thermostats with IDs
thermostat1andthermostat2.In the device list, select each downstream device and select Attach to gateway.
The following screenshot shows you can view the list of devices attached to a gateway on the Downstream Devices page:

In a transparent gateway, the downstream devices connect to the gateway itself, not to a custom module hosted by the gateway.
Before you deploy the devices, you need the:
- ID Scope of your IoT Central application.
- Device ID values for the gateway and downstream devices.
- Primary key values for the gateway and downstream devices.
To find these values, navigate to each device in the device list and select Connect. Make a note of these values before you continue.
Tip
You can connect the devices and establish relationships without first creating device templates for the devices. You can attach an unassigned downstream device to an unassigned gateway device.
Deploy the gateway and devices
To let you try out this scenario, the following steps show you how to deploy the gateway and downstream devices to Azure virtual machines.
Tip
To learn how to deploy the IoT Edge runtime to a physical device, see Create an IoT Edge device in the IoT Edge documentation.
To try out the transparent gateway scenario, select the following button to deploy two Linux virtual machines. One virtual machine has the IoT Edge 1.4 runtime installed and is the transparent IoT Edge gateway. The other virtual machine is a downstream device where you run code to send simulated thermostat telemetry:
When the two virtual machines are deployed and running, verify the IoT Edge gateway device is running on the edgegateway virtual machine:
Go to the Devices page in your IoT Central application. If the IoT Edge gateway device is connected to IoT Central, its status is Provisioned.
Open the IoT Edge gateway device and verify the status of the modules on the Modules page. If the IoT Edge runtime started successfully, the status of the $edgeAgent and $edgeHub modules is Running:

Tip
You may have to wait for several minutes while the virtual machine starts up and the device is provisioned in your IoT Central application.

Configure the gateway
For your IoT Edge device to function as a transparent gateway, it needs some certificates to prove its identity to any downstream devices. This article uses demo certificates. In a production environment, use certificates from your certificate authority.
To generate the demo certificates and install them on your gateway device:
Use SSH to connect to and sign in on your gateway device virtual machine.
Run the following commands to clone the IoT Edge repository and generate your demo certificates:
# Clone the repo
cd ~
git clone https://github.com/Azure/iotedge.git

# Generate the demo certificates
mkdir certs
cd certs
cp ~/iotedge/tools/CACertificates/*.cnf .
cp ~/iotedge/tools/CACertificates/certGen.sh .
./certGen.sh create_root_and_intermediate
./certGen.sh create_edge_device_ca_certificate "mycacert"
After you run the previous commands, the following files are ready to use in the next steps:
- ~/certs/certs/azure-iot-test-only.root.ca.cert.pem - The root CA certificate used to make all the other demo certificates for testing an IoT Edge scenario.
- ~/certs/certs/iot-edge-device-mycacert-full-chain.cert.pem - A device CA certificate referenced from the IoT Edge configuration file. In a gateway scenario, this CA certificate is how the IoT Edge device verifies its identity to downstream devices.
- ~/certs/private/iot-edge-device-mycacert.key.pem - The private key associated with the device CA certificate.
To learn more about these demo certificates, see Create demo certificates to test IoT Edge device features.
Open the config.toml file in a text editor. For example:
sudo nano /etc/aziot/config.tomlLocate the following settings in the configuration file. Add the certificate settings as follows:
trust_bundle_cert = "file:///home/AzureUser/certs/certs/azure-iot-test-only.root.ca.cert.pem"

[edge_ca]
cert = "file:///home/AzureUser/certs/certs/iot-edge-device-ca-mycacert-full-chain.cert.pem"
pk = "file:///home/AzureUser/certs/private/iot-edge-device-ca-mycacert.key.pem"
The previous example assumes you're signed in as AzureUser and created a device CA certificate called "mycacert".
Save the changes and restart the IoT Edge runtime:
sudo iotedge config apply
If the IoT Edge runtime starts successfully after your changes, the status of the $edgeAgent and $edgeHub modules changes to Running on the Modules page for your gateway device in IoT Central.
If the runtime doesn't start, check the changes you made in the IoT Edge configuration file and see Troubleshoot your IoT Edge device.
Your transparent gateway is now configured and ready to start forwarding telemetry from downstream devices.
Provision a downstream device
IoT Central relies on the Device Provisioning Service (DPS) to provision devices in IoT Central. Currently, IoT Edge can't use DPS provision a downstream device to your IoT Central application. The following steps show you how to provision the thermostat1 device manually. To complete these steps, you need an environment with Python installed and internet connectivity. Check the Azure IoT Python SDK for current Python version requirements. The Azure Cloud Shell has Python preinstalled:
Run the following command to install the
azure.iot.devicemodule:pip install azure.iot.deviceRun the following command to download the Python script that does the device provisioning:
wget https://raw.githubusercontent.com/Azure-Samples/iot-central-docs-samples/main/transparent-gateway-1-4/provision_device.pyTo provision the
thermostat1downstream device in your IoT Central application, run the following commands, replacing{your application id scope}and{your device primary key}. You made a note of these values when you added the devices to your IoT Central application:export IOTHUB_DEVICE_DPS_DEVICE_ID=thermostat1 export IOTHUB_DEVICE_DPS_ID_SCOPE={your application id scope} export IOTHUB_DEVICE_DPS_DEVICE_KEY={your device primary key} python provision_device.py
In your IoT Central application, verify that the Device status for the thermostat1 device is now Provisioned.
Configure a downstream device
In the previous section, you configured the edgegateway virtual machine with the demo certificates to enable it to run as gateway. The leafdevice virtual machine is ready for you to install a thermostat simulator that uses the gateway to connect to IoT Central.
The leafdevice virtual machine needs a copy of the root CA certificate you created on the edgegateway virtual machine. Copy the /home/AzureUser/certs/certs/azure-iot-test-only.root.ca.cert.pem file from the edgegateway virtual machine to your home directory on the leafdevice virtual machine. You can use the scp command to copy files between Linux virtual machines. For example, from the leafdevice machine:
scp AzureUser@edgegateway:/home/AzureUser/certs/certs/azure-iot-test-only.root.ca.cert.pem .
To learn how to check the connection from the downstream device to the gateway, see Test the gateway connection.
To run the thermostat simulator on the leafdevice virtual machine:
Use SSH to connect to and sign in on your
leafdevicevirtual machine.Download the Python sample to your home directory:
cd ~
wget https://raw.githubusercontent.com/Azure-Samples/iot-central-docs-samples/main/transparent-gateway-1-4/simple_thermostat.py
Install the Azure IoT device Python module:
sudo apt update
sudo apt install python3-pip
pip3 install azure.iot.device
Set the environment variables to configure the sample. Replace
{your device shared key}with the primary key of thethermostat1you made a note of previously. These variables assume the name of the gateway virtual machine isedgegatewayand the ID of the thermostat device isthermostat1:export IOTHUB_DEVICE_SECURITY_TYPE=connectionString export IOTHUB_DEVICE_CONNECTION_STRING="HostName=edgegateway;DeviceId=thermostat1;SharedAccessKey={your device shared key}" export IOTEDGE_ROOT_CA_CERT_PATH=~/azure-iot-test-only.root.ca.cert.pemNotice how the connection string uses the name of the gateway device and not the name of an IoT hub.
To run the code, use the following command:
python3 simple_thermostat.pyThe output from this command looks like:
Connecting using Connection String HostName=edgegateway;DeviceId=thermostat1;SharedAccessKey={your device shared key}
Listening for command requests and property updates
Press Q to quit
Sending telemetry for temperature
Sent message
Sent message
Sent message
...
Tip
If you see an error when the downstream device tries to connect. Try re-running the device provisioning steps.
To see the telemetry in IoT Central, navigate to the Overview page for the thermostat1 device:
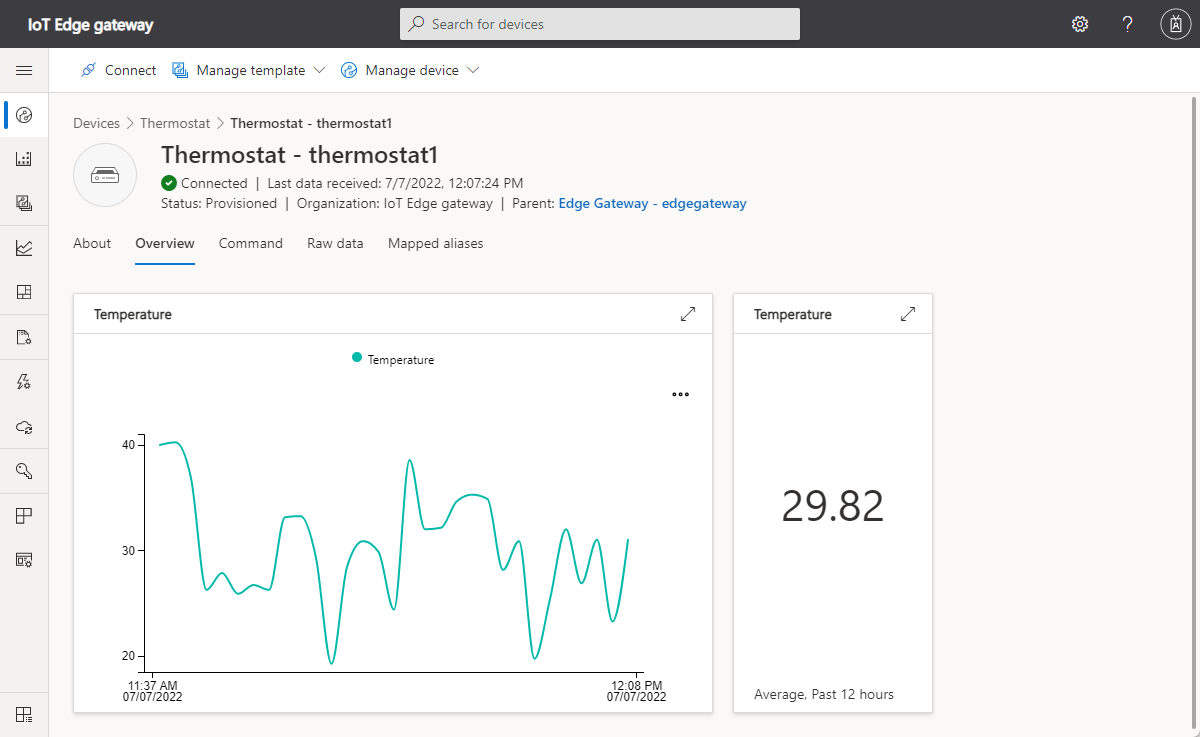
On the About page you can view property values sent from the downstream device, and on the Command page you can call commands on the downstream device.

Feedback
Coming soon: Throughout 2024 we will be phasing out GitHub Issues as the feedback mechanism for content and replacing it with a new feedback system. For more information see: https://aka.ms/ContentUserFeedback.
Submit and view feedback for