Transform data externally for IoT Central
IoT devices send data in various formats. To use the device data with your IoT Central application, you may need to use a transformation to:
- Make the format of the data compatible with your IoT Central application.
- Convert units.
- Compute new metrics.
- Enrich the data from other sources.
This article shows you how to transform device data outside of IoT Central either at ingress or egress.
Note
IoT Central can also transform data internally, to learn more see Map telemetry on ingress to IoT Central and Transform data inside your IoT Central application for export.
The following diagram shows three routes for data that include transformations:
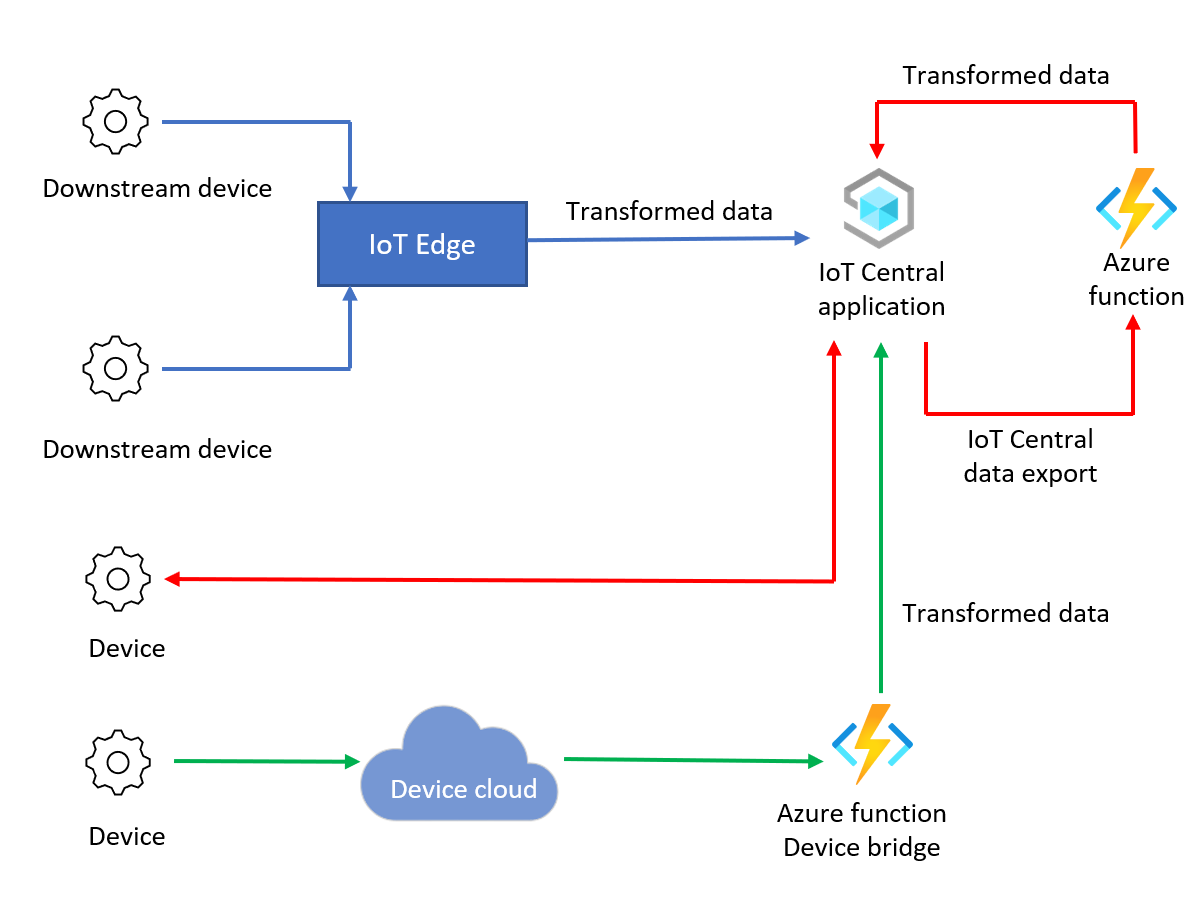
The following table shows three example transformation types:
| Transformation | Description | Example | Notes |
|---|---|---|---|
| Message Format | Convert to or manipulate JSON messages. | CSV to JSON | At ingress. IoT Central only accepts value JSON messages. To learn more, see Telemetry, property, and command payloads. |
| Computations | Math functions that Azure Functions can execute. | Unit conversion from Fahrenheit to Celsius. | Transform using the egress pattern to take advantage of scalable device ingress through direct connection to IoT Central. Transforming the data lets you use IoT Central features such as visualizations and jobs. |
| Message Enrichment | Enrichments from external data sources not found in device properties or telemetry. To learn more about internal enrichments, see Export IoT data to cloud destinations using Blob Storage. | Add weather information to messages using location data from devices. | Transform using the egress pattern to take advantage of scalable device ingress through direct connection to IoT Central. |
Prerequisites
To complete the steps in this how-to guide, you need:
An active Azure subscription. If you don't have an Azure subscription, create a free account before you begin.
An IoT Central application created from the Custom application template. To learn more, see Create an IoT Central application and About your application.
Data transformation at ingress
To transform device data at ingress, there are two options:
IoT Edge: Use an IoT Edge module to transform data from downstream devices before sending the data to your IoT Central application.
IoT Central device bridge: The IoT Central device bridge connects other IoT device clouds, such as Sigfox, Particle, and The Things Network, to IoT Central. The device bridge uses an Azure function to forward the data and you can customize the function to transform the device data.
Use IoT Edge to transform device data
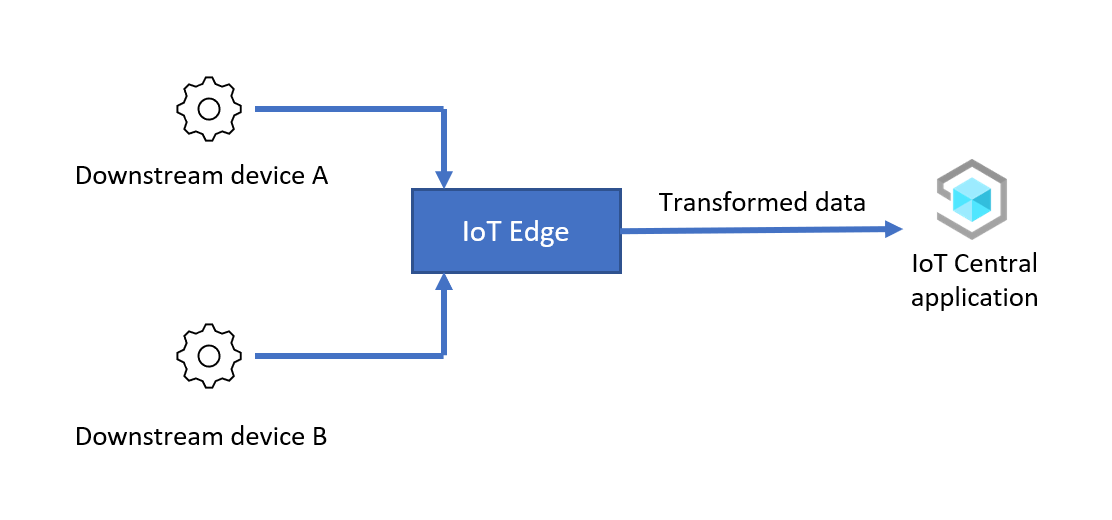
In this scenario, an IoT Edge module transforms the data from downstream devices before forwarding it to your IoT Central application. At a high level, the steps to configure this scenario are:
Set up an IoT Edge device: Install and provision an IoT Edge device as a gateway and connect the gateway to your IoT Central application.
Connect downstream device to the IoT Edge device: Connect downstream devices to the IoT Edge device and provision them to your IoT Central application.
Transform device data in IoT Edge: Create an IoT Edge module to transform the data. Deploy the module to the IoT Edge gateway device that forwards the transformed device data to your IoT Central application.
Verify: Send data from a downstream device to the gateway and verify the transformed device data reaches your IoT Central application.
In the example described in the following sections, the downstream device sends JSON data in the following format to the IoT Edge gateway device:
{
  "device": {
      "deviceId": "<downstream-deviceid>"
  },
  "measurements": {
    "temp": <temperature>,
    "pressure": <pressure>,
    "humidity": <humidity>,
    "scale": "celsius",
  }
}
You use an IoT Edge module to transform the data and convert the temperature value from Celsius to Fahrenheit before sending it to IoT Central:
{
  "device": {
      "deviceId": "<downstream-deviceid>"
  },
  "measurements": {
    "temp": <temperature>,
    "pressure": <pressure>,
    "humidity": <humidity>,
    "scale": "fahrenheit"
  }
}

The following steps show you how to set up and configure this scenario:
Build the custom module
In this scenario, the IoT Edge device runs a custom module that transforms the data from the downstream device. Before you deploy and configure the IoT Edge device, you need to:
- Build the custom module.
- Add the custom module to a container registry.
The IoT Edge runtime downloads custom modules from a container registry such as an Azure container registry or Docker Hub. The Azure Cloud Shell has all the tools you need to create a container registry, build the module, and upload the module to the registry:
To create a container registry:
Open the Azure Cloud Shell and sign in to your Azure subscription.
Select the Bash shell.
Run the following commands to create an Azure container registry:
REGISTRY_NAME="{your unique container registry name}"
az group create --name ingress-scenario --location eastus
az acr create -n $REGISTRY_NAME -g ingress-scenario --sku Standard --admin-enabled true
az acr credential show -n $REGISTRY_NAME
Make a note of the
usernameandpasswordvalues, you use them later. You only need one of the passwords shown in the command output.
To build the custom module in the Azure Cloud Shell:
In the Azure Cloud Shell, clone the GitHub repository that contains the module source code:
git clone https://github.com/iot-for-all/iot-central-transform-with-iot-edgeTo build the custom module, run the following commands in the Azure Cloud Shell:
cd iot-central-transform-with-iot-edge/custommodule/transformmodule
az acr build --registry $REGISTRY_NAME --image transformmodule:0.0.1-amd64 -f Dockerfile.amd64 .
The previous commands may take several minutes to run.
Set up an IoT Edge device
This scenario uses an IoT Edge gateway device to transform the data from any downstream devices. This section describes how to create IoT Central device template for the gateway device in your IoT Central application. IoT Edge devices use a deployment manifest to configure their modules.
In this example, the downstream device doesn't need a device template. The downstream device is registered in IoT Central so you can generate the credentials it needs to connect the IoT Edge device. Because the IoT Edge module transforms the data, all the downstream device telemetry arrives in IoT Central as if the IoT Edge device has sent it.
To create a device template for the IoT Edge gateway device:
Save a copy of the deployment manifest to your local development machine: moduledeployment.json.
Open your local copy of the moduledeployment.json manifest file in a text editor.
Find the
registryCredentialssection and replace the placeholders with the values you made a note of when you created the Azure container registry. Theaddressvalue looks like{your username}.azurecr.io.Find the
settingssection for thetransformmodule. Replace{your username}with the same value you used in the previous step. Save the changes.In your IoT Central application, navigate to the Edge manifests page.
Select + New. Enter a name such as Transformer for your deployment manifest, and then upload the moduledeployment.json file you downloaded previously. The deployment manifest includes a custom module called transformmodule.
Select Next and then Create.
In your IoT Central application, navigate to the Device templates page.
Select + New, select Azure IoT Edge, and then select Next: Customize.
Enter IoT Edge gateway device as the device template name. Select This is a gateway device.
Select Next: Review, then select Create.
On the Create a model page, select Custom model.
In the model, select Modules and then Import modules from manifest. Select the Transformer deployment manifest and then select Import.
The deployment manifest doesn't specify the telemetry the module sends. To add the telemetry definitions to the device template:
Select Module transformmodule in the Modules section of the IoT Edge gateway device template.
Select Add capability and use the information in the following tables to add a new telemetry type:
Setting Value Display name Device Name device Capability type Telemetry Semantic type None Schema Object Object definition:
Display name Name Schema Device ID deviceId String Save your changes.
Select Add capability and use the information in the following tables to add a new telemetry type:
Setting Value Display name Measurements Name measurements Capability type Telemetry Semantic type None Schema Object Object definition:
Display name Name Schema Temperature temperature Double Pressure pressure Double Humidity humidity Double Scale scale String Save your changes.
In the model, select Relationships. Don't select Relationships in the transformmodule module.
Select Add relationship.
Enter Downstream Sensor as the display name, sensor as the name, and select Any as the target. Select Save.
Select Publish to publish the device template.
To register a gateway device in IoT Central:
In your IoT Central application, navigate to the Devices page.
Select IoT Edge gateway device and select + New. Enter IoT Edge gateway device as the device name, enter gateway-01 as the device ID, make sure IoT Edge gateway device is selected as the device template and No is selected as Simulate this device?. Select Transformer as the edge manifest. Select Create.
In the list of devices, click on the IoT Edge gateway device, and then select Connect.
Make a note of the ID scope, Device ID, and Primary key values for the IoT Edge gateway device. You use them later.
To register a downstream device in IoT Central:
In your IoT Central application, navigate to the Devices page.
Don't select a device template. Select + New. Enter Downstream 01 as the device name, enter downstream-01 as the device ID, make sure that the device template is Unassigned and No is selected as Simulate this device?. Select Create.
In the list of devices, click on the Downstream 01 device, then select Manage device > Attach to gateway.
In the Attach to a gateway dialog, select the IoT Edge gateway device device template, and the IoT Edge gateway device device instance. Select Attach.
On the Downstream 01 device, select Connect.
Make a note of the ID scope, Device ID, and Primary key values for the Downstream 01 device. You use them later.
Deploy the gateway and downstream devices
For convenience, this article uses Azure virtual machines to run the gateway and downstream devices. To create the two Azure virtual machines, select the Deploy to Azure button shown after the following table. Use the information in the table to complete the Custom deployment form:
| Field | Value |
|---|---|
| Resource group | ingress-scenario |
| DNS Label Prefix Gateway | A unique DNS name for this machine such as <your name>edgegateway |
| DNS Label Prefix Downstream | A unique DNS name for this machine such as <your name>downstream |
| Scope ID | The ID scope you made a note of previously |
| Device ID IoT Edge Gateway | gateway-01 |
| Device Key IoT Edge Gateway | The primary key value you made a note of previously |
| Authentication Type | Password |
| Admin Password Or Key | Your choice of password for the AzureUser account on both virtual machines. |
Select Review + Create, and then Create. It takes a couple of minutes to create the virtual machines in the ingress-scenario resource group.
To check that the IoT Edge gateway device is running correctly:
Open your IoT Central application. Then navigate to the IoT Edge Gateway device on the list of devices on the Devices page.
Select the Modules tab and check the status of the three modules. It takes a few minutes for the IoT Edge runtime to start up in the virtual machine. When the virtual machine is running, the status of the three modules is Running. If the IoT Edge runtime doesn't start, see Troubleshoot your IoT Edge device.
For your IoT Edge device to function as a gateway, it needs some certificates to prove its identity to any downstream devices. This article uses demo certificates. In a production environment, use certificates from your certificate authority.
To generate the demo certificates and install them on your gateway device:
Use SSH to connect to and sign in on your gateway device virtual machine. You can find the DNS name for this virtual machine in the Azure portal. Navigate to the edgegateway virtual machine in the ingress-scenario resource group.
Tip
You may need to open the port 22 for SSH access on both your virtual machines before you can use SSH to connect from your local machine or the Azure Cloud Shell.
Run the following commands to clone the IoT Edge repository and generate your demo certificates:
# Clone the repo
cd ~
git clone https://github.com/Azure/iotedge.git

# Generate the demo certificates
mkdir certs
cd certs
cp ~/iotedge/tools/CACertificates/*.cnf .
cp ~/iotedge/tools/CACertificates/certGen.sh .
./certGen.sh create_root_and_intermediate
./certGen.sh create_edge_device_ca_certificate "mycacert"
After you run the previous commands, the following files are ready to use in the next steps:
- ~/certs/certs/azure-iot-test-only.root.ca.cert.pem - The root CA certificate used to make all the other demo certificates for testing an IoT Edge scenario.
- ~/certs/certs/iot-edge-device-mycacert-full-chain.cert.pem - A device CA certificate that's referenced from the config.yaml file. In a gateway scenario, this CA certificate is how the IoT Edge device verifies its identity to downstream devices.
- ~/certs/private/iot-edge-device-mycacert.key.pem - The private key associated with the device CA certificate.
To learn more about these demo certificates, see Create demo certificates to test IoT Edge device features.
Open the config.toml file in a text editor. For example:
sudo nano /etc/aziot/config.tomlUncomment and modify the certificate settings as follows:
trust_bundle_cert = "file:///home/AzureUser/certs/certs/azure-iot-test-only.root.ca.cert.pem"

...

[edge_ca]
cert = "file:///home/AzureUser/certs/certs/iot-edge-device-ca-mycacert-full-chain.cert.pem"
pk = "file:///home/AzureUser/certs/private/iot-edge-device-ca-mycacert.key.pem"
The previous example assumes you're signed in as AzureUser and created a device CA certificated called "mycacert".
Save the changes and run the following command to verify that the config.toml file is correct:
sudo iotedge checkRestart the IoT Edge runtime:
sudo iotedge config apply
If the IoT Edge runtime starts successfully after your changes, the status of the $edgeAgent and $edgeHub modules changes to Running. You can see these status values on the Modules page for your gateway device in IoT Central.
If the runtime doesn't start, check the changes you made in config.toml and see Troubleshoot your IoT Edge device.
Connect downstream device to IoT Edge device
To connect a downstream device to the IoT Edge gateway device:
Use SSH to connect to and sign in on your downstream device virtual machine. You can find the DNS name for this virtual machine in the Azure portal. Navigate to the leafdevice virtual machine in the ingress-scenario resource group.
Tip
You may need to open the port 22 for SSH access on both your virtual machines before you can use SSH to connect from your local machine or the Azure Cloud Shell.
To clone the GitHub repository with the source code for the sample downstream device, run the following command:
cd ~
git clone https://github.com/iot-for-all/iot-central-transform-with-iot-edge
To copy the required certificate from the gateway device, run the following
scpcommands. Thisscpcommand uses the hostnameedgegatewayto identify the gateway virtual machine. You're prompted for your password:cd ~/iot-central-transform-with-iot-edge scp AzureUser@edgegateway:/home/AzureUser/certs/certs/azure-iot-test-only.root.ca.cert.pem leafdevice/certsNavigate to the leafdevice folder and install the required packages. Then run the
buildandstartscripts to provision and connect the device to the gateway:cd ~/iot-central-transform-with-iot-edge/leafdevice sudo apt update curl -fsSL https://deb.nodesource.com/setup_14.x | sudo -E bash - sudo apt-get install nodejs npm install npm run-script build npm run-script startDuring
sudo apt-get install nodejscommands, you could be asked to allow installations: pressYif prompted.Enter the device ID, scope ID, and SAS key for the downstream device you created previously. For the hostname, enter
edgegateway. The output from the command looks like:Registering device downstream-01 with scope 0ne00284FD9 Registered device downstream-01. Connecting device downstream-01 Connected device downstream-01 Sent telemetry for device downstream-01 Sent telemetry for device downstream-01 Sent telemetry for device downstream-01 Sent telemetry for device downstream-01 Sent telemetry for device downstream-01 Sent telemetry for device downstream-01
For simplicity, the code for the downstream device provisions the device in IoT Central. Typically, downstream devices connect through a gateway because they can't connect to the internet and so can't connect to the Device Provisioning Service endpoint. To learn more, see How to connect devices through an IoT Edge transparent gateway.
Verify
To verify the scenario is running, navigate to your IoT Edge gateway device in IoT Central:

Select Modules. Verify that the three IoT Edge modules $edgeAgent, $edgeHub and transformmodule are running.
Select Raw data. The telemetry data in the Device column looks like:
{"deviceId":"downstream-01"}The telemetry data in the Measurements column looks like:
{"temperature":85.21208,"pressure":59.97321,"humidity":77.718124,"scale":"farenheit"}
The temperature is sent in Fahrenheit. Because the IoT Edge device is transforming the data from the downstream device, the telemetry is associated with the gateway device in IoT Central. To visualize the transformed telemetry, create a view in the IoT Edge gateway device template and republish it.
Data transformation at egress
You can connect your devices to IoT Central, export the device data to a compute engine to transforms it, and then send the transformed data back to IoT Central for device management and analysis. For example:
- Your devices send location data to IoT Central.
- IoT Central exports the data to a compute engine that enhances the location data with weather information.
- The compute engine sends the enhanced data back to IoT Central.
You can use the IoT Central device bridge as compute engine to transform data exported from IoT Central.
An advantage of transforming data at egress is that your devices connect directly to IoT Central, which makes it easy to send commands to devices or update device properties. However, with this method, you may use more messages than your monthly allotment and increase the cost of using Azure IoT Central.
Use the IoT Central device bridge to transform device data

In this scenario, a compute engine transforms device data exported from IoT Central before sending it back to your IoT Central application. At a high level, the steps to configure this scenario are:
Set up the compute engine: Create an IoT Central device bridge to act as a compute engine for data transformation.
Transform device data in the device bridge: Transform data in the device bridge by modifying the device bridge function code for your data transformation use case.
Enable data flow from IoT Central to the device bridge: Export the data from IoT Central to device bridge for transformation. Then, forward the transformed data back to IoT Central. When you create the data export, use message property filters to only export untransformed data.
Verify: Connect your device to the IoT Central app and check for both raw device data and transformed data in IoT Central.
In the example described in the following sections, the device sends CSV data in the following format to the IoT Edge gateway device:
"<temperature in degrees C>, <humidity>, <latitude>, <longitude>"
You use the device bridge to transform the device data by:
- Changing the unit of temperature from centigrade to fahrenheit.
- Enriching the device data with weather data pulled from the Open Weather service for the latitude and longitude values.
The device bridge then sends the transformed data to IoT Central in the following format:
{
  "temp": <temperature in degrees F>,
  "humidity": <humidity>,
  "lat": <latitude>,
  "lon": <logitude>,
  "weather": {
    "weather_temp": <temperature at lat/lon>,
    "weather_humidity": <humidity at lat/lon>,
    "weather_pressure": <pressure at lat/lon>,
    "weather_windspeed": <wind speed at lat/lon>,
    "weather_clouds": <cloud cover at lat/lon>,
    "weather_uvi": <UVI at lat/lon>
  }
}
The following steps show you how to set up and configure this scenario:
Retrieve your IoT Central connection settings
Before you set up this scenario, you need to get some connection settings from your IoT Central application:
Sign in to your IoT Central application.
Navigate to Permissions > Device connection groups.
Make a note of the ID scope. You use this value later.
Select the SaS-IoT-Devices enrollment group. Make a note of the shared access signature primary key. You use this value later.
Set up a compute engine
This scenario uses the same Azure Functions deployment as the IoT Central device bridge. To deploy the device bridge, select the Deploy to Azure button shown after the following table. Use the information in the table to complete the Custom deployment form:
| Field | Value |
|---|---|
| Resource group | Create a new resource group called egress-scenario |
| Region | Select the region closest to you. |
| Scope ID | Use the ID scope you made a note of previously. |
| IoT Central SAS Key | Use the shared access signature primary key for the SaS-IoT-Devices enrollment group. You made a note of this value previously. |
 .
.
Select Review + Create, and then Create. It takes a couple of minutes to create the Azure function and related resources in the egress-scenario resource group.
Transform device data in the device bridge
To configure the device bridge to transform the exported device data:
Obtain an application API key from the Open Weather service. An account is free with limited usage of the service. To create an application API key, create an account in the Open Weather service portal and follow the instructions. You use your Open Weather API key later.
In the Azure portal, navigate to Function App in the egress-scenario resource group.
In the left navigation, in Development Tools, select App Service Editor (Preview).
Select Go → to open the App Service Editor page. Make the following changes:
Open the wwwroot/IoTCIntegration/index.js file. Replace all the code in this file with the code in index.js.
In the new index.js, update the
openWeatherAppIdvariable file with Open Weather API key you obtained previously.const openWeatherAppId = '<Your Open Weather API Key>'Add a message property to the data sent by the function to IoT Central. IoT Central uses this property to prevent exporting the transformed data. To make this change, open the wwwroot/IoTCIntegration/lib/engine.js file. Locate the following code:
if (timestamp) {
  message.properties.add('iothub-creation-time-utc', timestamp);
}
Add the following code just after the code in the previous snippet:
// add a message property that we can look for in data export to not re-compute computed telemetry
message.properties.add('computed', true);
For reference, you can view a completed example of the engine.js file.
In the App Service Editor, select Console in the left navigation. Run the following commands to install the required packages:
cd IoTCIntegration
npm install
This command may take a few minutes to run.
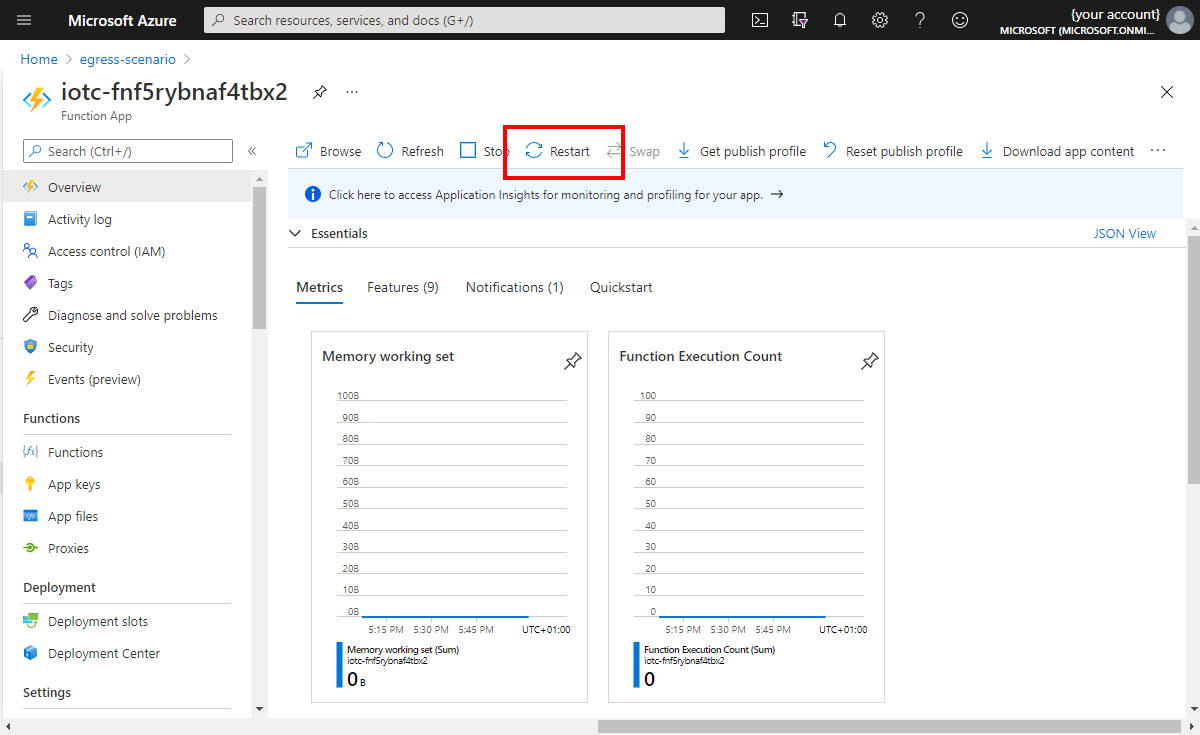
Return to the Azure Function Overview page and restart the function:
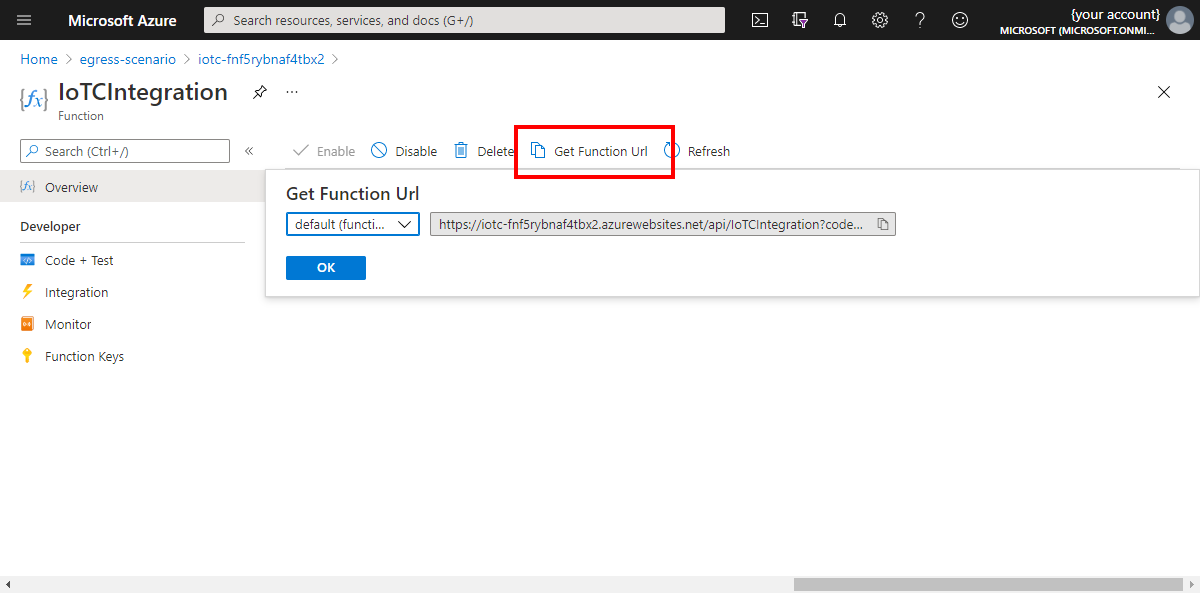
Select Functions in the left navigation. Then select IoTCIntegration. Select Code + Test.
Make a note of the function URL, you need this value later:
Enable data flow from IoT Central to the device bridge
This section describes how to set up the Azure IoT Central application.
First, save the device model file to your local machine.
To add a device template to your IoT Central application, navigate to your IoT Central application and then:
Sign in to your IoT Central application and navigate to the Device templates page.
Select + New, select IoT Device, select Next: Customize, enter Compute model as the template name. Select Next: Review. Then select Create.
Select Import a model and browse to the model.json file you downloaded previously.
After the model is imported, select Publish to publish the Compute model device template.
Set up the data export to send data to your Device bridge:
In your IoT Central application, select Data export.
Select + New destination to create a destination to use with the device bridge. Call the destination Compute function, for Destination type select Webhook. For the Callback URL, select paste in the function URL you made a note of previously. Leave the Authorization as No Auth.
Save the changes.
Select the + New export and create a data export called Compute export.
Add a filter to only export device data for the device template you're using. Select + Filter, select item Device template, select the operator Equals, and select the Compute model device template you created.
Add a message filter to differentiate between transformed and untransformed data. This filter prevents sending transformed values back to the device bridge. Select + Message property filter and enter the name value computed, then select the operator Does not exist. The string
computedis used as a keyword in the device bridge example code.For the destination, select the Compute function destination you created previously.
Save the changes. After a minute or so, the Export status shows as Healthy.
Verify
The sample device you use to test the scenario is written in Node.js. Make sure you have Node.js and npm installed on your local machine. If you don't want to install these prerequisites, use the Azure Cloud Shell where they are preinstalled.
To run a sample device that tests the scenario:
Clone the GitHub repository that contains the sample code, run the following command:
git clone https://github.com/Azure/iot-central-computeTo connect the sample device to your IoT Central application, edit the connection settings in the iot-central-compute/device/device.js file. Replace the scope ID and group SAS key with the values you made a note of previously:
// These values need to be filled in from your Azure IoT Central application
//
const scopeId = "<IoT Central Scope Id value>";
const groupSasKey = "<IoT Central Group SAS key>";
//
Save the changes.
Use the following commands to install the required packages and run the device:
cd ~/iot-central-compute/device
npm install
node device.js
The result of this command looks like the following output:
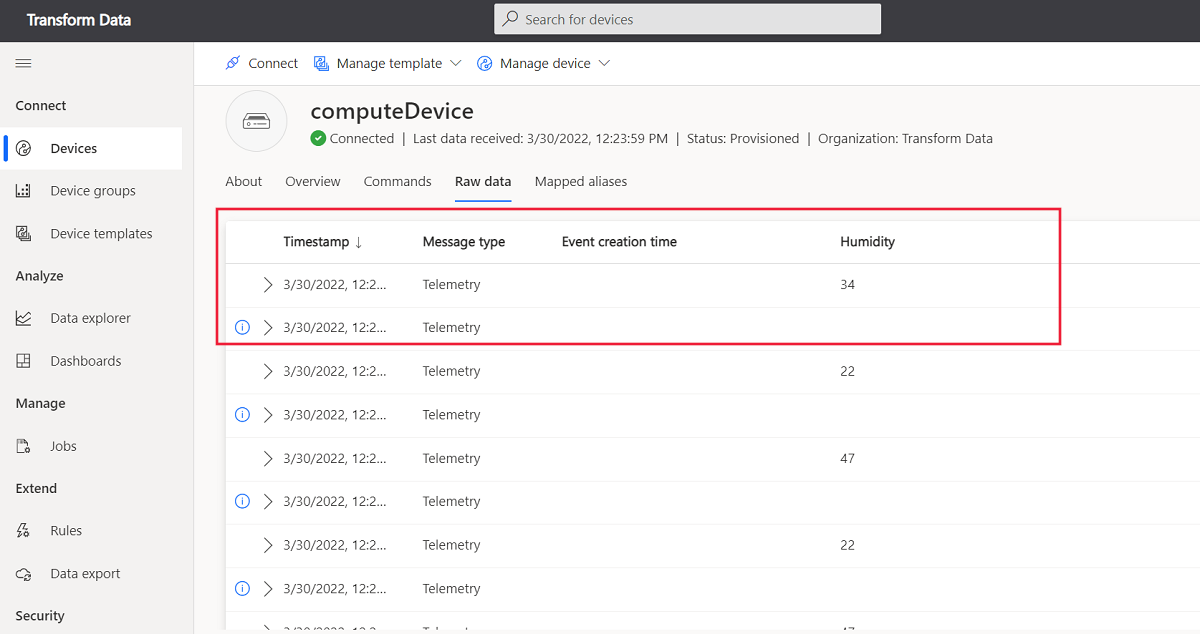
registration succeeded
assigned hub=iotc-2bd611b0....azure-devices.net
deviceId=computeDevice
Client connected
send status: MessageEnqueued [{"data":"33.23, 69.09, 30.7213, -61.1192"}]
send status: MessageEnqueued [{"data":"2.43, 75.86, -2.6358, 162.935"}]
send status: MessageEnqueued [{"data":"6.19, 76.55, -14.3538, -82.314"}]
send status: MessageEnqueued [{"data":"33.26, 48.01, 71.9172, 48.6606"}]
send status: MessageEnqueued [{"data":"40.5, 36.41, 14.6043, 14.079"}]
In your IoT Central application, navigate to the device called computeDevice. On the Raw data view, there are two different telemetry streams that show up around every five seconds. The stream with unmodeled data is the original telemetry, the stream with modeled data is the data that the function transformed:
Clean up resources
If you no longer need the Azure resources you created while following the steps in this guide, delete the resource groups in the Azure portal.
The two resource groups you used in this guide are ingress-scenario and egress-scenario.
Next steps
In this article, you learned about the different options for transforming device data for IoT Central, both at ingress and egress. The article included walkthroughs for two specific scenarios:
- Use an IoT Edge module to transform data from downstream devices before the data is sent to your IoT Central application.
- Use Azure Functions to transform data outside of IoT Central. In this scenario, IoT Central uses a data export to send incoming data to an Azure function to be transformed. The function sends the transformed data back to your IoT Central application.
Now that you've learned how to transform device data outside of your Azure IoT Central application, you can learn How to use data explorer to analyze device data in IoT Central.
Feedback
Coming soon: Throughout 2024 we will be phasing out GitHub Issues as the feedback mechanism for content and replacing it with a new feedback system. For more information see: https://aka.ms/ContentUserFeedback.
Submit and view feedback for