Tutorial: Configure, connect, and verify an IoT Edge module for a GPU
Applies to: ![]() IoT Edge 1.4
IoT Edge 1.4
Important
IoT Edge 1.4 is the supported release. If you are on an earlier release, see Update IoT Edge.
This tutorial shows you how to build a GPU-enabled virtual machine (VM). From the VM, you'll see how to run an IoT Edge device that allocates work from one of its modules to your GPU.
We'll use the Azure portal, the Azure Cloud Shell, and your VM's command line to:
- Build a GPU-capable VM
- Install the NVIDIA driver extension on the VM
- Configure a module on an IoT Edge device to allocate work to a GPU
Prerequisites
Azure account - create a free account
Azure IoT Hub - create an IoT Hub
Azure IoT Edge device
If you don't already have an IoT Edge device and need to quickly create one, run the following command. Use the Azure Cloud Shell located in the Azure portal. Create a new device name for
<DEVICE-NAME>and replace the IoT<IOT-HUB-NAME>with your own.az iot hub device-identity create --device-id <YOUR-DEVICE-NAME> --edge-enabled --hub-name <YOUR-IOT-HUB-NAME>For more information on creating an IoT Edge device, see Quickstart: Deploy your first IoT Edge module to a virtual Linux device. Later in this tutorial, we'll add an NVIDIA module to our IoT Edge device.
Create a GPU-optimized virtual machine
To create a GPU-optimized virtual machine (VM), choosing the right size is important. Not all VM sizes will accommodate GPU processing. In addition, there are different VM sizes for different workloads. For more information, see GPU optimized virtual machine sizes or try the Virtual machines selector.
Let's create an IoT Edge VM with the Azure Resource Manager (ARM) template in GitHub, then configure it to be GPU-optimized.
Go to the IoT Edge VM deployment template in GitHub: Azure/iotedge-vm-deploy.
Select the Deploy to Azure button, which initiates the creation of a custom VM for you in the Azure portal.

Fill out the Custom deployment fields with your Azure credentials and resources:
Property Description or sample value Subscription Choose your Azure account subscription. Resource group Add your Azure resource group. Region East US
GPU VMs aren't available in all regions.Dns Label Prefix Create a name for your VM. Admin Username adminUser
Alternatively, create your own user name.Device Connection String Copy your connection string from your IoT Edge device, then paste here. VM size Standard_NV6Authentication type Choose either password or SSH Public Key, then create a password or key pair name if needed. Tip
Check which GPU VMs are supported in each region: Products available by region.
To check which region your Azure subscription allows, try this Azure command from the Azure portal. The
NinStandard_Nmeans it's a GPU-enabled VM.az vm list-skus --location <YOUR-REGION> --size Standard_N --all --output tableSelect the Review + create button at the bottom, then the Create button. Deployment can take up one minute to complete.
Install the NVIDIA extension
Now that we have a GPU-optimized VM, let's install the NVIDIA extension on the VM using the Azure portal.
Open your VM in the Azure portal and select Extensions + applications from the left menu.
Select Add and choose the NVIDIA GPU Driver Extension from the list, then select Next.
Choose Review + create, then Create. The deployment can take up to 30 minutes to complete.
To confirm the installation in the Azure portal, return to Extensions + applications menu in your VM. The new extension named
NvidiaGpuDriverLinuxshould be in your extensions list and show Provisioning succeeded under Status.To confirm the installation using Azure Cloud Shell, run this command to list your extensions. Replace the
<>placeholders with your values:az vm extension list --resource-group <YOUR-RESOURCE-GROUP> --vm-name <YOUR-VM-NAME> -o tableWith an NVIDIA module, we'll use the NVIDIA System Management Interface program, also known as
nvidia-smi.From your device, install the
nvidia-smipackage based on your version of Ubuntu. For this tutorial, we'll installnvidia-utils-515for Ubuntu 20.04. SelectYwhen prompted in the installation.sudo apt install nvidia-utils-515Here's a list of all
nvidia-smiversions. If you runnvidia-smiwithout installing it first, this list will print in your console.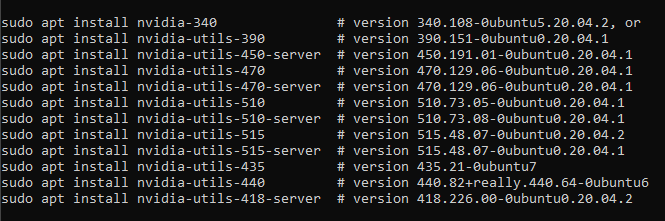
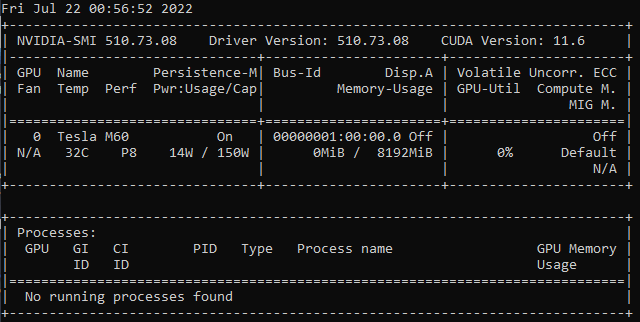
After installation, run this command to confirm it's installed:
nvidia-smiA confirmation table will appear, similar to this table.
Note
The NVIDIA extension is a simplified way to install the NVIDIA drivers, but you may need more customization. For more information about custom installations on N-series VMs, see Install NVIDIA GPU drivers on N-series VMs running Linux.
Enable a module with GPU acceleration
There are different ways to enable an IoT Edge module so that it uses a GPU for processing. One way is to configure an existing IoT Edge module on your device to become GPU-accelerated. Another way is to use a prefabricated container module, for example, a module from NVIDIA DIGITS that's already GPU-optimized. Let's see how both ways are done.
Enable GPU in an existing module using DeviceRequests
If you have an existing module on your IoT Edge device, adding a configuration using DeviceRequests in createOptions of the deployment manifest makes the module GPU-optimized. Follow these steps to configure an existing module.
Go to your IoT Hub in the Azure portal and choose Devices under the Device management menu.
Select your IoT Edge device to open it.
Select the Set modules tab at the top.
Select the module you want to enable for GPU use in the IoT Edge Modules list.
A side panel opens, choose the Container Create Options tab.
Copy this
HostConfigJSON string and paste into the Create options box.{ "HostConfig": { "DeviceRequests": [ { "Count": -1, "Capabilities": [ [ "gpu" ] ] } ] } }Select Update.
Select Review + create. The new
HostConfigobject is now visible in thesettingsof your module.Select Create.
To confirm the new configuration works, run this command in your VM:
sudo docker inspect <YOUR-MODULE-NAME>You should see the parameters you specified for
DeviceRequestsin the JSON printout in the console.
Note
To understand the DeviceRequests parameter better, view the source code: moby/host_config.go
Enable a GPU in a prefabricated NVIDIA module
Let's add an NVIDIA DIGITS module to the IoT Edge device and then allocate a GPU to the module by setting its environment variables. This NVIDIA module is already in a Docker container.
Select your IoT Edge device in the Azure portal from your IoT Hub's Devices menu.
Select the Set modules tab at the top.
Select + Add under the IoT Edge modules heading and choose IoT Edge Module.
Provide a name in the IoT Edge Module Name field.
Under the Module Settings tab, add
nvidia/digits:6.0to the Image URI field.Select the Environment Variables tab.
Add the environment variable name
NVIDIA_VISIBLE_DEVICESwith the value0. This variable controls which GPUs are visible to the containerized application running on the edge device. TheNVIDIA_VISIBLE_DEVICESenvironment variable can be set to a comma-separated list of device IDs, which correspond to the physical GPUs in the system. For example, if there are two GPUs in the system with device IDs 0 and 1, the variable can be set to "NVIDIA_VISIBLE_DEVICES=0,1" to make both GPUs visible to the container. In this article, since the VM only has one GPU, we will use the first (and only) one.Name Type Value NVIDIA_VISIBLE_DEVICES Text 0 Select Add.
Select Review + create. Your deployment manifest properties will appear.
Select Create to create the module.
Select Refresh to update your module list. The module will take a couple of minutes to show running in the Runtime status, so keep refreshing the device.
From your device, run this command to confirm your new NVIDIA module exists and is running.
iotedge listYou should see your NVIDIA module in a list of modules on your IoT Edge device with a status of
running.
Note
For more information on the NVIDIA DIGITS container module, see the Deep Learning Digits Documentation.
Clean up resources
If you want to continue with other IoT Edge tutorials, you can use the device that you created for this tutorial. Otherwise, you can delete the Azure resources that you created to avoid charges.
If you created your virtual machine and IoT hub in a new resource group, you can delete that group, which will delete all the associated resources. Double check the contents of the resource group to make sure that there's nothing you want to keep. If you don't want to delete the whole group, you can delete individual resources (virtual machine, device, or GPU-module) instead.
Important
Deleting a resource group is irreversible.
Use the following command to remove your Azure resource group. It might take a few minutes to delete a resource group.
az group delete --name <YOUR-RESOURCE-GROUP> --yes
You can confirm the resource group is removed by viewing the list of resource groups.
az group list
Next steps
This article helped you set up your virtual machine and IoT Edge device to be GPU-accelerated. To run an application with a similar setup, try the learning path for NVIDIA DeepStream development with Microsoft Azure. The Learn tutorial shows you how to develop optimized Intelligent Video Applications that can consume multiple video, image, and audio sources.
Feedback
Coming soon: Throughout 2024 we will be phasing out GitHub Issues as the feedback mechanism for content and replacing it with a new feedback system. For more information see: https://aka.ms/ContentUserFeedback.
Submit and view feedback for