Connect Azure IoT Edge devices to create a hierarchy
Applies to: ![]() IoT Edge 1.4
IoT Edge 1.4
Important
IoT Edge 1.4 is the supported release. If you are on an earlier release, see Update IoT Edge.
This article provides steps for establishing a trusted connection between an IoT Edge gateway and a downstream IoT Edge device. This configuration is also known as nested edge.
In a gateway scenario, an IoT Edge device can be both a gateway and a downstream device. Multiple IoT Edge gateways can be layered to create a hierarchy of devices. The downstream (child) devices can authenticate and send or receive messages through their gateway (parent) device.
There are two different configurations for IoT Edge devices in a gateway hierarchy, and this article address both. The first is the top layer IoT Edge device. When multiple IoT Edge devices are connecting through each other, any device that doesn't have a parent device but connects directly to IoT Hub is considered to be in the top layer. This device is responsible for handling requests from all the devices below it. The other configuration applies to any IoT Edge device in a lower layer of the hierarchy. These devices might be a gateway for other downstream IoT and IoT Edge devices, but also need to route any communications through their own parent devices.
Some network architectures require that only the top IoT Edge device in a hierarchy can connect to the cloud. In this configuration, all IoT Edge devices in lower layers of a hierarchy can only communicate with their gateway (parent) device and any downstream (child) devices.
All the steps in this article build on Configure an IoT Edge device to act as a transparent gateway, which sets up an IoT Edge device to be a gateway for downstream IoT devices. The same basic steps apply to all gateway scenarios:
- Authentication: Create IoT Hub identities for all devices in the gateway hierarchy.
- Authorization: Set up the parent/child relationship in IoT Hub to authorize downstream devices to connect to their parent device like they would connect to IoT Hub.
- Gateway discovery: Ensure that the downstream device can find its parent device on the local network.
- Secure connection: Establish a secure connection with trusted certificates that are part of the same chain.
Prerequisites
- A free or standard IoT hub.
- At least two IoT Edge devices, one to be the top layer device and one or more lower layer devices. If you don't have IoT Edge devices available, you can Run Azure IoT Edge on Ubuntu virtual machines.
- If you use the Azure CLI to create and manage devices, install the Azure IoT extension.
Tip
This article provides detailed steps and options to help you create the right gateway hierarchy for your scenario. For a guided tutorial, see Create a hierarchy of IoT Edge devices using gateways.
Create a gateway hierarchy
You create an IoT Edge gateway hierarchy by defining parent/child relationships for the IoT Edge devices in the scenario. You can set a parent device when you create a new device identity, or you can manage the parent and children of an existing device identity.
The step of setting up parent/child relationships authorizes downstream devices to connect to their parent device like they would connect to IoT Hub.
Only IoT Edge devices can be parent devices, but both IoT Edge devices and IoT devices can be children. A parent can have many children, but a child can only have one parent. A gateway hierarchy is created by chaining parent/child sets together so that the child of one device is the parent of another.
By default, a parent can have up to 100 children. You can change this limit by setting the MaxConnectedClients environment variable in the parent device's edgeHub module.
In the Azure portal, you can manage the parent/child relationship when you create new device identities, or by editing existing devices.
When you create a new IoT Edge device, you have the option of choosing parent and children devices from the list of existing IoT Edge devices in that hub.
- In the Azure portal, navigate to your IoT hub.
- Select Devices under the Device management menu.
- Select Add device then check the IoT Edge Device checkbox.
- Along with setting the device ID and authentication settings, you can Set a parent device or Choose child devices.
- Choose the device or devices that you want as a parent or child.
You can also create or manage parent/child relationships for existing devices.
- In the Azure portal, navigate to your IoT hub.
- Select Devices in the Device management menu.
- Select the IoT Edge device you want to manage from the list.
- Select the Set a parent device gear icon or Manage child devices.
- Add or remove any parent or child devices.
Note
If you wish to establish parent-child relationships programmatically, you can use the C#, Java, or Node.js IoT Hub Service SDK.
Here is an example of assigning child devices using the C# SDK. The task RegistryManager_AddAndRemoveDeviceWithScope() shows how to programmatically create a three-layer hierarchy. An IoT Edge device is in layer one, as the parent. Another IoT Edge device is in layer two, serving as both a child and a parent. Finally, an IoT device is in layer three, as the lowest layer child device.
Generate certificates
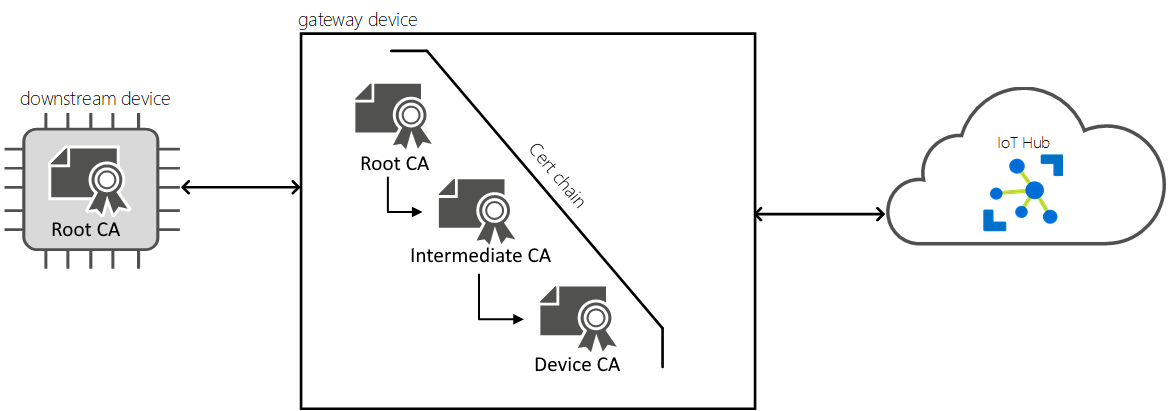
A consistent chain of certificates must be installed across devices in the same gateway hierarchy to establish a secure communication between themselves. Every device in the hierarchy, whether an IoT Edge device or an IoT downstream device, needs a copy of the same root CA certificate. Each IoT Edge device in the hierarchy then uses that root CA certificate as the root for its device CA certificate.
With this setup, each downstream IoT Edge device can verify the identity of their parent by verifying that the edgeHub they connect to has a server certificate that is signed by the shared root CA certificate.
For more information about IoT Edge certificate requirements, see Understand how Azure IoT Edge uses certificates.
Create or request the following certificates:
- A root CA certificate, which is the topmost shared certificate for all the devices in a given gateway hierarchy. This certificate is installed on all devices.
- Any intermediate certificates that you want to include in the root certificate chain.
- A device CA certificate and its private key, generated by the root and intermediate certificates. You need one unique device CA certificate for each IoT Edge device in the gateway hierarchy.
You can use either a self-signed certificate authority or purchase one from a trusted commercial certificate authority like Baltimore, Verisign, Digicert, or GlobalSign.
If you don't have your own certificates to use for test, create one set of root and intermediate certificates, then create IoT Edge device CA certificates for each device. In this article, we'll use test certificates generated using test CA certificates for samples and tutorials. For example, the following commands create a root CA certificate, a parent device certificate, and a child device certificate.
# !!! For test only - do not use in production !!!

# Create the the root CA test certificate
./certGen.sh create_root_and_intermediate

# Create the parent (gateway) device test certificate
# signed by the shared root CA certificate
./certGen.sh create_edge_device_ca_certificate "gateway"

# Create the downstream device test certificate
# signed by the shared root CA certificate
./certGen.sh create_edge_device_ca_certificate "downstream"
Warning
Don't use certificates created by the test scripts for production. They contain hard-coded passwords and expire by default after 30 days. The test CA certificates are provided for demonstration purposes to help you understand CA Certificates. Use your own security best practices for certification creation and lifetime management in production.
For more information about creating test certificates, see create demo certificates to test IoT Edge device features.
You'll need to transfer the certificates and keys to each device. You can use a USB drive, a service like Azure Key Vault, or with a function like Secure file copy. Choose one of these methods that best matches your scenario. Copy the files to the preferred directory for certificates and keys. Use
/var/aziot/certsfor certificates and/var/aziot/secretsfor keys.
For more information on installing certificates on a device, see Manage certificates on an IoT Edge device.
Configure parent device
To configure your parent device, open a local or remote command shell.
To enable secure connections, every IoT Edge parent device in a gateway scenario needs to be configured with a unique device CA certificate and a copy of the root CA certificate shared by all devices in the gateway hierarchy.
Check your certificates meet the format requirements.
Transfer the root CA certificate, parent device CA certificate, and parent private key to the parent device.
Copy the certificates and keys to the correct directories. The preferred directories for device certificates are
/var/aziot/certsfor the certificates and/var/aziot/secretsfor keys.### Copy device certificate ### # If the device certificate and keys directories don't exist, create, set ownership, and set permissions sudo mkdir -p /var/aziot/certs sudo chown aziotcs:aziotcs /var/aziot/certs sudo chmod 755 /var/aziot/certs sudo mkdir -p /var/aziot/secrets sudo chown aziotks:aziotks /var/aziot/secrets sudo chmod 700 /var/aziot/secrets # Copy full-chain device certificate and private key into the correct directory sudo cp iot-edge-device-ca-gateway-full-chain.cert.pem /var/aziot/certs sudo cp iot-edge-device-ca-gateway.key.pem /var/aziot/secrets ### Root certificate ### # Copy root certificate into the /certs directory sudo cp azure-iot-test-only.root.ca.cert.pem /var/aziot/certs # Copy root certificate into the CA certificate directory and add .crt extension. # The root certificate must be in the CA certificate directory to install it in the certificate store. # Use the appropriate copy command for your device OS or if using EFLOW. # For Ubuntu and Debian, use /usr/local/share/ca-certificates/ sudo cp azure-iot-test-only.root.ca.cert.pem /usr/local/share/azure-iot-test-only.root.ca.cert.pem.crt # For EFLOW, use /etc/pki/ca-trust/source/anchors/ sudo cp azure-iot-test-only.root.ca.cert.pem /etc/pki/ca-trust/source/anchors/azure-iot-test-only.root.ca.pem.crtChange the ownership and permissions of the certificates and keys.
# Give aziotcs ownership to certificates
# Read and write for aziotcs, read-only for others
sudo chown -R aziotcs:aziotcs /var/aziot/certs
sudo find /var/aziot/certs -type f -name "*.*" -exec chmod 644 {} \;

# Give aziotks ownership to private keys
# Read and write for aziotks, no permission for others
sudo chown -R aziotks:aziotks /var/aziot/secrets
sudo find /var/aziot/secrets -type f -name "*.*" -exec chmod 600 {} \;

# Verify permissions of directories and files
sudo ls -Rla /var/aziot
The output of list with correct ownership and permission is similar to the following:
azureUser@vm:/var/aziot$ sudo ls -Rla /var/aziot
/var/aziot:
total 16
drwxr-xr-x  4 root    root    4096 Dec 14 00:16 .
drwxr-xr-x 15 root    root    4096 Dec 14 00:15 ..
drwxr-xr-x  2 aziotcs aziotcs 4096 Jan 14 00:31 certs
drwx------  2 aziotks aziotks 4096 Jan 23 17:23 secrets

/var/aziot/certs:
total 20
drwxr-xr-x 2 aziotcs aziotcs 4096 Jan 14 00:31 .
drwxr-xr-x 4 root    root    4096 Dec 14 00:16 ..
-rw-r--r-- 1 aziotcs aziotcs 1984 Jan 14 00:24 azure-iot-test-only.root.ca.cert.pem
-rw-r--r-- 1 aziotcs aziotcs 5887 Jan 14 00:27 iot-edge-device-ca-gateway-full-chain.cert.pem

/var/aziot/secrets:
total 16
drwx------ 2 aziotks aziotks 4096 Jan 23 17:23 .
drwxr-xr-x 4 root    root    4096 Dec 14 00:16 ..
-rw------- 1 aziotks aziotks 3243 Jan 14 00:28 iot-edge-device-ca-gateway.key.pem
Install the root CA certificate on the parent IoT Edge device by updating the certificate store on the device using the platform-specific command.
# Update the certificate store

# For Ubuntu or Debian - use update-ca-certificates
sudo update-ca-certificates
# For EFLOW or RHEL - use update-ca-trust
sudo update-ca-trust
For more information about using
update-ca-trustin EFLOW, see CBL-Mariner SSL CA certificates management.
The command reports one certificate was added to /etc/ssl/certs.
Updating certificates in /etc/ssl/certs...
1 added, 0 removed; done.
Update parent configuration file
You should already have IoT Edge installed on your device. If not, follow the steps to Manually provision a single Linux IoT Edge device.
Verify the
/etc/aziot/config.tomlconfiguration file exists on the parent device.If the config file doesn't exist on your device, use the following command to create it based on the template file:
sudo cp /etc/aziot/config.toml.edge.template /etc/aziot/config.tomlYou can also use the template file as a reference to add configuration parameters in this section.
Open the IoT Edge configuration file using an editor. For example, use the
nanoeditor to open the/etc/aziot/config.tomlfile.sudo nano /etc/aziot/config.tomlFind the hostname parameter or add it to the beginning of the configuration file. Update the value to be the fully qualified domain name (FQDN) or the IP address of the IoT Edge parent device. For example:
hostname = "10.0.0.4"To enable gateway discovery, every IoT Edge gateway (parent) device needs to specify a hostname parameter that its child devices will use to find it on the local network. Every downstream IoT Edge device needs to specify a parent_hostname parameter to identify its parent. In a hierarchical scenario where a single IoT Edge device is both a parent and a child device, it needs both parameters.
The hostname and trust_bundle_cert parameters must be at the beginning of the configuration file before any sections. Adding the parameter before defined sections, ensures it's applied correctly.
Use a hostname shorter than 64 characters, which is the character limit for a server certificate common name.
Be consistent with the hostname pattern across a gateway hierarchy. Use either FQDNs or IP addresses, but not both. FQDN or IP address is required to connect downstream devices.
Set the hostname before the edgeHub container is created. If edgeHub is running, changing the hostname in the configuration file won't take effect until the container is recreated. For more information on how to verify the hostname is applied, see the verify parent configuration section.
Find the Trust bundle cert parameter or add it to the beginning of the configuration file.
Update the
trust_bundle_certparameter with the file URI to the root CA certificate on your device. For example:trust_bundle_cert = "file:///var/aziot/certs/azure-iot-test-only.root.ca.cert.pem"Find or add the Edge CA certificate section in the config file. Update the certificate
certand private keypkparameters with the file URI paths for the full-chain certificate and key files on the parent IoT Edge device. IoT Edge requires the certificate and private key to be in text-based privacy-enhanced mail (PEM) format. For example:[edge_ca] cert = "file:///var/aziot/certs/iot-edge-device-ca-gateway-full-chain.cert.pem" pk = "file:///var/aziot/secrets/iot-edge-device-ca-gateway.key.pem"Verify your IoT Edge device uses the correct version of the IoT Edge agent when it starts. Find the Default Edge Agent section and set the image value for IoT Edge to version 1.4. For example:
[agent.config]
image = "mcr.microsoft.com/azureiotedge-agent:1.4"
The beginning of your parent configuration file should look similar to the following example.
hostname = "10.0.0.4"
trust_bundle_cert = "file:///var/aziot/certs/azure-iot-test-only.root.ca.cert.pem"

[edge_ca]
cert = "file:///var/aziot/certs/iot-edge-device-ca-gateway-full-chain.cert.pem"
pk = "file:///var/aziot/secrets/iot-edge-device-ca-gateway.key.pem"
Save and close the
config.tomlconfiguration file. For example if you're using the nano editor, select Ctrl+O - Write Out, Enter, and Ctrl+X - Exit.If you've used any other certificates for IoT Edge before, delete the files in the following two directories to make sure that your new certificates get applied:
/var/lib/aziot/certd/certs/var/lib/aziot/keyd/keys
Apply your changes.
sudo iotedge config applyCheck for any errors in the configuration.
sudo iotedge check --verboseNote
On a newly provisioned device, you may see an error related to IoT Edge Hub:
× production readiness: Edge Hub's storage directory is persisted on the host filesystem - Error
Could not check current state of edgeHub container
This error is expected on a newly provisioned device because the IoT Edge Hub module isn't running. To resolve the error, in IoT Hub, set the modules for the device and create a deployment. Creating a deployment for the device starts the modules on the device including the IoT Edge Hub module.
Verify parent configuration
The hostname must be a qualified domain name (FQDN) or the IP address of the IoT Edge device because IoT Edge uses this value in the server certificate when downstream devices connect. The values must match or you'll get IP address mismatch error.
To verify the hostname, you need to inspect the environment variables of the edgeHub container.
List the running IoT Edge containers.
iotedge listVerify edgeAgent and edgeHub containers are running. The command output should be similar to the following example.
NAME                        STATUS           DESCRIPTION      CONFIG
SimulatedTemperatureSensor  running          Up 5 seconds     mcr.microsoft.com/azureiotedge-simulated-temperature-sensor:1.0
edgeAgent                   running          Up 17 seconds    mcr.microsoft.com/azureiotedge-agent:1.4
edgeHub                     running          Up 6 seconds     mcr.microsoft.com/azureiotedge-hub:1.4
Inspect the edgeHub container.
sudo docker inspect edgeHubIn the output, find the EdgeDeviceHostName parameter in the Env section.
"EdgeDeviceHostName=10.0.0.4"Verify the EdgeDeviceHostName parameter value matches the
config.tomlhostname setting. If it doesn't match, the edgeHub container was running when you modified and applied the configuration. To update the EdgeDeviceHostName, remove the edgeAgent container.sudo docker rm -f edgeAgentThe edgeAgent and edgeHub containers are recreated and started within a few minutes. Once edgeHub container is running, inspect the container and verify the EdgeDeviceHostName parameter matches the configuration file.
Configure downstream device
To configure your downstream device, open a local or remote command shell.
To enable secure connections, every IoT Edge downstream device in a gateway scenario needs to be configured with a unique device CA certificate and a copy of the root CA certificate shared by all devices in the gateway hierarchy.
Check your certificates meet the format requirements.
Transfer the root CA certificate, child device CA certificate, and child private key to the downstream device.
Copy the certificates and keys to the correct directories. The preferred directories for device certificates are
/var/aziot/certsfor the certificates and/var/aziot/secretsfor keys.### Copy device certificate ### # If the device certificate and keys directories don't exist, create, set ownership, and set permissions sudo mkdir -p /var/aziot/certs sudo chown aziotcs:aziotcs /var/aziot/certs sudo chmod 755 /var/aziot/certs sudo mkdir -p /var/aziot/secrets sudo chown aziotks:aziotks /var/aziot/secrets sudo chmod 700 /var/aziot/secrets # Copy device full-chain certificate and private key into the correct directory sudo cp iot-device-downstream-full-chain.cert.pem /var/aziot/certs sudo cp iot-device-downstream.key.pem /var/aziot/secrets ### Root certificate ### # Copy root certificate into the /certs directory sudo cp azure-iot-test-only.root.ca.cert.pem /var/aziot/certs # Copy root certificate into the CA certificate directory and add .crt extension. # The root certificate must be in the CA certificate directory to install it in the certificate store. # Use the appropriate copy command for your device OS or if using EFLOW. # For Ubuntu and Debian, use /usr/local/share/ca-certificates/ sudo cp azure-iot-test-only.root.ca.cert.pem /usr/local/share/azure-iot-test-only.root.ca.cert.pem.crt # For EFLOW, use /etc/pki/ca-trust/source/anchors/ sudo cp azure-iot-test-only.root.ca.cert.pem /etc/pki/ca-trust/source/anchors/azure-iot-test-only.root.ca.pem.crtChange the ownership and permissions of the certificates and keys.
# Give aziotcs ownership to certificates
# Read and write for aziotcs, read-only for others
sudo chown -R aziotcs:aziotcs /var/aziot/certs
sudo find /var/aziot/certs -type f -name "*.*" -exec chmod 644 {} \;

# Give aziotks ownership to private keys
# Read and write for aziotks, no permission for others
sudo chown -R aziotks:aziotks /var/aziot/secrets
sudo find /var/aziot/secrets -type f -name "*.*" -exec chmod 600 {} \;
Install the root CA certificate on the downstream IoT Edge device by updating the certificate store on the device using the platform-specific command.
# Update the certificate store

# For Ubuntu or Debian - use update-ca-certificates
sudo update-ca-certificates
# For EFLOW or RHEL - use update-ca-trust
sudo update-ca-trust
For more information about using
update-ca-trustin EFLOW, see CBL-Mariner SSL CA certificates management.
The command reports one certificate was added to /etc/ssl/certs.
Updating certificates in /etc/ssl/certs...
1 added, 0 removed; done.
Update downstream configuration file
You should already have IoT Edge installed on your device. If not, follow the steps to Manually provision a single Linux IoT Edge device.
Verify the
/etc/aziot/config.tomlconfiguration file exists on the downstream device.If the config file doesn't exist on your device, use the following command to create it based on the template file:
sudo cp /etc/aziot/config.toml.edge.template /etc/aziot/config.tomlYou can also use the template file as a reference to add configuration parameters in this section.
Open the IoT Edge configuration file using an editor. For example, use the
nanoeditor to open the/etc/aziot/config.tomlfile.sudo nano /etc/aziot/config.tomlFind the parent_hostname parameter or add it to the beginning of the configuration file Every downstream IoT Edge device needs to specify a parent_hostname parameter to identify its parent. Update the
parent_hostnameparameter to be the FQDN or IP address of the parent device, matching whatever was provided as the hostname in the parent device's config file. For example:parent_hostname = "10.0.0.4"Find the Trust bundle cert parameter or add it to the beginning of the configuration file.
Update the
trust_bundle_certparameter with the file URI to the root CA certificate on your device. For example:trust_bundle_cert = "file:///var/aziot/certs/azure-iot-test-only.root.ca.cert.pem"Find or add the Edge CA certificate section in the configuration file. Update the certificate
certand private keypkparameters with the file URI paths for the full-chain certificate and key files on the IoT Edge downstream device. IoT Edge requires the certificate and private key to be in text-based privacy-enhanced mail (PEM) format. For example:[edge_ca] cert = "file:///var/aziot/certs/iot-device-downstream-full-chain.cert.pem" pk = "file:///var/aziot/secrets/iot-device-downstream.key.pem"Verify your IoT Edge device uses the correct version of the IoT Edge agent when it starts. Find the Default Edge Agent section and set the image value for IoT Edge to version 1.4. For example:
[agent.config]
image: "mcr.microsoft.com/azureiotedge-agent:1.4"
The beginning of your downstream configuration file should look similar to the following example.
parent_hostname = "10.0.0.4"
trust_bundle_cert = "file:///var/aziot/certs/azure-iot-test-only.root.ca.cert.pem"

[edge_ca]
cert = "file:///var/aziot/certs/iot-device-downstream-full-chain.cert.pem"
pk = "file:///var/aziot/secrets/iot-device-downstream.key.pem"
Save and close the
config.tomlconfiguration file. For example if you're using the nano editor, select Ctrl+O - Write Out, Enter, and Ctrl+X - Exit.If you've used any other certificates for IoT Edge before, delete the files in the following two directories to make sure that your new certificates get applied:
/var/lib/aziot/certd/certs/var/lib/aziot/keyd/keys
Apply your changes.
sudo iotedge config applyCheck for any errors in the configuration.
sudo iotedge check --verboseTip
The IoT Edge check tool uses a container to perform some of the diagnostics check. If you want to use this tool on downstream IoT Edge devices, make sure they can access
mcr.microsoft.com/azureiotedge-diagnostics:latest, or have the container image in your private container registry.Note
On a newly provisioned device, you may see an error related to IoT Edge Hub:
× production readiness: Edge Hub's storage directory is persisted on the host filesystem - Error
Could not check current state of edgeHub container
This error is expected on a newly provisioned device because the IoT Edge Hub module isn't running. To resolve the error, in IoT Hub, set the modules for the device and create a deployment. Creating a deployment for the device starts the modules on the device including the IoT Edge Hub module.
Network isolate downstream devices
The steps so far in this article set up IoT Edge devices as either a gateway or a downstream device, and create a trusted connection between them. The gateway device handles interactions between the downstream device and IoT Hub, including authentication and message routing. Modules deployed to downstream IoT Edge devices can still create their own connections to cloud services.
Some network architectures, like those that follow the ISA-95 standard, seek to minimize the number of internet connections. In those scenarios, you can configure downstream IoT Edge devices without direct internet connectivity. Beyond routing IoT Hub communications through their gateway device, downstream IoT Edge devices can rely on the gateway device for all cloud connections.
This network configuration requires that only the IoT Edge device in the top layer of a gateway hierarchy has direct connections to the cloud. IoT Edge devices in the lower layers can only communicate with their parent device or any children devices. Special modules on the gateway devices enable this scenario, including:
The API proxy module is required on any IoT Edge gateway that has another IoT Edge device below it. That means it must be on every layer of a gateway hierarchy except the bottom layer. This module uses an nginx reverse proxy to route HTTP data through network layers over a single port. It's highly configurable through its module twin and environment variables, so can be adjusted to fit your gateway scenario requirements.
The Docker registry module can be deployed on the IoT Edge gateway at the top layer of a gateway hierarchy. This module is responsible for retrieving and caching container images on behalf of all the IoT Edge devices in lower layers. The alternative to deploying this module at the top layer is to use a local registry, or to manually load container images onto devices and set the module pull policy to never.
The Azure Blob Storage on IoT Edge can be deployed on the IoT Edge gateway at the top layer of a gateway hierarchy. This module is responsible for uploading blobs on behalf of all the IoT Edge devices in lower layers. The ability to upload blobs also enables useful troubleshooting functionality for IoT Edge devices in lower layers, like module log upload and support bundle upload.
Network configuration
For each gateway device in the top layer, network operators need to:
Provide a static IP address or fully qualified domain name (FQDN).
Authorize outbound communications from this IP address to your Azure IoT Hub hostname over ports 443 (HTTPS) and 5671 (AMQP).
Authorize outbound communications from this IP address to your Azure Container Registry hostname over port 443 (HTTPS).
The API proxy module can only handle connections to one container registry at a time. We recommend having all container images, including the public images provided by Microsoft Container Registry (mcr.microsoft.com), stored in your private container registry.
For each gateway device in a lower layer, network operators need to:
- Provide a static IP address.
- Authorize outbound communications from this IP address to the parent gateway's IP address over ports 443 (HTTPS) and 5671 (AMQP).
Deploy modules to top layer devices
The IoT Edge device at the top layer of a gateway hierarchy has a set of required modules that must be deployed to it, in addition to any workload modules you may run on the device.
The API proxy module was designed to be customized to handle most common gateway scenarios. This article provides an example to set up the modules in a basic configuration. Refer to Configure the API proxy module for your gateway hierarchy scenario for more detailed information and examples.
In the Azure portal, navigate to your IoT hub.
Select Devices under the Device management menu.
Select the top layer IoT Edge device that you're configuring from the list.
Select Set modules.
In the IoT Edge modules section, select Add then choose Marketplace module.
Search for and select the IoT Edge API Proxy module.
Select the name of the API proxy module from the list of deployed modules and update the following module settings:
In the Environment variables tab, update the value of NGINX_DEFAULT_PORT to
443.In the Container create options tab, update the port bindings to reference port 443.
{
  "HostConfig": {
    "PortBindings": {
      "443/tcp": [
        {
          "HostPort": "443"
        }
      ]
    }
  }
}
These changes configure the API proxy module to listen on port 443. To prevent port binding collisions, you need to configure the edgeHub module to not listen on port 443. Instead, the API proxy module will route any edgeHub traffic on port 443.
Select Runtime Settings and find the edgeHub module create options. Delete the port binding for port 443, leaving the bindings for ports 5671 and 8883.
{
  "HostConfig": {
    "PortBindings": {
      "5671/tcp": [
        {
          "HostPort": "5671"
        }
      ],
      "8883/tcp": [
        {
          "HostPort": "8883"
        }
      ]
    }
  }
}
Select Save to save your changes to the runtime settings.
Select Add again, then choose IoT Edge module.
Provide the following values to add the Docker registry module to your deployment:
IoT Edge module name:
registryOn the Module settings tab, Image URI:
registry:latestOn the Environment variables tab, add the following environment variables:
Name:
REGISTRY_PROXY_REMOTEURLValue: The URL for the container registry you want this registry module to map to. For example,https://myregistry.azurecr.The registry module can only map to one container registry, so we recommend having all container images in a single private container registry.
Name:
REGISTRY_PROXY_USERNAMEValue: Username to authenticate to the container registry.Name:
REGISTRY_PROXY_PASSWORDValue: Password to authenticate to the container registry.
On the Container create options tab, paste:
{
    "HostConfig": {
        "PortBindings": {
            "5000/tcp": [
                {
                    "HostPort": "5000"
                }
            ]
        }
    }
}
Select Add to add the module to the deployment.
Select Next: Routes to go to the next step.
To enable device-to-cloud messages from downstream devices to reach IoT Hub, include a route that passes all messages to IoT Hub. For example:
- Name:
Route - Value:
FROM /messages/* INTO $upstream
- Name:
Select Review + create to go to the final step.
Select Create to deploy to your device.
Deploy modules to lower layer devices
IoT Edge devices in lower layers of a gateway hierarchy have one required module that must be deployed to them, in addition to any workload modules you may run on the device.
Route container image pulls
Before discussing the required proxy module for IoT Edge devices in gateway hierarchies, it's important to understand how IoT Edge devices in lower layers get their module images.
If your lower layer devices can't connect to the cloud, but you want them to pull module images as usual, then the top layer device of the gateway hierarchy must be configured to handle these requests. The top layer device needs to run a Docker registry module that is mapped to your container registry. Then, configure the API proxy module to route container requests to it. Those details are discussed in the earlier sections of this article. In this configuration, the lower layer devices shouldn't point to cloud container registries, but to the registry running in the top layer.
For example, instead of calling mcr.microsoft.com/azureiotedge-api-proxy:1.1, lower layer devices should call $upstream:443/azureiotedge-api-proxy:1.1.
The $upstream parameter points to the parent of a lower layer device, so the request will route through all the layers until it reaches the top layer which has a proxy environment routing container requests to the registry module. The :443 port in this example should be replaced with whichever port the API proxy module on the parent device is listening on.
The API proxy module can only route to one registry module, and each registry module can only map to one container registry. Therefore, any images that lower layer devices need to pull must be stored in a single container registry.
If you don't want lower layer devices making module pull requests through a gateway hierarchy, another option is to manage a local registry solution. Or, push the module images onto the devices before creating deployments and then set the imagePullPolicy to never.
Bootstrap the IoT Edge agent
The IoT Edge agent is the first runtime component to start on any IoT Edge device. You need to make sure that any downstream IoT Edge devices can access the edgeAgent module image when they start up, and then they can access deployments and start the rest of the module images.
When you go into the config file on an IoT Edge device to provide its authentication information, certificates, and parent hostname, also update the edgeAgent container image.
If the top level gateway device is configured to handle container image requests, replace mcr.microsoft.com with the parent hostname and API proxy listening port. In the deployment manifest, you can use $upstream as a shortcut, but that requires the edgeHub module to handle routing and that module hasn't started at this point. For example:
[agent]
name = "edgeAgent"
type = "docker"

[agent.config]
image: "{Parent FQDN or IP}:443/azureiotedge-agent:1.4"
If you are using a local container registry, or providing the container images manually on the device, update the config file accordingly.
Configure runtime and deploy proxy module
The API proxy module is required for routing all communications between the cloud and any downstream IoT Edge devices. An IoT Edge device in the bottom layer of the hierarchy, with no downstream IoT Edge devices, does not need this module.
The API proxy module was designed to be customized to handle most common gateway scenarios. This article briefly touches on the steps to set up the modules in a basic configuration. Refer to Configure the API proxy module for your gateway hierarchy scenario for more detailed information and examples.
In the Azure portal, navigate to your IoT hub.
Select Devices under the Device management menu.
Select the lower layer IoT Edge device that you're configuring from the list.
Select Set modules.
In the IoT Edge modules section, select Add then choose Marketplace module.
Search for and select the IoT Edge API Proxy module.
Select the name of the API proxy module from the list of deployed modules and update the following module settings:
In the Module settings tab, update the value of Image URI. Replace
mcr.microsoft.comwith$upstream:443.In the Environment variables tab, update the value of NGINX_DEFAULT_PORT to
443.In the Container create options tab, update the port bindings to reference port 443.
{
  "HostConfig": {
    "PortBindings": {
      "443/tcp": [
        {
          "HostPort": "443"
        }
      ]
    }
  }
}
These changes configure the API proxy module to listen on port 443. To prevent port binding collisions, you need to configure the edgeHub module to not listen on port 443. Instead, the API proxy module will route any edgeHub traffic on port 443.
Select Runtime Settings.
Update the edgeHub module settings:
- In the Image field, replace
mcr.microsoft.comwith$upstream:443. - In the Create options field, delete the port binding for port 443, leaving the bindings for ports 5671 and 8883.
{ "HostConfig": { "PortBindings": { "5671/tcp": [ { "HostPort": "5671" } ], "8883/tcp": [ { "HostPort": "8883" } ] } } }- In the Image field, replace
Update the edgeAgent module settings:
- In the Image field, replace
mcr.microsoft.comwith$upstream:443.
- In the Image field, replace
Select Save to save your changes to the runtime settings.
Select Next: Routes to go to the next step.
To enable device-to-cloud messages from downstream devices to reach IoT Hub, include a route that passes all messages to
$upstream. The upstream parameter points to the parent device in the case of lower layer devices. For example:- Name:
Route - Value:
FROM /messages/* INTO $upstream
- Name:
Select Review + create to go to the final step.
Select Create to deploy to your device.
Verify connectivity from child to parent
Verify the TLS/SSL connection from the child to the parent by running the following
opensslcommand on the downstream device. Replace<parent hostname>with the FQDN or IP address of the parent.openssl s_client -connect <parent hostname>:8883 </dev/null 2>&1 >/dev/nullThe command should assert successful validation of the parent certificate chain similar to the following example:
azureUser@child-vm:~$ openssl s_client -connect <parent hostname>:8883 </dev/null 2>&1 >/dev/null
Can't use SSL_get_servername
depth=3 CN = Azure_IoT_Hub_CA_Cert_Test_Only
verify return:1
depth=2 CN = Azure_IoT_Hub_Intermediate_Cert_Test_Only
verify return:1
depth=1 CN = gateway.ca
verify return:1
depth=0 CN = <parent hostname>
verify return:1
DONE
The "Can't use SSL_get_servername" message can be ignored.
The
depth=0 CN =value should match the hostname parameter specified in the parent'sconfig.tomlconfiguration file.If the command times out, there may be blocked ports between the child and parent devices. Review the network configuration and settings for the devices.
Warning
Not using a full-chain certificate in the gateway's
[edge_ca]section results in certificate validation errors from the downstream device. For example, theopenssl s_client ...command above will produce:Can't use SSL_get_servername depth=1 CN = gateway.ca verify error:num=20:unable to get local issuer certificate verify return:1 depth=0 CN = <parent hostname> verify return:1 DONEThe same issue occurs for TLS-enabled devices that connect to the downstream IoT Edge device if the full-chain device certificate isn't used and configured on the downstream device.
Integrate Microsoft Defender for IoT with IoT Edge gateway
Downstream devices can be used to integrate the Microsoft Defender for IoT's micro agent with the IoT Edge gateway using downstream device proxying.
Learn more about the Defender for IoT micro agent.
To integrate Microsoft Defender for IoT with IoT Edge using downstream device proxying:
Sign in to the Azure portal.
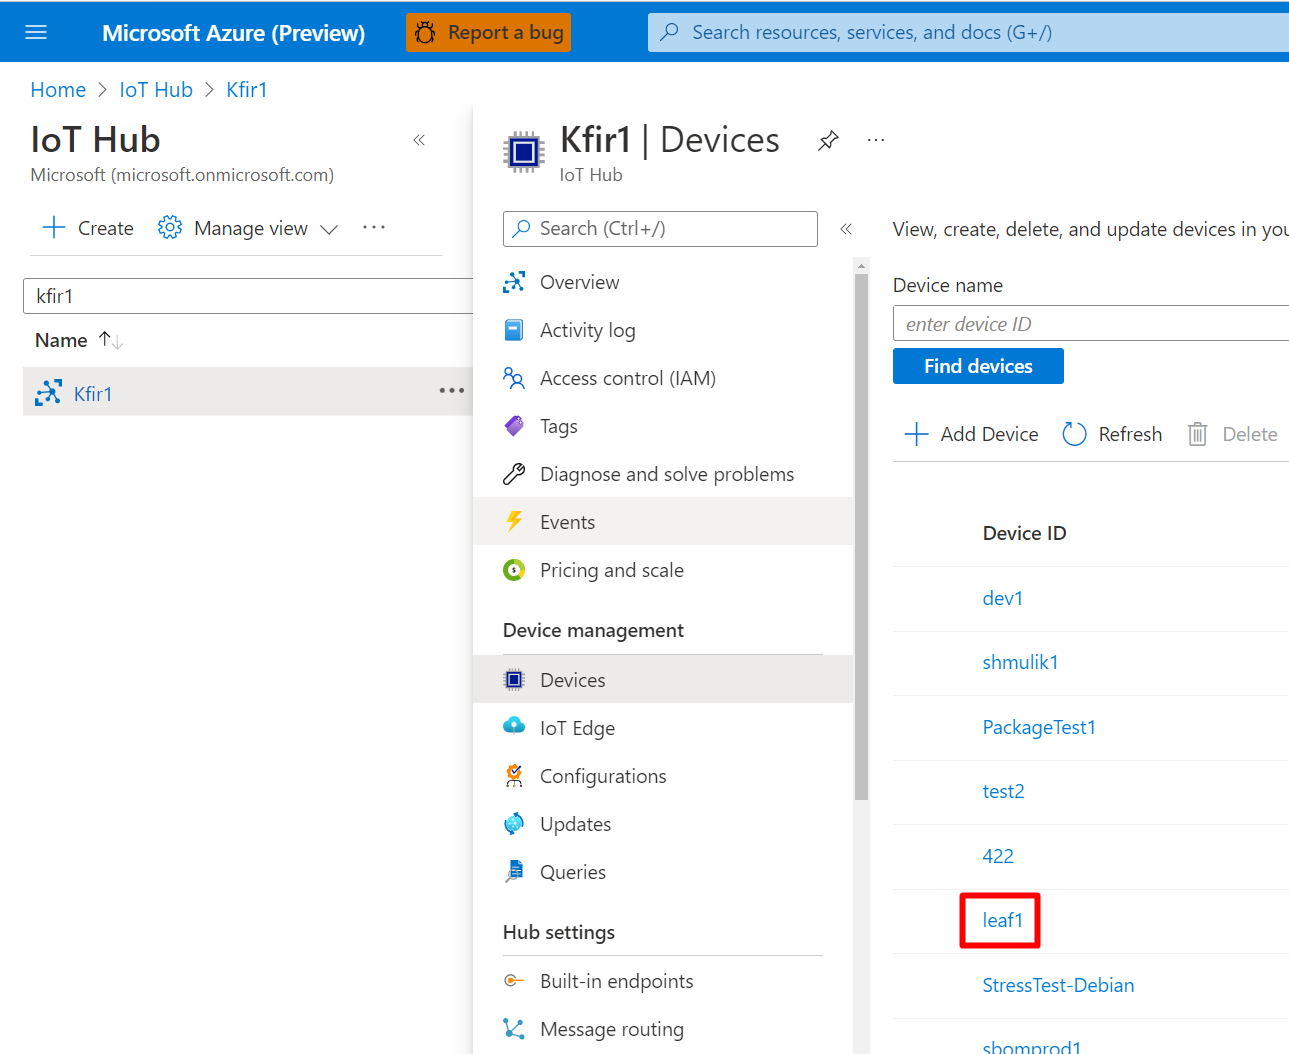
Navigate to IoT Hub >
Your Hub> Device management > DevicesSelect your device.
Select the
DefenderIotMicroAgentmodule twin that you created from these instructions.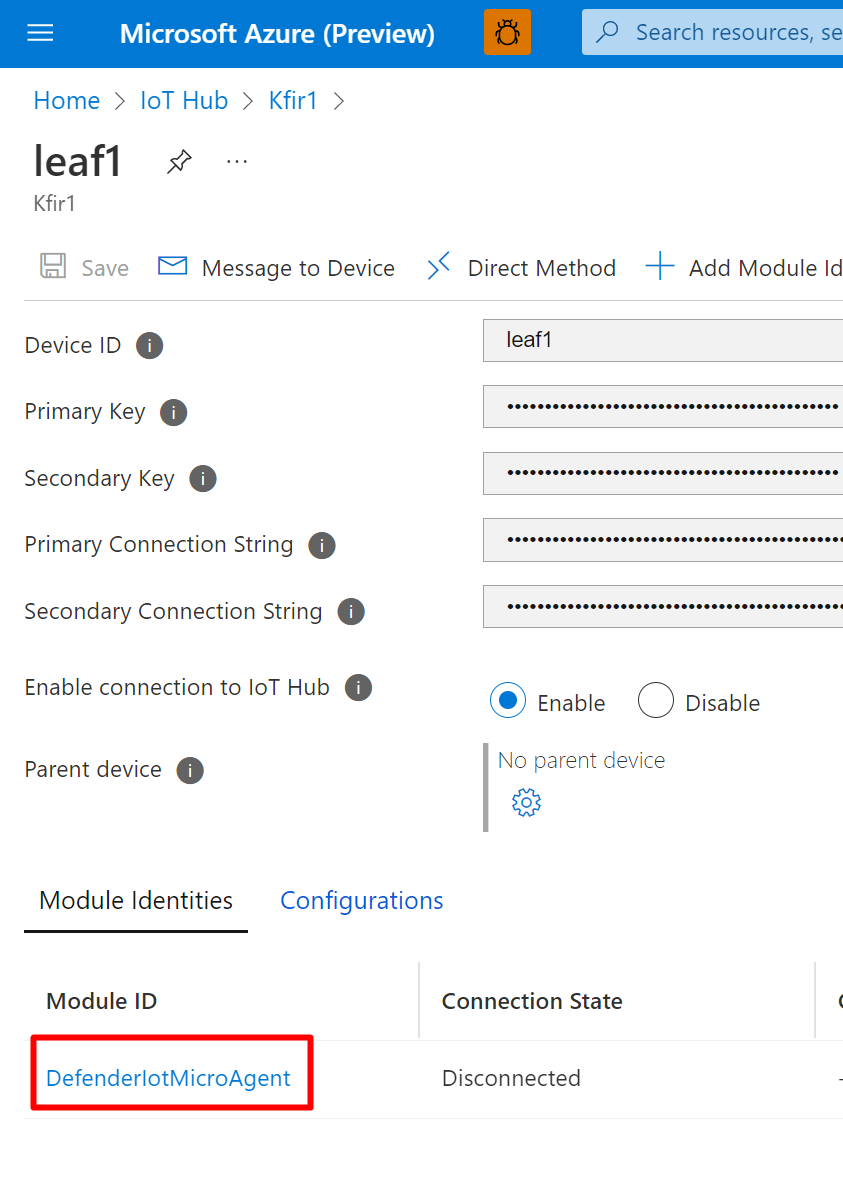
Select the
 button to copy your Connection string (primary key).
Paste the Connection string into a text editing application, and add the GatewayHostName to the string. For example,
HostName=nested11.azure-devices.net;DeviceId=downstream1;ModuleId=module1;SharedAccessKey=xxx;GatewayHostName=10.16.7.4.Open a terminal on the downstream device.
Use the following command to place the connection string encoded in utf-8 in the Defender for Cloud agent directory into the file
connection_string.txtin the following path:/etc/defender_iot_micro_agent/connection_string.txt:sudo bash -c 'echo "<connection string>" > /etc/defender_iot_micro_agent/connection_string.txt'The
connection_string.txtshould now be located in the following path location/etc/defender_iot_micro_agent/connection_string.txt.Restart the service using this command:
sudo systemctl restart defender-iot-micro-agent.serviceNavigate back to the device.
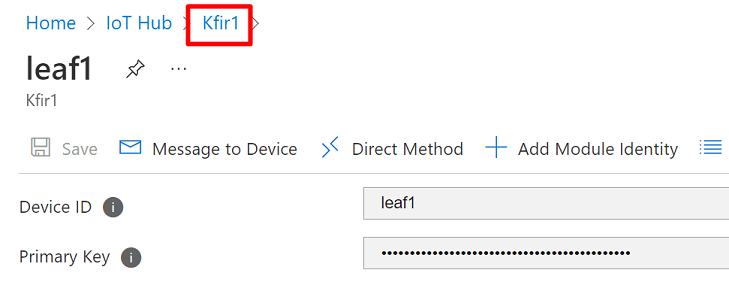
Enable the connection to the IoT Hub, and select the gear icon.
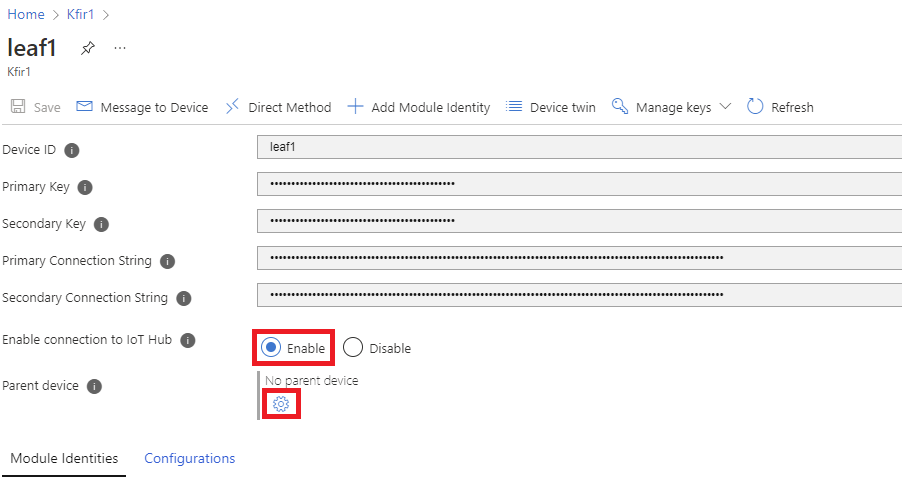
Select the parent device from the displayed list.
Ensure that port 8883 (MQTT) between the downstream device and the IoT Edge device is open.
Next steps
How an IoT Edge device can be used as a gateway
Configure the API proxy module for your gateway hierarchy scenario
Feedback
Coming soon: Throughout 2024 we will be phasing out GitHub Issues as the feedback mechanism for content and replacing it with a new feedback system. For more information see: https://aka.ms/ContentUserFeedback.
Submit and view feedback for