Tutorial: Develop IoT Edge modules with Linux containers using IoT Edge for Linux on Windows
Applies to: ![]() IoT Edge 1.4
IoT Edge 1.4
Important
IoT Edge 1.4 is the supported release. If you are on an earlier release, see Update IoT Edge.
This tutorial walks through developing, debugging and deploying your own code to an IoT Edge device using IoT Edge for Linux on Windows and Visual Studio 2022. You'll learn the most common developer scenario for IoT Edge solutions by deploying a C# module to a Linux device. You'll deploy and debug a custom Azure IoT Edge module running in a Linux container on Windows (EFLOW). Even if you plan on using a different language or deploying an Azure service, this tutorial is still useful to learn about the development tools and concepts.
This article includes steps for two IoT Edge development tools:
- Command line interface (CLI) is the preferred tool for development.
- Azure IoT Edge tools for Visual Studio extension. The extension is in maintenance mode.
Use the tool selector button at the beginning of this article to select the tool version.
In this tutorial, you learn how to:
- Set up your development machine.
- Use the IoT Edge tools for Visual Studio Code to create a new project.
- Build your project as a container and store it in an Azure container registry.
- Deploy your code to an IoT Edge device.
Prerequisites
This article assumes that you use a machine running Windows as your development machine. On Windows computers, you can develop either Windows or Linux modules. This tutorial guides you through the development of Linux containers, using IoT Edge for Linux on Windows for building and deploying the modules.
Quickstart: Deploy your first IoT Edge module to a Windows device
Install or modify Visual Studio 2022 on your development machine. Choose the Azure development and Desktop development with C++ workloads options.
After your Visual Studio 2022 is ready, you also need the following tools and components:
Download and install Azure IoT Edge Tools from the Visual Studio Marketplace. You can use the Azure IoT Edge Tools extension to create and build your IoT Edge solution. The preferred development tool is the command-line (CLI) Azure IoT Edge Dev Tool. The extension includes the Azure IoT Edge project templates used create the Visual Studio project. Currently, you need the extension installed regardless of the development tool you use.
Important
The Azure IoT Edge Tools for VS 2022 extension is in maintenance mode. The preferred development tool is the command-line (CLI) Azure IoT Edge Dev Tool.
Tip
If you are using Visual Studio 2019, download and install Azure IoT Edge Tools for VS 2019 from the Visual Studio marketplace.
- Install the Azure CLI.
Cloud resources:
- A free or standard-tier IoT hub in Azure.
If you don't have an Azure subscription, create an Azure free account before you begin.
Key concepts
This tutorial walks through the development of an IoT Edge module. An IoT Edge module, or sometimes just module for short, is a container with executable code. You can deploy one or more modules to an IoT Edge device. Modules perform specific tasks like ingesting data from sensors, cleaning and analyzing data, or sending messages to an IoT hub. For more information, see Understand Azure IoT Edge modules.
When developing IoT Edge modules, it's important to understand the difference between the development machine and the target IoT Edge device where the module will eventually be deployed. The container that you build to hold your module code must match the operating system (OS) of the target device. For example, the most common scenario is someone developing a module on a Windows computer intending to target a Linux device running IoT Edge. In that case, the container operating system would be Linux. As you go through this tutorial, keep in mind the difference between the development machine OS and the container OS. For this tutorial, you'll be using your Windows host for development and the IoT Edge for Linux on Windows (EFLOW) VM for building and deploying the modules.
This tutorial targets devices running IoT Edge with Linux containers. You can use your preferred operating system as long as your development machine runs Linux containers. We recommend using Visual Studio to develop with Linux containers, so that's what this tutorial uses. You can use Visual Studio Code as well, although there are differences in support between the two tools. For more information, see Develop Azure IoT Edge modules using Visual Studio Code.
Set up docker-cli and Docker engine remote connection
IoT Edge modules are packaged as containers, so you need a container engine on your development machine to build and manage them. The EFLOW virtual machine already contains an instance of Docker engine, so this tutorial shows you how to remotely connect from the Windows developer machine to the EFLOW VM Docker instance. By using this, we remove the dependency on Docker Desktop for Windows.
The first step is to configure docker-cli on the Windows development machine to be able to connect to the remote docker engine.
- Download the precompiled docker.exe version of the docker-cli from docker-cli Chocolatey. You can also download the official cli project from docker/cli GitHub and compile it following the repo instructions.
- Extract the docker.exe to a directory in your development machine. For example, C:\Docker\bin
- Open About your PC -> System Info -> Advanced system settings
- Select Advanced -> Environment variables -> Under User variables check Path
- Edit the Path variable and add the location of the docker.exe
- Open an elevated PowerShell session
- Check that Docker CLI is accessible using the command
docker --version
If everything was successfully configurated, the previous command should output the docker version, something like Docker version 20.10.12, build e91ed57.
The second step is to configure the EFLOW virtual machine Docker engine to accept external connections, and add the appropriate firewall rules.
Warning
Exposing Docker engine to external connections may increase security risks. This configuration should only be used for development purposes. Make sure to revert the configuration to default settings after development is finished.
Open an elevated PowerShell session and run the following commands
# Configure the EFLOW virtual machine Docker engine to accept external connections, and add the appropriate firewall rules.
Invoke-EflowVmCommand "sudo iptables -A INPUT -p tcp --dport 2375 -j ACCEPT"

# Create a copy of the EFLOW VM _docker.service_ in the system folder.
Invoke-EflowVmCommand "sudo cp /lib/systemd/system/docker.service /etc/systemd/system/docker.service"

# Replace the service execution line to listen for external connections.
Invoke-EflowVmCommand "sudo sed -i 's/-H fd:\/\// -H fd:\/\/ -H tcp:\/\/0.0.0.0:2375/g'  /etc/systemd/system/docker.service"

# Reload the EFLOW VM services configurations.
Invoke-EflowVmCommand "sudo systemctl daemon-reload"

# Reload the Docker engine service.
Invoke-EflowVmCommand "sudo systemctl restart docker.service"

# Check that the Docker engine is listening to external connections.
Invoke-EflowVmCommand "sudo netstat -lntp | grep dockerd"
The following is example output.
PS C:\> # Configure the EFLOW virtual machine Docker engine to accept external connections, and add the appropriate firewall rules.
PS C:\> Invoke-EflowVmCommand "sudo iptables -A INPUT -p tcp --dport 2375 -j ACCEPT"
PS C:\>
PS C:\> # Create a copy of the EFLOW VM docker.service in the system folder.
PS C:\> Invoke-EflowVmCommand "sudo cp /lib/systemd/system/docker.service /etc/systemd/system/docker.service"
PS C:\>
PS C:\> # Replace the service execution line to listen for external connections.
PS C:\> Invoke-EflowVmCommand "sudo sed -i 's/-H fd:\/\// -H fd:\/\/ -H tcp:\/\/0.0.0.0:2375/g' /etc/systemd/system/docker.service"
PS C:\>
PS C:\> # Reload the EFLOW VM services configurations.
PS C:\> Invoke-EflowVmCommand "sudo systemctl daemon-reload"
PS C:\>
PS C:\> # Reload the Docker engine service.
PS C:\> Invoke-EflowVmCommand "sudo systemctl restart docker.service"
PS C:\>
PS C:\> # Check that the Docker engine is listening to external connections.
PS C:\> Invoke-EflowVmCommand "sudo netstat -lntp | grep dockerd"
tcp6       0      0 :::2375                 :::*                    LISTEN      2790/dockerd
The final step is to test the Docker connection to the EFLOW VM Docker engine. First, you need the EFLOW VM IP address.
Get-EflowVmAddrTip
If the EFLOW VM was deployed without Static IP, the IP address may change across Windows host OS reboots or networking changes. Make sure you are using the correct EFLOW VM IP address every time you want to establish a remote Docker engine connection.
The following is example output.
PS C:\> Get-EflowVmAddr
[03/15/2022 15:22:30] Querying IP and MAC addresses from virtual machine (DESKTOP-J1842A1-EFLOW)
 - Virtual machine MAC: 00:15:5d:6f:da:78
 - Virtual machine IP : 172.31.24.105 retrieved directly from virtual machine
00:15:5d:6f:da:78
172.31.24.105
Using the obtained IP address, connect to the EFLOW VM Docker engine, and run the Hello-World sample container. Replace <EFLOW-VM-IP> with the EFLOW VM IP address obtained in the previous step.
docker -H tcp://<EFLOW-VM-IP>:2375 run --rm hello-worldYou should see that the container is being downloaded, and after will run and output the following.
PS C:\> docker -H tcp://172.31.24.105:2375 run --rm hello-world
Unable to find image 'hello-world:latest' locally
latest: Pulling from library/hello-world
2db29710123e: Pull complete
Digest: sha256:4c5f3db4f8a54eb1e017c385f683a2de6e06f75be442dc32698c9bbe6c861edd
Status: Downloaded newer image for hello-world:latest

Hello from Docker!
This message shows that your installation appears to be working correctly.

To generate this message, Docker took the following steps:
 1. The Docker client contacted the Docker daemon.
 2. The Docker daemon pulled the "hello-world" image from the Docker Hub.
    (amd64)
 3. The Docker daemon created a new container from that image which runs the
    executable that produces the output you are currently reading.
 4. The Docker daemon streamed that output to the Docker client, which sent it
    to your terminal.

To try something more ambitious, you can run an Ubuntu container with:
 $ docker run -it ubuntu bash

Share images, automate workflows, and more with a free Docker ID:
 https://hub.docker.com/

For more examples and ideas, visit:
 https://docs.docker.com/get-started/
Create an Azure IoT Edge project
The IoT Edge project template in Visual Studio creates a solution that can be deployed to IoT Edge devices. First you create an Azure IoT Edge solution, and then you generate the first module in that solution. Each IoT Edge solution can contain more than one module.
Important
The IoT Edge project structure created by Visual Studio isn't the same as the one in Visual Studio Code.
Currently, the Azure IoT Edge Dev Tool CLI doesn't support creating the Visual Studio project type. You need to use the Visual Studio IoT Edge extension to create the Visual Studio project.
In Visual Studio, create a new project.
On the Create a new project page, search for Azure IoT Edge. Select the project that matches the platform (Linux IoT Edge module) and architecture for your IoT Edge device, and select Next.
On the Configure your new project page, enter a name for your project and specify the location, then select Create.
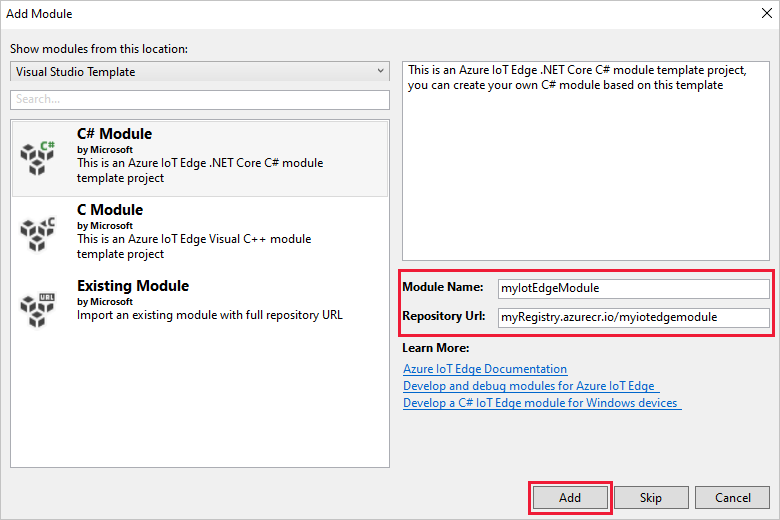
On the Add Module window, select the type of module you want to develop. You can also select Existing module to add an existing IoT Edge module to your deployment. Specify your module name and module image repository.
In Repository Url, provide the name of the module's image repository. Visual Studio autopopulates the module name with localhost:5000/<your module name>. Replace it with your own registry information. Use localhost if you use a local Docker registry for testing. If you use Azure Container Registry, then use the login server from your registry's settings. The login server looks like <registry name>.azurecr.io. Only replace the localhost:5000 part of the string so that the final result looks like <registry name>.azurecr.io/<your module name>.
Select Add to add your module to the project.
Note
If you have an existing IoT Edge project, you can change the repository URL by opening the module.json file. The repository URL is located in the repository property of the JSON file.
Now, you have an IoT Edge project and an IoT Edge module in your Visual Studio solution.
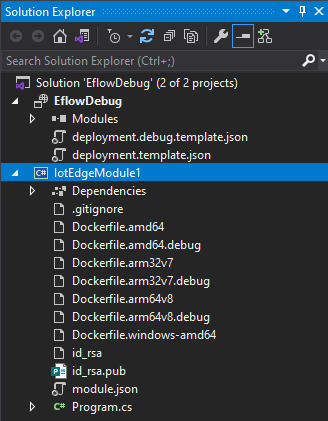
Project structure
In your solution, there are two project level folders including a main project folder and a single module folder. For example, you may have a main project folder named AzureIotEdgeApp1 and a module folder named IotEdgeModule1. The main project folder contains your deployment manifest.
The module folder contains a file for your module code, named either Program.cs or main.c depending on the language you chose. This folder also contains a file named module.json that describes the metadata of your module. Various Docker files provide the information needed to build your module as a Windows or Linux container.
Deployment manifest of your project
The deployment manifest you edit is named deployment.debug.template.json. This file is a template of an IoT Edge deployment manifest that defines all the modules that run on a device along with how they communicate with each other. For more information about deployment manifests, see Learn how to deploy modules and establish routes.
If you open this deployment template, you see that the two runtime modules, edgeAgent and edgeHub are included, along with the custom module that you created in this Visual Studio project. A fourth module named SimulatedTemperatureSensor is also included. This default module generates simulated data that you can use to test your modules, or delete if it's not necessary. To see how the simulated temperature sensor works, view the SimulatedTemperatureSensor.csproj source code.
Set IoT Edge runtime version
Currently, the latest stable runtime version is 1.4. You should update the IoT Edge runtime version to the latest stable release or the version you want to target for your devices.
In the Solution Explorer, right-click the name of your main project and select Set IoT Edge runtime version.
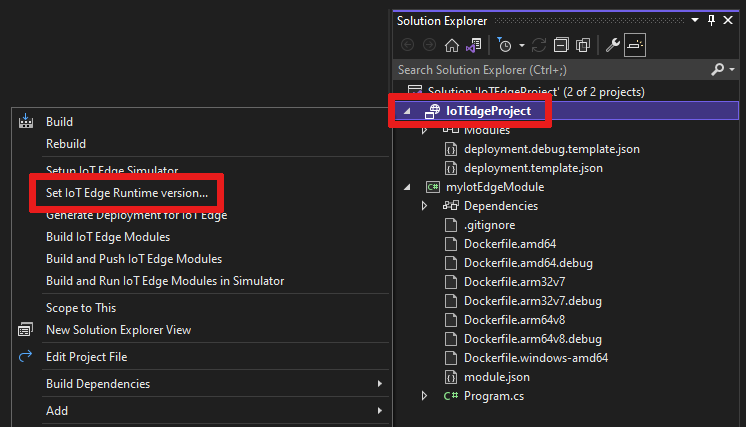
Use the drop-down menu to choose the runtime version that your IoT Edge devices are running, then select OK to save your changes. If no change was made, select Cancel to exit.
Currently, the extension doesn't include a selection for the latest runtime versions. If you want to set the runtime version higher than 1.2, open deployment.debug.template.json deployment manifest file. Change the runtime version for the system runtime module images edgeAgent and edgeHub. For example, if you want to use the IoT Edge runtime version 1.4, change the following lines in the deployment manifest file:
"systemModules": {
   "edgeAgent": {
    //...
      "image": "mcr.microsoft.com/azureiotedge-agent:1.4"
    //...
   "edgeHub": {
   //...
      "image": "mcr.microsoft.com/azureiotedge-hub:1.4",
   //...
If you changed the version, regenerate your deployment manifest by right-clicking the name of your project and select Generate deployment for IoT Edge. This generates a deployment manifest based on your deployment template and appears in the config folder of your Visual Studio project.
Open deployment.debug.template.json deployment manifest file. The deployment manifest is a JSON document that describes the modules to be configured on the targeted IoT Edge device.
Change the runtime version for the system runtime module images edgeAgent and edgeHub. For example, if you want to use the IoT Edge runtime version 1.4, change the following lines in the deployment manifest file:
"systemModules": {
    "edgeAgent": {
    //...
        "image": "mcr.microsoft.com/azureiotedge-agent:1.4",
    //...
    "edgeHub": {
    //...
        "image": "mcr.microsoft.com/azureiotedge-hub:1.4",
    //...
Set up Visual Studio 2022 remote Docker engine instance
Use the Azure IoT Edge tools extension and configure it to use the remote Docker engine running inside the EFLOW virtual machine.
Select Tools -> Azure IoT Edge tools -> IoT Edge tools settings...
Replace the DOCKER_HOST localhost value with the EFLOW VM IP address. If you don't remember the IP address, use the EFLOW PowerShell cmdlet
Get-EflowVmAddrto obtain it. For exmaple, if the EFLOW VM IP address is 172.20.1.100, then the new value should be tcp://172.20.1.100:2375.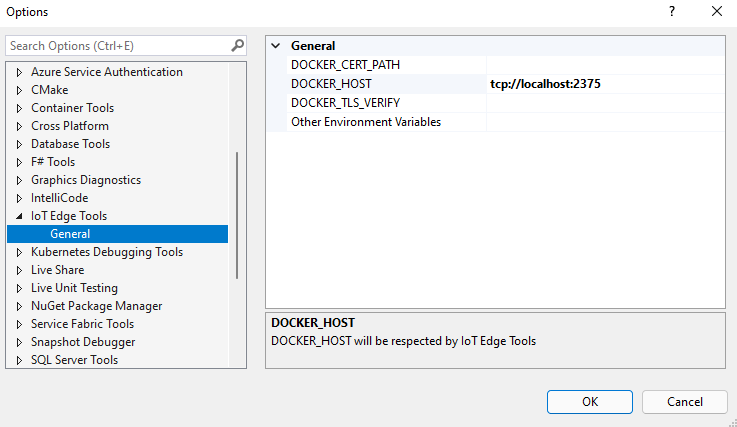
Select OK
Develop your module
When you add a new module, it comes with default code that is ready to be built and deployed to a device so that you can start testing without touching any code. The module code is located within the module folder in a file named Program.cs (for C#) or main.c (for C).
The default solution is built so that the simulated data from the SimulatedTemperatureSensor module is routed to your module, which takes the input and then sends it to IoT Hub.
When you're ready to customize the module template with your own code, use the Azure IoT Hub SDKs to build other modules that address the key needs for IoT solutions such as security, device management, and reliability.
Build and push a single module
Typically, you'll want to test and debug each module before running it within an entire solution with multiple modules. Because the solution will be build or debug using the Docker engine running inside the EFLOW VM, the first step is building and publishing the module to enable remote debugging.
In Solution Explorer, select and highlight the module project folder (for example, myIotEdgeModule). Set the custom module as the startup project. Select Project > Set as StartUp Project from the menu.
To debug the C# Linux module, we need to update Dockerfile.amd64.debug file to enable SSH service. Update the Dockerfile.amd64.debug file to use the following template: Dockerfile for Azure IoT Edge AMD64 C# Module with Remote Debug Support.
Note
When choosing Debug, Visual Studio uses
Dockerfile.(amd64|windows-amd64).debugto build Docker images. This includes the .NET Core command-line debugger VSDBG in your container image while building it. For production-ready IoT Edge modules, we recommend that you use the Release configuration, which usesDockerfile.(amd64|windows-amd64)without VSDBG.Warning
Make sure the last line of the template ENTRYPOINT ["dotnet", "IotEdgeModule1.dll"] the name of the DLL matches the name of your IoT Edge module project.
To establish an SSH connection with the Linux module, we need to create an RSA key. Open an elevated PowerShell session and run the following commands to create a new RSA key. Make sure you save the RSA key under the same IoT Edge module folder, and the name of the key is id_rsa.
ssh-keygen -t RSA -b 4096 -m PEM
If you're using a private registry like Azure Container Registry (ACR), use the following Docker command to sign in to it. You can get the username and password from the Access keys page of your registry in the Azure portal. If you're using local registry, you can run a local registry.
docker -H tcp://<EFLOW-VM-IP>:2375 login -u <ACR username> -p <ACR password> <ACR login server>
In Solution Explorer, right-click the project folder and select Build and Push IoT Edge Modules to build and push the Docker image for each module.
If you're using a private registry like Azure Container Registry, you need to add your registry login information to the runtime settings found in the file
deployment.template.json. Replace the placeholders with your actual ACR admin username, password, and registry name."settings": { "minDockerVersion": "v1.25", "loggingOptions": "", "registryCredentials": { "registry1": { "username": "<username>", "password": "<password>", "address": "<registry name>.azurecr.io" } } }Note
This article uses admin login credentials for Azure Container Registry, which are convenient for development and test scenarios. When you're ready for production scenarios, we recommend a least-privilege authentication option like service principals. For more information, see Manage access to your container registry.
It's necessary to expose port 22 to access the module SSH service. This tutorial uses 10022 as the host port, but you may specify a different port, which will be used as an SSH port to connect into the Linux C# module. You need to add the SSH port information to the "createOptions" of this Linux module setting found in the file
deployment.debug.template.json."createOptions": { "HostConfig": { "Privileged": true, "PortBindings": { "22/tcp": [ { "HostPort": "10022" } ] } } }In Solution Explorer, right-click the project folder and select Generate Deployment for IoT Edge to build the new IoT Edge deployment json.
Open Cloud Explorer by clicking View > Cloud Explorer. Make sure you've logged in to Visual Studio 2019.
In Cloud Explorer, expand your subscription, find your Azure IoT Hub and the Azure IoT Edge device you want to deploy.
Right-click on the IoT Edge device and choose Create deployment. Navigate to the debug deployment manifest configured for your platform located in the config folder in your Visual Studio solution, such as
deployment.amd64.json.
Build module Docker image
Once you've developed your module, you can build the module image to store in a container registry for deployment to your IoT Edge device.
Use the module's Dockerfile to build the module Docker image.
docker build --rm -f "<DockerFilePath>" -t <ImageNameAndTag> "<ContextPath>"
For example, let's assume your command shell is in your project directory and your module name is IotEdgeModule1. To build the image for the local registry or an Azure container registry, use the following commands:
# Build the image for the local registry

docker build --rm -f "./IotEdgeModule1/Dockerfile.amd64.debug" -t localhost:5000/iotedgemodule1:0.0.1-amd64 "./IotEdgeModule1"

# Or build the image for an Azure Container Registry

docker build --rm -f "./IotEdgeModule1/Dockerfile.amd64.debug" -t myacr.azurecr.io/iotedgemodule1:0.0.1-amd64 "./IotEdgeModule1"
Push module Docker image
Push your module image to the local registry or a container registry.
docker push <ImageName>
For example:
# Push the Docker image to the local registry

docker push localhost:5000/iotedgemodule1:0.0.1-amd64

# Or push the Docker image to an Azure Container Registry
az acr login --name myacr
docker push myacr.azurecr.io/iotedgemodule1:0.0.1-amd64
Deploy the module to the IoT Edge device.
In Visual Studio, open deployment.debug.template.json deployment manifest file in the main project. The deployment manifest is a JSON document that describes the modules to be configured on the targeted IoT Edge device. Before deployment, you need to update your Azure Container Registry credentials, your module images, and the proper createOptions values. For more information about createOption values, see How to configure container create options for IoT Edge modules.
If you're using an Azure Container Registry to store your module image, you need to add your credentials to deployment.debug.template.json in the edgeAgent settings. For example,
"modulesContent": {
"$edgeAgent": {
  "properties.desired": {
    "schemaVersion": "1.1",
    "runtime": {
      "type": "docker",
      "settings": {
        "minDockerVersion": "v1.25",
        "loggingOptions": "",
        "registryCredentials": {
          "myacr": {
            "username": "myacr",
            "password": "<your_acr_password>",
            "address": "myacr.azurecr.io"
          }
        }
      }
    },
//...
Replace the image property value with the module image name you pushed to the registry. For example, if you pushed an image tagged
myacr.azurecr.io/iotedgemodule1:0.0.1-amd64for custom module IotEdgeModule1, replace the image property value with the tag value.Add or replace the createOptions value with stringified content for each system and custom module in the deployment template.
For example, the IotEdgeModule1's image and createOptions settings would be similar to the following:
"IotEdgeModule1": {
"version": "1.0.0",
"type": "docker",
"status": "running",
"restartPolicy": "always",
"settings": {
    "image": "myacr.azurecr.io/iotedgemodule1:0.0.1-amd64",
    "createOptions": "{\"HostConfig\":{\"PortBindings\":{\"5671/tcp\":[{\"HostPort\":\"5671\"}],\"8883/tcp\":[{\"HostPort\":\"8883\"}],\"443/tcp\":[{\"HostPort\":\"443\"}]}}}"
}
Use the IoT Edge Azure CLI set-modules command to deploy the modules to the Azure IoT Hub. For example, to deploy the modules defined in the deployment.debug.amd64.json file to IoT Hub my-iot-hub for the IoT Edge device my-device, use the following command:
az iot edge set-modules --hub-name my-iot-hub --device-id my-device --content ./deployment.debug.template.json --login "HostName=my-iot-hub.azure-devices.net;SharedAccessKeyName=iothubowner;SharedAccessKey=<SharedAccessKey>"
Tip
You can find your IoT Hub connection string in the Azure portal under Azure IoT Hub > Security settings > Shared access policies.
- In Cloud Explorer, right-click your edge device and refresh to see the new module running along with $edgeAgent and $edgeHub modules.
Debug the solution
Using and elevated PowerShell session run the following commands
Get the moduleId based on the name used for the Linux C# module. Make sure to replace the <iot-edge-module-name> placeholder with your module's name.
$moduleId = Invoke-EflowVmCommand "sudo docker ps -aqf name=<iot-edge-module-name>"Check that the $moduleId is correct - If the variable is empty, make sure you're using the correct module name
Start the SSH service inside the Linux container
Invoke-EflowVmCommand "sudo docker exec -it -d $moduleId service ssh start"Open the module SSH port on the EFLOW VM (this tutorial uses port 10022)
Invoke-EflowVmCommand "sudo iptables -A INPUT -p tcp --dport 10022 -j ACCEPT"
Warning
For security reasons, every time the EFLOW VM reboots, the IP table rule will delete and go back to the original settings. Also, the module SSH service will have to be started again manually.
After successfully starting SSH service, select Debug -> Attach to Process, set Connection Type to SSH, and Connection target to the IP address of your EFLOW VM. If you don't know the EFLOW VM IP, you can use the
Get-EflowVmAddrPowerShell cmdlet. First, type the IP and then press enter. In the pop-up window, input the following configurations:Field Value Hostname Use the EFLOW VM IP Port 10022 (Or the one you used in your deployment configuration) Username root Authentication type Private Key Private Key File Full path to the id_rsa that created in a previous step Passphrase Passphrase used for the key created in a previous step 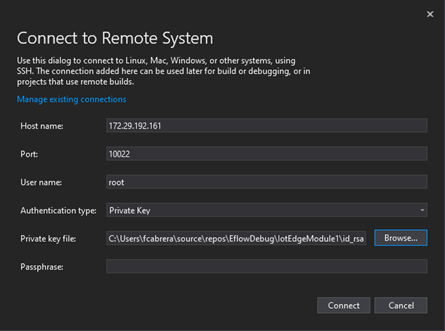
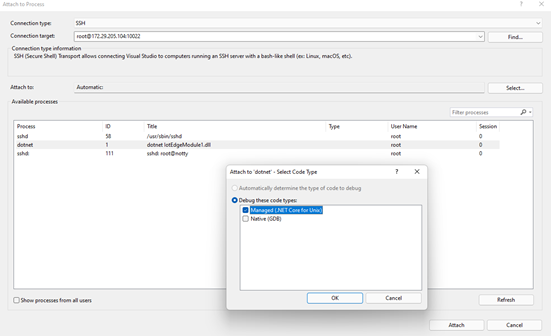
After successfully connecting to the module using SSH, then you can choose the process and select Attach. For the C# module you need to choose process dotnet and Attach to to Managed (CoreCLR). It may take 10 to 20 seconds the first time.
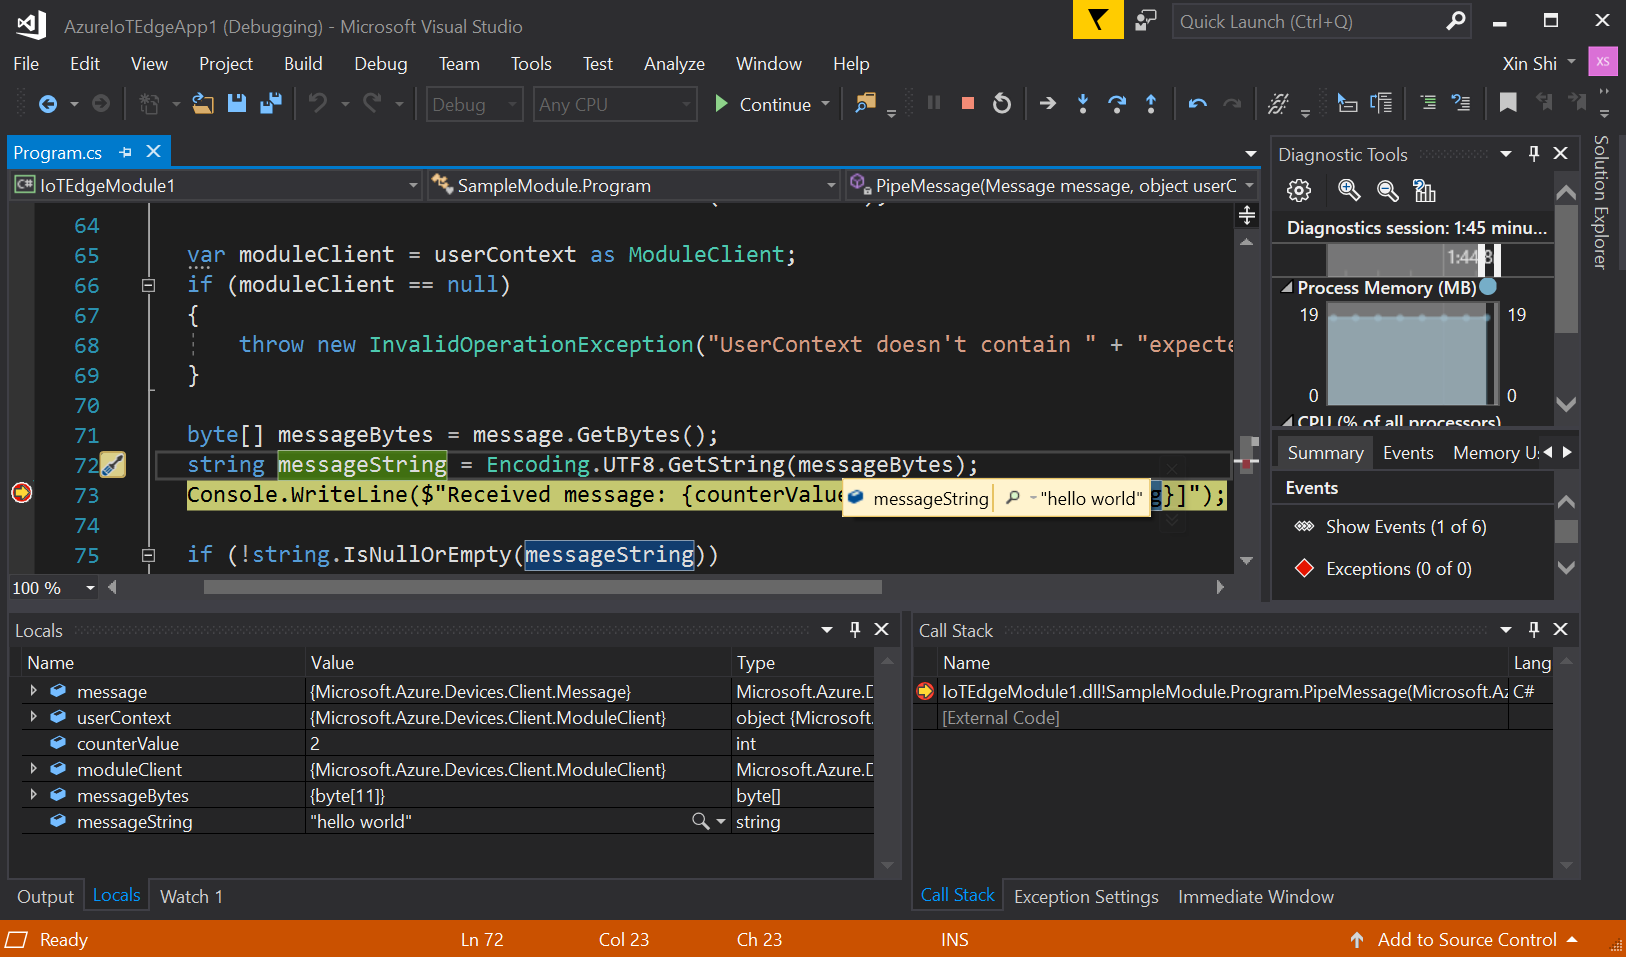
Set a breakpoint to inspect the module.
- If developing in C#, set a breakpoint in the
PipeMessage()function in ModuleBackgroundService.cs. - If using C, set a breakpoint in the
InputQueue1Callback()function in main.c.
- If developing in C#, set a breakpoint in the
The output of the SimulatedTemperatureSensor should be redirected to input1 of the custom Linux C# module. The breakpoint should be triggered. You can watch variables in the Visual Studio Locals window.
Press Ctrl + F5 or select the stop button to stop debugging.

Clean up resources
If you plan to continue to the next recommended article, you can keep the resources and configurations that you created and reuse them. You can also keep using the same IoT Edge device as a test device.
Otherwise, you can delete the local configurations and the Azure resources that you used in this article to avoid charges.
Delete Azure resources
Deleting Azure resources and resource groups is irreversible. Make sure that you don't accidentally delete the wrong resource group or resources. If you created the IoT hub inside an existing resource group that has resources that you want to keep, delete only the IoT hub resource itself, not the resource group.
To delete the resources:
Sign in to the Azure portal, and then select Resource groups.
Select the name of the resource group that contains your IoT Edge test resources.
Review the list of resources that are contained in your resource group. If you want to delete all of them, you can select Delete resource group. If you want to delete only some of them, you can click into each resource to delete them individually.
Next steps
In this tutorial, you set up Visual Studio on your development machine and deployed and debugged your first IoT Edge module from it. Now that you know the basic concepts, try adding functionality to a module so that it can analyze the data passing through it.
Feedback
Coming soon: Throughout 2024 we will be phasing out GitHub Issues as the feedback mechanism for content and replacing it with a new feedback system. For more information see: https://aka.ms/ContentUserFeedback.
Submit and view feedback for