Schedule and broadcast jobs (Java)
Use Azure IoT Hub to schedule and track jobs that update millions of devices. Use jobs to:
- Update desired properties
- Update tags
- Invoke direct methods
A job wraps one of these actions and tracks the execution against a set of devices. A device twin query defines the set of devices the job executes against. For example, a back-end app can use a job to invoke a direct method on 10,000 devices that reboots the devices. You specify the set of devices with a device twin query and schedule the job to run at a future time. The job tracks progress as each of the devices receives and executes the reboot direct method.
To learn more about each of these capabilities, see:
Device twin and properties: Get started with device twins and Understand and use device twins in IoT Hub
Direct methods: IoT Hub developer guide - direct methods
Note
The features described in this article are available only in the standard tier of IoT Hub. For more information about the basic and standard/free IoT Hub tiers, see Choose the right IoT Hub tier for your solution.
This article shows you how to create two Java apps:
A device app, simulated-device, that implements a direct method called lockDoor, which can be called by the back-end app.
A back-end app, schedule-jobs, that creates two jobs. One job calls the lockDoor direct method and another job sends desired property updates to multiple devices.
Note
See Azure IoT SDKs for more information about the SDK tools available to build both device and back-end apps.
Prerequisites
An IoT hub. Create one with the CLI or the Azure portal.
A registered device. Register one in the Azure portal.
Java SE Development Kit 8. Make sure you select Java 8 under Long-term support to get to downloads for JDK 8.
Make sure that port 8883 is open in your firewall. The device sample in this article uses MQTT protocol, which communicates over port 8883. This port may be blocked in some corporate and educational network environments. For more information and ways to work around this issue, see Connecting to IoT Hub (MQTT).
Note
To keep things simple, this article does not implement a retry policy. In production code, you should implement retry policies (such as an exponential backoff), as suggested in the article, Transient Fault Handling.
Get the IoT Hub connection string
In this article, you create a back-end service that schedules a job to invoke a direct method on a device, schedules a job to update the device twin, and monitors the progress of each job. To perform these operations, your service needs the registry read and registry write permissions. By default, every IoT hub is created with a shared access policy named registryReadWrite that grants these permissions.
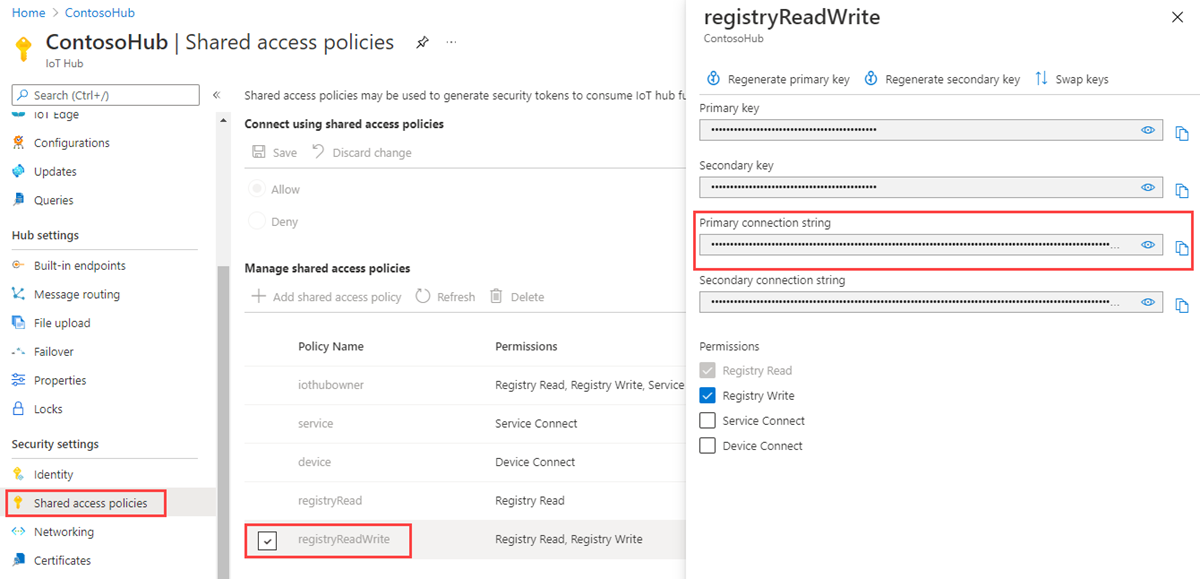
To get the IoT Hub connection string for the registryReadWrite policy, follow these steps:
In the Azure portal, select Resource groups. Select the resource group where your hub is located, and then select your hub from the list of resources.
On the left-side pane of your hub, select Shared access policies.
From the list of policies, select the registryReadWrite policy.
Copy the Primary connection string and save the value.

For more information about IoT Hub shared access policies and permissions, see Access control and permissions.
Create the service app
In this section, you create a Java console app that uses jobs to:
Call the lockDoor direct method on multiple devices.
Send desired properties to multiple devices.
To create the app:
On your development machine, create an empty folder called iot-java-schedule-jobs.
In the iot-java-schedule-jobs folder, create a Maven project called schedule-jobs using the following command at your command prompt. Note this is a single, long command:
mvn archetype:generate -DgroupId=com.mycompany.app -DartifactId=schedule-jobs -DarchetypeArtifactId=maven-archetype-quickstart -DinteractiveMode=falseAt your command prompt, navigate to the schedule-jobs folder.
Using a text editor, open the pom.xml file in the schedule-jobs folder and add the following dependency to the dependencies node. This dependency enables you to use the iot-service-client package in your app to communicate with your IoT hub:
<dependency>
  <groupId>com.microsoft.azure.sdk.iot</groupId>
  <artifactId>iot-service-client</artifactId>
  <version>1.17.1</version>
  <type>jar</type>
</dependency>
Note
You can check for the latest version of iot-service-client using Maven search.
Add the following build node after the dependencies node. This configuration instructs Maven to use Java 1.8 to build the app:
<build>
  <plugins>
    <plugin>
      <groupId>org.apache.maven.plugins</groupId>
      <artifactId>maven-compiler-plugin</artifactId>
      <version>3.3</version>
      <configuration>
        <source>1.8</source>
        <target>1.8</target>
      </configuration>
    </plugin>
  </plugins>
</build>
Save and close the pom.xml file.
Using a text editor, open the schedule-jobs\src\main\java\com\mycompany\app\App.java file.
Add the following import statements to the file:
import com.microsoft.azure.sdk.iot.service.devicetwin.DeviceTwinDevice;
import com.microsoft.azure.sdk.iot.service.devicetwin.Pair;
import com.microsoft.azure.sdk.iot.service.devicetwin.Query;
import com.microsoft.azure.sdk.iot.service.devicetwin.SqlQuery;
import com.microsoft.azure.sdk.iot.service.jobs.JobClient;
import com.microsoft.azure.sdk.iot.service.jobs.JobResult;
import com.microsoft.azure.sdk.iot.service.jobs.JobStatus;

import java.util.Date;
import java.time.Instant;
import java.util.HashSet;
import java.util.Set;
import java.util.UUID;
Add the following class-level variables to the App class. Replace
{youriothubconnectionstring}with your IoT hub connection string that you copied previously in Get the IoT hub connection string:public static final String iotHubConnectionString = "{youriothubconnectionstring}"; public static final String deviceId = "myDeviceId"; // How long the job is permitted to run without // completing its work on the set of devices private static final long maxExecutionTimeInSeconds = 30;Add the following method to the App class to schedule a job to update the Building and Floor desired properties in the device twin:
private static JobResult scheduleJobSetDesiredProperties(JobClient jobClient, String jobId) {
  DeviceTwinDevice twin = new DeviceTwinDevice(deviceId);
  Set<Pair> desiredProperties = new HashSet<Pair>();
  desiredProperties.add(new Pair("Building", 43));
  desiredProperties.add(new Pair("Floor", 3));
  twin.setDesiredProperties(desiredProperties);
  // Optimistic concurrency control
  twin.setETag("*");

  // Schedule the update twin job to run now
  // against a single device
  System.out.println("Schedule job " + jobId + " for device " + deviceId);
  try {
    JobResult jobResult = jobClient.scheduleUpdateTwin(jobId,
      "deviceId='" + deviceId + "'",
      twin,
      new Date(),
      maxExecutionTimeInSeconds);
    return jobResult;
  } catch (Exception e) {
    System.out.println("Exception scheduling desired properties job: " + jobId);
    System.out.println(e.getMessage());
    return null;
  }
}
To schedule a job to call the lockDoor method, add the following method to the App class:
private static JobResult scheduleJobCallDirectMethod(JobClient jobClient, String jobId) {
  // Schedule a job now to call the lockDoor direct method
  // against a single device. Response and connection
  // timeouts are set to 5 seconds.
  System.out.println("Schedule job " + jobId + " for device " + deviceId);
  try {
    JobResult jobResult = jobClient.scheduleDeviceMethod(jobId,
      "deviceId='" + deviceId + "'",
      "lockDoor",
      5L, 5L, null,
      new Date(),
      maxExecutionTimeInSeconds);
    return jobResult;
  } catch (Exception e) {
    System.out.println("Exception scheduling direct method job: " + jobId);
    System.out.println(e.getMessage());
    return null;
  }
};
To monitor a job, add the following method to the App class:
private static void monitorJob(JobClient jobClient, String jobId) {
  try {
    JobResult jobResult = jobClient.getJob(jobId);
    if(jobResult == null)
    {
      System.out.println("No JobResult for: " + jobId);
      return;
    }
    // Check the job result until it's completed
    while(jobResult.getJobStatus() != JobStatus.completed)
    {
      Thread.sleep(100);
      jobResult = jobClient.getJob(jobId);
      System.out.println("Status " + jobResult.getJobStatus() + " for job " + jobId);
    }
    System.out.println("Final status " + jobResult.getJobStatus() + " for job " + jobId);
  } catch (Exception e) {
    System.out.println("Exception monitoring job: " + jobId);
    System.out.println(e.getMessage());
    return;
  }
}
To query for the details of the jobs you ran, add the following method:
private static void queryDeviceJobs(JobClient jobClient, String start) throws Exception {
  System.out.println("\nQuery device jobs since " + start);

  // Create a jobs query using the time the jobs started
  Query deviceJobQuery = jobClient
      .queryDeviceJob(SqlQuery.createSqlQuery("*", SqlQuery.FromType.JOBS, "devices.jobs.startTimeUtc > '" + start + "'", null).getQuery());

  // Iterate over the list of jobs and print the details
  while (jobClient.hasNextJob(deviceJobQuery)) {
    System.out.println(jobClient.getNextJob(deviceJobQuery));
  }
}
Update the main method signature to include the following
throwsclause:public static void main( String[] args ) throws ExceptionTo run and monitor two jobs sequentially, replace the code in the main method with the following code:
// Record the start time
String start = Instant.now().toString();

// Create JobClient
JobClient jobClient = JobClient.createFromConnectionString(iotHubConnectionString);
System.out.println("JobClient created with success");

// Schedule twin job desired properties
// Maximum concurrent jobs is 1 for Free and S1 tiers
String desiredPropertiesJobId = "DPCMD" + UUID.randomUUID();
scheduleJobSetDesiredProperties(jobClient, desiredPropertiesJobId);
monitorJob(jobClient, desiredPropertiesJobId);

// Schedule twin job direct method
String directMethodJobId = "DMCMD" + UUID.randomUUID();
scheduleJobCallDirectMethod(jobClient, directMethodJobId);
monitorJob(jobClient, directMethodJobId);

// Run a query to show the job detail
queryDeviceJobs(jobClient, start);

System.out.println("Shutting down schedule-jobs app");
Save and close the schedule-jobs\src\main\java\com\mycompany\app\App.java file
Build the schedule-jobs app and correct any errors. At your command prompt, navigate to the schedule-jobs folder and run the following command:
mvn clean package -DskipTests
Create a device app
In this section, you create a Java console app that handles the desired properties sent from IoT Hub and implements the direct method call.
In the iot-java-schedule-jobs folder, create a Maven project called simulated-device using the following command at your command prompt. Note this is a single, long command:
mvn archetype:generate -DgroupId=com.mycompany.app -DartifactId=simulated-device -DarchetypeArtifactId=maven-archetype-quickstart -DinteractiveMode=falseAt your command prompt, navigate to the simulated-device folder.
Using a text editor, open the pom.xml file in the simulated-device folder and add the following dependencies to the dependencies node. This dependency enables you to use the iot-device-client package in your app to communicate with your IoT hub:
<dependency>
  <groupId>com.microsoft.azure.sdk.iot</groupId>
  <artifactId>iot-device-client</artifactId>
  <version>1.17.5</version>
</dependency>
Note
You can check for the latest version of iot-device-client using Maven search.
Add the following dependency to the dependencies node. This dependency configures a NOP for the Apache SLF4J logging facade, which is used by the device client SDK to implement logging. This configuration is optional, but if you omit it, you may see a warning in the console when you run the app. For more information about logging in the device client SDK, see Loggingin the Samples for the Azure IoT device SDK for Java readme file.
<dependency>
  <groupId>org.slf4j</groupId>
  <artifactId>slf4j-nop</artifactId>
  <version>1.7.28</version>
</dependency>
Add the following build node after the dependencies node. This configuration instructs Maven to use Java 1.8 to build the app:
<build>
  <plugins>
    <plugin>
      <groupId>org.apache.maven.plugins</groupId>
      <artifactId>maven-compiler-plugin</artifactId>
      <version>3.3</version>
      <configuration>
        <source>1.8</source>
        <target>1.8</target>
      </configuration>
    </plugin>
  </plugins>
</build>
Save and close the pom.xml file.
Using a text editor, open the simulated-device\src\main\java\com\mycompany\app\App.java file.
Add the following import statements to the file:
import com.microsoft.azure.sdk.iot.device.*;
import com.microsoft.azure.sdk.iot.device.DeviceTwin.*;

import java.io.IOException;
import java.net.URISyntaxException;
import java.util.Scanner;
Add the following class-level variables to the App class. Replace
{yourdeviceconnectionstring}with the device connection string you saw when you registered a device in your IoT Hub:private static String connString = "{yourdeviceconnectionstring}"; private static IotHubClientProtocol protocol = IotHubClientProtocol.MQTT; private static final int METHOD_SUCCESS = 200; private static final int METHOD_NOT_DEFINED = 404;This sample app uses the protocol variable when it instantiates a DeviceClient object.
To print device twin notifications to the console, add the following nested class to the App class:
// Handler for device twin operation notifications from IoT Hub
protected static class DeviceTwinStatusCallBack implements IotHubEventCallback {
  public void execute(IotHubStatusCode status, Object context) {
    System.out.println("IoT Hub responded to device twin operation with status " + status.name());
  }
}
To print direct method notifications to the console, add the following nested class to the App class:
// Handler for direct method notifications from IoT Hub
protected static class DirectMethodStatusCallback implements IotHubEventCallback {
  public void execute(IotHubStatusCode status, Object context) {
    System.out.println("IoT Hub responded to direct method operation with status " + status.name());
  }
}
To handle direct method calls from IoT Hub, add the following nested class to the App class:
// Handler for direct method calls from IoT Hub
protected static class DirectMethodCallback
    implements DeviceMethodCallback {
  @Override
  public DeviceMethodData call(String methodName, Object methodData, Object context) {
    DeviceMethodData deviceMethodData;
    switch (methodName) {
      case "lockDoor": {
        System.out.println("Executing direct method: " + methodName);
        deviceMethodData = new DeviceMethodData(METHOD_SUCCESS, "Executed direct method " + methodName);
        break;
      }
      default: {
        deviceMethodData = new DeviceMethodData(METHOD_NOT_DEFINED, "Not defined direct method " + methodName);
      }
    }
    // Notify IoT Hub of result
    return deviceMethodData;
  }
}
Update the main method signature to include the following
throwsclause:public static void main( String[] args ) throws IOException, URISyntaxExceptionReplace the code in the main method with the following code to:
- Create a device client to communicate with IoT Hub.
- Create a Device object to store the device twin properties.
// Create a device client
DeviceClient client = new DeviceClient(connString, protocol);

// An object to manage device twin desired and reported properties
Device dataCollector = new Device() {
  @Override
  public void PropertyCall(String propertyKey, Object propertyValue, Object context)
  {
    System.out.println("Received desired property change: " + propertyKey + " " + propertyValue);
  }
};
To start the device client services, add the following code to the main method:
try {
  // Open the DeviceClient
  // Start the device twin services
  // Subscribe to direct method calls
  client.open();
  client.startDeviceTwin(new DeviceTwinStatusCallBack(), null, dataCollector, null);
  client.subscribeToDeviceMethod(new DirectMethodCallback(), null, new DirectMethodStatusCallback(), null);
} catch (Exception e) {
  System.out.println("Exception, shutting down \n" + " Cause: " + e.getCause() + " \n" + e.getMessage());
  dataCollector.clean();
  client.closeNow();
  System.out.println("Shutting down...");
}
To wait for the user to press the Enter key before shutting down, add the following code to the end of the main method:
// Close the app
System.out.println("Press any key to exit...");
Scanner scanner = new Scanner(System.in);
scanner.nextLine();
dataCollector.clean();
client.closeNow();
scanner.close();
Save and close the simulated-device\src\main\java\com\mycompany\app\App.java file.
Build the simulated-device app and correct any errors. At your command prompt, navigate to the simulated-device folder and run the following command:
mvn clean package -DskipTests
Run the apps
You are now ready to run the console apps.
At a command prompt in the simulated-device folder, run the following command to start the device app listening for desired property changes and direct method calls:
mvn exec:java -Dexec.mainClass="com.mycompany.app.App"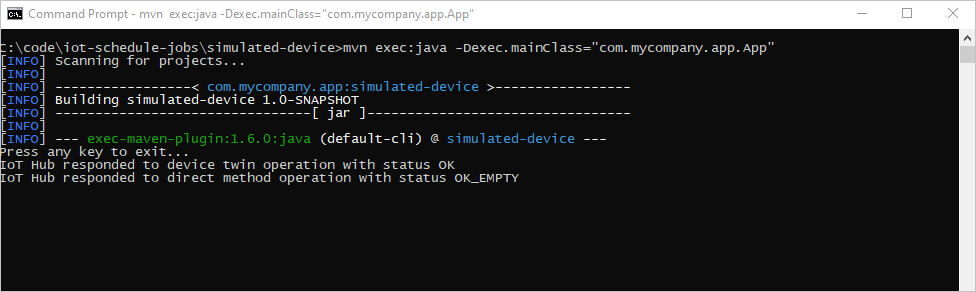
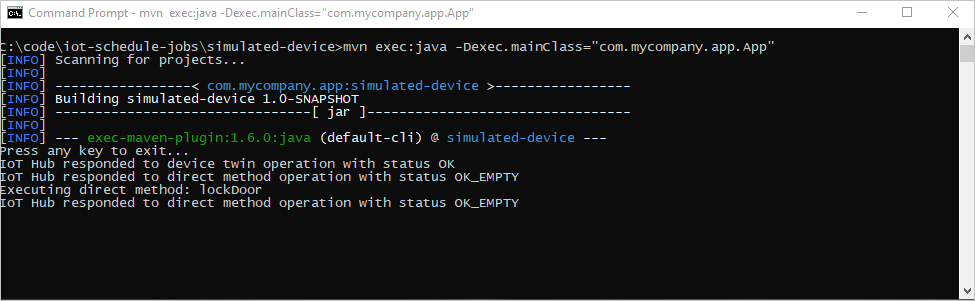
At a command prompt in the
schedule-jobsfolder, run the following command to run the schedule-jobs service app to run two jobs. The first sets the desired property values, the second calls the direct method:mvn exec:java -Dexec.mainClass="com.mycompany.app.App"
The device app handles the desired property change and the direct method call:
Next steps
In this article, you scheduled jobs to run a direct method and update the device twin's properties.
To continue exploring IoT Hub and device management patterns, update an image in Device Update for Azure IoT Hub tutorial using the Raspberry Pi 3 B+ Reference Image.
Feedback
Coming soon: Throughout 2024 we will be phasing out GitHub Issues as the feedback mechanism for content and replacing it with a new feedback system. For more information see: https://aka.ms/ContentUserFeedback.
Submit and view feedback for