Tutorial: Use a simulated device to test connectivity with your IoT hub
In this tutorial, you use Azure IoT Hub portal tools and Azure CLI commands to test device connectivity. This tutorial also uses a simple device simulator that you run on your desktop machine.
If you don't have an Azure subscription, create a free account before you begin.
In this tutorial, you learn how to:
- Check your device authentication
- Check device-to-cloud connectivity
- Check cloud-to-device connectivity
- Check device twin synchronization
Prerequisites
This tutorial uses the Azure CLI to create cloud resources. There are two ways to run CLI commands:
Use the Bash environment in Azure Cloud Shell. For more information, see Azure Cloud Shell Quickstart - Bash.

If you prefer to run CLI reference commands locally, install the Azure CLI. If you're running on Windows or macOS, consider running Azure CLI in a Docker container. For more information, see How to run the Azure CLI in a Docker container.
- Sign in to the Azure CLI by using the az login command.
- When you're prompted, install Azure CLI extensions on first use. For more information about extensions, see Use extensions with the Azure CLI.
- Run az version to find the version and dependent libraries that are installed. To upgrade to the latest version, run az upgrade.
Note
This article uses the newest version of the Azure IoT extension, called
azure-iot. The legacy version is calledazure-cli-iot-ext.You should only have one version installed at a time. You can use the commandaz extension listto validate the currently installed extensions.Use
az extension remove --name azure-cli-iot-extto remove the legacy version of the extension.Use
az extension add --name azure-iotto add the new version of the extension.To see what extensions you have installed, use
az extension list.The sample application that you run in this tutorial uses Node.js. You need Node.js v10.x.x or later on your development machine.
You can download Node.js for multiple platforms from nodejs.org.
You can verify the current version of Node.js on your development machine using the following command:
node --version
Clone or download the sample Node.js project from Azure IoT samples for Node.js.
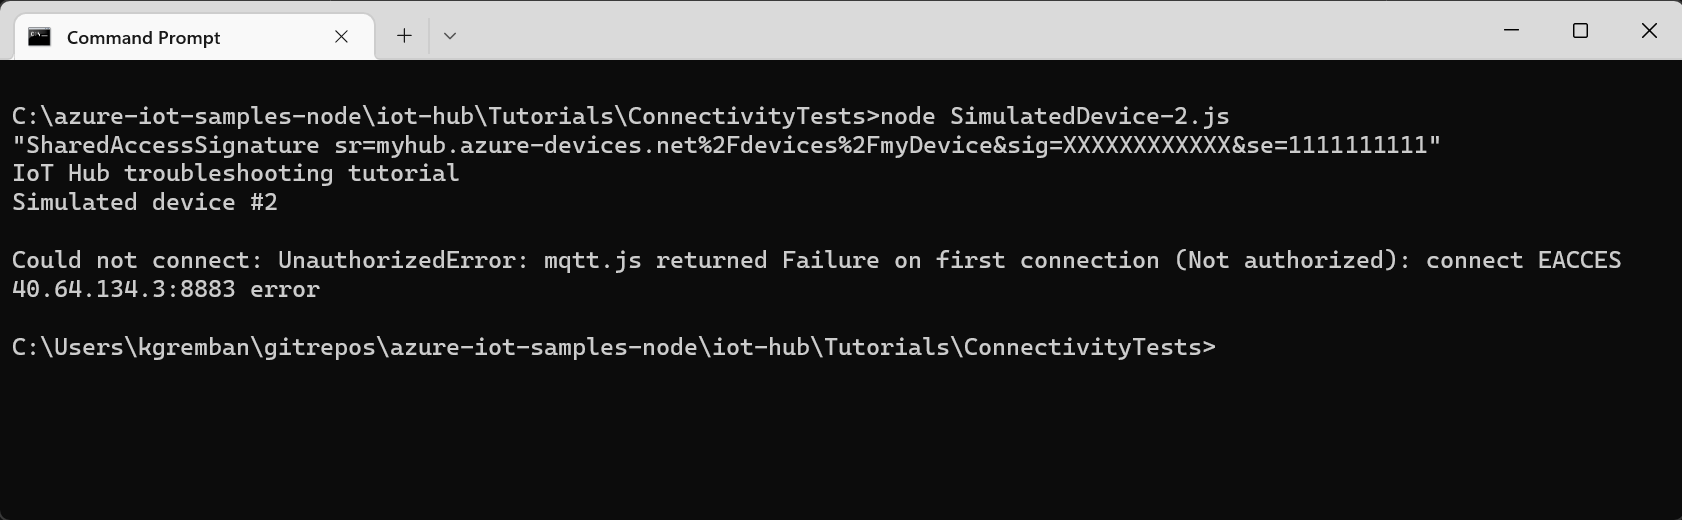
Make sure that port 8883 is open in your firewall. The device sample in this tutorial uses MQTT protocol, which communicates over port 8883. This port may be blocked in some corporate and educational network environments. For more information and ways to work around this issue, see Connecting to IoT Hub (MQTT).
Create an IoT hub
In this section, you use Azure CLI to create an IoT hub and a resource group. An Azure resource group is a logical container into which Azure resources are deployed and managed. An IoT hub acts as a central message hub for bi-directional communication between your IoT application and the devices.
If you already have an IoT hub in your Azure subscription, you can skip this section.
To create an IoT hub and a resource group:
Launch your CLI app. To run the CLI commands in the rest of this article, copy the command syntax, paste it into your CLI app, edit variable values, and press
Enter.- If you're using Cloud Shell, select the Try It button on the CLI commands to launch Cloud Shell in a split browser window. Or you can open the Cloud Shell in a separate browser tab.
- If you're using Azure CLI locally, start your CLI console app and sign in to Azure CLI.
Run az extension add to install or upgrade the azure-iot extension to the current version.
az extension add --upgrade --name azure-iotIn your CLI app, run the az group create command to create a resource group. The following command creates a resource group named MyResourceGroup in the eastus location.
Note
Optionally, you can set a different location. To see available locations, run
az account list-locations. This quickstart uses eastus as shown in the example command.az group create --name MyResourceGroup --location eastusRun the az iot hub create command to create an IoT hub. It might take a few minutes to create an IoT hub.
YourIotHubName. Replace this placeholder and the surrounding braces in the following command, using the name you chose for your IoT hub. An IoT hub name must be globally unique in Azure. Use your IoT hub name in the rest of this quickstart wherever you see the placeholder.
az iot hub create --resource-group MyResourceGroup --name {your_iot_hub_name}
Check device authentication
A device must authenticate with your hub before it can exchange any data with the hub. You can use the IoT Devices tool in the Device Management section of the portal to manage your devices and check the authentication keys they're using. In this section of the tutorial, you add a new test device, retrieve its key, and check that the test device can connect to the hub. Later you reset the authentication key to observe what happens when a device tries to use an outdated key.
Register a device
A device must be registered with your IoT hub before it can connect. In this section, you use Azure CLI to create a device identity.
If you already have a device registered in your IoT hub, you can skip this section.
To create a device identity:
Run the az iot hub device-identity create command in your CLI shell. This command creates the device identity.
your_iot_hub_name. Replace this placeholder below with the name you chose for your IoT hub.
myDevice. You can use this name for the device ID throughout this article, or provide a different device name.
az iot hub device-identity create --device-id myDevice --hub-name {your_iot_hub_name}Run the az iot hub device-identity connection-string show command.
az iot hub device-identity connection-string show --device-id myDevice --hub-name {your_iot_hub_name}The connection string output is in the following format:
HostName=<your IoT Hub name>.azure-devices.net;DeviceId=<your device id>;SharedAccessKey=<some value>Save the connection string in a secure location.
Note
Keep your CLI app open. You'll use it in later steps.
Simulate a test device
To simulate a device sending telemetry to your IoT hub, run the Node.js simulated device application you downloaded previously.
In a terminal window on your development machine, navigate to the root folder of the sample Node.js project that you downloaded. Then navigate to the iot-hub\Tutorials\ConnectivityTests folder.
In the terminal window, run the following commands to install the required libraries and run the simulated device application. Use the device connection string you made a note of when you registered the device.
npm install
node SimulatedDevice-1.js "{your_device_connection_string}"
The terminal window displays a success message once it connects to your hub:
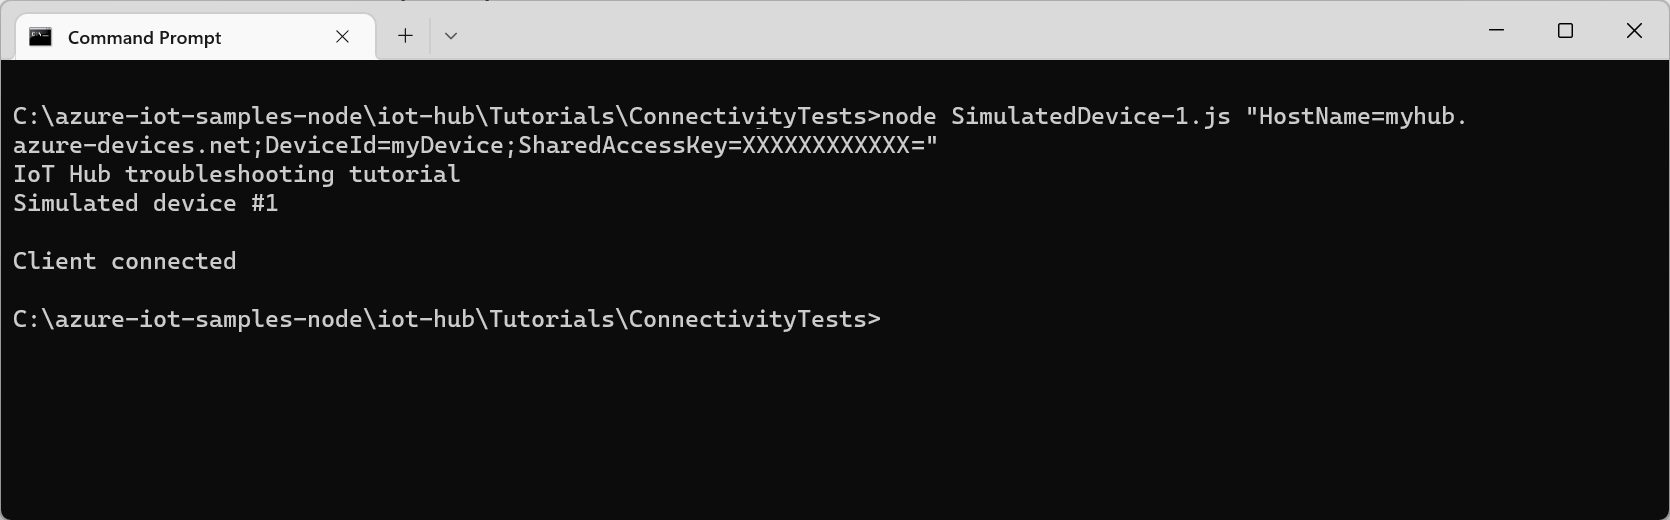
You've now successfully authenticated from a device using a device key generated by your IoT hub.
Reset keys
In this section, you reset the device key and observe the error when the simulated device tries to connect.
To reset the primary device key for your device, run the az iot hub device-identity update command:
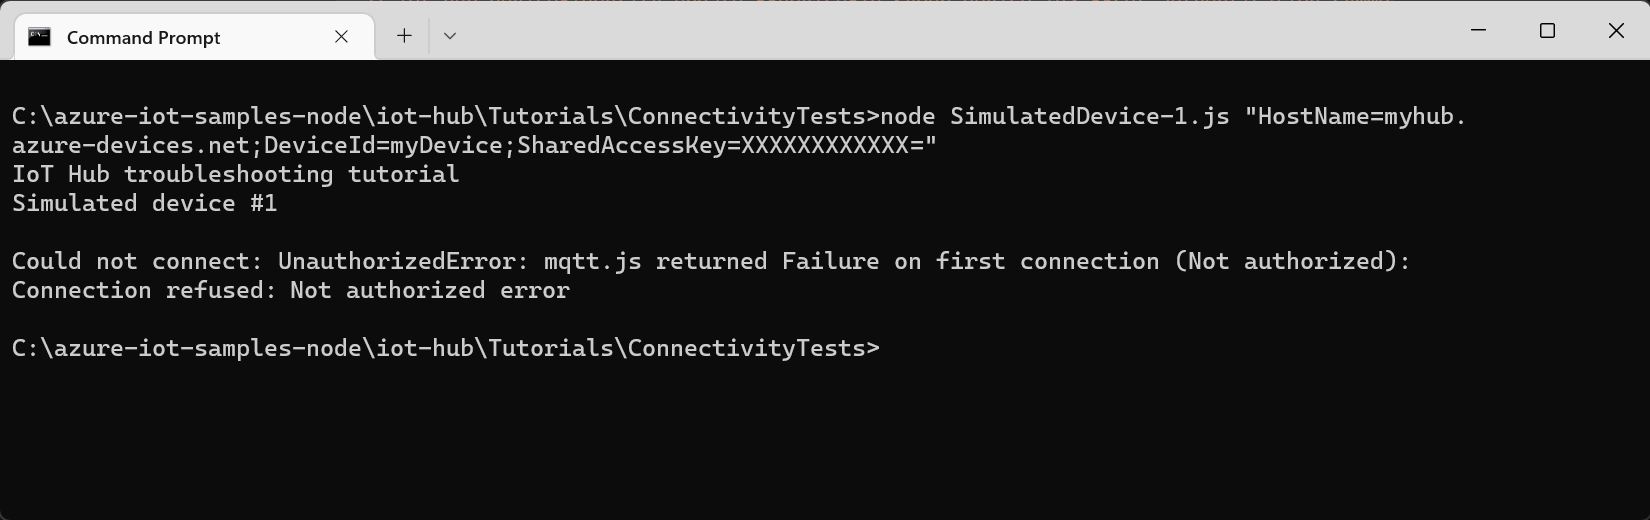
# Generate a new Base64 encoded key using the current date
read key < <(date +%s | sha256sum | base64 | head -c 32)

# Reset the primary device key for test device
az iot hub device-identity update --device-id {your_device_id} --set authentication.symmetricKey.primaryKey=$key --hub-name {your_iot_hub_name}
In the terminal window on your development machine, run the simulated device application again:
npm install
node SimulatedDevice-1.js "{your_device_connection_string}"
This time you see an authentication error when the application tries to connect:
Generate a shared access signature (SAS) token
If your device uses one of the IoT Hub device SDKs, the SDK library code generates the SAS token used to authenticate with the hub. A SAS token is generated from the name of your hub, the name of your device, and the device key.
In some scenarios, such as in a cloud protocol gateway or as part of a custom authentication scheme, you may need to generate the SAS token yourself. To troubleshoot issues with your SAS generation code, it's useful to generate a known-good SAS token to use during testing.
Note
The SimulatedDevice-2.js sample includes examples of generating a SAS token both with and without the SDK.
Run the az iot hub genereate-sas-token command to generate a known-good SAS token using the CLI:
az iot hub generate-sas-token --device-id {your_device_id} --hub-name {your_iot_hub_name}Copy the full text of the generated SAS token. A SAS token looks like the following example:
SharedAccessSignature sr=tutorials-iot-hub.azure-devices.net%2Fdevices%2FmyDevice&sig=xxxxxx&se=111111In a terminal window on your development machine, navigate to the root folder of the sample Node.js project you downloaded. Then navigate to the iot-hub\Tutorials\ConnectivityTests folder.
In the terminal window, run the following commands to install the required libraries and run the simulated device application:
npm install
node SimulatedDevice-2.js "{Your SAS token}"
The terminal window displays a success message once it connects to your hub using the SAS token:
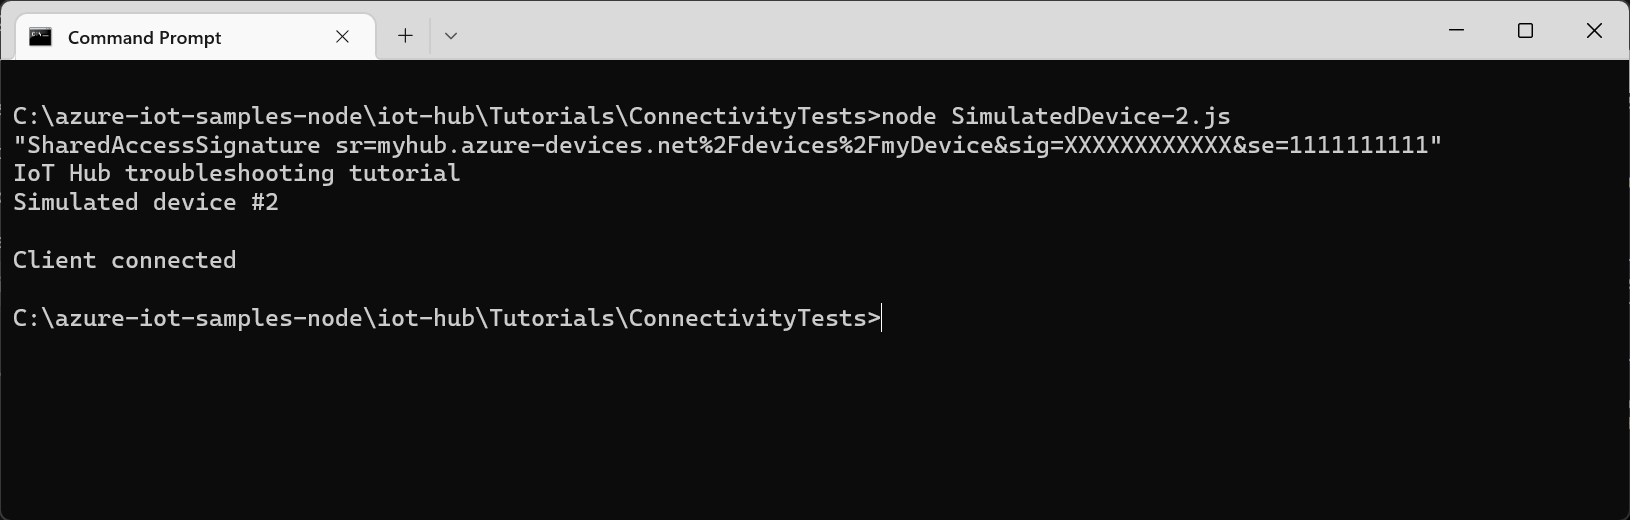
You've now successfully authenticated from a device using a test SAS token generated by a CLI command. The SimulatedDevice-2.js file includes sample code that shows you how to generate a SAS token in code.
Protocols
A device can use any of the following protocols to connect to your IoT hub:
| Protocol | Outbound port |
|---|---|
| MQTT | 8883 |
| MQTT over WebSockets | 443 |
| AMQP | 5671 |
| AMQP over WebSockets | 443 |
| HTTPS | 443 |
If the outbound port is blocked by a firewall, the device can't connect:
Check device-to-cloud connectivity
After a device connects, it can start sending telemetry to your IoT hub. This section shows you how you can verify that the telemetry sent by the device reaches your hub.
Send device-to-cloud messages
Since we reset the connection string for your device in the previous section, use the az iot hub device-identity connection-string show command to retrieve the updated connection string:
az iot hub device-identity connection-string show --device-id {your_device_id} --output table --hub-name {your_iot_hub_name}To run a simulated device that sends messages, navigate to the iot-hub\Tutorials\ConnectivityTests folder in the code you downloaded.
In the terminal window, run the following commands to install the required libraries and run the simulated device application:
npm install
node SimulatedDevice-3.js "{your_device_connection_string}"
The terminal window displays information as it sends telemetry to your hub:
Monitor incoming messages
You can use Metrics in the portal to verify that the telemetry messages are reaching your IoT hub.
In the Azure portal, select your IoT hub in the Resource drop-down.
Select Metrics from the Monitoring section of the navigation menu.
Select Telemetry messages sent as the metric, and set the time range to Past hour. The chart shows the aggregate count of messages sent by the simulated device:
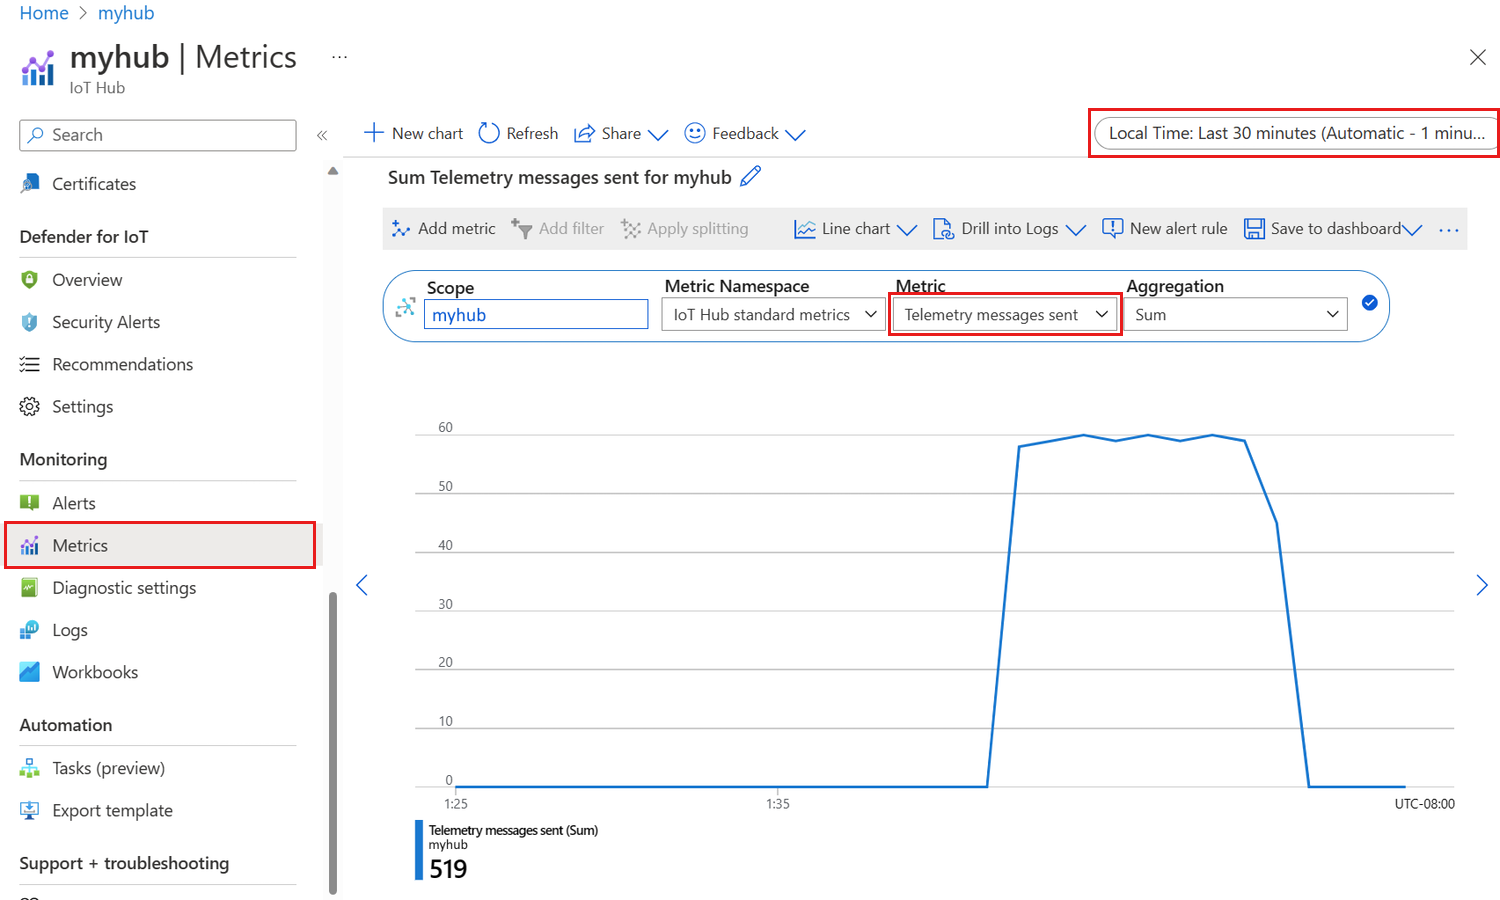
It takes a few minutes for the metrics to become available after you start the simulated device.
Check cloud-to-device connectivity
This section shows how you can make a test direct method call to a device to check cloud-to-device connectivity. You run a simulated device on your development machine to listen for direct method calls from your hub.
In a terminal window, use the following command to run the simulated device application:
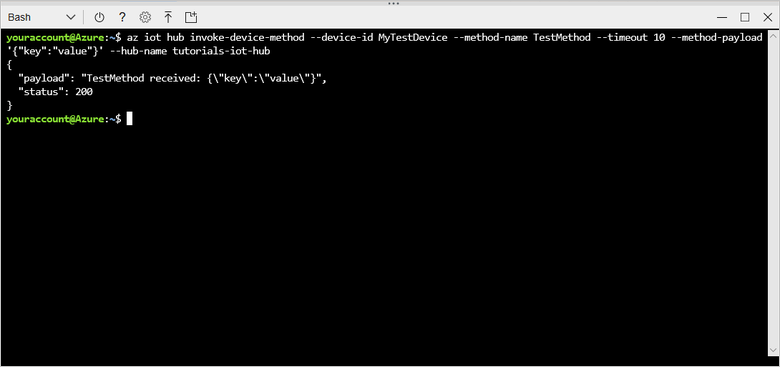
node SimulatedDevice-3.js "{your_device_connection_string}"In a separate window, use the az iot hub invoke-device-method command to call a direct method on the device:
az iot hub invoke-device-method --device-id {your_device_id} --method-name TestMethod --timeout 10 --method-payload '{"key":"value"}' --hub-name {your_iot_hub_name}The simulated device prints a message to the console when it receives a direct method call:
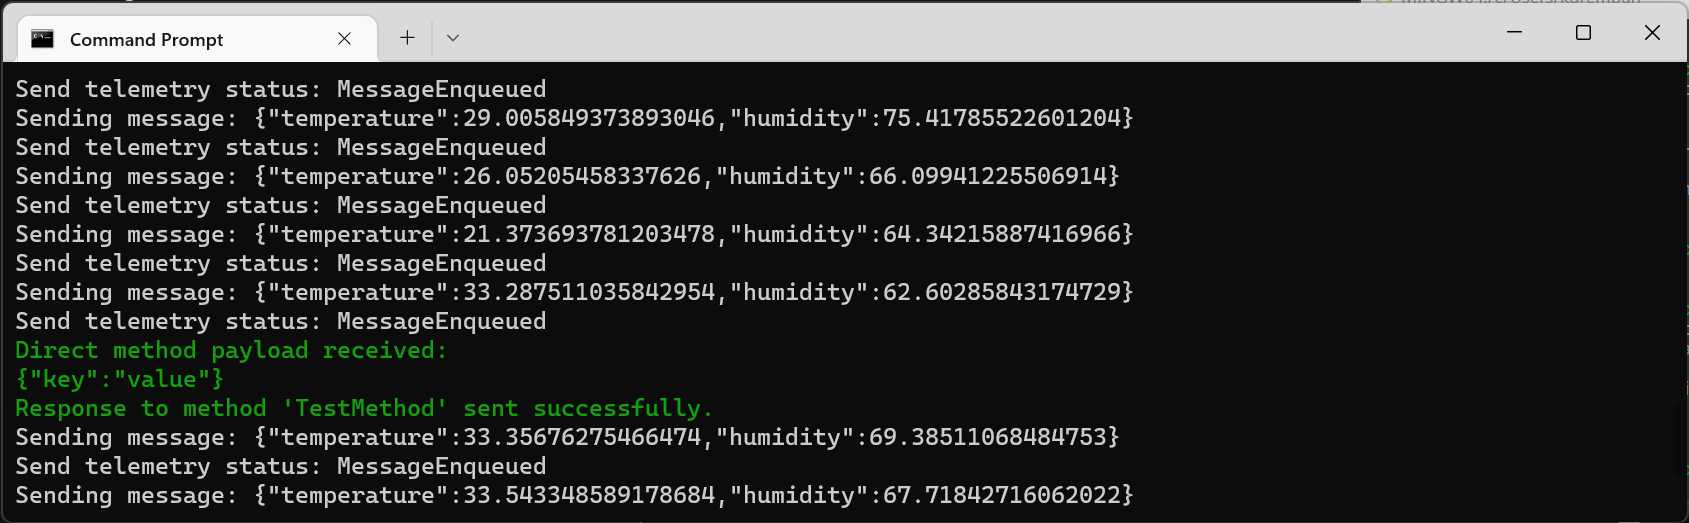
When the simulated device successfully receives the direct method call, it sends an acknowledgment back to the hub:
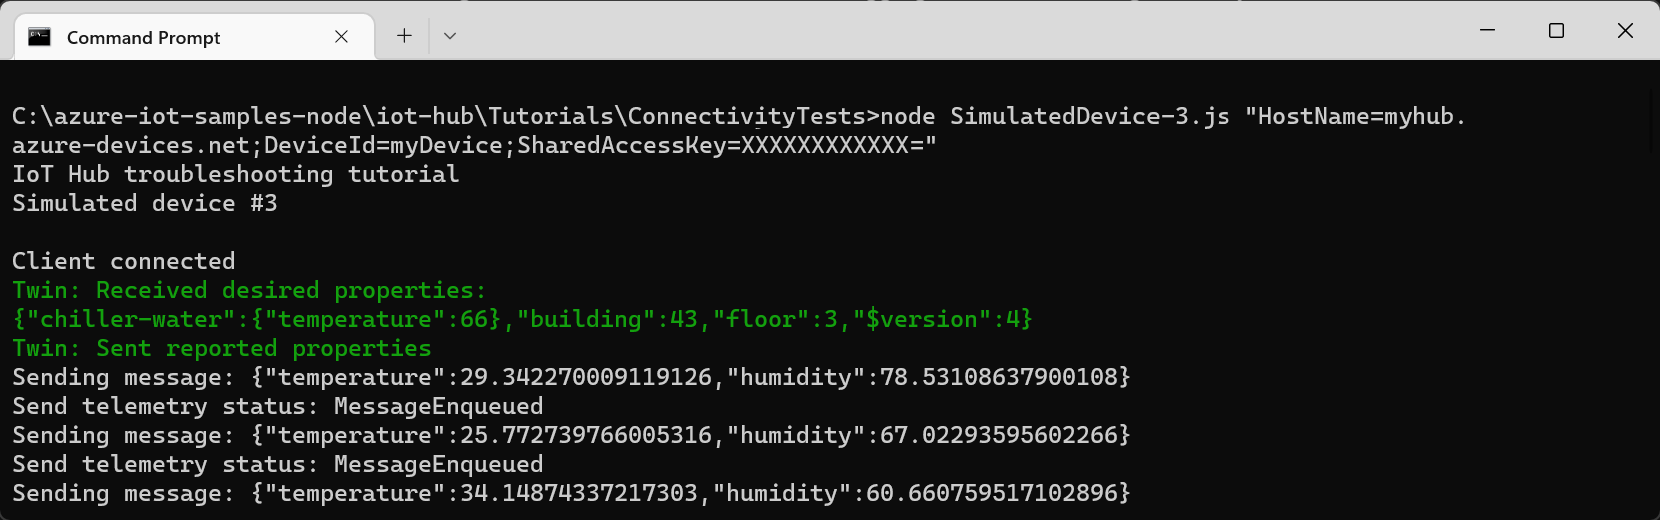
Check twin synchronization
Devices use twins to synchronize state between the device and the hub. In this section, you use CLI commands to send desired properties to a device and read the reported properties sent by the device.
The simulated device you use in this section sends reported properties to the hub whenever it starts up, and prints desired properties to the console whenever it receives them.
In a terminal window, use the following command to run the simulated device application:
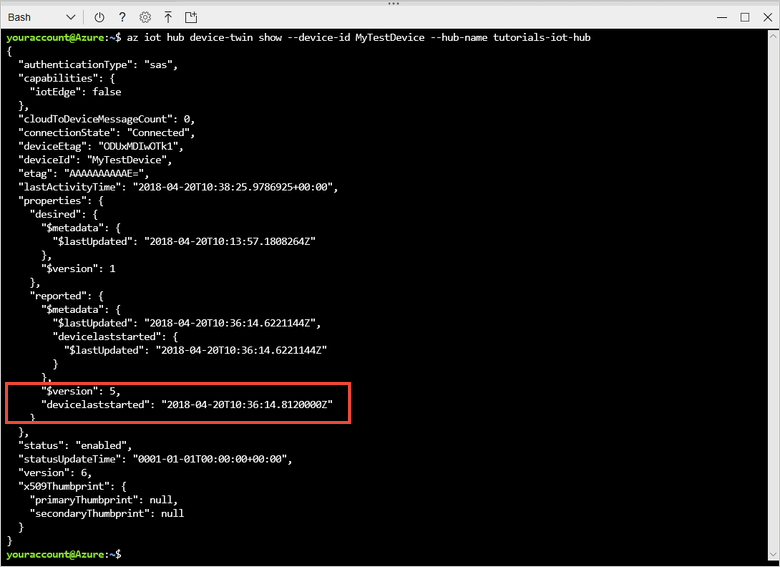
node SimulatedDevice-3.js "{your_device_connection_string}"In a separate window, run the az iot hub device-twin show command to verify that the hub received the reported properties from the device:
az iot hub device-twin show --device-id {your_device_id} --hub-name {your_iot_hub_name}In the output from the command, you can see the devicelaststarted property in the reported properties section. This property shows the date and time you last started the simulated device.
To verify that the hub can send desired property values to the device, use the az iot hub device-twin update command:
az iot hub device-twin update --set properties.desired='{"mydesiredproperty":"propertyvalue"}' --device-id {your_device_id} --hub-name {your_iot_hub_name}The simulated device prints a message when it receives a desired property update from the hub:
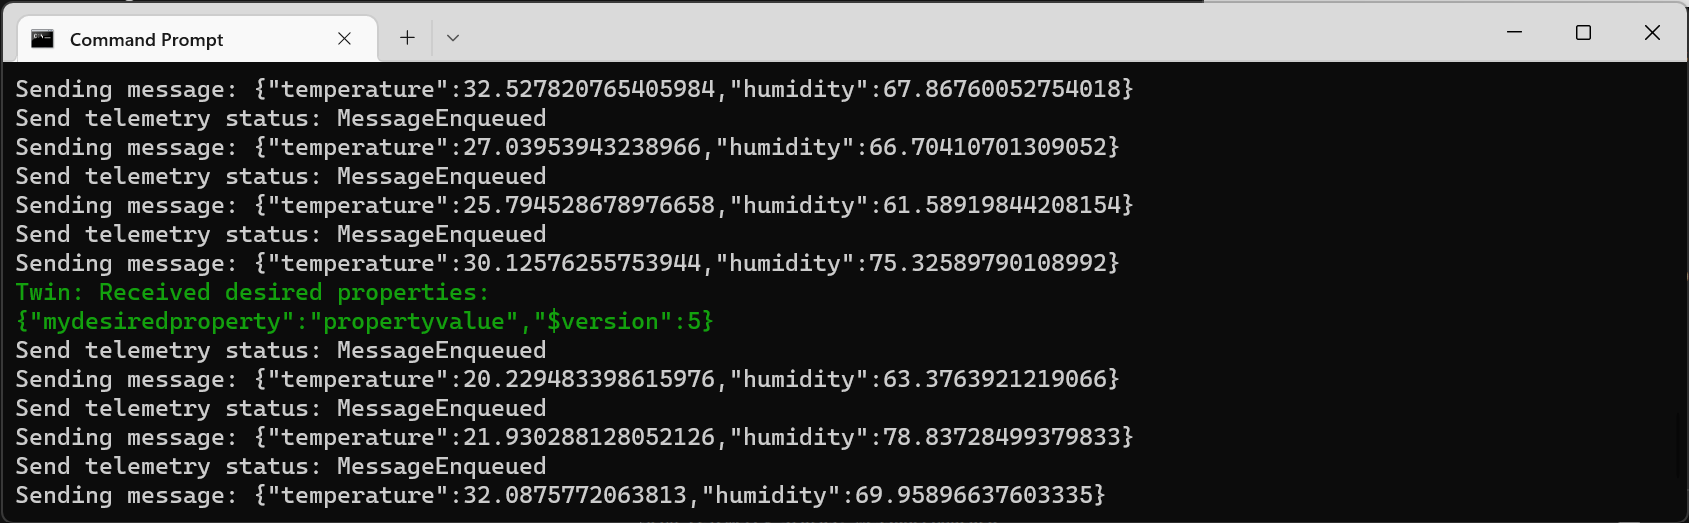
In addition to receiving desired property changes as they're made, the simulated device automatically checks for desired properties when it starts up.
Clean up resources
If you don't need the IoT hub any longer, delete it and the resource group in the portal. To do so, select the resource group that contains your IoT hub and select Delete.
Next steps
In this tutorial, you've seen how to check your device keys, check device-to-cloud connectivity, check cloud-to-device connectivity, and check device twin synchronization. To learn more about how to monitor your IoT hub, visit the how-to article for IoT Hub monitoring.
Feedback
Coming soon: Throughout 2024 we will be phasing out GitHub Issues as the feedback mechanism for content and replacing it with a new feedback system. For more information see: https://aka.ms/ContentUserFeedback.
Submit and view feedback for