Tutorial: Use Azure IoT Hub message enrichments
Message enrichments are the ability of Azure IoT Hub to stamp messages with additional information before the messages are sent to the designated endpoint. One reason to use message enrichments is to include data that can be used to simplify downstream processing. For example, enriching device messages with a device twin tag can reduce load on customers to make device twin API calls for this information. For more information, see Overview of message enrichments.
In the first part of this tutorial, you saw how to create custom endpoints and route messages to other Azure services. In this tutorial, you see how to create and configure the extra resources needed to test message enrichments for an IoT hub. The resources include a second storage container for an existing storage account (created in the first part of the tutorial) to hold the enriched messages and a message route to send them there. After the configurations for the message routing and message enrichments are finished, you use an application to send messages to the IoT hub. The hub then routes them to both storage containers. Only the messages sent to the endpoint for the enriched storage container are enriched.
In this tutorial, you perform the following tasks:
- Create a second container in your storage account.
- Create another custom endpoint and route messages to it from the IoT hub.
- Configure message enrichments that are routed to the new endpoint.
- Run an app that simulates an IoT device sending messages to the hub.
- View the results and verify that the message enrichments are being applied to the targeted messages.
Prerequisites
You must have an Azure subscription. If you don't have an Azure subscription, create a free account before you begin.
You must have completed Tutorial: Send device data to Azure Storage using IoT Hub message routing and maintained the resources you created for it.
Make sure that port 8883 is open in your firewall. The device sample in this tutorial uses MQTT protocol, which communicates over port 8883. This port may be blocked in some corporate and educational network environments. For more information and ways to work around this issue, see Connecting to IoT Hub (MQTT).
There are no other prerequisites for the Azure portal.

Create a second container in your storage account
In the first part of this tutorial, you created a storage account and container for routed messages. Now you should create a second container for enriched messages.
In the Azure portal, search for Storage accounts.
Select the account you created earlier.
In the storage account menu, select Containers from the Data storage section.
Select Container to create the new container.
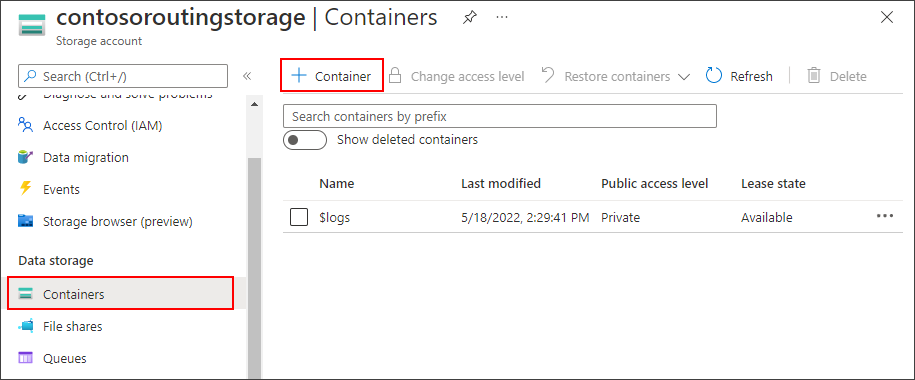
Name the container
enriched, and select Create.
Route messages to a second endpoint
Create a second endpoint and route for the enriched messages.
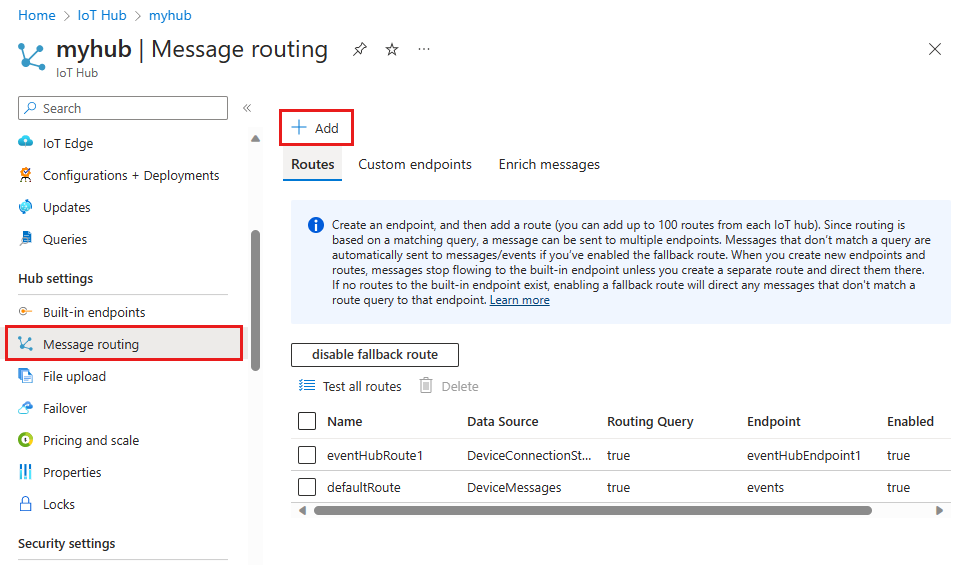
In the Azure portal, go to your IoT hub.
In the resource menu under Hub settings, select Message routing then select Add.
On the Endpoint tab, create a Storage endpoint by providing the following information:
Parameter Value Endpoint type Select Storage. Endpoint name Enter ContosoStorageEndpointEnriched.Azure Storage container Select Pick a container. Follow the prompts to select the storage account and enriched container that you created in the previous section. Encoding Select JSON. If this field is greyed out, then your storage account region doesn't support JSON. In that case, continue with the default AVRO. 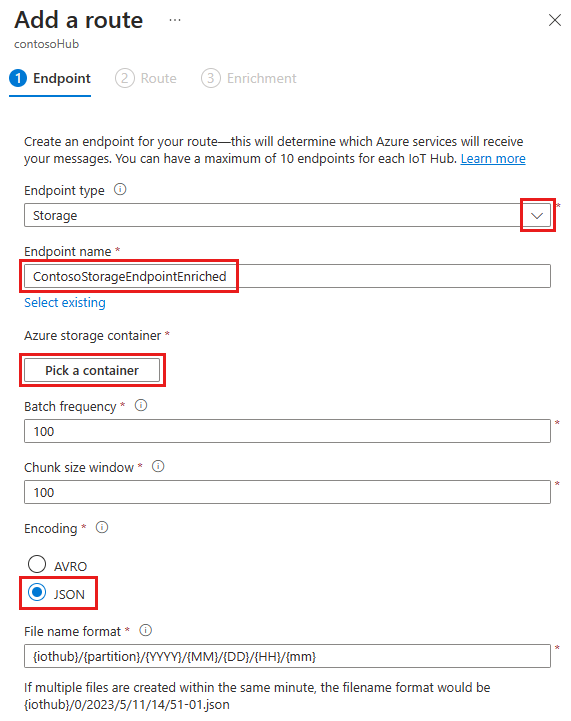
Accept the default values for the rest of the parameters and select Create + next.
Continue creating the new route, now that you've added the storage endpoint. Provide the following information for the new route:
Parameter Value Name ContosoStorageRouteEnriched Data source Verify that Device Telemetry Messages is selected from the dropdown list. Enable route Verify that this field is set to enabled.Routing query Enter level="storage"as the query string.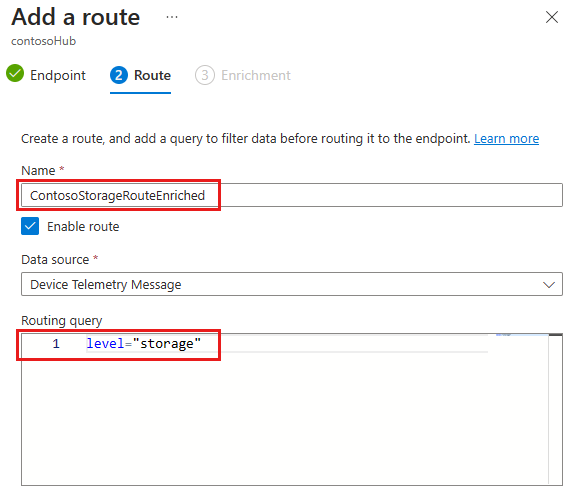
Select Create + add enrichments.
Add message enrichment to the new endpoint
Create three message enrichments that will be routed to the enriched storage container.
On the Enrichment tab of the Add a route wizard, add three message enrichments for the messages going to the endpoint for the storage container called enriched.
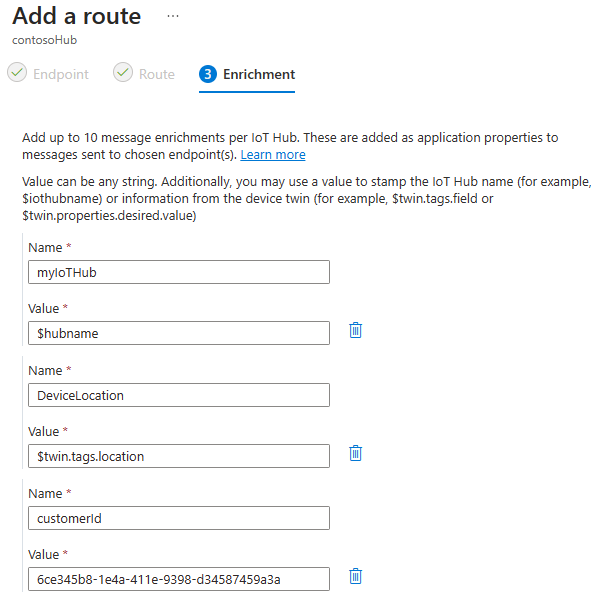
Add these values as message enrichments for the ContosoStorageEndpointEnriched endpoint:
Name Value myIotHub $hubnameDeviceLocation $twin.tags.location(assumes that the device twin has a location tag)customerID 6ce345b8-1e4a-411e-9398-d34587459a3aWhen you're finished, your enrichments should look similar to this image:
Select Add to add the message enrichments.
You now have message enrichments set up for all messages routed to the endpoint you created for enriched messages. If you don't want to add a location tag to the device twin, you can skip to the Test message enrichments section to continue the tutorial.
Add location tag to the device twin
One of the message enrichments configured on your IoT hub specifies a key of DeviceLocation with its value determined by the following device twin path: $twin.tags.location. If your device twin doesn't have a location tag, the twin path, $twin.tags.location, will be stamped as a string for the DeviceLocation key in the message enrichments.
Follow these steps to add a location tag to your device's twin:
Navigate to your IoT hub in the Azure portal.
Select Devices on the navigation menu of the IoT hub, then select your device.
Select the Device twin tab at the top of the device page and add the following line just before the closing brace at the bottom of the device twin. Then select Save.
, "tags": {"location": "Plant 43"}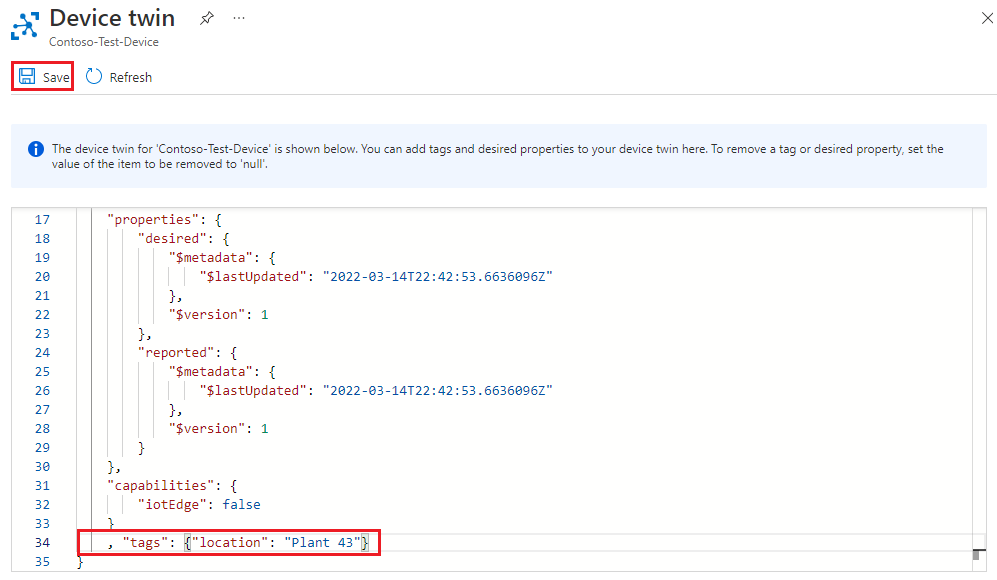
Tip
Wait about five minutes before continuing to the next section. It can take up to that long for updates to the device twin to be reflected in message enrichment values.
To learn more about how device twin paths are handled with message enrichments, see Message enrichments limitations. To learn more about device twins, see Understand and use device twins in IoT Hub.
Test message enrichments
Now that the message enrichments are configured for the ContosoStorageEndpointEnriched endpoint, run the simulated device application to send messages to the IoT hub. At this point, message routing has been set up as follows:
Messages routed to the storage endpoint you created in the first part of the tutorial won't be enriched and will be stored in the storage container you created then.
Messages routed to the storage endpoint ContosoStorageEndpointEnriched will be enriched and stored in the storage container enriched.
If you aren't still running the SimulatedDevice console application from the first part of this tutorial, run it again:
Tip
If you're following the Azure CLI steps for this tutorial, run the sample code in a separate session. That way, you can allow the sample code to continue running while you follow the rest of the CLI steps.
In the sample folder, navigate to the
/iot-hub/Tutorials/Routing/SimulatedDevice/folder.The variable definitions you updated before should still be valid but, if not, edit them in the
Program.csfile:Find the variable definitions at the top of the Program class. Update the following variables with your own information:
- s_myDeviceId: The device ID that you assigned when registering the device to your IoT hub.
- s_iotHubUri: The hostname of your IoT hub, which takes the format
IOTHUB_NAME.azure-devices.net. - s_deviceKey: The device primary key found in the device identity information.
Save and close the file.
Run the sample code:
dotnet run
After leaving the console application to run for a few minutes, view the data:
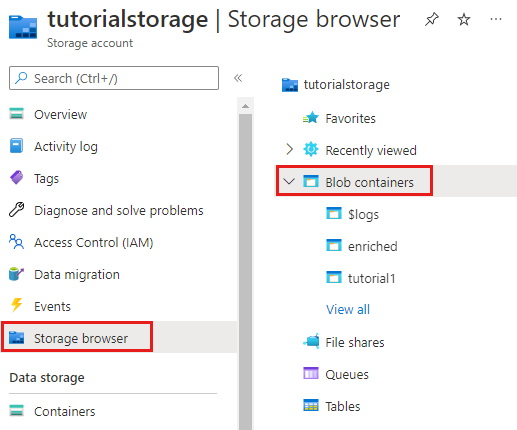
In the Azure portal, navigate to your storage account.
Select Storage browser from the navigation menu. Select Blob containers to see the two containers that you created over the course of these tutorials.
The messages in the container called enriched have the message enrichments included in the messages. The messages in the container you created earlier have the raw messages with no enrichments. Drill down into the enriched container until you get to the bottom and then open the most recent message file. Then do the same for the other container to verify that one is enriched and one isn't.
When you look at messages that have been enriched, you should see "myIotHub" with the hub name, the location, and the customer ID, like this:
{
  "EnqueuedTimeUtc":"2019-05-10T06:06:32.7220000Z",
  "Properties":
  {
    "level":"storage",
    "myIotHub":"{your hub name}",
    "DeviceLocation":"Plant 43",
    "customerID":"6ce345b8-1e4a-411e-9398-d34587459a3a"
  },
  "SystemProperties":
  {
    "connectionDeviceId":"Contoso-Test-Device",
    "connectionAuthMethod":"{\"scope\":\"device\",\"type\":\"sas\",\"issuer\":\"iothub\",\"acceptingIpFilterRule\":null}",
    "connectionDeviceGenerationId":"636930642531278483",
    "enqueuedTime":"2019-05-10T06:06:32.7220000Z"
  },"Body":"eyJkZXZpY2VJZCI6IkNvbnRvc28tVGVzdC1EZXZpY2UiLCJ0ZW1wZXJhdHVyZSI6MjkuMjMyMDE2ODQ4MDQyNjE1LCJodW1pZGl0eSI6NjQuMzA1MzQ5NjkyODQ0NDg3LCJwb2ludEluZm8iOiJUaGlzIGlzIGEgc3RvcmFnZSBtZXNzYWdlLiJ9"
}
Clean up resources
To remove all of the resources you created in both parts of this tutorial, delete the resource group. This action deletes all resources contained within the group. If you don't want to delete the entire resource group, you can select individual resources within to delete.
- In the Azure portal, navigate to the resource group that contains the IoT hub and storage account for this tutorial.
- Review all the resources that are in the resource group to determine which ones you want to clean up.
- If you want to delete all the resource, select Delete resource group.
- If you only want to delete certain resource, use the check boxes next to each resource name to select the ones you want to delete. Then select Delete.
Next steps
In this tutorial, you configured and tested message enrichments for IoT Hub messages as they're routed to an endpoint.
For more information about message enrichments, see Overview of message enrichments.
To learn more about IoT Hub, continue to the next tutorial.
Feedback
Coming soon: Throughout 2024 we will be phasing out GitHub Issues as the feedback mechanism for content and replacing it with a new feedback system. For more information see: https://aka.ms/ContentUserFeedback.
Submit and view feedback for