Migrate from lab accounts to lab plans
Lab plans replace lab accounts in Azure Lab Services. This article lists the steps needed to migrate your lab accounts to lab plans. Lab plans bring improvements in performance, reliability, and scalability. Lab plans also give you more flexibility for managing labs, using capacity, and tracking costs.
Important
Azure Lab Services lab plans replace lab accounts. Learn how you can get started by creating a lab plan. For existing lab account customers, we recommend that you migrate from lab accounts to lab plans.
Difference between lab plans and lab accounts
In Azure Lab Services, lab plans replace lab accounts and there some fundamental differences between the two concepts. A lab plan serves as a collection of configurations and settings that apply to the labs you create from it. Also, a lab is now an Azure resource in its own right and a sibling resource to lab plans. Learn more about the difference between lab plans and lab accounts.
If you're moving from lab accounts to lab plans, there's likely to be a time when you're using both your existing lab accounts and using the newer lab plans. Both are still supported, can coexist in your Azure subscription, and can even share the same external resources.
Migration process at-a-glance
This checklist highlights the high-level migration process:
- Request capacity for your lab plans
- Configure shared resources
- Create additional lab plans
- Validate images
- Create and publish labs
- Update cost management reports
1. Request capacity
When you use lab plans, you're now assigned your own dedicated VM cores quota. This quota is assigned per-subscription. The initial number of VM cores assigned to your subscription is limited, so you need to request a core limit increase.
Important
Even if you're already using lab accounts, you still need to request capacity because your VM cores are not automatically available for creating labs with lab plans. You can either request your capacity to be transferred to lab plans, or request new capacity.
Transfer VM cores from lab accounts
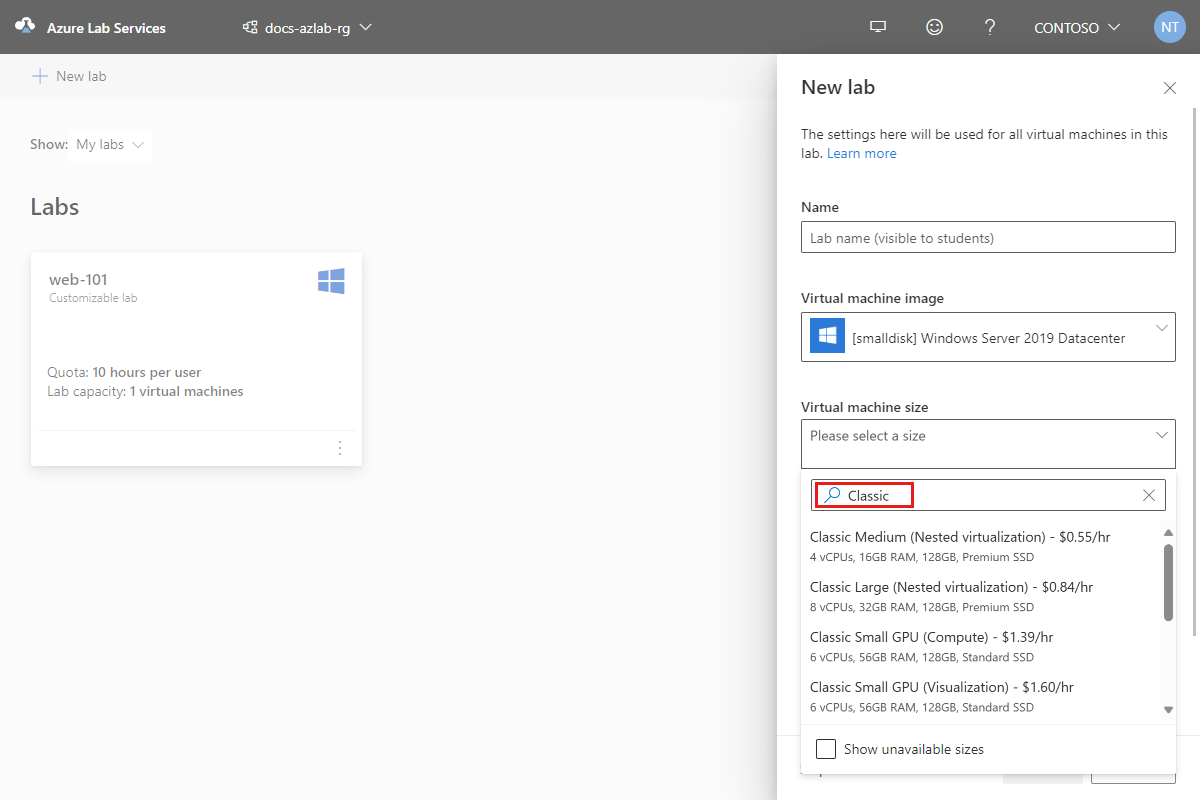
When you create a lab plan and you still have lab accounts in your Azure subscription, then you can select from the list of VM sizes that were available for lab accounts. In the Azure Lab Services user interface, these VM sizes are marked as classic VM sizes. Learn more about virtual machine sizes in the administrator's guide.
Important
You can't request capacity for the classic VM sizes. You can only get access to the classic VM sizes by requesting a transfer of the VM core capacity that was previously assigned to your lab accounts. After the transfer, you can then select from the classic VM sizes for creating labs in your lab plans.
To request a transfer of your lab account VM core capacity:
In the Azure portal, create an Azure support request.
Provide the following information in the support request:
The number of cores you want to transfer
The type VM sizes you need
The Azure region in which the capacity needs to be available
Tip
It's recommended to request a transfer of your VM cores capacity to lab plans to minimize the time needed to allocate capacity for your lab plans.
Request capacity for lab plans
If you don't want to transfer your existing capacity from lab accounts to lab plans, or if you require additional VM cores, you should request capacity for lab plans.
If you don't already have a lab plan, you can create a temporary lab plan for requesting capacity, and delete the plan afterwards. Because capacity is assigned to your subscription, it's not affected when you create or delete lab plans. The first time you create a lab plan, a special Microsoft-managed Azure subscription is automatically created. This subscription isn’t visible to you and is used internally to assign your dedicated capacity.
To request additional VM cores:
Create a lab plan. To request capacity, you need at least one (temporary) lab plan.
Verify the capacity available in your subscription by determining the current usage and quota.
Request a core limit increase.
In the list of available VM sizes, you can choose from either the default or the alternative VM sizes (prefixed with alternative in the list). Learn more about virtual machine sizes in the administrator's guide.
Tip
It's recommended that you first request capacity for the default VM sizes. If you need more VM cores than available, request additional capacity from the list of alternative VM sizes.
If you created a temporary lab plan, you can delete it at this point. Deleting lab plans has no impact on your subscription or the capacity you have available. Capacity is assigned to your subscription.
Important
You can't request capacity for the classic VM sizes. You can only get access to the classic VM sizes by requesting a transfer of your lab account VM core capacity.
Tips for requesting a capacity increase
The time it takes to assign capacity varies depending on the VM size, region, and number of cores requested. You don't need to go through the process of requesting extra capacity often. To ensure that you have the resources you require when you need them, you should:
- Request capacity as far in advance as possible.
- Be flexible on the region where you're requesting capacity, if possible.
- Recognize that capacity remains assigned for the lifetime of a subscription. When lab plans or labs are deleted, the capacity remains assigned to the subscription.
- Request extra capacity only if you need more than is already assigned to your subscription.
- Make incremental requests for VM cores rather than making large, bulk requests. Break requests for large numbers of cores into smaller requests for extra flexibility in how those requests are fulfilled.
For example, when you move from lab accounts to lab plans, you should first request sufficient capacity to set up a few representative labs that serve as a proof-of-concept. Later, you can make additional capacity requests based on your upcoming lab needs.
2. Configure shared resources
You can reuse the same Azure compute gallery and licensing servers that you use with your lab accounts. Optionally, you can also configure more licensing servers and galleries based on your needs.
If you're attaching an Azure compute gallery, the compute gallery and the lab plan must be in the same Azure region. Also, it's recommended that the enabled regions only has this Azure region selected.
For VMs that require access to a licensing server, you'll create lab plans with advanced networking enabled as shown in the next step.
Important
If you saved templates for labs created with lab accounts, you can reuse these templates for labs created with lab plans. However, the reverse is not supported. Templates you saved for labs created with lab plans can not be reused for labs created with lab accounts.
3. Create additional lab plans
While you're waiting for capacity to be assigned, you can continue creating lab plans that will be used for setting up your labs.
In practice, more than one lab plan might be needed depending on your scenario. For example, the math department might only require one lab plan in one resource group. The computer science department might require multiple lab plans. One lab plan can enable advanced networking and a few custom images. Another lab plan can use basic networking and not enable custom images. Multiple lab plans can be kept in the same resource group.
- Create and configure lab plans.
- If you plan to use a license server, don't forget to enable advanced networking when creating your lab plans.
- The lab plan’s resource group name is significant because educators will select the resource group to create a lab.
- Likewise, the lab plan name is important. If more than one lab plan is in the resource group, educators will see a dropdown to choose a lab plan when they create a lab.
- Assign permissions to educators that will create labs.
- Enable Azure Marketplace images.
- Configure regions for labs. You should enable your lab plans to use the regions that you specified in your capacity request.
- Optionally, attach an Azure Compute Gallery.
- Optionally, configure integration with Canvas including adding the app and linking lab plans. Alternately, configure integration with Teams by adding the app to Teams groups.
If you're moving from lab accounts, the following table provides guidance on how to map your lab accounts to lab plans:
| Lab account configuration | Lab plan configuration |
|---|---|
| Virtual network peering | Lab plans can reuse the same virtual network as lab accounts. - Setup advanced networking when you create the lab plan. |
| Role assignments - Lab account owner\contributor. - Lab creator\owner\contributor. | Lab plans include new specialized roles. 1. Review roles. 2. Assign permissions. |
| Enabled Marketplace images. - Lab accounts only support Gen1 images from the Marketplace. | Lab plans include settings to enable Azure Marketplace images. - Lab plans support Gen1 and Gen2 Marketplace images, so the list of images will be different than what you would see if using lab accounts. |
| Location - Labs are automatically created within the same geolocation as the lab account. - You can't specify the exact region where a lab is created. | Lab plans enable specific control over which regions labs are created. - Configure regions for labs. |
| Attached Azure Compute Gallery (Shared Image Gallery) | Lab plans can be attached to the same gallery used by lab accounts. 1. Attach an Azure Compute Gallery. 2. Ensure that you enable images for the lab plan. |
| Teams integration | Configure lab plans with Teams integration by adding the app to Teams groups. |
| Firewall settings - Create inbound and outbound rules for the lab's public IP address and the port range 49152 - 65535. | Firewall settings - Create inbound and outbound rules for the lab's public IP address and the port ranges 4980-4989, 5000-6999, and 7000-8999. |
4. Validate images
Each of the VM sizes has been remapped to use a newer Azure VM Compute SKU. If you're using an attached compute gallery, validate each of your customized images with the new VM Compute SKU by publishing a lab with the image and testing common student workloads. Before creating labs, verify that each image in the compute gallery is replicated to the same regions enabled in your lab plans.
5. Create and publish labs
Once you have capacity assigned to your subscription, you can create and publish representative labs to validate the educator and student experience. Creating a selection of representative labs as a proof of concept is an optional but highly recommended step, which enables you to validate performance based on common student workloads. After a successful proof of concept is completed, you can submit capacity requests based on your immediate upcoming need, building incrementally to your full capacity requirement over time.
Lab strategies
You cannot migrate existing labs to a lab plan. Instead, you must create new labs. Along with all the new enhancements, the requirement to create new labs provides a good opportunity to revisit your overall lab structure and plan changes where necessary.
Delete and recreate labs
Most organizations delete their labs and recreate them each semester (or class session). You can schedule the move to lab plans during one of these transitions.
Reuse existing labs
Some organizations reuse the same labs each class session and change the lab user roster. With this approach, you must plan the creation of new labs to migrate to, typically at the start of a new session.
Although you cannot migrate existing labs, you can still reuse other assets such as compute galleries and images, and any licensing servers.
Tip
If you have concerns about migrating your labs to lab plans, you can reach out to the Azure Lab Services customer engagement team. Provide your organization name and subscription ID, along with the number of labs you're looking to migrate.
6. Update cost management reports
Update reports to include the new cost entry type, Microsoft.LabServices/labs, for labs created using lab plans. Built-in and custom tags allow for grouping in cost analysis. For more information about tracking costs, see Cost management for Azure Lab Services.
Next steps
- As an admin, create a lab plan.
- As an admin, manage your lab plan.
- As an educator, configure and control usage of a lab.
Feedback
Coming soon: Throughout 2024 we will be phasing out GitHub Issues as the feedback mechanism for content and replacing it with a new feedback system. For more information see: https://aka.ms/ContentUserFeedback.
Submit and view feedback for