Quickstart: Create an example Consumption logic app workflow using the Azure portal
Applies to: Azure Logic Apps (Consumption)
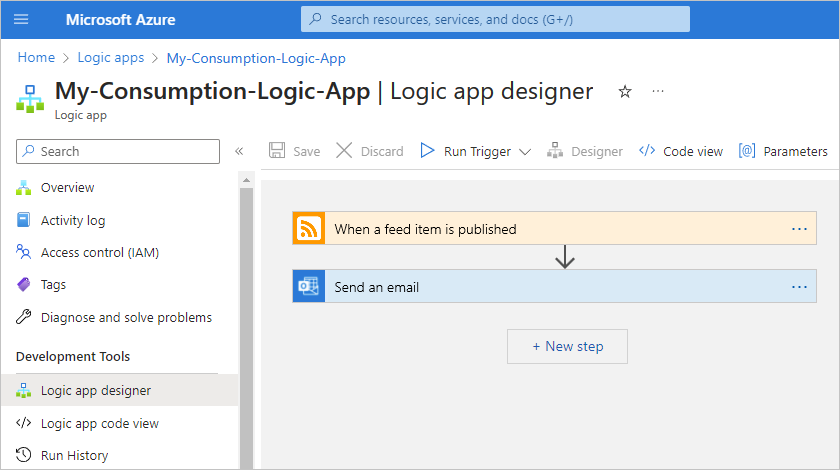
To create an automated workflow that integrates multiple cloud services, this quickstart shows how to create an example workflow that integrates the following services, an RSS feed for a website and an email account. The example workflow uses the RSS connector and the Office 365 Outlook connector. The RSS connector provides a trigger that you can use to check an RSS feed, based on the specified schedule. The Office 365 Outlook connector provides an action that sends an email for each new RSS item.
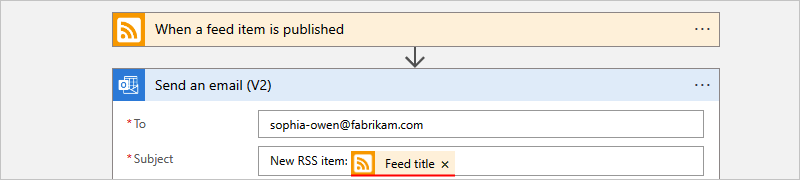
The following screenshot shows the high-level example workflow:
This example specifically creates a Consumption logic app resource and workflow that runs in multitenant Azure Logic Apps. To create a Standard logic app workflow that runs in single-tenant Azure Logic Apps instead, see Create an example Standard logic app workflow using Azure portal. The connectors in this example are only two connectors among 1000+ connectors that you can use in a workflow. While this example is cloud-based, Azure Logic Apps supports workflows that connect apps, data, services, and systems across cloud, on-premises, and hybrid environments.
As you progress through this quickstart, you'll learn the following basic steps:
- Create a Consumption logic app resource that's hosted in multitenant Azure Logic Apps.
- Select the blank logic app workflow template.
- Add a trigger that specifies when to run the workflow.
- Add an action that performs a task after the trigger fires.
- Run your workflow.
To create and manage a Consumption logic app workflow using other tools, see the following quickstarts:
- Create and manage logic app workflows in Visual Studio Code
- Create and manage logic app workflows in Visual Studio
- Create and manage logic apps workflows using the Azure CLI
Prerequisites
An Azure account and subscription. If you don't have a subscription, sign up for a free Azure account.
An email account from a service that works with Azure Logic Apps, such as Office 365 Outlook or Outlook.com. For other supported email providers, review Connectors for Azure Logic Apps.
Note
If you want to use the Gmail connector, only G Suite accounts can use this connector without restriction in Azure Logic Apps. If you have a consumer Gmail account, you can only use this connector with specific Google-approved services, unless you create a Google client app to use for authentication with your Gmail connector. For more information, see Data security and privacy policies for Google connectors in Azure Logic Apps.
If you have a firewall that limits traffic to specific IP addresses, make sure that you set up your firewall to allow access for both the inbound and outbound IP addresses used by Azure Logic Apps in the Azure region where you create your logic app workflow.
This example uses the RSS and Office 365 Outlook connectors, which run in global Azure and are managed by Microsoft. These connectors require that you set up your firewall to allow access for all the managed connector outbound IP addresses in the Azure region for your logic app resource.
Create a Consumption logic app resource
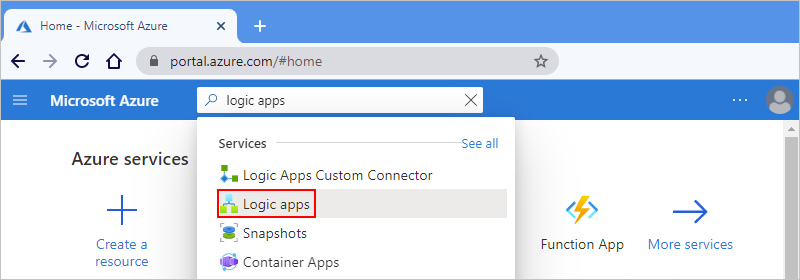
In the Azure portal search box, enter logic apps, and select Logic apps.
On the Logic apps page toolbar, select Add.
On the Create Logic App page, first select the Plan type for your logic app resource. That way, only the options for that plan type appear.
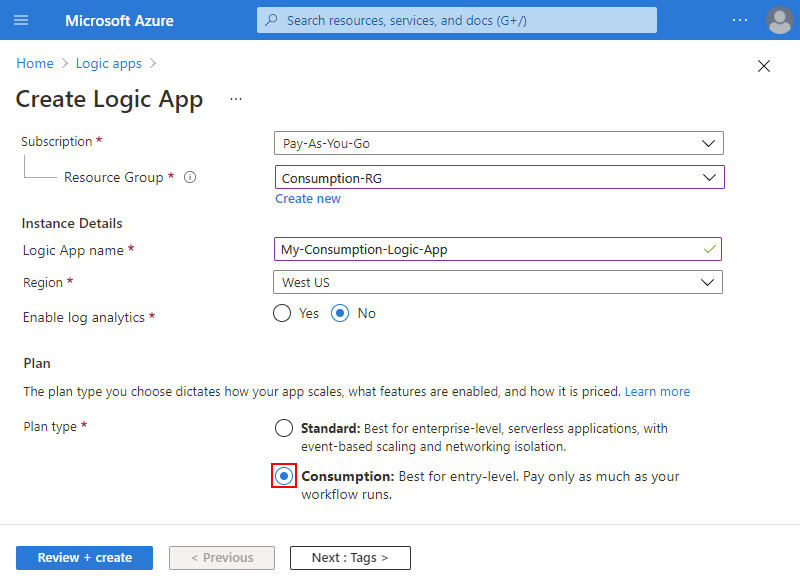
In the Plan section, for Plan type, select Consumption to view only the Consumption logic app resource settings.
The Plan type not only specifies the logic app resource type, but also the billing model.
Plan type Description Standard This logic app resource is the default selection and supports multiple workflows. These workflows run in single-tenant Azure Logic Apps and use the Standard billing model. Consumption This logic app resource type is the alternative selection and supports only a single workflow. This workflow runs in multitenant Azure Logic Apps and uses the Consumption billing model.
Provide the following information for your logic app resource:
Property Required Value Description Subscription Yes <Azure-subscription-name> Your Azure subscription name. Resource Group Yes <Azure-resource-group-name> The Azure resource group where you create your logic app and related resources. This name must be unique across regions and can contain only letters, numbers, hyphens (-), underscores (_), parentheses (()), and periods (.).
This example creates a resource group named Consumption-RG.Logic App name Yes <logic-app-resource-name> Your logic app resource name, which must be unique across regions and can contain only letters, numbers, hyphens ( -), underscores (_), parentheses ((,)), and periods (.).
This example creates a logic app resource named My-Consumption-Logic-App.Region Yes <Azure-region> The Azure datacenter region for storing your app's information. This example deploys the sample logic app to the West US region in Azure. Enable log analytics Yes No This option appears and applies only when you select the Consumption logic app type.
Change this option only when you want to enable diagnostic logging. For this quickstart, keep the default selection.Note
If you selected an Azure region that supports availability zone redundancy, the Zone redundancy section is automatically enabled. This preview section offers the choice to enable availability zone redundancy for your logic app. However, currently supported Azure regions don't include West US, so you can ignore this section for this example. For more information, see Protect logic apps from region failures with zone redundancy and availability zones.
When you're done, your settings look similar to the following example:
When you're ready, select Review + Create.
On the validation page that appears, confirm all the provided information, and select Create.
Select the blank template
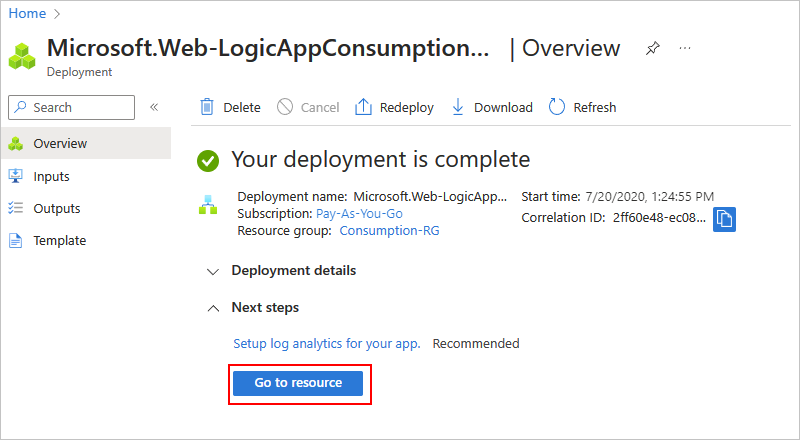
After Azure successfully deploys your logic app resource, select Go to resource. Or, find and select your logic app resource by typing the name in the Azure search box.
The designer's template page opens to show an introduction video and commonly used triggers.
Scroll down past the video and the section named Start with a common trigger.
Under Templates, select Blank Logic App.
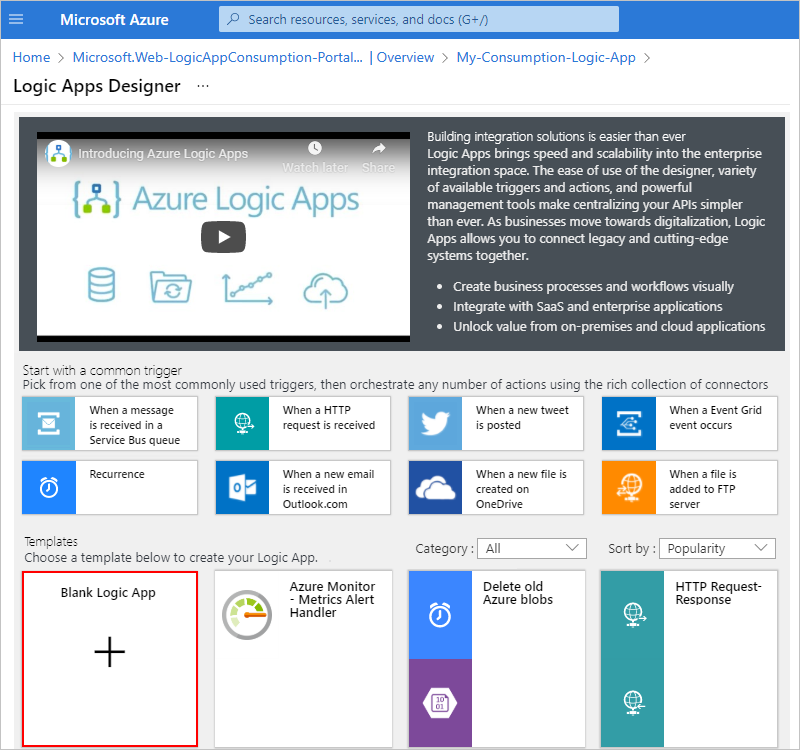
After you select the template, the designer shows the empty workflow designer.
Add the trigger
A workflow always starts with a single trigger, which specifies the condition to meet before running any subsequent actions in the workflow. Each time the trigger fires, Azure Logic Apps creates and runs a workflow instance. If the trigger doesn't fire, no workflow instance is created or run.
This example uses an RSS trigger that checks an RSS feed, based on the specified schedule. If a new item exists in the feed, the trigger fires, and a new workflow instance is created and run. If multiple new items exist between checks, the trigger fires for each item, and a separate new workflow instance runs for each item. By default, workflow instances that are created at the same time also run at the same time, or concurrently.
On the workflow designer, follow these general steps to add the RSS trigger named When a feed item is published.
In the trigger, provide the following information:
Property Required Value Description The RSS feed URL Yes <RSS-feed-URL> The RSS feed URL to monitor.
This example uses the Wall Street Journal's RSS feed at https://feeds.a.dj.com/rss/RSSMarketsMain.xml. However, you can use any RSS feed that doesn't require HTTP authorization. Choose an RSS feed that publishes frequently, so you can easily test your workflow.Chosen property will be used to determine No PublishDate The property that determines which items are new. Interval Yes 1 The number of intervals to wait between feed checks.
This example uses 1 as the interval.Frequency Yes Minute The unit of frequency to use for every interval.
This example uses Minute as the frequency.
Hide the trigger's information for now by selecting inside the title bar to collapse the details window.

Save your workflow. On the designer toolbar, select Save.
This step instantly publishes your logic app workflow live in the Azure portal. However, the trigger only checks the RSS feed without taking any other actions. So, you need to add an action to specify what you want to happen when the trigger fires.
Add an action
Following a trigger, an action is any subsequent step that runs some operation in the workflow. Any action can use the outputs from the previous operations, which include the trigger and any other actions. You can choose from many different actions, include multiple actions up to the limit per workflow, and even create different action paths.
This example uses an Office 365 Outlook action that sends an email each time that the trigger fires for a new RSS feed item. If multiple new items exist between checks, you receive multiple emails.
On the workflow designer, follow these general steps to add a connector action that you can use to send email, for example:
- If you have a Microsoft work or school account, add the Office 365 Outlook connector action named Send an email.
- If you have a personal Microsoft account, add the Outlook.com connector action named Send an email.
This example continues with the Office 365 Outlook connector action named Send an email.
Note
If you use a different supported email service in your workflow, the user interface might look slightly different. However, the basic concepts for connecting to another email service remain the same.
If your selected email service prompts you to sign in and authenticate your identity, complete that step now.
Note
Many connectors require that you first create a connection and authenticate your identity before you can continue. This example uses manual authentication for connecting to Office 365 Outlook. However, other services might support or use different authentication types. Based on your scenario, you can handle connection authentication in various ways.
For more information, review the following documentation:
In the Send an email action, provide the following information to include in the email.
In the To box, enter the recipient's email address.
For this example, use your email address.
Note
When you select inside the To box or other edit boxes, the Add dynamic content list appears. This list shows any outputs from previous operations that you can select and use as inputs for the current action. You can ignore this list for now. The next step uses the dynamic content list.
In the Subject box, enter the subject for the email subject.
For this example, include the output from the trigger to show the RSS item's title by following these steps:
Enter the following text with a trailing blank space:
New RSS item: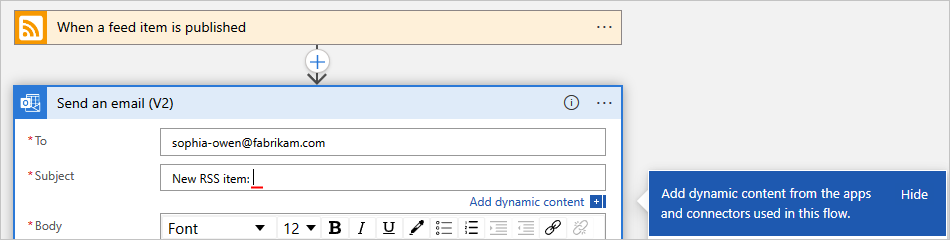
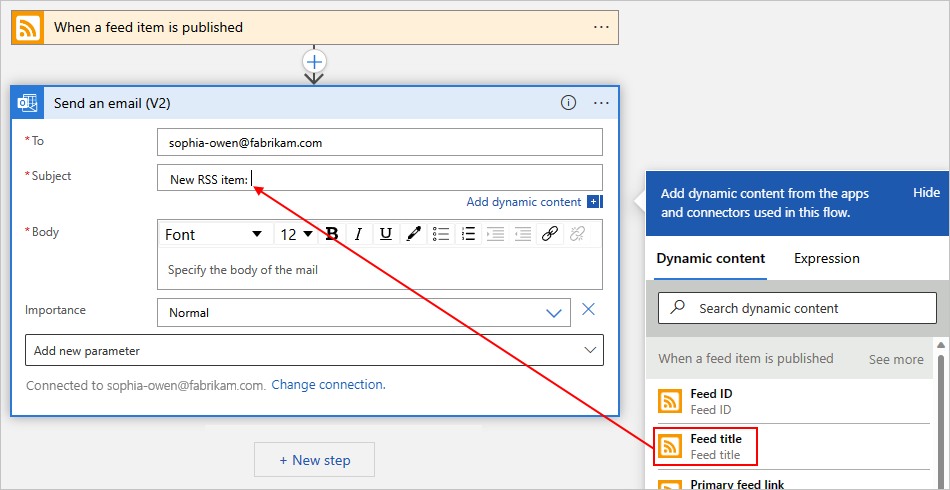
From the Add dynamic content list that appears, under When a feed item is published, select Feed title, which is a trigger output that references the title for the RSS item.
Tip
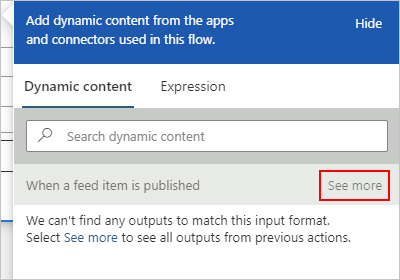
If no outputs appear available under When a feed item is published, select See more.
When you're done, the email subject looks like the following example:
Note
If you select an output that references an array, the designer automatically adds a For each loop around the action that references the output. That way, your workflow processes the array by performing the same action on each item in the array.
To remove the loop, on the loop's title bar, select the ellipses (...) button, and then select Delete.
In the Body box, enter the email content.
For this example, the body includes the following properties, preceded by descriptive text for each property. To add blank lines in an edit box, press Shift + Enter.
Descriptive text Property Description Title:Feed title The item's title Date published:Feed published on The item's publishing date and time Link:Primary feed link The URL for the item 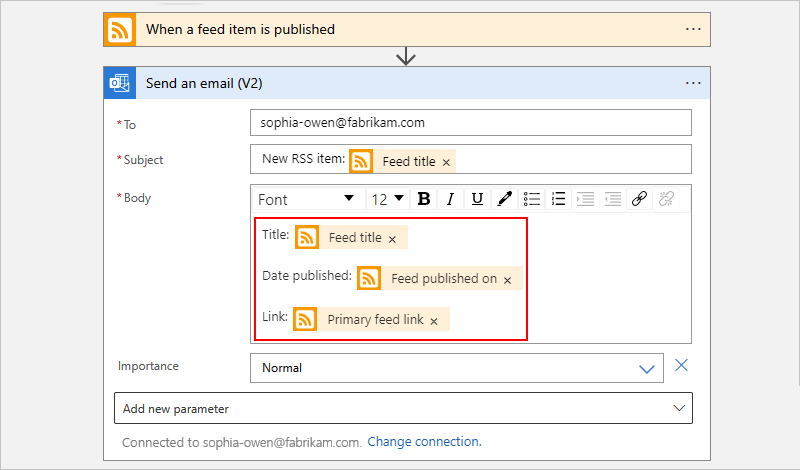
Save your workflow. On the designer toolbar, select Save.
Test your workflow
To check that the workflow runs correctly, you can either wait for the trigger to fire after checking the RSS feed based on your specified schedule, or you can manually run the workflow.
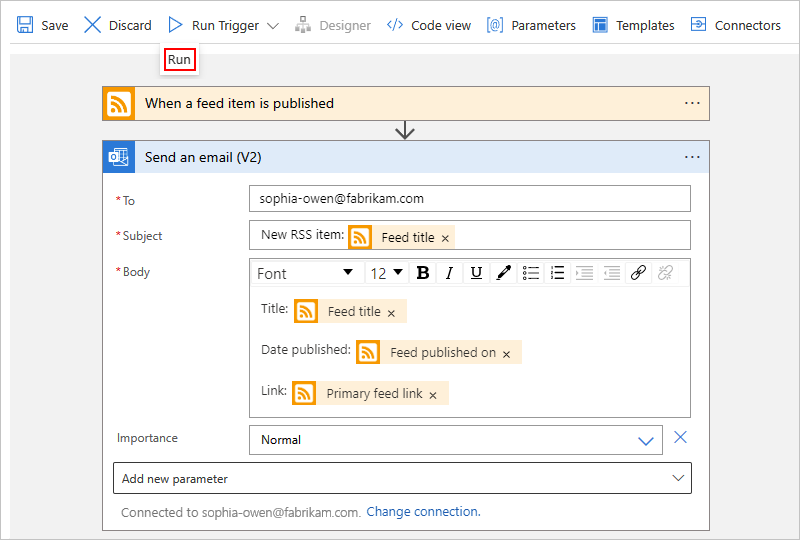
On the designer toolbar, from the Run Trigger menu, select Run.
If the RSS feed has new items, your workflow sends an email for each new item. Otherwise, your workflow waits until the next interval to check the RSS feed again.
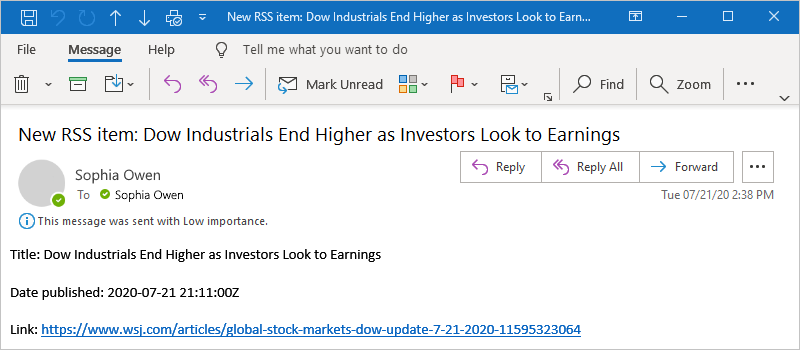
The following screenshot shows a sample email that's sent by the example workflow. The email includes the details from each trigger output that you selected plus the descriptive text that you included for each item.
Troubleshoot problems
If you don't receive emails from the workflow as expected:
Check your email account's junk or spam folder, in case the message was incorrectly filtered.
Make sure the RSS feed you're using has published items since the last scheduled or manual check.
Clean up resources
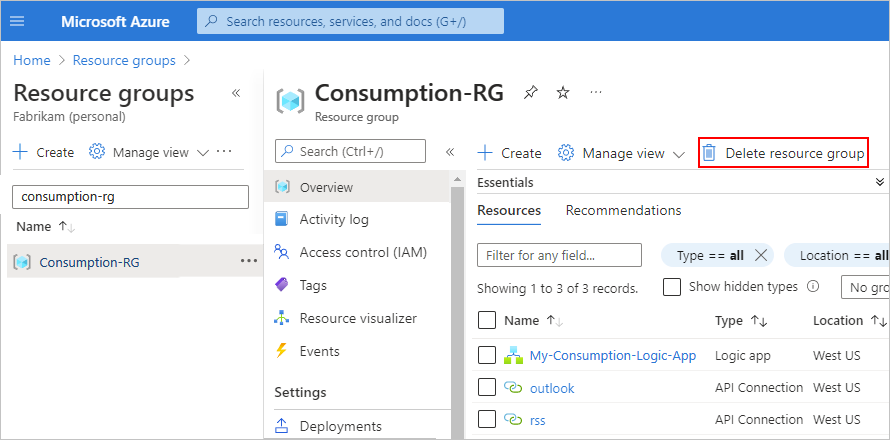
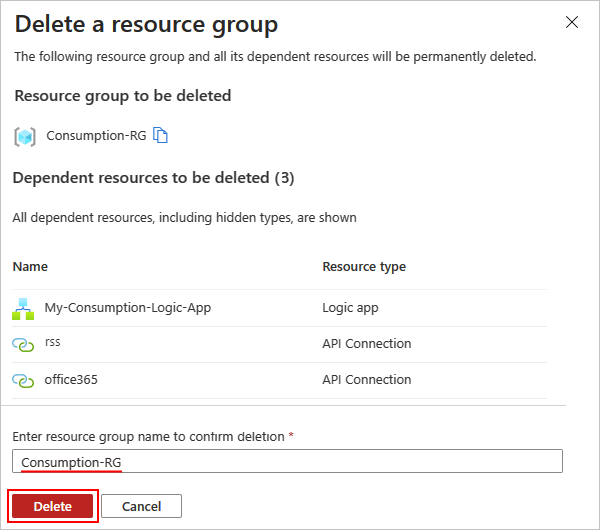
When you're done with this quickstart, delete the sample logic app resource and any related resources by deleting the resource group that you created for this example.
In the Azure search box, enter resource groups, and select Resource groups.

Find and select your logic app's resource group. On the Overview pane, select Delete resource group.
When the confirmation pane appears, enter the resource group name, and select Delete.
Next steps
In this quickstart, you created a Consumption logic app workflow in the Azure portal to check an RSS feed, and send an email for each new item. To learn more about advanced scheduled workflows, see the following tutorial:
Feedback
Coming soon: Throughout 2024 we will be phasing out GitHub Issues as the feedback mechanism for content and replacing it with a new feedback system. For more information see: https://aka.ms/ContentUserFeedback.
Submit and view feedback for