Tutorial: Use the designer to deploy a machine learning model
In part one of this tutorial, you trained a linear regression model that predicts car prices. In this second part, you use the Azure Machine Learning designer to deploy the model so that others can use it.
Note
The designer supports two types of components: classic prebuilt components (v1) and custom components (v2). These two types of components are NOT compatible.
Classic prebuilt components provide prebuilt components mainly for data processing and traditional machine learning tasks like regression and classification. This type of component continues to be supported but no new components will be added.
Custom components allow you to wrap your own code as a component. They support sharing components across workspaces and seamless authoring across Machine Learning Studio, CLI v2, and SDK v2 interfaces.
For new projects, we advise that you use custom components, which are compatible with Azure Machine Learning v2 and will keep receiving new updates.
This article applies to classic prebuilt components and isn't compatible with CLI v2 and SDK v2.
In this tutorial, you:
- Create a real-time inference pipeline.
- Create an inferencing cluster.
- Deploy the real-time endpoint.
- Test the real-time endpoint.
Prerequisites
Complete part one of the tutorial to learn how to train and score a machine learning model in the designer.
Important
If you don't see graphical elements mentioned in this document, such as buttons in studio or designer, you might not have the right level of permissions to the workspace. Please contact your Azure subscription administrator to verify that you have been granted the correct level of access. For more information, see Manage users and roles.
Create a real-time inference pipeline
To deploy your pipeline, you must first convert the training pipeline into a real-time inference pipeline. This process removes training components and adds web service inputs and outputs to handle requests.
Note
The Create inference pipeline feature supports training pipelines that only contain the designer built-in components and that have a component like Train Model that outputs the trained model.
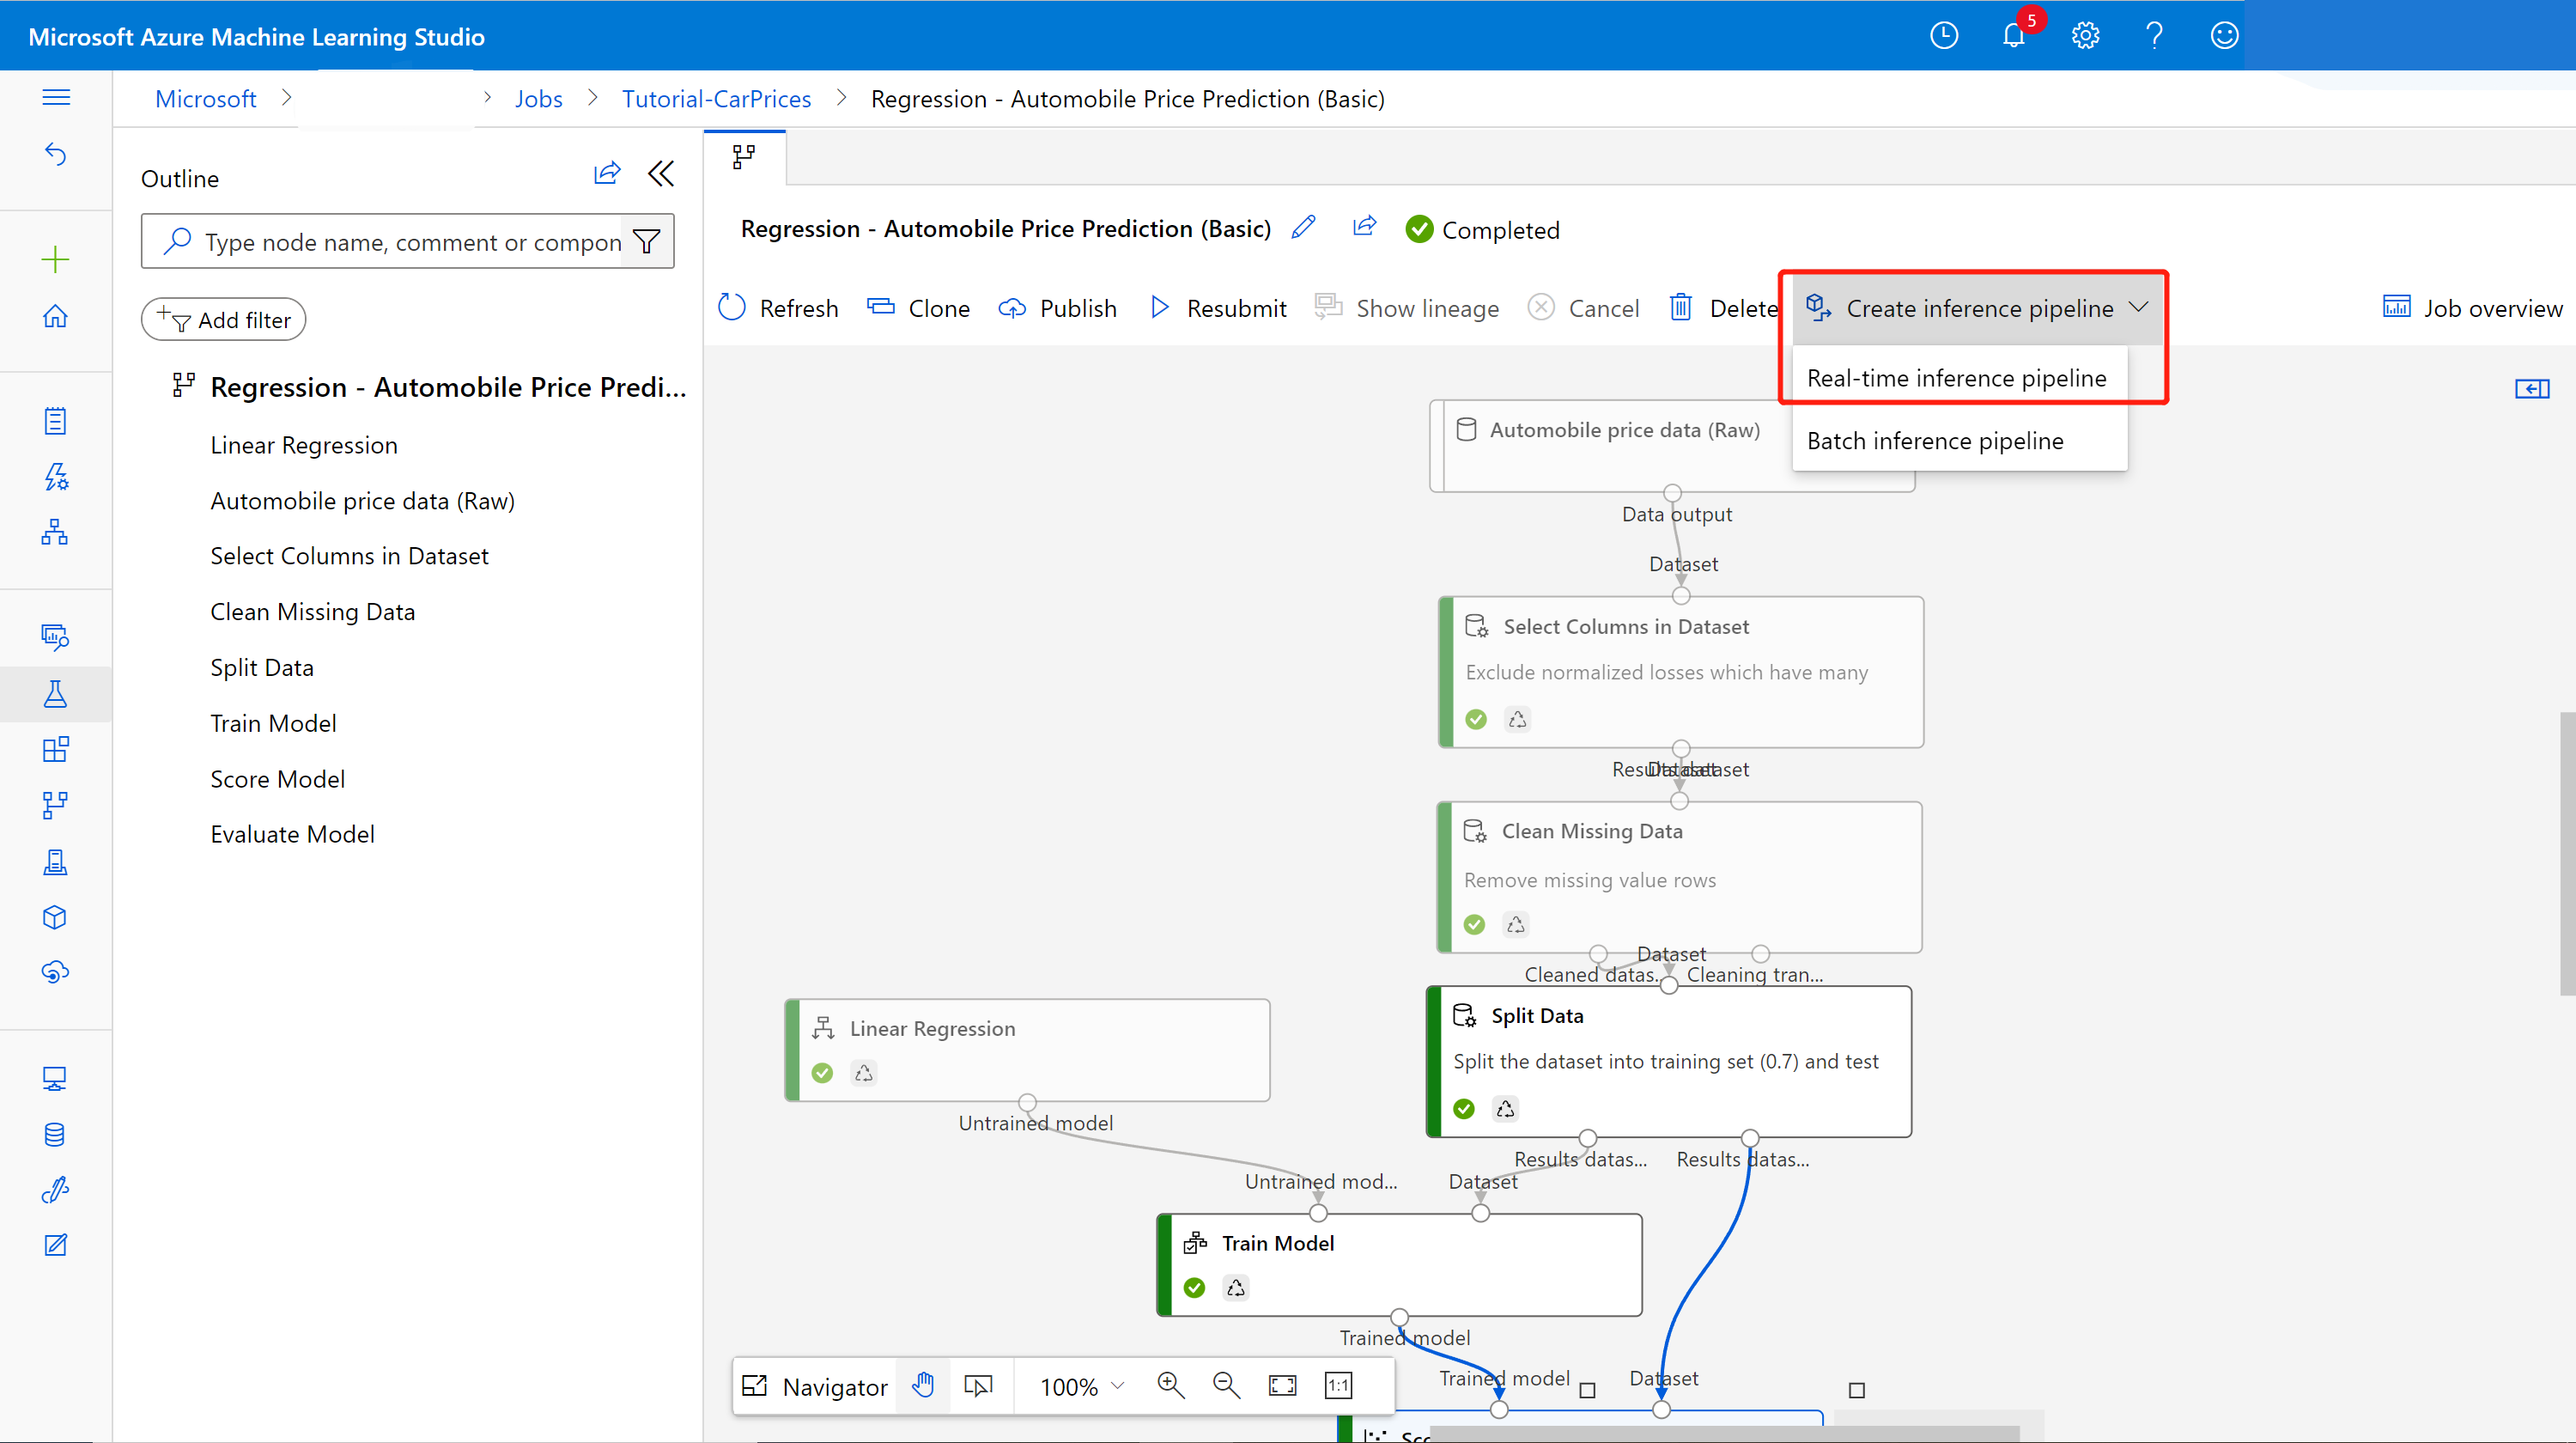
Create a real-time inference pipeline
Select Pipelines from the side navigation panel, then open the pipeline job that you created. On the detail page, above the pipeline canvas, select the ellipses ... then choose Create inference pipeline > Real-time inference pipeline.
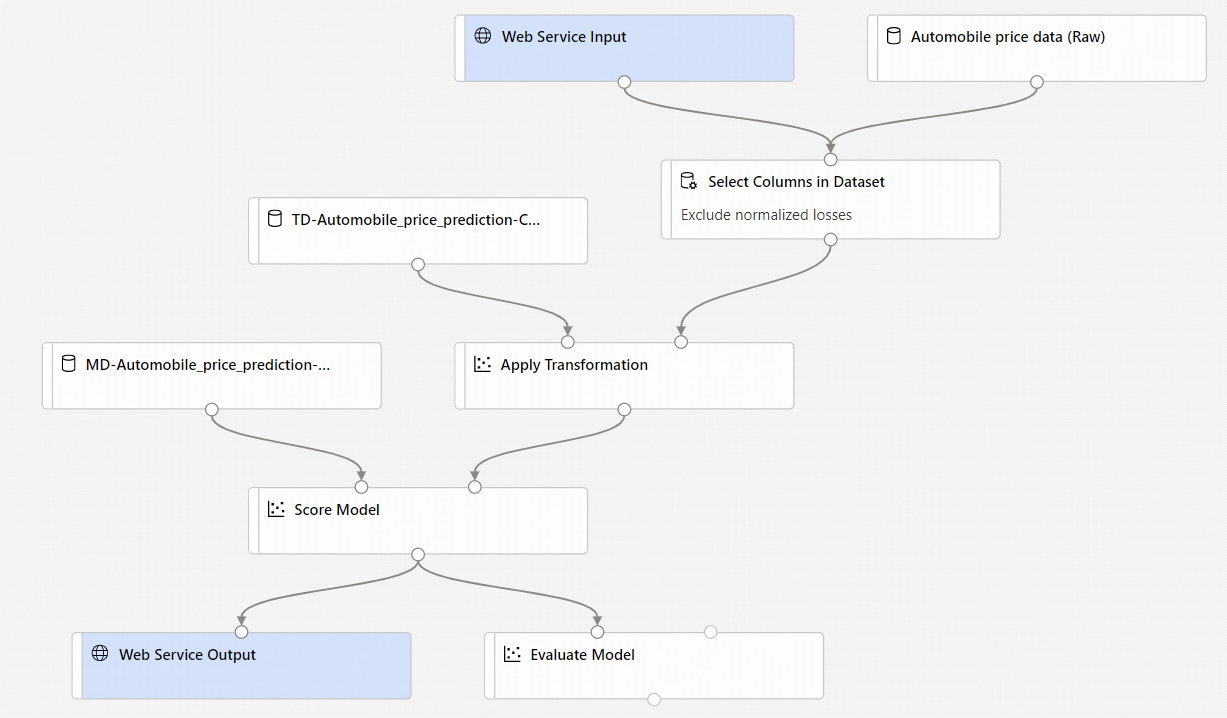
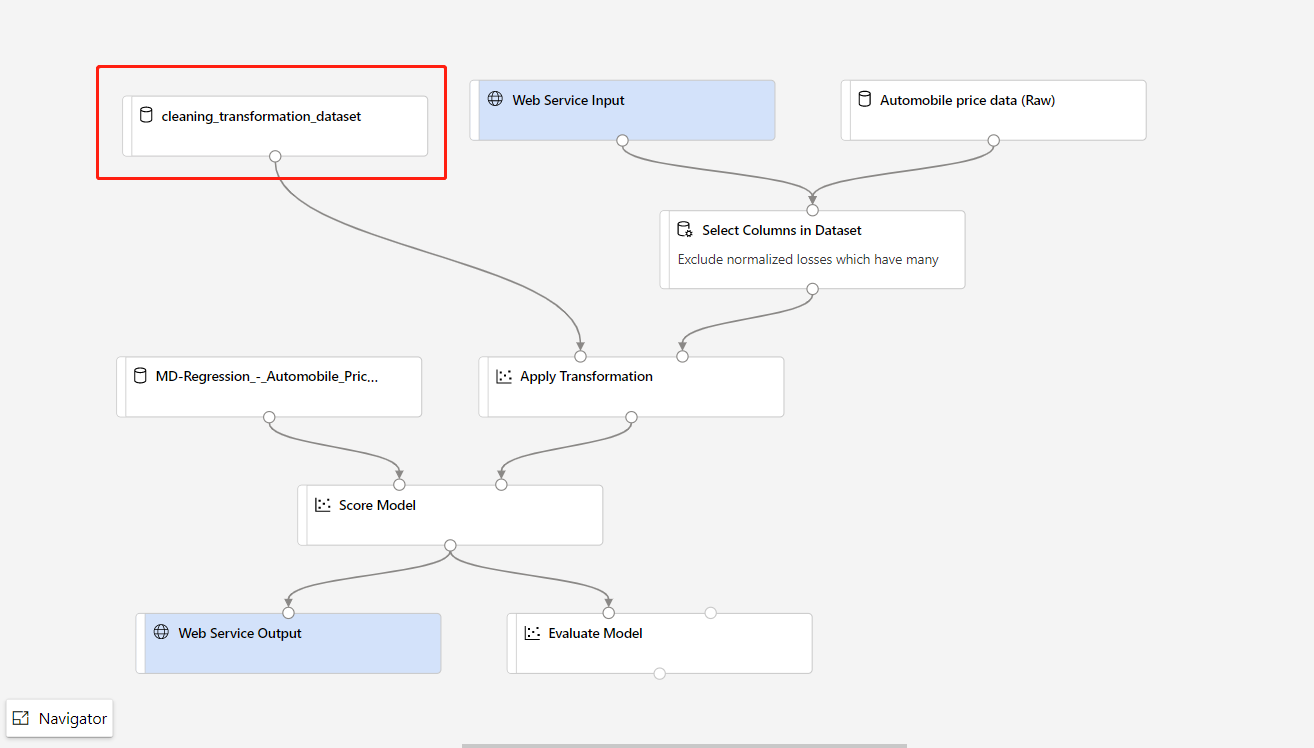
Your new pipeline now looks like this:
When you select Create inference pipeline, several things happen:
- The trained model is stored as a Dataset component in the component palette. You can find it under My Datasets.
- Training components like Train Model and Split Data are removed.
- The saved trained model is added back into the pipeline.
- Web Service Input and Web Service Output components are added. These components show where user data enters the pipeline and where data is returned.
Note
By default, the Web Service Input expects the same data schema as the component output data that connects to the same downstream port. In this sample, Web Service Input and Automobile price data (Raw) connect to the same downstream component, so Web Service Input expects the same data schema as Automobile price data (Raw) and target variable column
priceis included in the schema. However, when you score the data, you won't know the target variable values. In that case, you can remove the target variable column in the inference pipeline using the Select Columns in Dataset component. Make sure that the output of Select Columns in Dataset removing target variable column is connected to the same port as the output of the Web Service Input component.Select Configure & Submit, and use the same compute target and experiment that you used in part one.
If this is the first job, it might take up to 20 minutes for your pipeline to finish running. The default compute settings have a minimum node size of 0, which means that the designer must allocate resources after being idle. Repeated pipeline jobs take less time since the compute resources are already allocated. Additionally, the designer uses cached results for each component to further improve efficiency.
Go to the real-time inference pipeline job detail by selecting Job detail in the left pane.
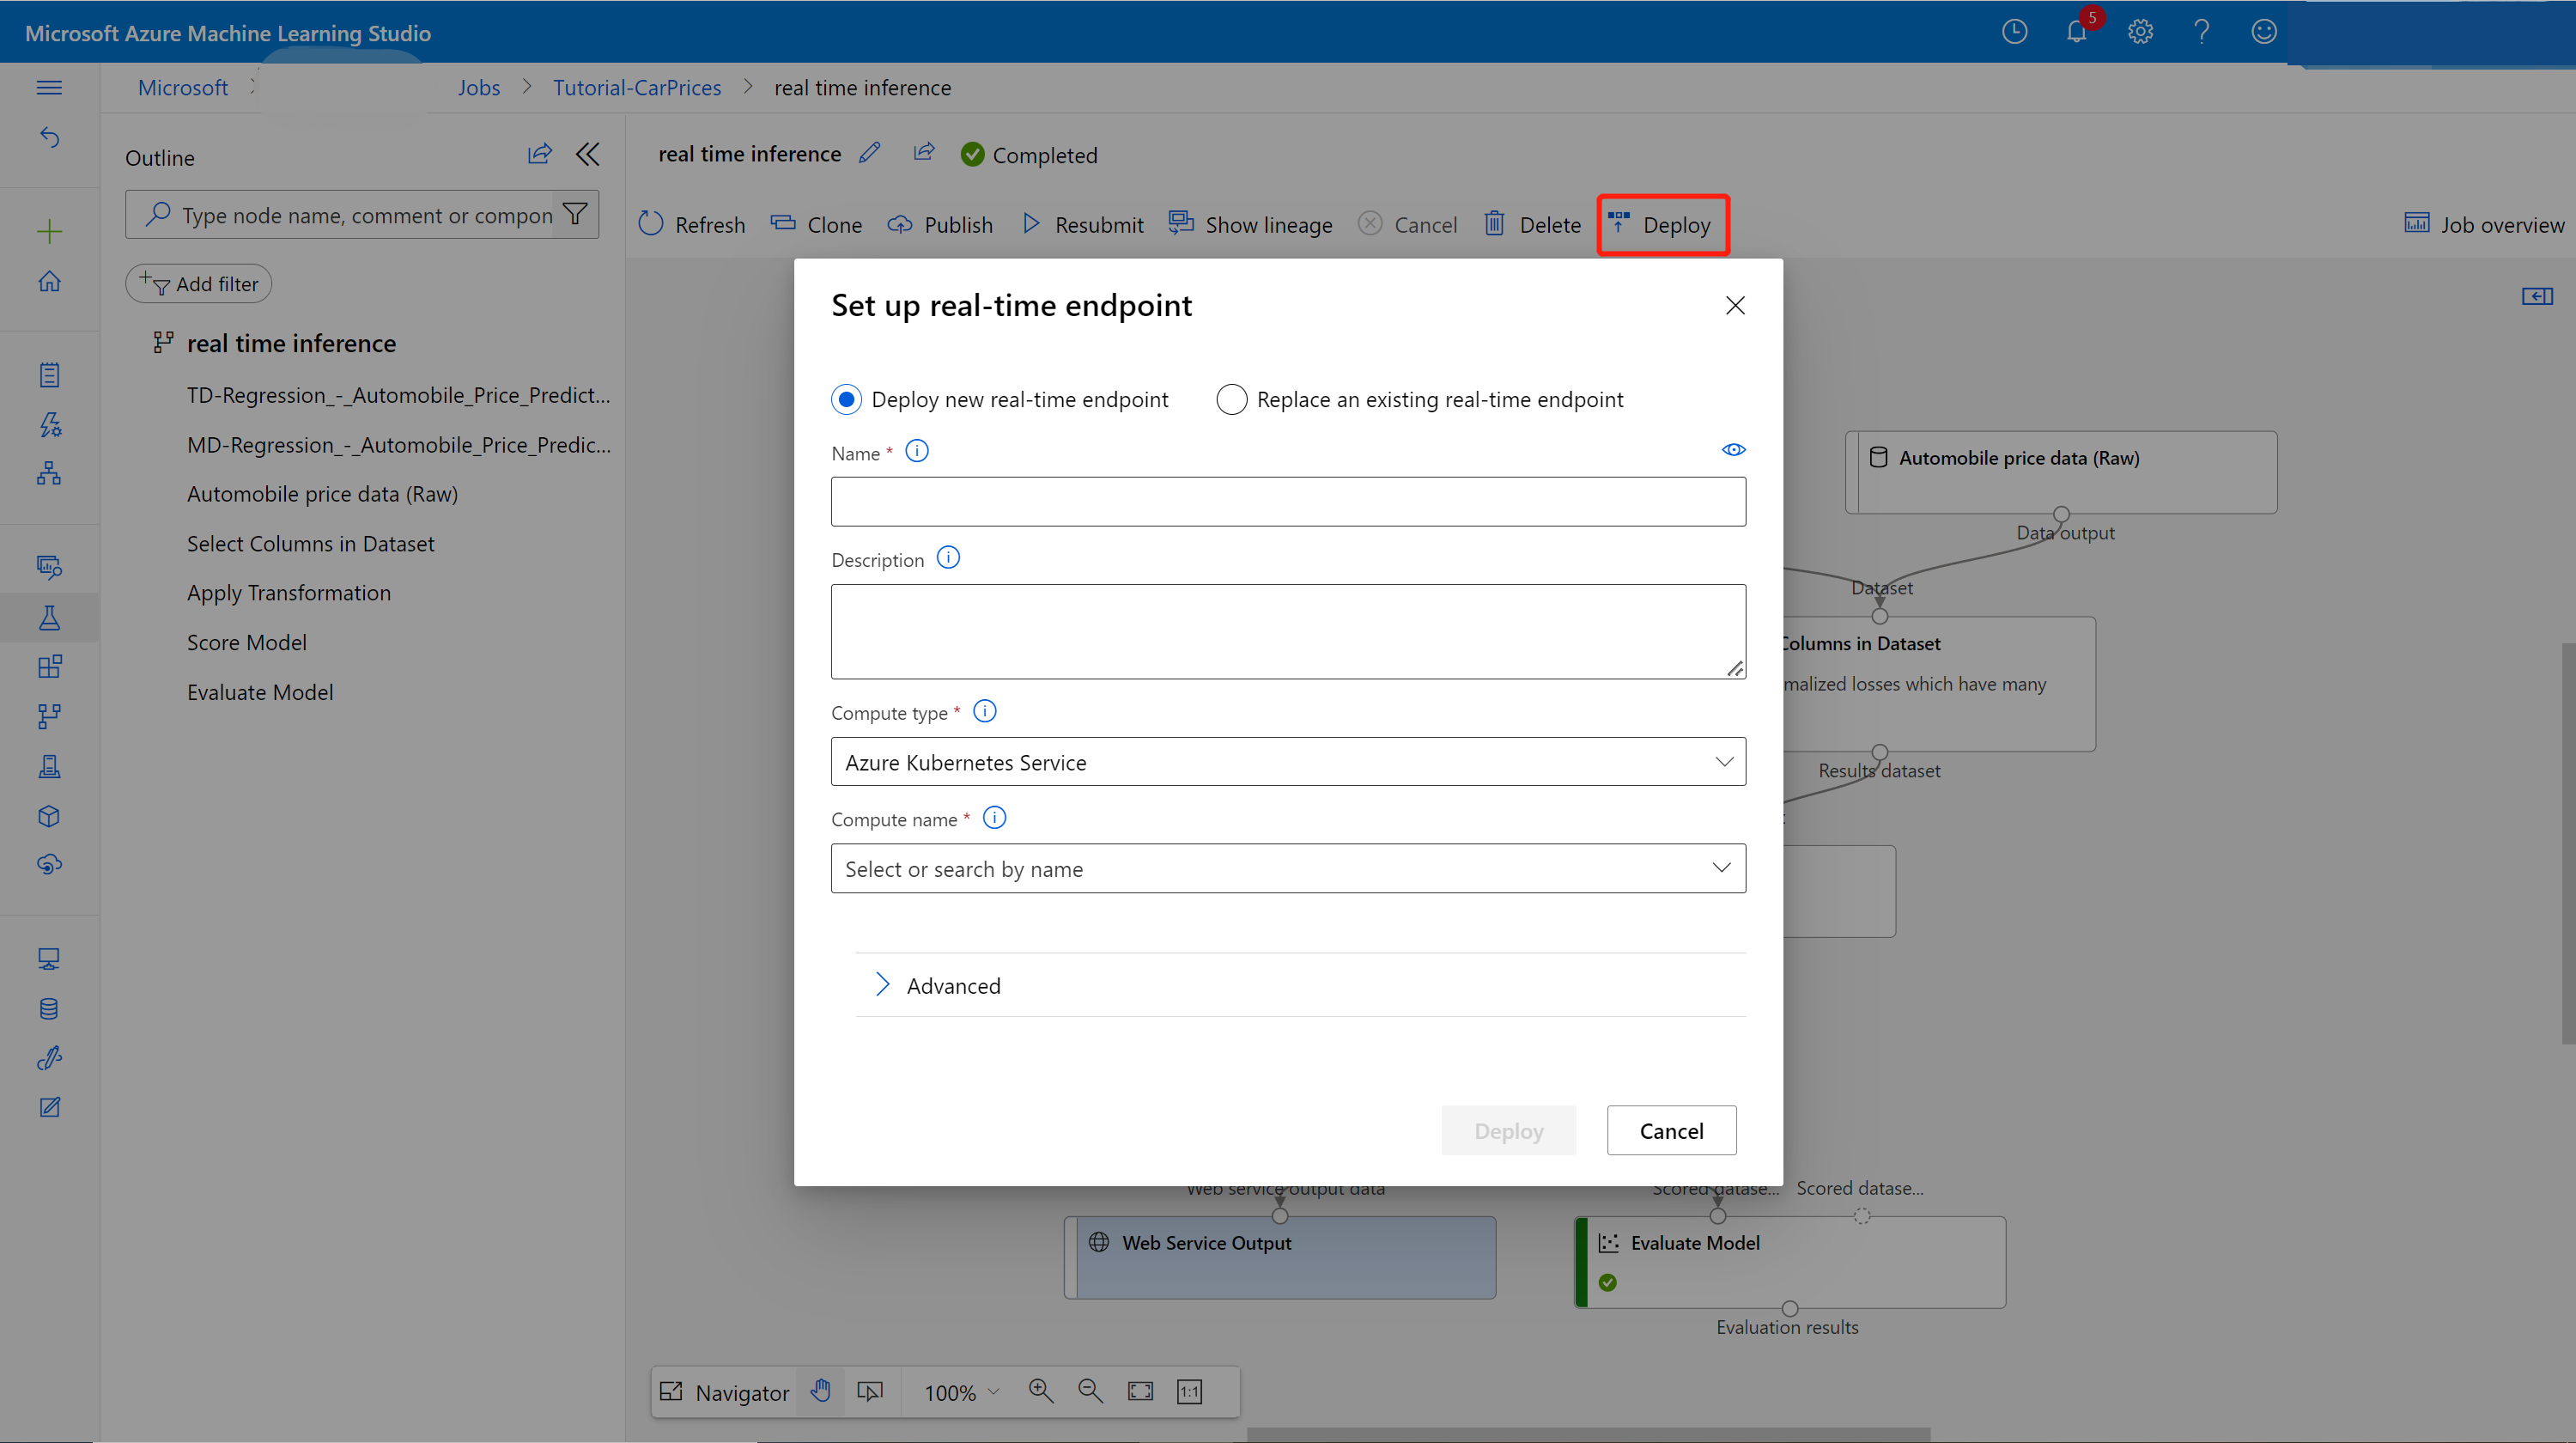
Select Deploy in the job detail page.


Create an inferencing cluster
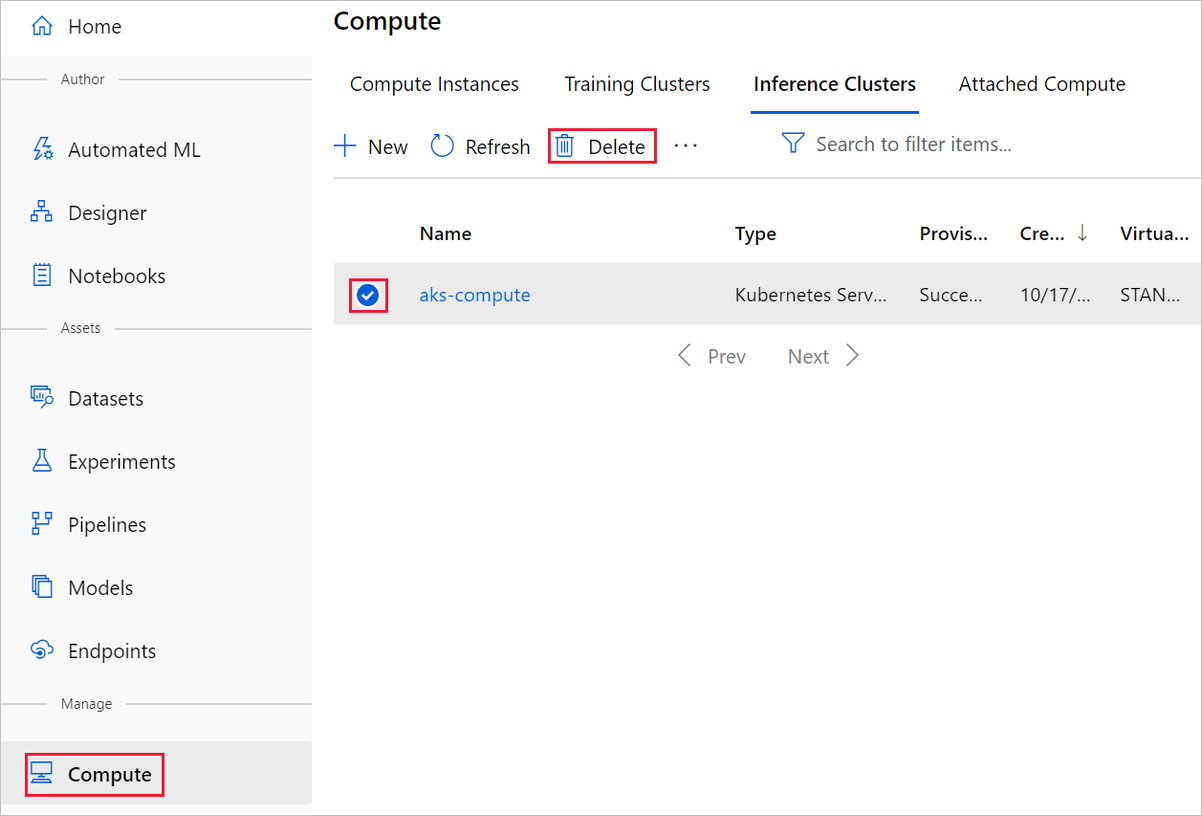
In the dialog box that appears, you can select from any existing Azure Kubernetes Service (AKS) clusters to deploy your model to. If you don't have an AKS cluster, use the following steps to create one.
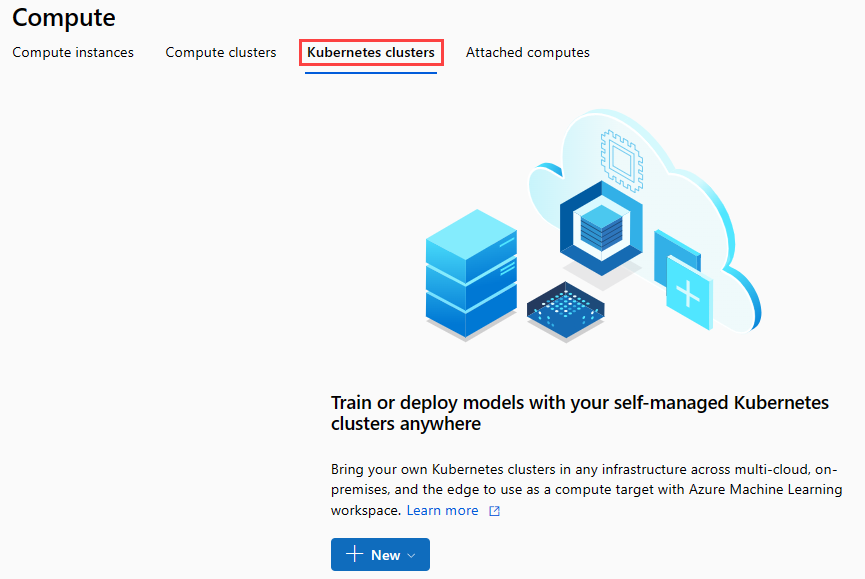
Go to the Compute page by selecting Compute in the dialog box.
On the navigation ribbon, select Kubernetes Clusters > + New.
In the inference cluster pane, configure a new Kubernetes Service.
Enter aks-compute for the Compute name.
Select a nearby region that's available for the Region.
Select Create.
Note
It takes approximately 15 minutes to create a new AKS service. You can check the provisioning state on the Inference Clusters page.
Deploy the real-time endpoint
After your AKS service finishes provisioning, return to the real-time inferencing pipeline to complete deployment.
Select Deploy above the canvas.
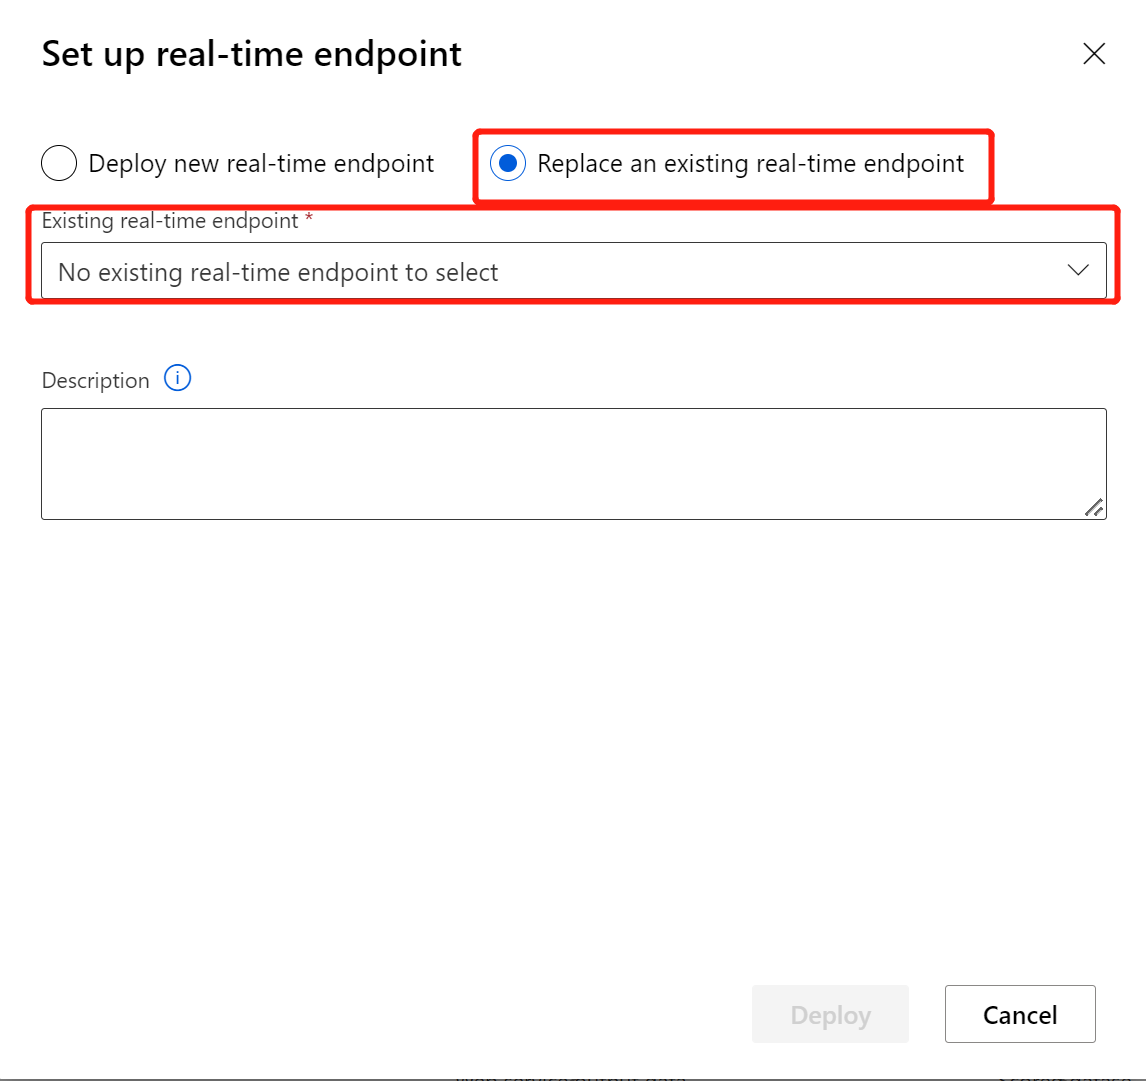
Select Deploy new real-time endpoint.
Select the AKS cluster you created.
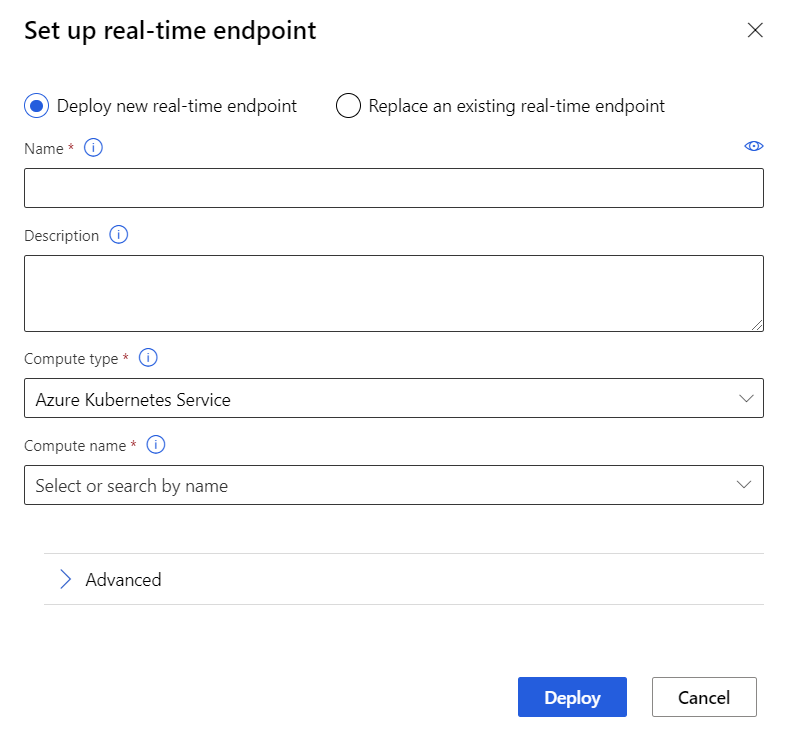
You can also change the Advanced setting for your real-time endpoint.
Advanced setting Description Enable Application Insights diagnostics and data collection Allows Azure Application Insights to collect data from the deployed endpoints.
By default: false.Scoring timeout A timeout in milliseconds to enforce for scoring calls to the web service.
By default: 60000.Auto scale enabled Allows autoscaling for the web service.
By default: true.Min replicas The minimum number of containers to use when autoscaling this web service.
By default: 1.Max replicas The maximum number of containers to use when autoscaling this web service.
By default: 10.Target utilization The target utilization (as a percentage) that the autoscaler should attempt to maintain for this web service.
By default: 70.Refresh period How often (in seconds) the autoscaler attempts to scale this web service.
By default: 1.CPU reserve capacity The number of CPU cores to allocate for this web service.
By default: 0.1.Memory reserve capacity The amount of memory (in GB) to allocate for this web service.
By default: 0.5.Select Deploy.
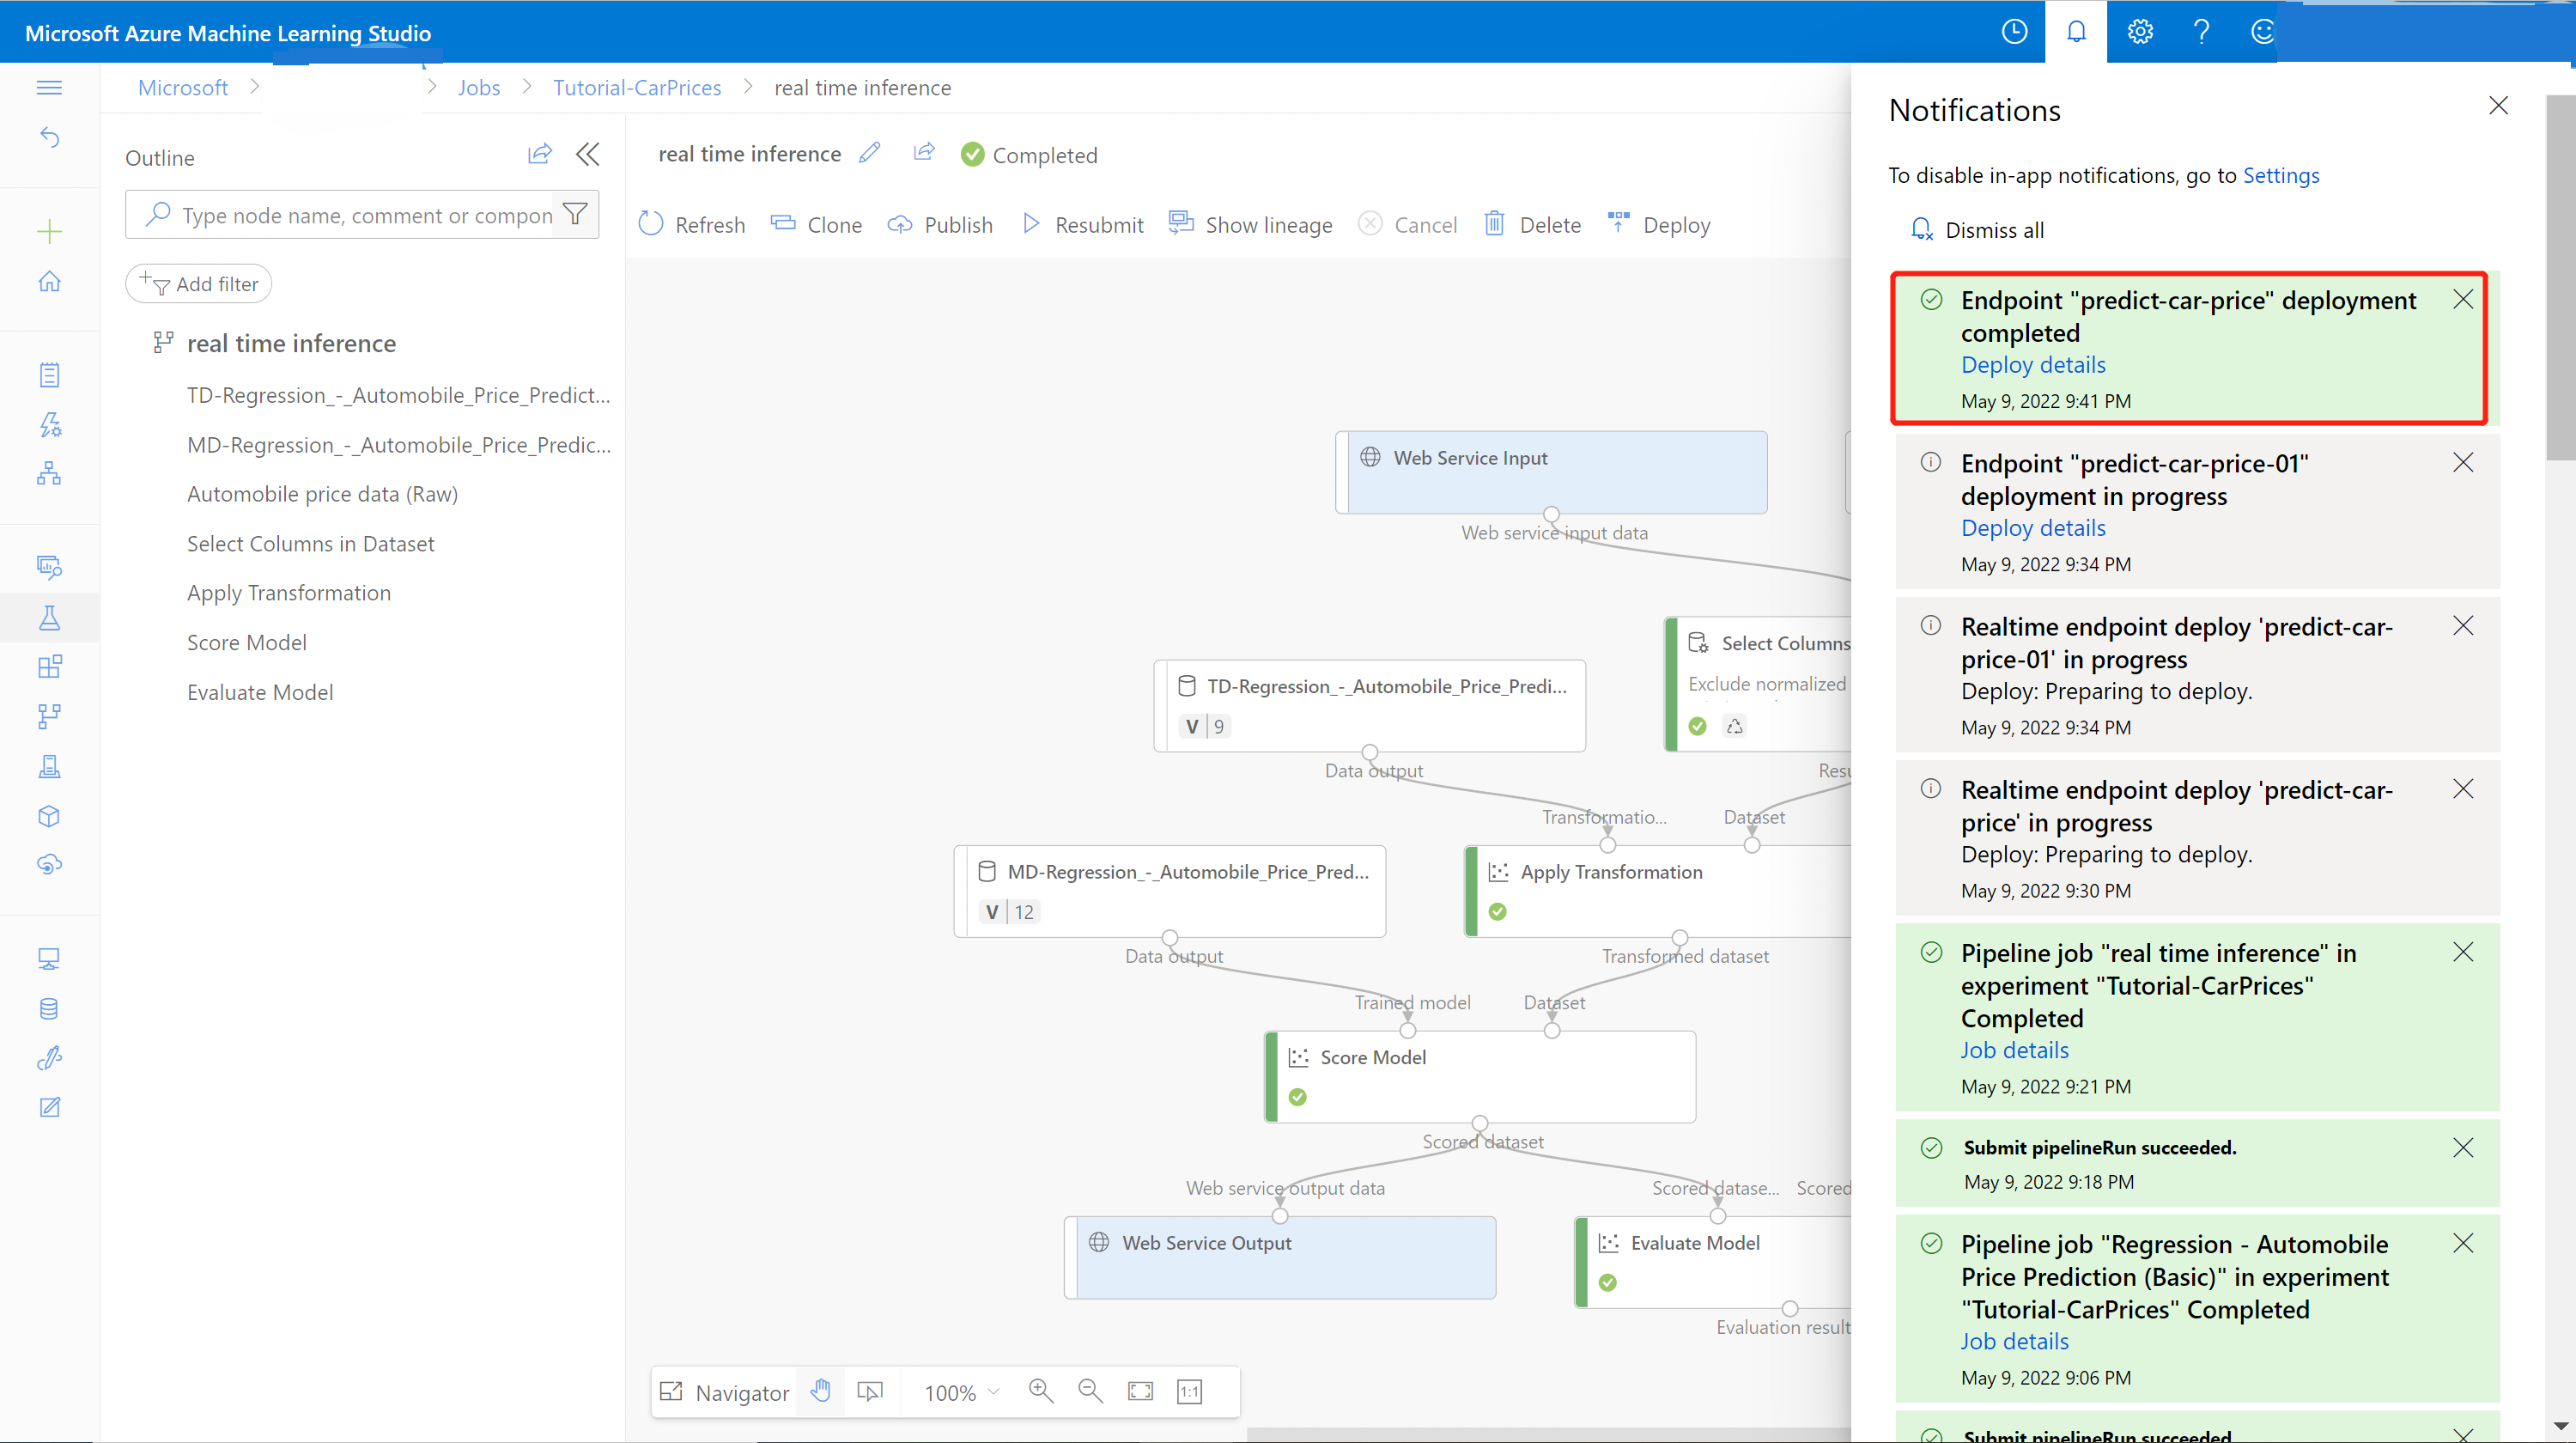
A success notification from the notification center appears after deployment finishes. It might take a few minutes.

Tip
You can also deploy to Azure Container Instance if you select Azure Container Instance for Compute type in the real-time endpoint setting box. Azure Container Instance is used for testing or development. Use Azure Container Instance for low-scale CPU-based workloads that require less than 48 GB of RAM.
Test the real-time endpoint
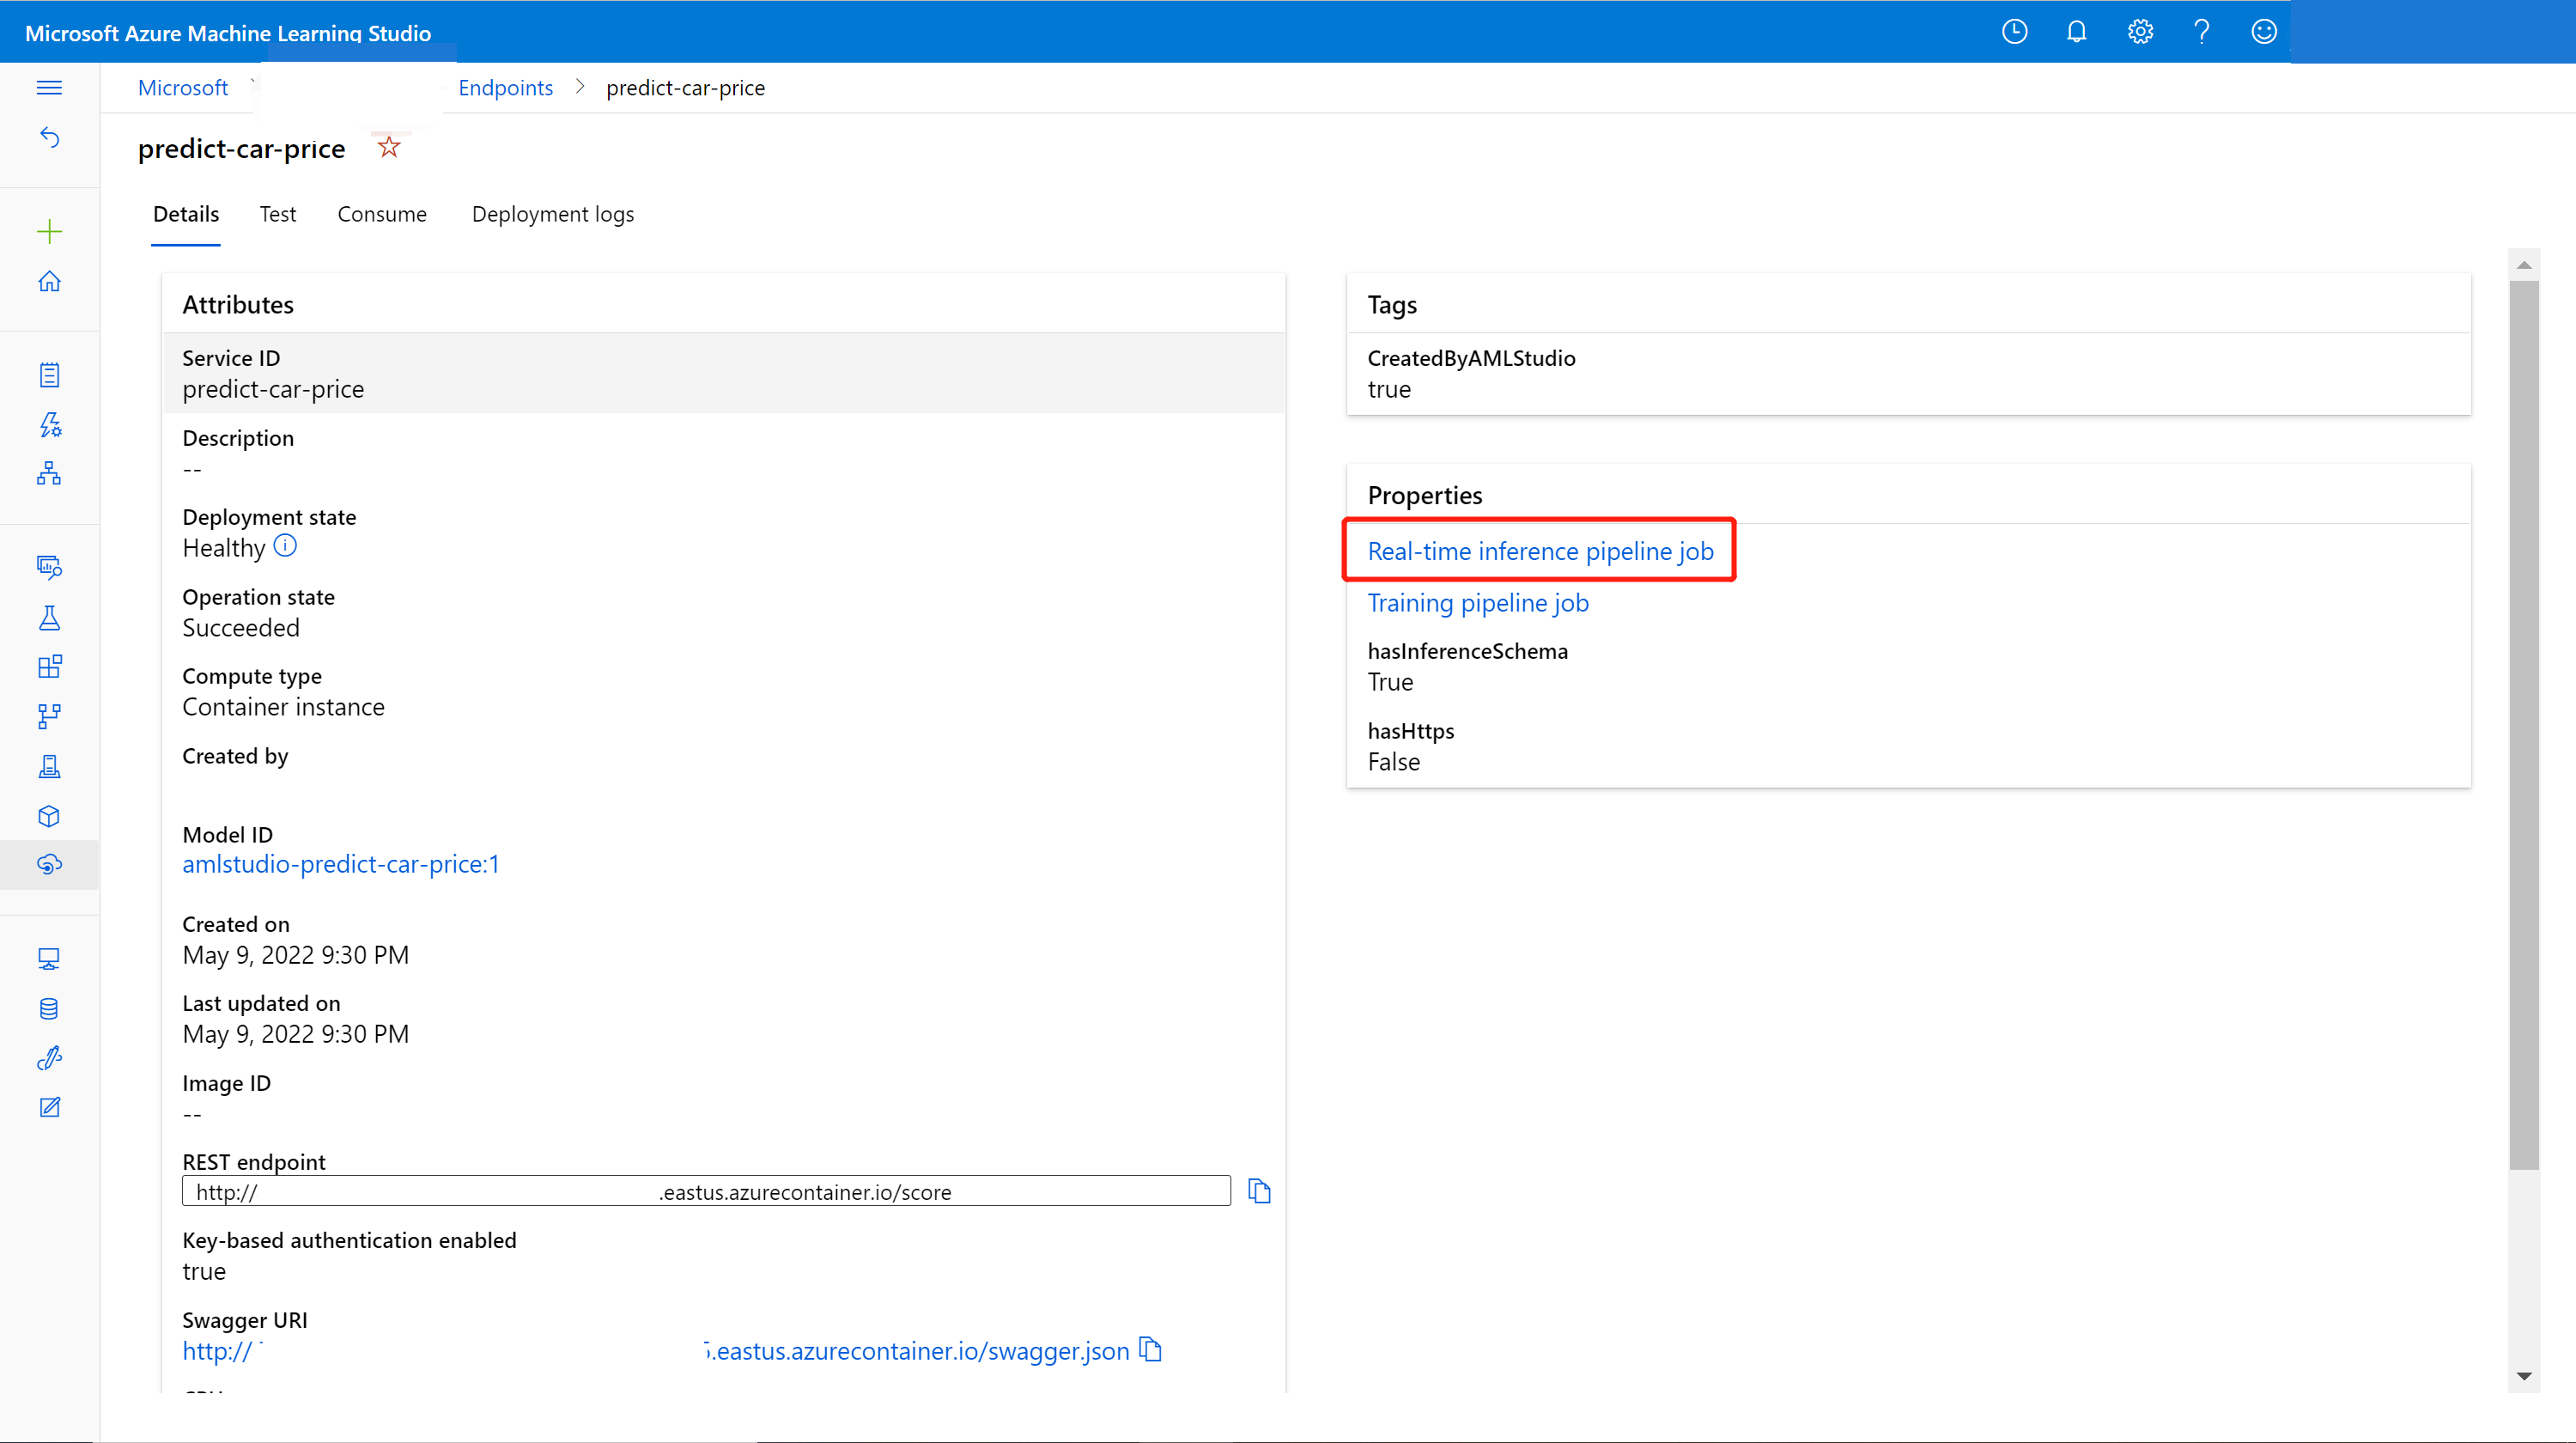
After deployment finishes, you can view your real-time endpoint by going to the Endpoints page.
On the Endpoints page, select the endpoint you deployed.
In the Details tab, you can see more information such as the REST URI, Swagger definition, status, and tags.
In the Consume tab, you can find sample consumption code, security keys, and set authentication methods.
In the Deployment logs tab, you can find the detailed deployment logs of your real-time endpoint.
To test your endpoint, go to the Test tab. From here, you can enter test data and select Test verify the output of your endpoint.
Update the real-time endpoint
You can update the online endpoint with new model trained in the designer. On the online endpoint detail page, find your previous training pipeline job and inference pipeline job.
You can find and modify your training pipeline draft in the designer homepage.
Or you can open the training pipeline job link and then clone it into a new pipeline draft to continue editing.
After you submit the modified training pipeline, go to the job detail page.
When the job completes, right click Train Model and select Register data.
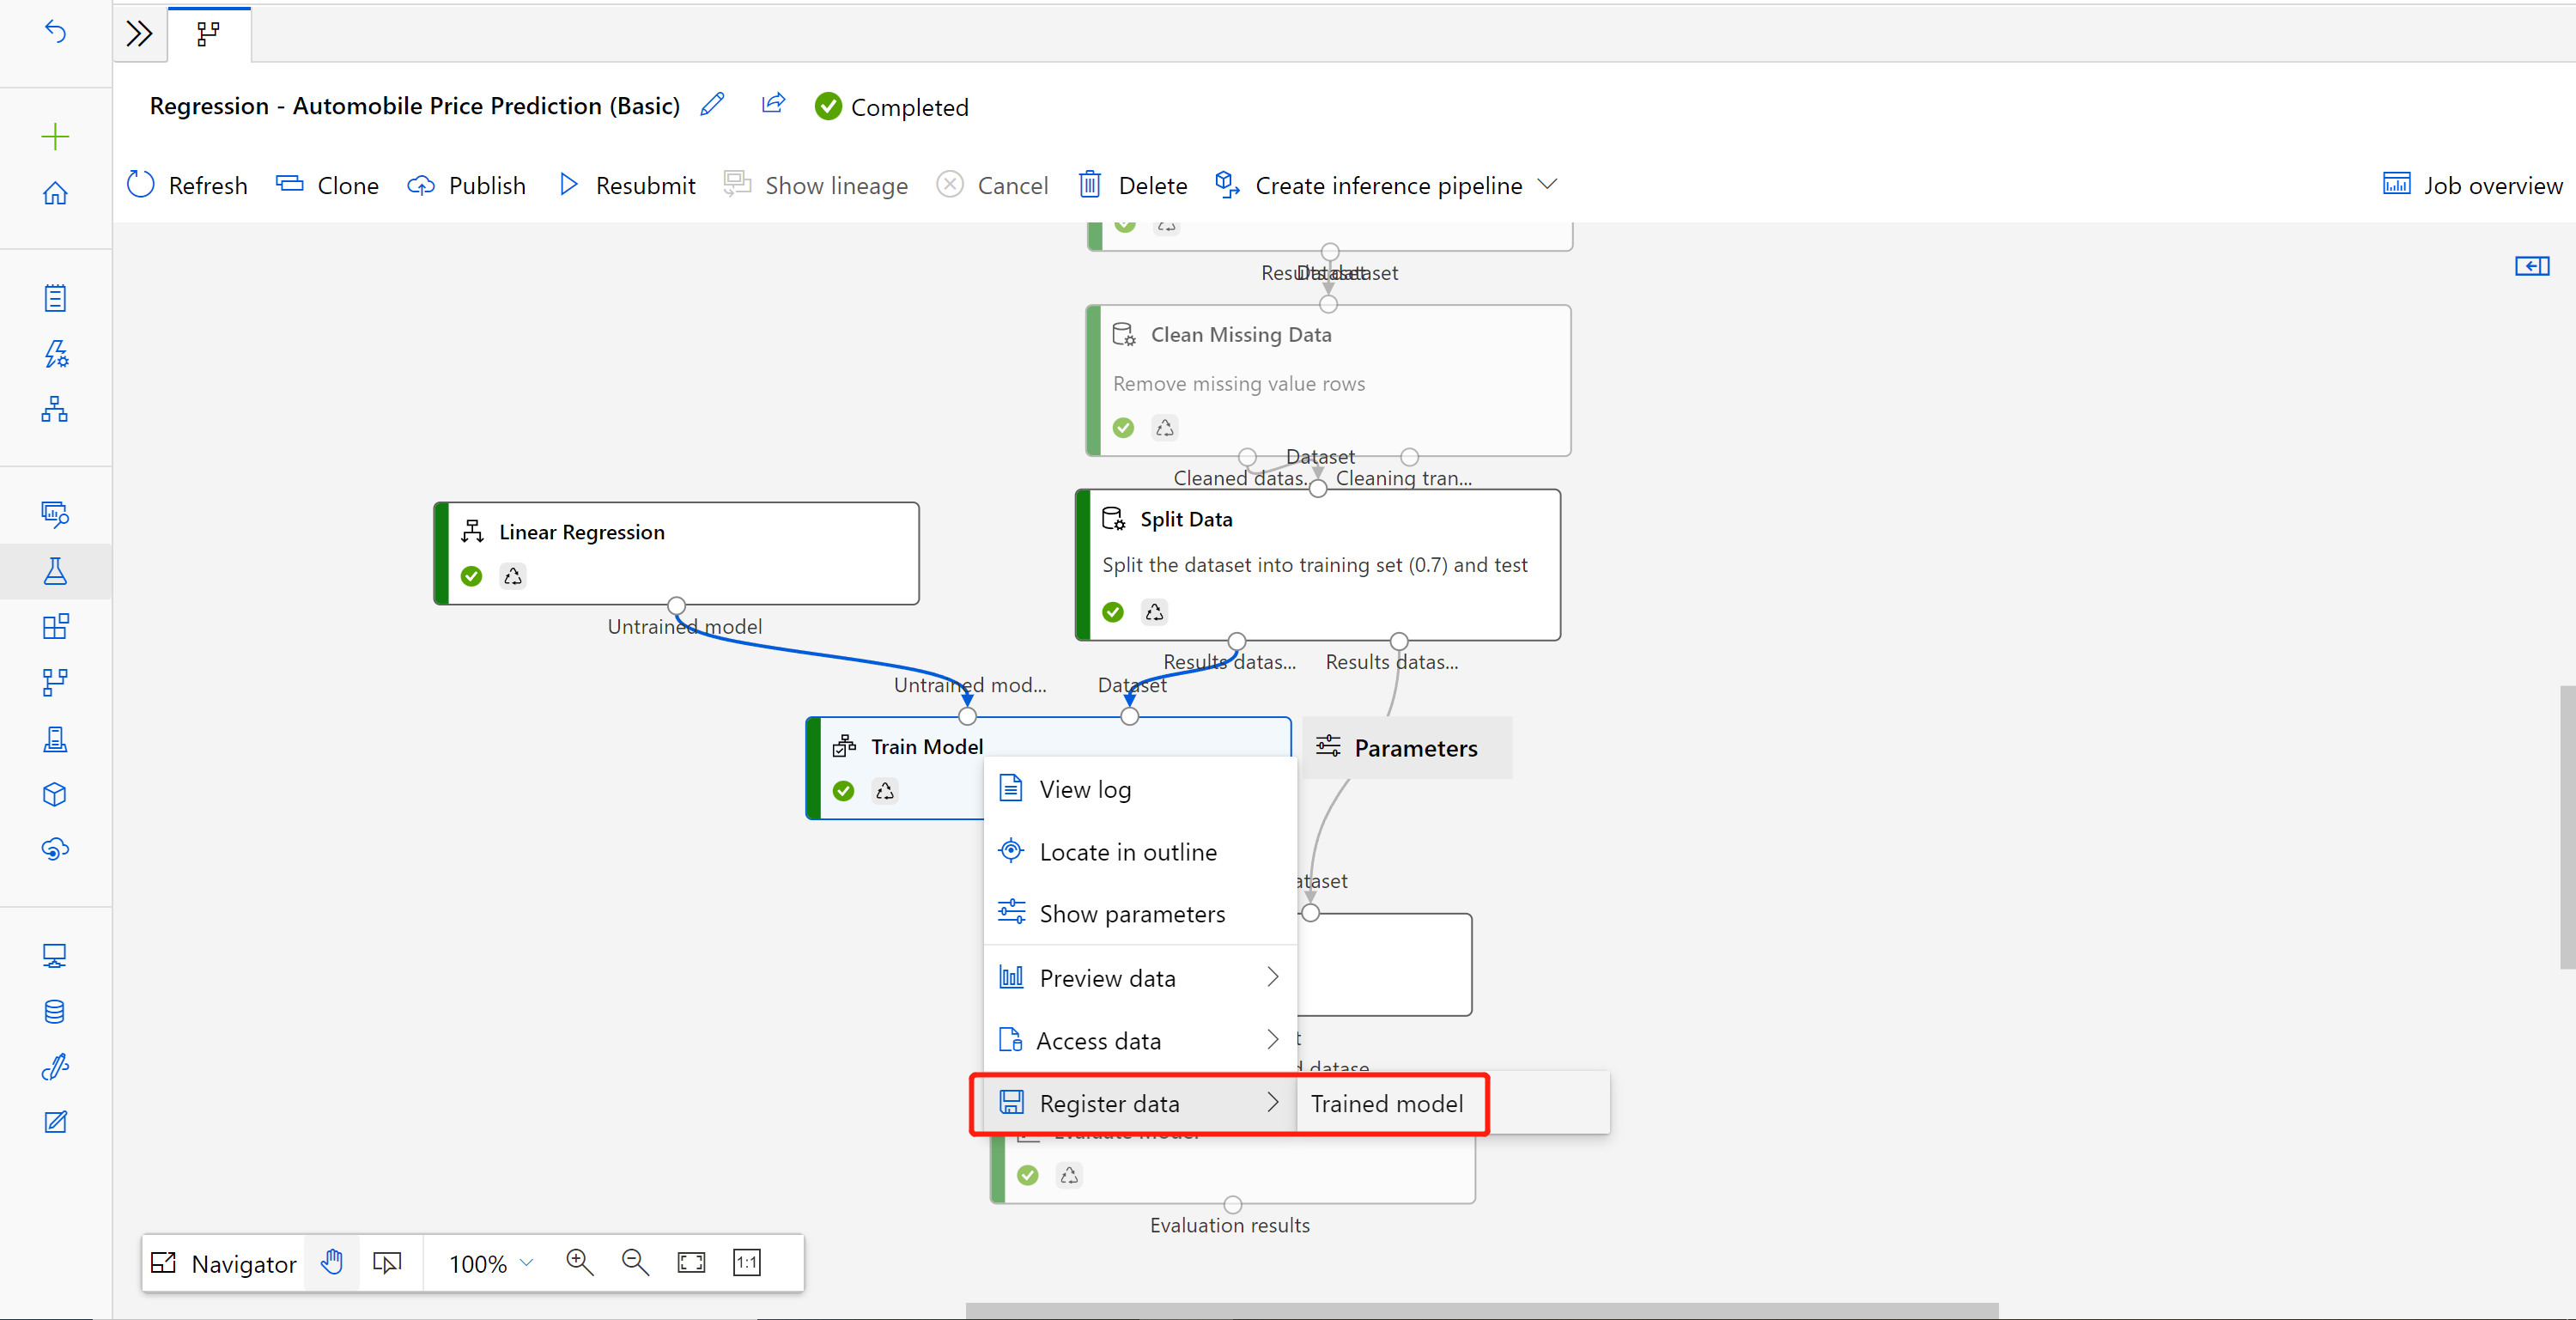
Input name and select File type.
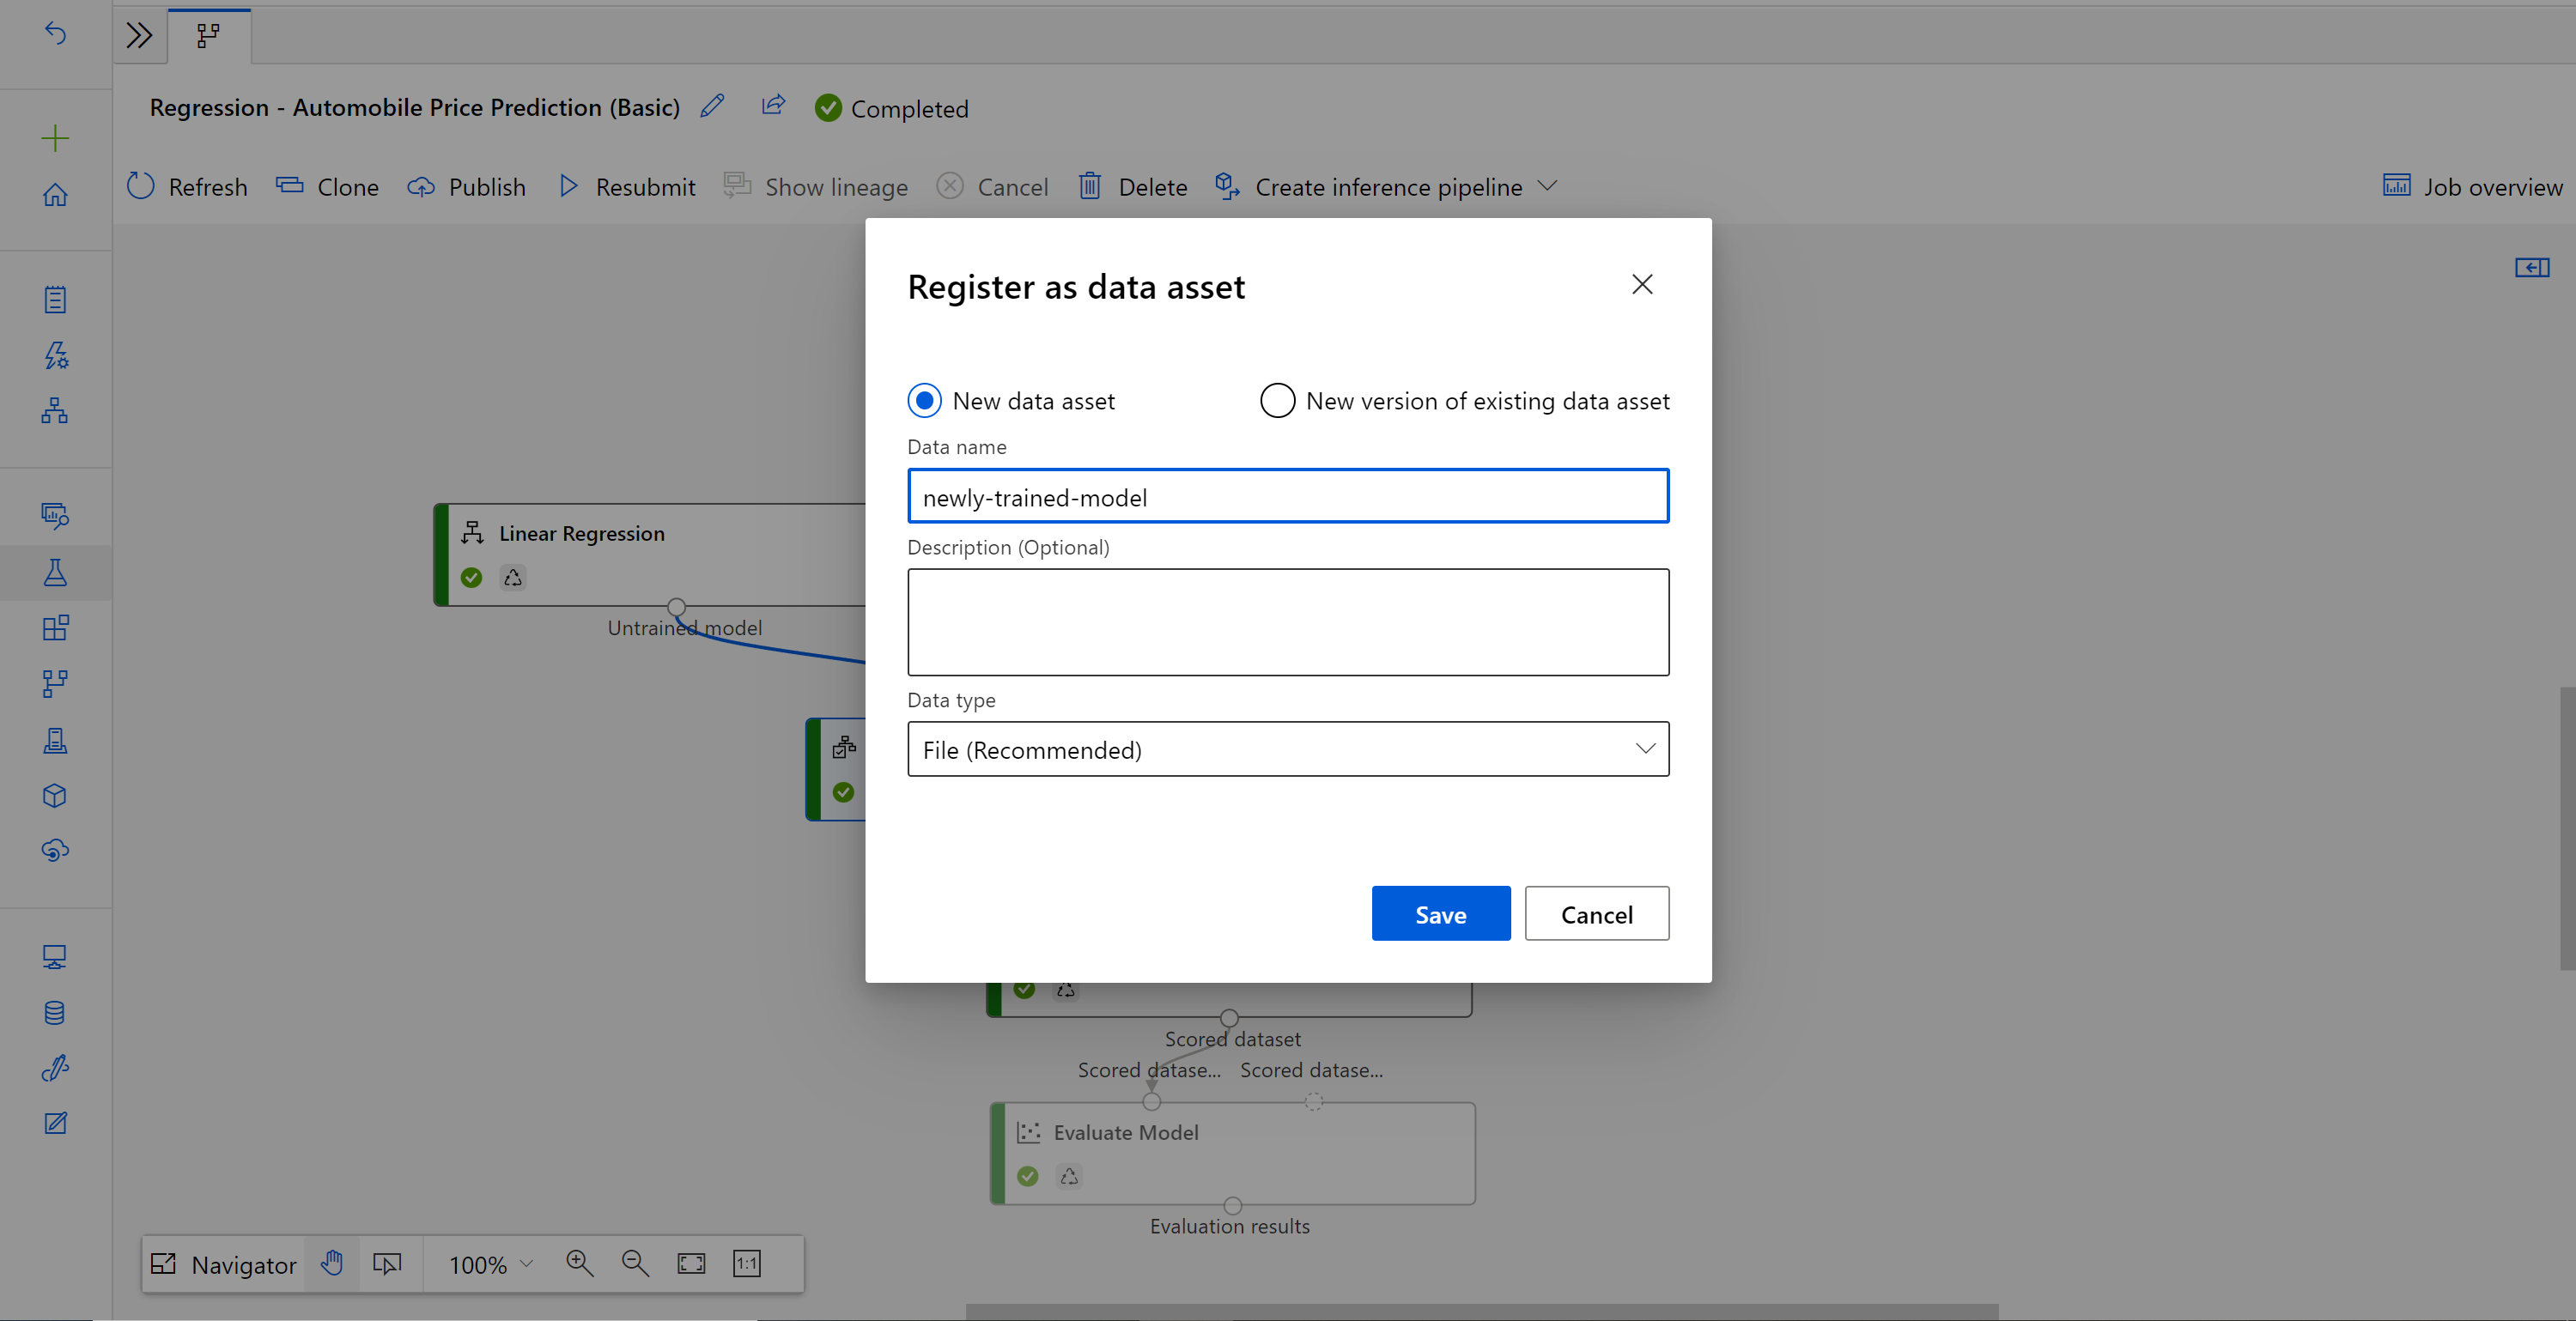
After the dataset registers successfully, open your inference pipeline draft, or clone the previous inference pipeline job into a new draft. In the inference pipeline draft, replace the previous trained model shown as MD-XXXX node connected to the Score Model component with the newly registered dataset.

If you need to update the data preprocessing part in your training pipeline, and would like to update that into the inference pipeline, the processing is similar as steps above.
You just need to register the transformation output of the transformation component as dataset.
Then, manually replace the TD- component in the inference pipeline with the registered dataset.
After modifying your inference pipeline with the newly trained model or transformation, submit it. When the job is completed, deploy it to the existing online endpoint deployed previously.


Limitations
Due to datastore access limitation, if your inference pipeline contains Import Data or Export Data components, they're auto-removed when deployed to real-time endpoint.
If you have datasets in the real-time inference pipeline and want to deploy it to real-time endpoint, currently this flow only supports datasets registered from Blob datastore. If you want to use datasets from other type datastores, you can use Select Column to connect with your initial dataset with settings of selecting all columns, register the outputs of Select Column as File dataset and then replace the initial dataset in the real-time inference pipeline with this newly registered dataset.
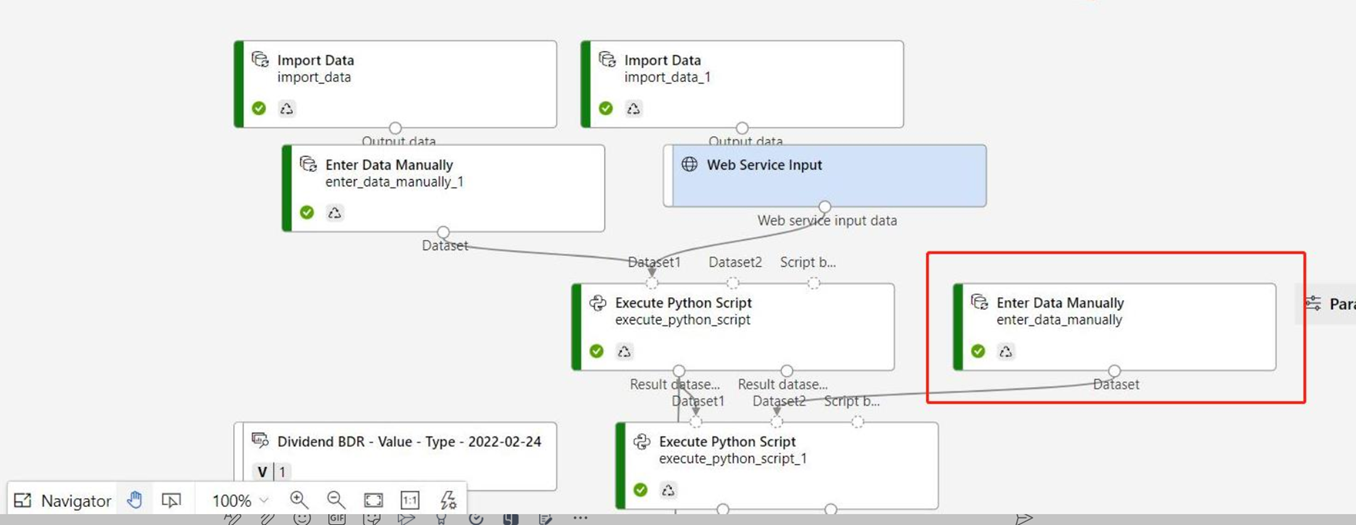
If your inference graph contains Enter Data Manually component that isn't connected to the same port as Web Service Input component, the Enter Data Manually component isn't executed during HTTP call processing. A workaround is to register the outputs of that Enter Data Manually component as a dataset, then in the inference pipeline draft, replace the Enter Data Manually component with the registered dataset.

Clean up resources
Important
You can use the resources that you created as prerequisites for other Azure Machine Learning tutorials and how-to articles.
Delete everything
If you don't plan to use anything that you created, delete the entire resource group so you don't incur any charges.
In the Azure portal, select Resource groups on the left side of the window.
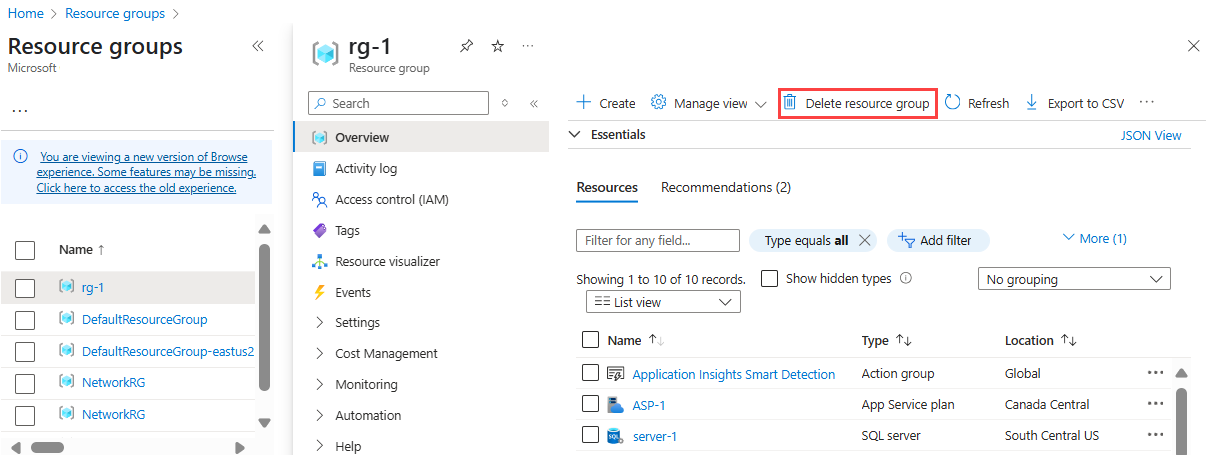
In the list, select the resource group that you created.
Select Delete resource group.
Deleting the resource group also deletes all resources that you created in the designer.
Delete individual assets
In the designer where you created your experiment, delete individual assets by selecting them and then selecting the Delete button.
The compute target that you created here automatically autoscales to zero nodes when it's not being used. This action is taken to minimize charges. If you want to delete the compute target, take these steps:
You can unregister datasets from your workspace by selecting each dataset and selecting Unregister.

To delete a dataset, go to the storage account by using the Azure portal or Azure Storage Explorer and manually delete those assets.
Related content
In this tutorial, you learned how to create, deploy, and consume a machine learning model in the designer. To learn more about how you can use the designer, see the following articles:
Feedback
Coming soon: Throughout 2024 we will be phasing out GitHub Issues as the feedback mechanism for content and replacing it with a new feedback system. For more information see: https://aka.ms/ContentUserFeedback.
Submit and view feedback for