Build the landing page for your free or trial SaaS offer in the commercial marketplace
This article guides you through the process of building a landing page for a free or trial SaaS app that will be sold on the Microsoft commercial marketplace.
Important
Azure Active Directory (Azure AD) Graph is deprecated as of June 30, 2023. Going forward, we're making no further investments in Azure AD Graph. Azure AD Graph APIs have no SLA or maintenance commitment beyond security-related fixes. Investments in new features and functionalities will only be made in Microsoft Graph.
We'll retire Azure AD Graph in incremental steps so that you have sufficient time to migrate your applications to Microsoft Graph APIs. At a later date that we will announce, we will block the creation of any new applications using Azure AD Graph.
To learn more, see Important: Azure AD Graph Retirement and Powershell Module Deprecation.
Overview
You can think of the landing page as the "lobby" for your software as a service (SaaS) offer. After the customer chooses to get your app, the commercial marketplace directs them to the landing page to activate and configure their subscription to your SaaS application. When you create a software as a service (SaaS) offer, in Partner Center, you can choose whether or not to sell through Microsoft. If you want to only list your offer in the Microsoft commercial marketplace and not sell through Microsoft, you can specify how potential customers can interact with the offer. When you enable the Get it now (Free) or Free trial listing option, you must specify a landing page URL to which the user can go to access the free subscription or trial.
The purpose of the landing page is simply to receive the user so they can activate the free trial or free subscription. Using Microsoft Entra ID and Microsoft Graph, you'll enable single sign-on (SSO) for the user and get important details about the user that you can use to activate their free trial or free subscription, including their name, email address, and organization.
Because the information needed to activate the subscription is limited and provided by Microsoft Entra ID and Microsoft Graph, there should be no need to request information that requires more than basic consent. If you need user details that require more consent for your application, you should request this information after subscription activation is complete. This enables frictionless subscription activation for the user and decreases the risk of abandonment.
The landing page typically includes the following information and listing options:
- Present the name and details of the free trial or free subscription. For example, specify the usage limits or duration of a trial.
- Present the user's account details, including first and last name, organization, and email.
- Prompt the user to confirm or substitute different account details.
- Guide the user on next steps after activation. For example, receive a welcome email, manage the subscription, get support, or read documentation.
The following sections in this article guide you through the process of building a landing page:
- Create a Microsoft Entra app registration for the landing page.
- Use a code sample as a starting point for your app.
- Read information from claims encoded in the ID token, received from Microsoft Entra ID after sign in, that was sent with the request.
- Use the Microsoft Graph API to gather additional information, as required.
Create a Microsoft Entra app registration
The commercial marketplace is fully integrated with Microsoft Entra ID. Users arrive at the marketplace authenticated with an Microsoft Entra account or Microsoft account (MSA). After acquiring a free or free trial subscription through your list-only offer, the user goes from the commercial marketplace to your landing page URL to activate and manage their subscription to your SaaS application. You must let the user sign in to your application with Microsoft Entra SSO. (The landing page URL is specified in the offer's Technical configuration page.)
Tip
Don't include the pound sign character (#) in the landing page URL. Otherwise, customers will not be able to access your landing page.
The first step to using the identity is to make sure your landing page is registered as a Microsoft Entra application. Registering the application lets you use Microsoft Entra ID to authenticate users and request access to user resources. It can be considered the application's definition, which lets the service know how to issue tokens to the app based on the app's settings.
Register a new application using the Azure portal
To get started, follow the instructions for registering a new application. To let users from other companies visit the app, you must choose Accounts in any organizational directory (any Microsoft Entra directory—multitenant) and personal Microsoft accounts (like Skype or Xbox) when asked who can use the application.
If you intend to query the Microsoft Graph API, configure your new application to access web APIs. When you select the API permissions for this application, the default of User.Read is enough to gather basic information about the user to make the onboarding process smooth and automatic. Don't request any API permissions labeled needs admin consent, as this will block all nonadministrator users from visiting your landing page.
If you do require elevated permissions as part of your onboarding or provisioning process, consider using the incremental consent functionality of Microsoft Entra ID so that all users sent from the marketplace are able to interact initially with the landing page.
Use a code sample as a starting point
Microsoft has provided several sample apps that implement a simple website with Microsoft Entra login enabled. After your application is registered in Microsoft Entra ID, the Quickstart blade offers a list of common application types and development stacks (Figure 1). Choose the one that matches your environment and follow the instructions for download and setup.
Figure 1: Quickstart blade in the Azure portal
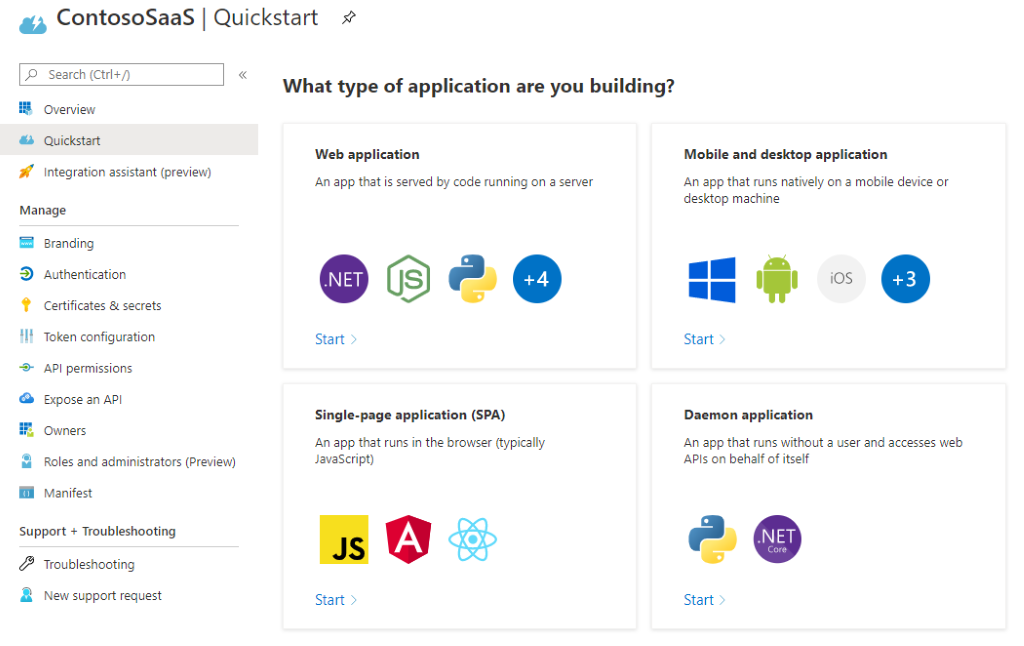
After you download the code and set up your development environment, change the configuration settings in the app to reflect the Application ID, tenant ID, and client secret you recorded in the previous procedure. The exact steps differ depending on which sample you're using.
Read information from claims encoded in the ID token
As part of the OpenID Connect flow, Microsoft Entra ID adds an ID token to the request when the user is sent to the landing page. This token contains multiple pieces of basic information that could be useful in the activation process, including the information seen in this table.
| Value | Description |
|---|---|
| aud | Intended audience for this token. In this case, it should match your Application ID and be validated. |
| preferred_username | Primary username of the visiting user. This could be an email address, phone number, or other identifier. |
| User's email address. This field can be empty. | |
| name | Human-readable value that identifies the subject of the token. In this case, it is the user's name. |
| oid | Identifier in the Microsoft identity system that uniquely identifies the user across applications. Microsoft Graph will return this value as the ID property for a given user account. |
| tid | Identifier that represents the Microsoft Entra tenant the user is from. In the case of an MSA identity, this will always be 9188040d-6c67-4c5b-b112-36a304b66dad. For more information, see the note in the next section: Use Microsoft Graph API. |
| sub | Identifier that uniquely identifies the user in this specific application. |
Use the Microsoft Graph API
The ID token contains basic information to identify the user, but your activation process might require more details—such as the user's company—to complete the onboarding process. Use the Microsoft Graph API to request this information to avoid forcing the user to input these details again. The standard User.Read permissions include the following information, by default:
| Value | Description |
|---|---|
| displayName | Name displayed in the address book for the user. |
| givenName | First name of the user. |
| jobTitle | User's job title. |
| SMTP address for the user. | |
| mobilePhone | Primary cellular telephone number for the user. |
| preferredLanguage | ISO 639-1 code for the user's preferred language. |
| surname | Last name of the user. |
More properties—such as the name of the user's company or the user's location (country/region)—can be selected for inclusion in the request. For more information, see Properties for the user resource type.
Most apps that are registered with Microsoft Entra ID grant delegated permissions to read the user's information from their company's Microsoft Entra tenant. Any request to Microsoft Graph for that information must be accompanied by an access token as authentication. Specific steps to generate the access token will depend on the technology stack you're using, but the sample code will contain an example. For more information, see Get access on behalf of a user.
Note
Accounts from the MSA tenant (with tenant ID 9188040d-6c67-4c5b-b112-36a304b66dad) will not return more information than has already been collected with the ID token. So you can skip this call to the Graph API for these accounts.
Next steps
Feedback
Coming soon: Throughout 2024 we will be phasing out GitHub Issues as the feedback mechanism for content and replacing it with a new feedback system. For more information see: https://aka.ms/ContentUserFeedback.
Submit and view feedback for