Quickstart: Create an instance of Azure Database for MySQL - Flexible Server by using the Azure CLI
APPLIES TO:  Azure Database for MySQL - Flexible Server
This quickstart shows you how to use Azure CLI commands in Azure Cloud Shell to create an instance of Azure Database for MySQL - Flexible Server in five minutes.
If you don't have an Azure subscription, create an Azure free account before you begin. Currently, with an Azure free account, you can try Azure Database for MySQL - Flexible Server free for 12 months. For more information, see Try Azure Database for MySQL - Flexible Server for free.
Open Azure Cloud Shell
Azure Cloud Shell is a free, interactive shell that you can use to run the steps that are described in this article. In Cloud Shell, common Azure tools are preinstalled and configured to use with your account.
To open Cloud Shell, in the upper-right corner of a code example, select Try it.
You can also open Cloud Shell in a separate browser tab by going to https://shell.azure.com/bash. Select Copy to copy the contents of a code block. In Cloud Shell, paste the code and select Enter to run it.
If you prefer to install and use the Azure CLI, this quickstart requires Azure CLI version 2.0 or later. To find the version of your Azure CLI installation. , run az --version. If you need to install or upgrade, see Install the Azure CLI.
Prerequisites
Sign in to your account by using the az login command. Note the id property. The id property refers to the subscription ID of your Azure account.
az login
Select the specific subscription in your Azure account by using the az account set command. Make a note of the id value from the az login output to use as the value for the subscription argument in the command.
If you have multiple subscriptions, select the subscription in which you want the resource to be billed. To get a list of your subscriptions, use az account list.
az account set --subscription <subscription ID>
Create an Azure Database for MySQL flexible server
Create an Azure resource group by using the az group create command. Then create your Azure Database for MySQL flexible server inside the resource group. Be sure to provide a unique name. The following example creates a resource group named myresourcegroup in the eastus2 location.
az group create --name myresourcegroup --location eastus2
Create an Azure Database for MySQL flexible server by using the az mysql flexible-server create command. A server can contain multiple databases. The following command creates a server by using service defaults and values from the local context of the Azure CLI:
az mysql flexible-server create
The server that's created has the following attributes:
- An autogenerated server name, admin username, admin password, and resource group name (if it's not already specified in a local context), and it's in the same location as your resource group.
- Service defaults for the remaining server configurations: compute tier (Burstable), compute size/SKU (B1MS), backup retention period (seven days), and MySQL version (5.7).
- The default connectivity method is Private access (VNet Integration), with an autogenerated virtual network and subnet.
Note
The connectivity method can't be changed after you create the server. For example, if you selected Private access (VNet Integration) when you created the server, you can't change the setting to Public access (allowed IP addresses) after deployment. We highly recommend that you create a server that has private access to securely access your server by using virtual network integration. For more information about private access, see the article about networking concepts.
If you want to change any defaults, see the Azure CLI reference documentation for the complete list of configurable Azure CLI parameters.
Here's sample output:
Creating Resource Group 'groupXXXXXXXXXX'...
Creating new vnet "serverXXXXXXXXXVNET" in resource group "groupXXXXXXXXXX"...
Creating new subnet "serverXXXXXXXXXSubnet" in resource group "groupXXXXXXXXXX" and delegating it to "Microsoft.DBforMySQL/flexibleServers"...
Creating MySQL Server 'serverXXXXXXXXX' in group 'groupXXXXXXXXXX'...
Your server 'serverXXXXXXXXX' is using SKU 'Standard_B1ms' (Paid Tier). For pricing details, see https://aka.ms/mysql-pricing.
Creating MySQL database 'flexibleserverdb'...
Make a note of your password. If you forget your password, reset the password by running 'az mysql flexible-server update -n serverXXXXXXXXX -g groupXXXXXXXXXX -p <new-password>'.
{
  "connectionString": "server=serverXXXXXXXXX.mysql.database.azure.com;database=flexibleserverdb;uid=secureusername;pwd=securepasswordstring",
  "databaseName": "flexibleserverdb",
  "host": "serverXXXXXXXXX.mysql.database.azure.com",
  "id": "/subscriptions/00000000-0000-0000-0000-000000000000/resourceGroups/groupXXXXXXXXXX/providers/Microsoft.DBforMySQL/flexibleServers/serverXXXXXXXXX",
  "location": "East US 2",
  "password": "securepasswordstring",
  "resourceGroup": "groupXXXXXXXXXX",
  "skuname": "Standard_B1ms",
  "subnetId": "/subscriptions/00000000-0000-0000-0000-000000000000/resourceGroups/groupXXXXXXXXXX/providers/Microsoft.Network/virtualNetworks/serverXXXXXXXXXVNET/subnets/serverXXXXXXXXXSubnet",
  "username": "secureusername",
  "version": "5.7"
}
If you want to change any defaults, see the Azure CLI reference documentation for the complete list of configurable Azure CLI parameters.
Create a database
If you didn't already create a database, create one called newdatabase by running the following command:
az mysql flexible-server db create -d newdatabase
Note
Connections to Azure Database for MySQL - Flexible Server communicate by using port 3306. If you try to connect from within a corporate network, outbound traffic through port 3306 might not be allowed. You can't connect to your server unless your IT department opens port 3306.
Get the connection information
To connect to your server, you need to provide host information and access credentials:
az mysql flexible-server show --resource-group myresourcegroup --name mydemoserver
The result is in JSON format. Make a note of the values for fullyQualifiedDomainName and administratorLogin. Here's an example of the JSON output:
{
  "administratorLogin": "myadminusername",
  "administratorLoginPassword": null,
  "delegatedSubnetArguments": {
    "subnetArmResourceId": "/subscriptions/00000000-0000-0000-0000-000000000000/resourceGroups/myresourcegroup/providers/Microsoft.Network/virtualNetworks/mydemoserverVNET/subnets/mydemoserverSubnet"
  },
  "fullyQualifiedDomainName": "mydemoserver.mysql.database.azure.com",
  "id": "/subscriptions/00000000-0000-0000-0000-000000000000/resourceGroups/myresourcegroup/providers/Microsoft.DBforMySQL/flexibleServers/mydemoserver",
  "location": "East US 2",
  "name": "mydemoserver",
  "publicNetworkAccess": "Disabled",
  "resourceGroup": "myresourcegroup",
  "sku": {
    "capacity": 0,
    "name": "Standard_B1ms",
    "tier": "Burstable"
  },
  "storageProfile": {
    "backupRetentionDays": 7,
    "fileStorageSkuName": "Premium_LRS",
    "storageAutogrow": "Disabled",
    "storageIops": 0,
    "storageMb": 10240
  },
  "tags": null,
  "type": "Microsoft.DBforMySQL/flexibleServers",
  "version": "5.7"
}
Connect and test the connection by using the Azure CLI
You can use Azure Database for MySQL - Flexible Server to connect to your flexible server by using the az mysql flexible-server connect command in the Azure CLI. You can use this command to test connectivity to your database server, create a quick basic database, and run queries directly against your server without installing mysql.exe or MySQL Workbench. You can also use the command in interactive mode to run multiple queries at a time.
Run the following script to test and validate the connection to the database from your development environment:
az mysql flexible-server connect -n <servername> -u <username> -p <password> -d <databasename>
Here's an example:
az mysql flexible-server connect -n mysqldemoserver1 -u dbuser -p "dbpassword" -d newdatabase
In a successful connection, output like the following example appears:
Connecting to newdatabase database.
Successfully connected to mysqldemoserver1.
If the connection fails, try these solutions:
- Check whether port 3306 is open on your client machine.
- Verify that your server administrator username and password are correct.
- Verify that you configured a firewall rule for your client machine.
- Ensure that your client machine is in the same virtual network as the server if you configured your server for private access in a virtual network.
To run a single query, use the--querytext argument (-q):
az mysql flexible-server connect -n <server-name> -u <username> -p "<password>" -d <database-name> --querytext "<query text>"
Here's an example:
az mysql flexible-server connect -n mysqldemoserver1 -u dbuser -p "dbpassword" -d newdatabase -q "select * from table1;" --output table
To learn more about using az mysql flexible-server connect, see Azure CLI connect and query.
Connect by using the MySQL command-line client
If you created your Azure Database for MySQL flexible server by using private access with virtual network integration, connect to your server from a resource that's in the same virtual network as your server. You can create a virtual machine and add it to the virtual network that was created when you created your Azure Database for MySQL - Flexible Server instance. To learn more, see Configure private access.
If you created your Azure Database for MySQL - Flexible Server instance by using public access (allowed IP addresses), you can add your local IP address to the list of firewall rules on your server. For detailed guidance, see Create or manage firewall rules.
To connect to the server from your local environment, you can use either mysql.exe or MySQL Workbench. Azure Database for MySQL - Flexible Server supports connecting your client applications to the Azure Database for MySQL - Flexible Server service by using Transport Layer Security (TLS), previously known as Secure Sockets Layer (SSL). TLS is an industry-standard protocol that ensures encrypted network connections between your database server and client applications, so you can adhere to compliance requirements. To connect by using your Azure Database for MySQL flexible server, download the public SSL certificate for certificate authority verification. To learn more about connecting by using encrypted connections or disabling SSL, see Connect to Azure Database for MySQL - Flexible Server by using encrypted connections.
The following example shows how to connect to your Azure Database for MySQL flexible server by using the MySQL command-line client tool. You can install the tool if it's not already installed. Download the DigiCertGlobalRootCA certificate that's required for SSL connections. Use the --ssl-mode=REQUIRED connection string setting to enforce TLS/SSL certificate verification. Pass the local certificate file path to the --ssl-ca parameter. Replace values with your actual server name and password.
sudo apt-get install mysql-client
wget --no-check-certificate https://dl.cacerts.digicert.com/DigiCertGlobalRootCA.crt.pem
mysql -h mydemoserver.mysql.database.azure.com -u mydemouser -p --ssl-mode=REQUIRED --ssl-ca=DigiCertGlobalRootCA.crt.pem
If you provisioned your Azure Database for MySQL flexible server by using public access, you can also use Azure Cloud Shell to connect to your Azure Database for MySQL flexible server by using the preinstalled MySQL client.
To use Azure Cloud Shell to connect to your Azure Database for MySQL flexible server, allow networking access from Azure Cloud Shell to your Azure Database for MySQL flexible server. To allow access, go to the Azure portal Networking pane for your Azure Database for MySQL flexible server. Under Firewall, select the Allow public access from any Azure service within Azure to this server checkbox as shown in the following screenshot. Then select Save to persist the setting.
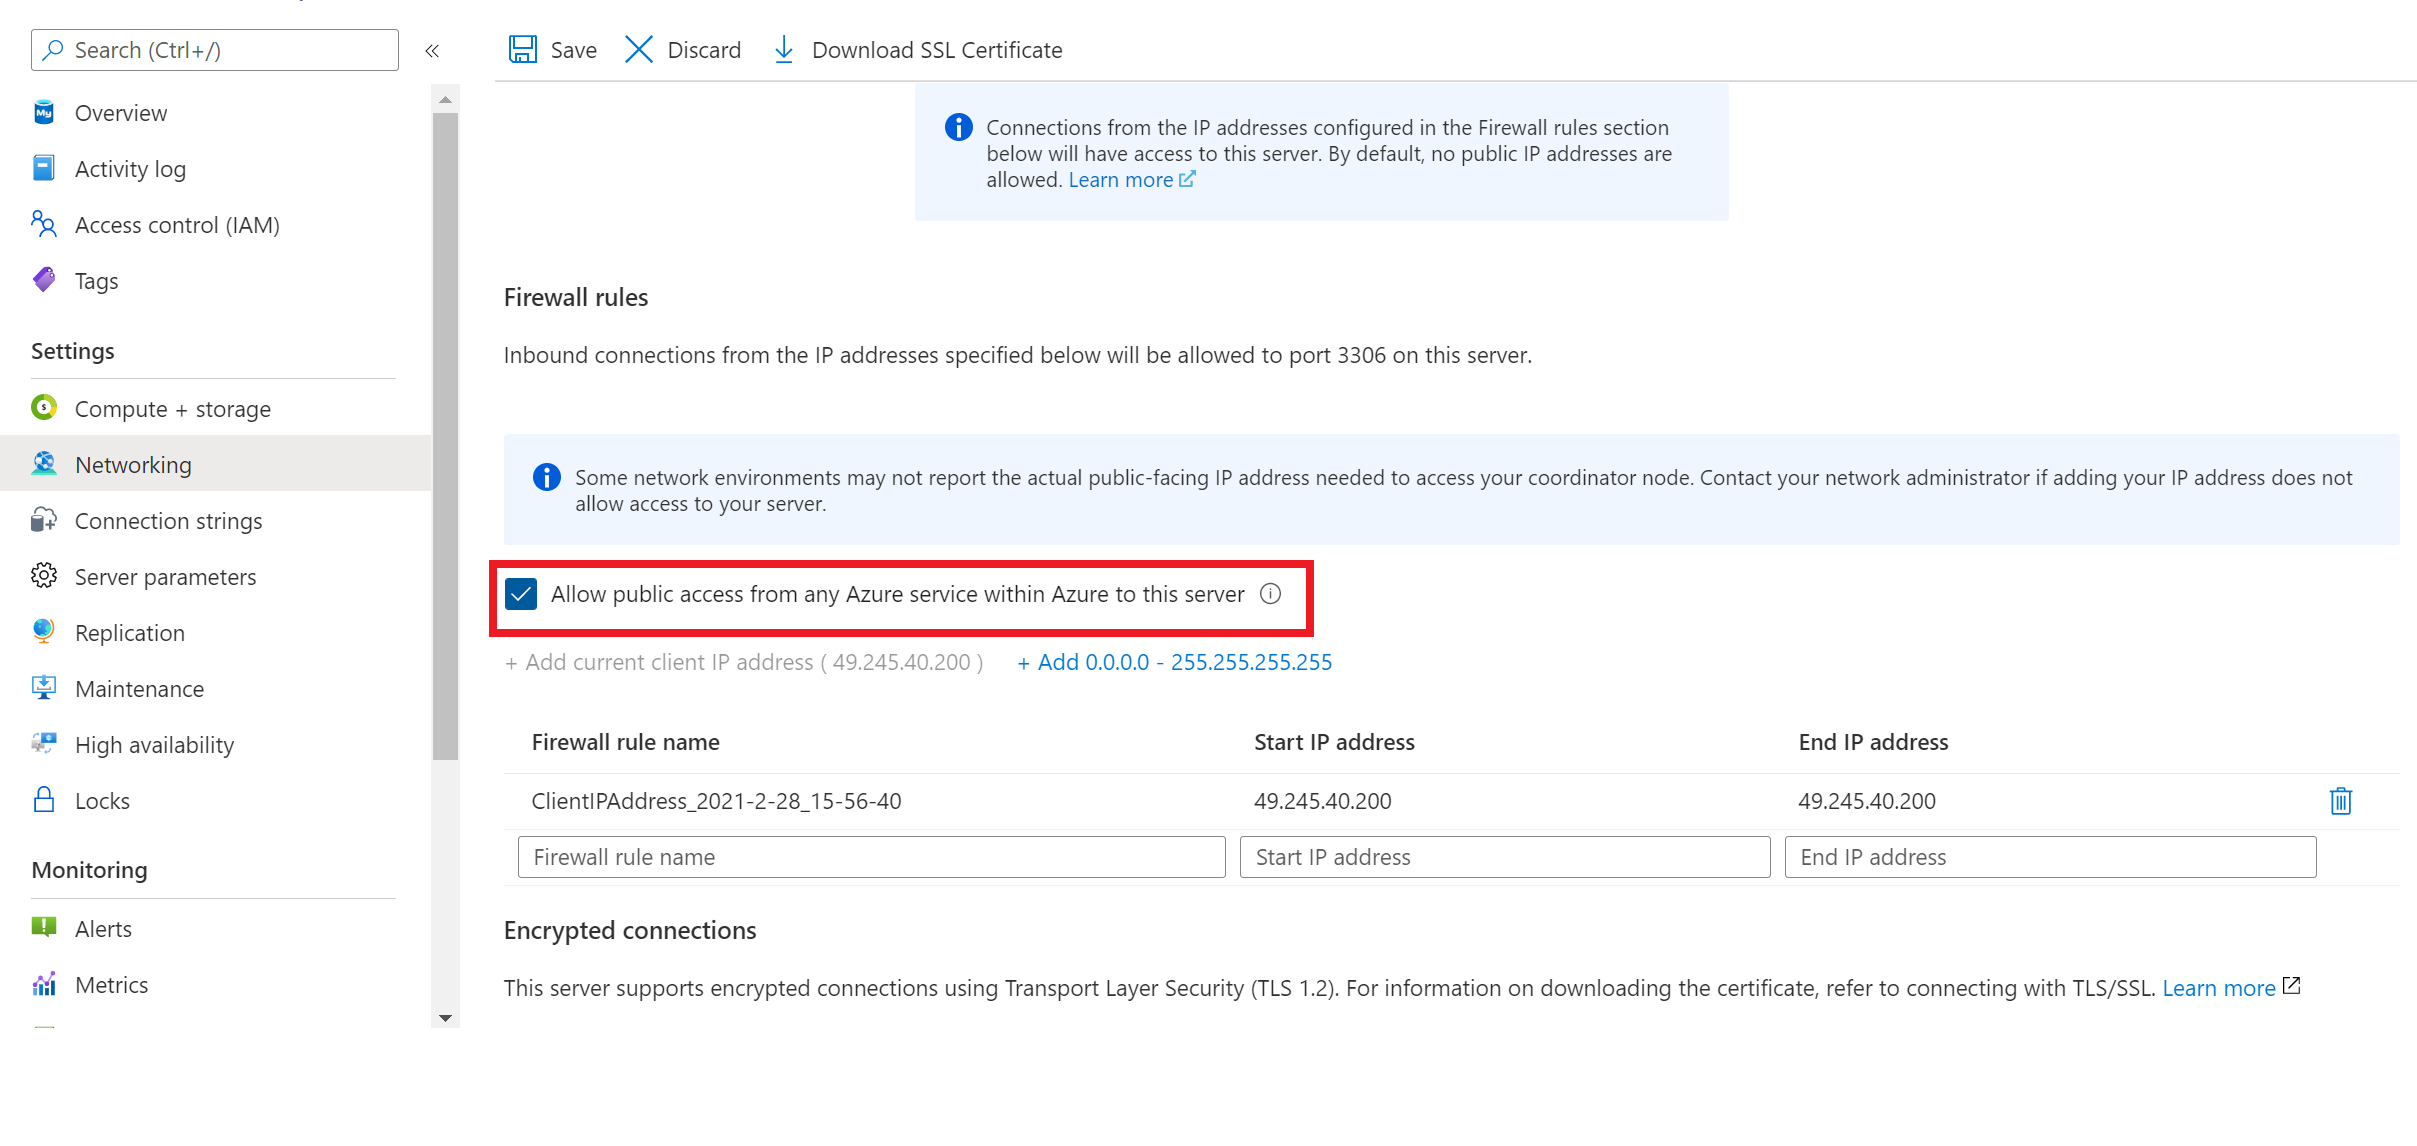
Note
Select Allow public access from any Azure service within Azure to this server only for development or testing. This setting configures the firewall to allow connections from IP addresses that are allocated to any Azure service or asset, including connections from other Azure subscriptions.
Select Try it to open Azure Cloud Shell. In Cloud Shell, use the following commands to connect to your Azure Database for MySQL flexible server. Use your server name, username, and password in the command.
wget --no-check-certificate https://dl.cacerts.digicert.com/DigiCertGlobalRootCA.crt.pem
mysql -h mydemoserver.mysql.database.azure.com -u mydemouser -p --ssl=true --ssl-ca=DigiCertGlobalRootCA.crt.pem
Important
When you connect to your Azure Database for MySQL flexible server by using Cloud Shell, use the --ssl=true parameter. Do not use --ssl-mode=REQUIRED.
The primary reason that this guidance is important is that Azure Cloud Shell is preinstalled with the mysql.exe client from the MariaDB distribution. The mysql.exe client requires the --ssl parameter. The MySQL client from the Oracle distribution requires the --ssl-mode parameter.
If you see the following error message when you connect to your Azure Database for MySQL flexible server, either you didn't select the Allow public access from any Azure service within Azure to this server checkbox when you set up your firewall rules, or the option isn't saved. Set the firewall rules, and then try again.
ERROR 2002 (HY000): Can't connect to MySQL server on <servername> (115)
Clean up resources
If you don't need to use the resources that you created for this article in another quickstart or tutorial, you can delete them by running the following command:
az group delete --name myresourcegroup
If you want to delete only the flexible server that you created, run this command:
az mysql flexible-server delete --resource-group myresourcegroup --name mydemoserver
Related content
Feedback
Coming soon: Throughout 2024 we will be phasing out GitHub Issues as the feedback mechanism for content and replacing it with a new feedback system. For more information see: https://aka.ms/ContentUserFeedback.
Submit and view feedback for