Tutorial: Set up your iOS app to work with Azure Notification Hubs
This tutorial shows you how to set up Azure Notification Hubs and configure credentials to push notifications to an iOS device via the Apple Push Notification service (APNS).
Running this tutorial is a prerequisite to the subsequent Objective C and Swift iOS tutorials, and covers the following steps:
- Generate the certificate signing request file.
- Request your app for push notifications.
- Create a provisioning profile for the app.
- Create a notification hub.
- Configure the notification hub with APNS information.
Prerequisites
To complete this tutorial, you must have an active Azure account. If you don't have an account, you can create a free trial account in just a couple of minutes. For details, see Azure Free Trial.
You'll also need the following:
- An active Apple Developer account.
- A Mac running Xcode, along with a valid developer certificate installed into your Keychain.
- An iPhone or iPad running iOS version 10 or later.
- Your physical device registered in the Apple Portal and associated with your certificate.
Be sure to read the Azure Notification Hubs overview if you’re not familiar with the service.
Note
The notification hub will be configured to use the Sandbox authentication mode only. You should not use this authentication mode for production workloads.
Generate the certificate-signing request file
The Apple Push Notification Service (APNS) uses certificates to authenticate your push notifications. Follow these instructions to create the necessary push certificate to send and receive notifications. For more information on these concepts, see the official Apple Push Notification Service documentation.
Generate the Certificate Signing Request (CSR) file, which Apple uses to generate a signed push certificate:
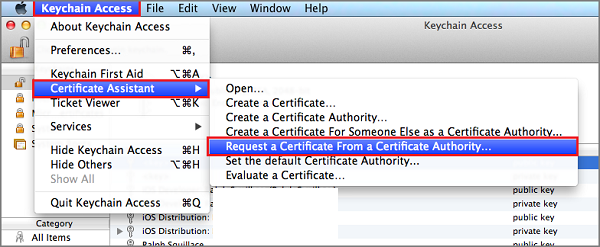
On your Mac, run the Keychain Access tool. It can be opened from the Utilities folder or the Other folder on the Launchpad.
Select Keychain Access, expand Certificate Assistant, and then select Request a Certificate from a Certificate Authority.
Note
By default, Keychain Access selects the first item in the list. This can be a problem if you're in the Certificates category and Apple Worldwide Developer Relations Certification Authority is not the first item in the list. Make sure you have a non-key item, or the Apple Worldwide Developer Relations Certification Authority key is selected, before generating the CSR (Certificate Signing Request).
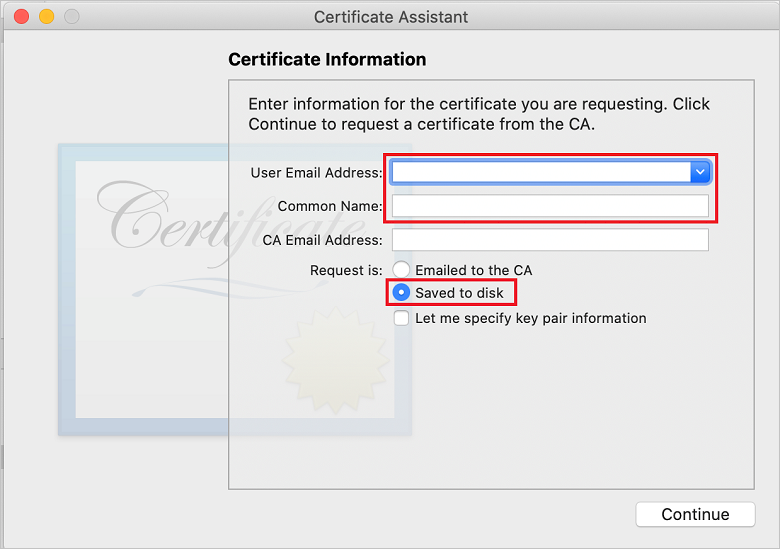
Select your User Email Address, enter your Common Name value, make sure that you specify Saved to disk, and then select Continue. Leave CA Email Address blank as it isn't required.
Enter a name for the CSR file in Save As, select the location in Where, and then select Save.
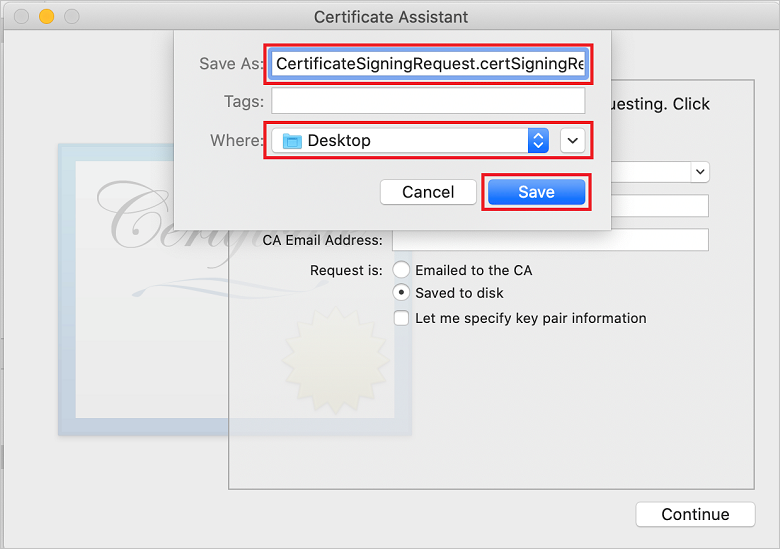
This action saves the CSR file in the selected location. The default location is Desktop. Remember the location chosen for the file.
Next, register your app with Apple, enable push notifications, and upload the exported CSR to create a push certificate.
Register your app for push notifications
To send push notifications to an iOS app, register your application with Apple, and also register for push notifications.
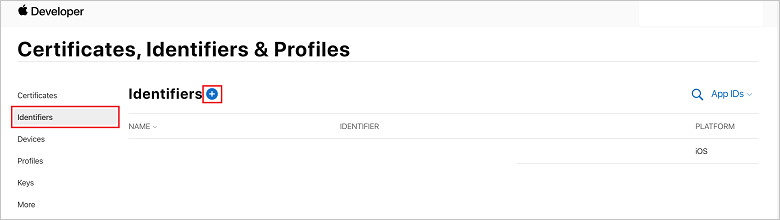
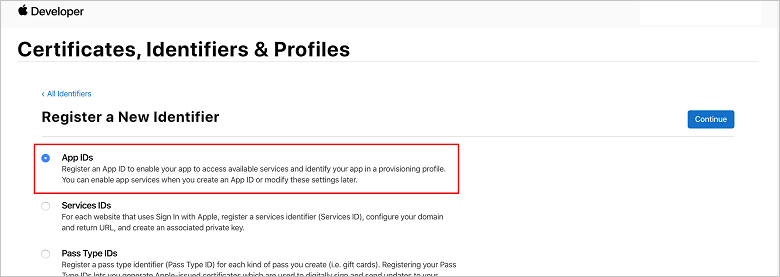
If you haven't already registered your app, browse to the iOS Provisioning Portal at the Apple Developer Center. Sign in to the portal with your Apple ID, and select Identifiers. Then select + to register a new app.
On the Register a New Identifier screen, select the App IDs radio button. Then select Continue.
Update the following three values for your new app, and then select Continue:
Description: Type a descriptive name for your app.
Bundle ID: Enter a Bundle ID of the form Organization Identifier.Product Name as mentioned in the App Distribution Guide. The Organization Identifier and Product Name values must match the organization identifier and product name you use when you create your Xcode project. In the following screenshot, the NotificationHubs value is used as an organization identifier and the GetStarted value is used as the product name. Make sure the Bundle Identifier value matches the value in your Xcode project, so that Xcode uses the correct publishing profile.
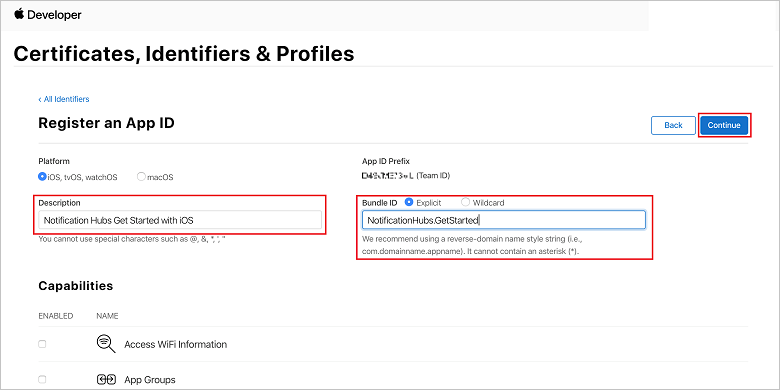
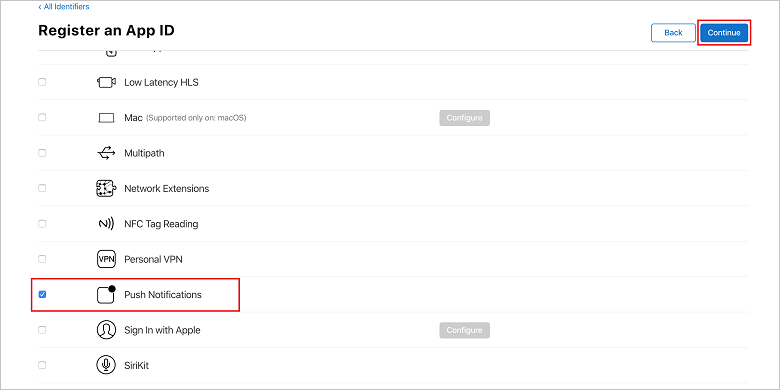
Push Notifications: Check the Push Notifications option in the Capabilities section.
This action generates your App ID and requests that you confirm the information. Select Continue, then select Register to confirm the new App ID.
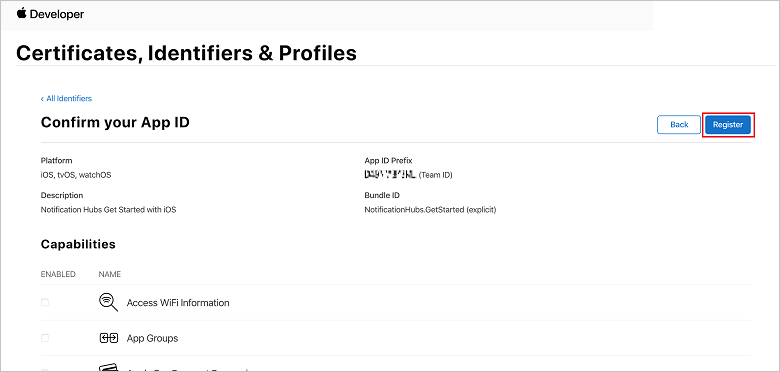
After you select Register, you see the new App ID as a line item on the Certificates, Identifiers & Profiles page.
In the Certificates, Identifiers & Profiles page, under Identifiers, locate the App ID line item that you just created, and select its row to display the Edit your App ID Configuration screen.
Create a certificate for Notification Hubs
Note
With the release of iOS 13, you can only receive silent notifications using token based authentication. If you are using certificate-based authentication for your APNS credentials, you must switch to using token-based authentication.
A certificate is required to enable the notification hub to work with APNS. This can be done in one of two ways:
Create a .p12 file that can be uploaded directly to Notification Hubs.
Create a .p8 file that can be used for token-based authentication (the newer approach).
The second option has a number of benefits compared to using certificates, as documented in Token-based (HTTP/2) authentication for APNS. However, steps are provided for both approaches.
Option 1: Create a .p12 push certificate that can be uploaded directly to Notification Hubs
Scroll down to the checked Push Notifications option, and then select Configure to create the certificate.

The Apple Push Notification service SSL Certificates window appears. Select the Create Certificate button in the Development SSL Certificate section.
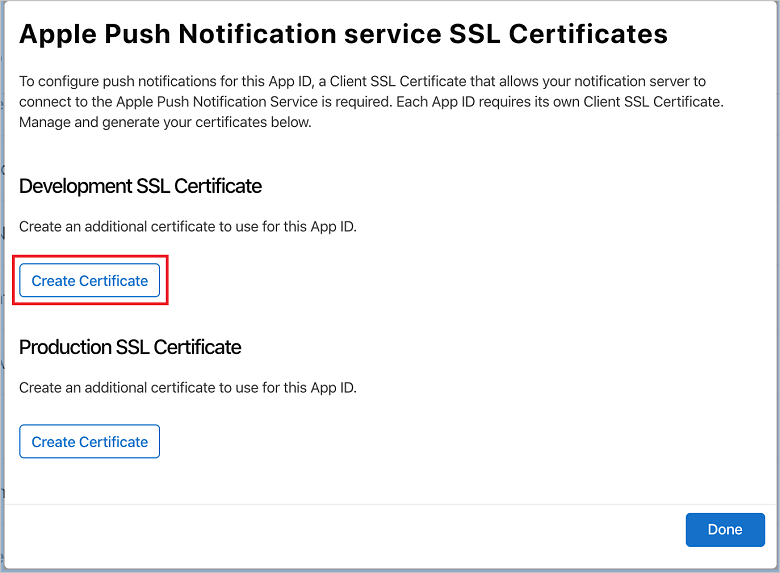
The Create a new Certificate screen is displayed.
Note
This tutorial uses a development certificate. The same process is used when registering a production certificate. Make sure that you use the same certificate type when sending notifications.
Select Choose File, browse to the location at which you saved the CSR file from the first task, and then double-click the certificate name to load it. Then select Continue.
After the portal creates the certificate, select the Download button. Save the certificate, and remember the location to which it's saved.
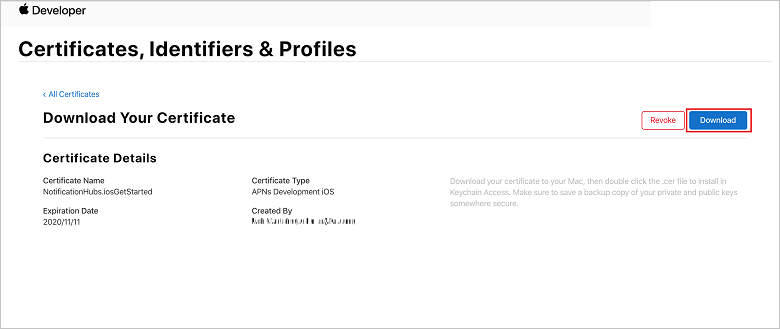
The certificate is downloaded and saved in your Downloads folder.
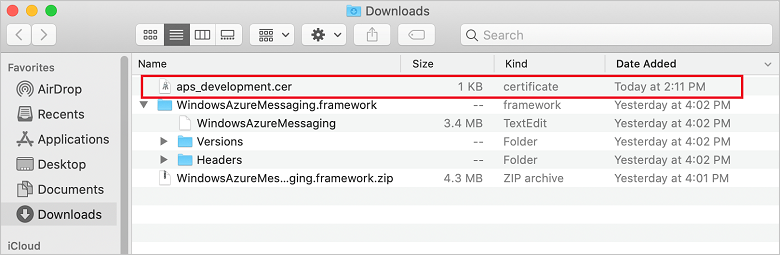
By default, the downloaded development certificate is named aps_development.cer.
Double-click the downloaded push certificate aps_development.cer. This action installs the new certificate in the Keychain, as shown in the following image:
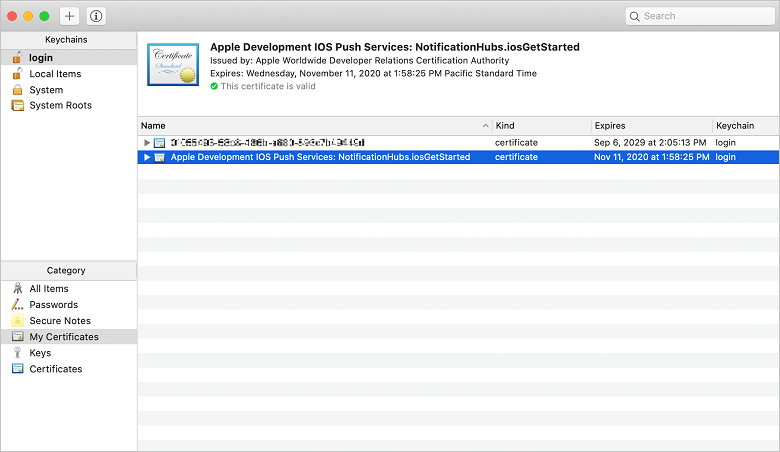
Although the name in your certificate might be different, the name will be prefixed with Apple Development iOS Push Services.
In Keychain Access, right-click the new push certificate that you created in the Certificates category. Select Export, name the file, select the .p12 format, and then select Save.

You can choose to protect the certificate with a password, but this is optional. Click OK if you want to bypass password creation. Make a note of the file name and location of the exported .p12 certificate. They are used to enable authentication with APNS.
Note
Your .p12 file name and location might be different than what is pictured in this tutorial.
Option 2: Create a .p8 certificate that can be used for token-based authentication
Make note of the following details:
- App ID Prefix (this is a Team ID)
- Bundle ID
Back in Certificates, Identifiers & Profiles, click Keys. If you already have a key configured for APNS, you can re-use the .p8 certificate that you downloaded right after it was created. If so, you can ignore steps 3 through 5.
Click the + button (or the Create a key button) to create a new key.
Provide a suitable Key Name value, check the Apple Push Notifications service (APNS) option, and then click Continue, followed by Register on the next screen.
Click Download and then move the .p8 file (prefixed with
AuthKey_) to a secure local directory, then click Done.Important
Be sure to keep your .p8 file in a secure place (and save a backup). After downloading your key, it cannot be re-downloaded; the server copy is removed.
On Keys, click on the key that you just created (or an existing key if you have chosen to use that instead).
Make note of the Key ID value.
Open your .p8 certificate in a suitable application of your choice, such as Visual Studio Code, then make note of the key value. This is the value between -----BEGIN PRIVATE KEY----- and -----END PRIVATE KEY----- .
-----BEGIN PRIVATE KEY-----
<key_value>
-----END PRIVATE KEY-----
This is the token value that will be used later to configure Notification Hubs.
At the end of these steps you should have the following information for use later in Configure your notification hub with APNS information:
- Team ID (see step 1)
- Bundle ID (see step 1)
- Key ID (see step 7)
- Token value (the .p8 key value, see step 8)
Create a provisioning profile
Return to the iOS Provisioning Portal, select Certificates, Identifiers & Profiles, select Profiles from the left menu, and then select + to create a new profile. The Register a New Provisioning Profile screen appears.
Select iOS App Development under Development as the provisioning profile type, and then select Continue.
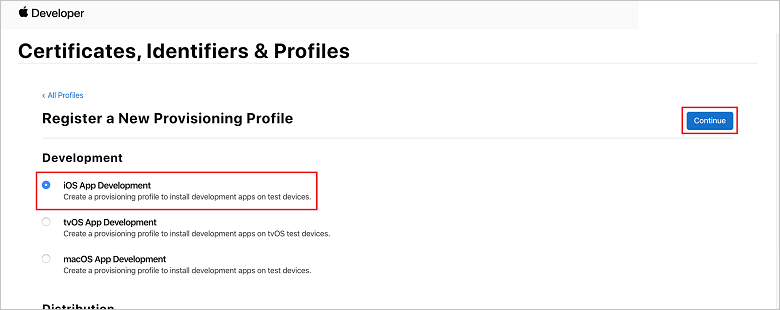
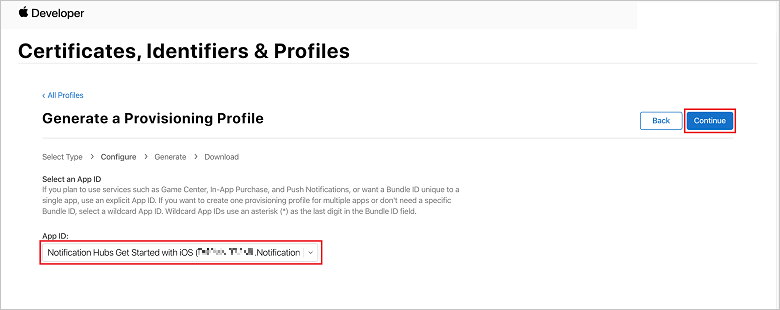
Next, select the app ID you created from the App ID drop-down list, then select Continue.
In the Select certificates window, select the development certificate that you use for code signing, and select Continue. This certificate isn't the push certificate you created. If one does not exist, you must create it. If a certificate does exist, skip to the next step. To create a development certificate if one does not exist:
- If you see No Certificates are available, select Create Certificate.
- In the Software section, select Apple Development. Then select Continue.
- In the Create a New Certificate screen, select Choose File.
- Browse to the Certificate Signing Request certificate you created earlier, select it, and then select Open.
- Select Continue.
- Download the development certificate, and remember the location in which it's saved.
Return to the Certificates, Identifiers & Profiles page, select Profiles from the left menu, and then select + to create a new profile. The Register a New Provisioning Profile screen appears.
In the Select certificates window, select the development certificate that you just created. Then select Continue.
Next, select the devices to use for testing, and select Continue.
Finally, choose a name for the profile in Provisioning Profile Name, then select Generate.
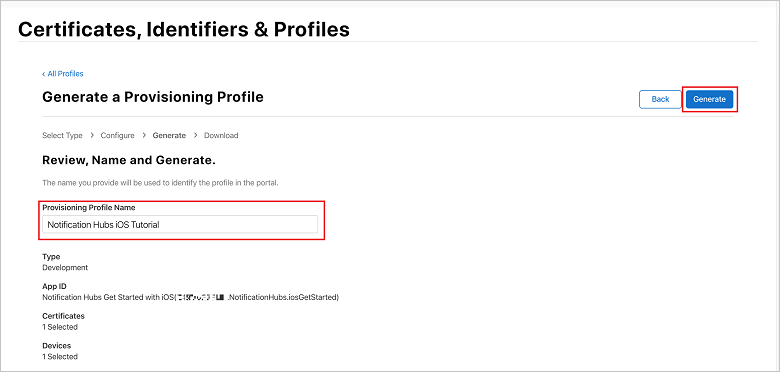
When the new provisioning profile is created, select Download. Remember the location in which it's saved.
Browse to the location of the provisioning profile, and then double-click it to install it on your Xcode development machine.
Create a notification hub
In this section, you create a notification hub and configure authentication with APNS by using either the .p12 push certificate or token-based authentication. If you want to use a notification hub that you've already created, you can skip to step 5.
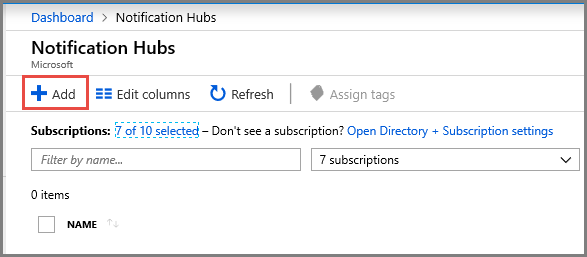
Sign in to the Azure portal.
Select All services on the left menu, and then select Notification Hubs in the Mobile section. Select the star icon next to the service name to add the service to the FAVORITES section on the left menu. After you add Notification Hubs to FAVORITES, select it.

On the Notification Hubs page, select Add on the toolbar.
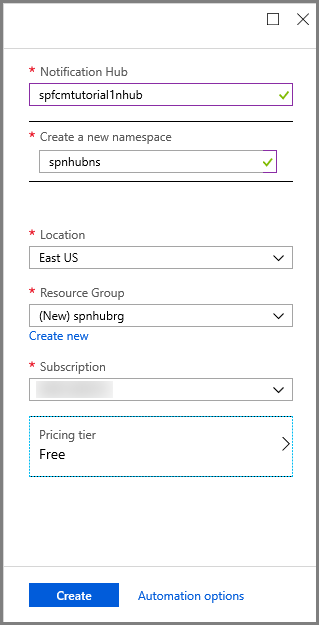
On the Notification Hubs page, do the following steps:
- Enter a name in Notification Hub.
- Enter a name in Create a new namespace. A namespace contains one or more notification hubs.
- Select a value from the Location drop-down list. This value specifies the location in which you want to create the notification hub.
- Select an existing resource group in Resource Group, or create a new resource group.
- Select Create.
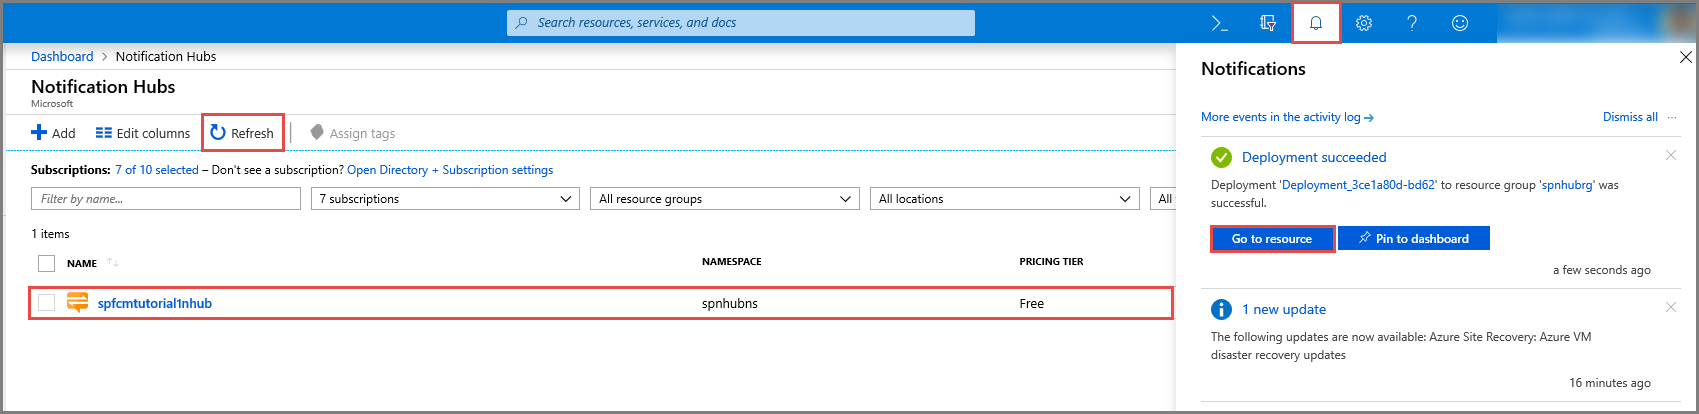
Select Notifications (the bell icon), and then select Go to resource. You can also refresh the list on the Notification Hubs page and select your hub.
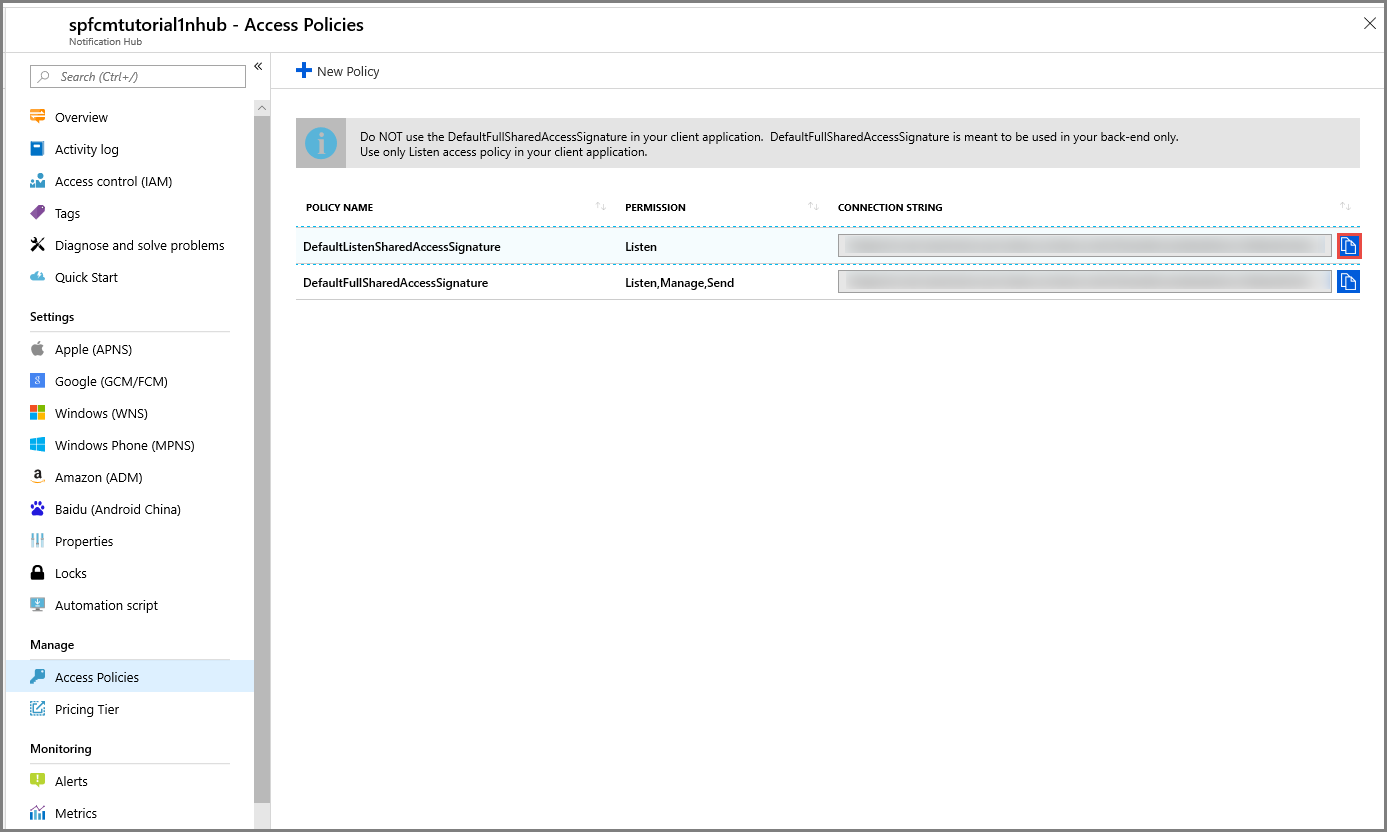
Select Access Policies from the list. Note that the two connection strings are available to you. You'll need them later to handle push notifications.
Important
Do not use the DefaultFullSharedAccessSignature policy in your application. This is meant to be used in your back end only.
Configure the notification hub with APNS information
Under Notification Services, select Apple (APNS), then follow the appropriate steps based on the approach you chose previously in the Creating a Certificate for Notification Hubs section.
Note
Use Production for Application Mode only if you want to send push notifications to users who purchased your app from the store.
Option 1: Use a .p12 push certificate
Select Certificate.
Select the file icon.
Select the .p12 file that you exported earlier, and then select Open.
If required, specify the correct password.
Select Sandbox mode.
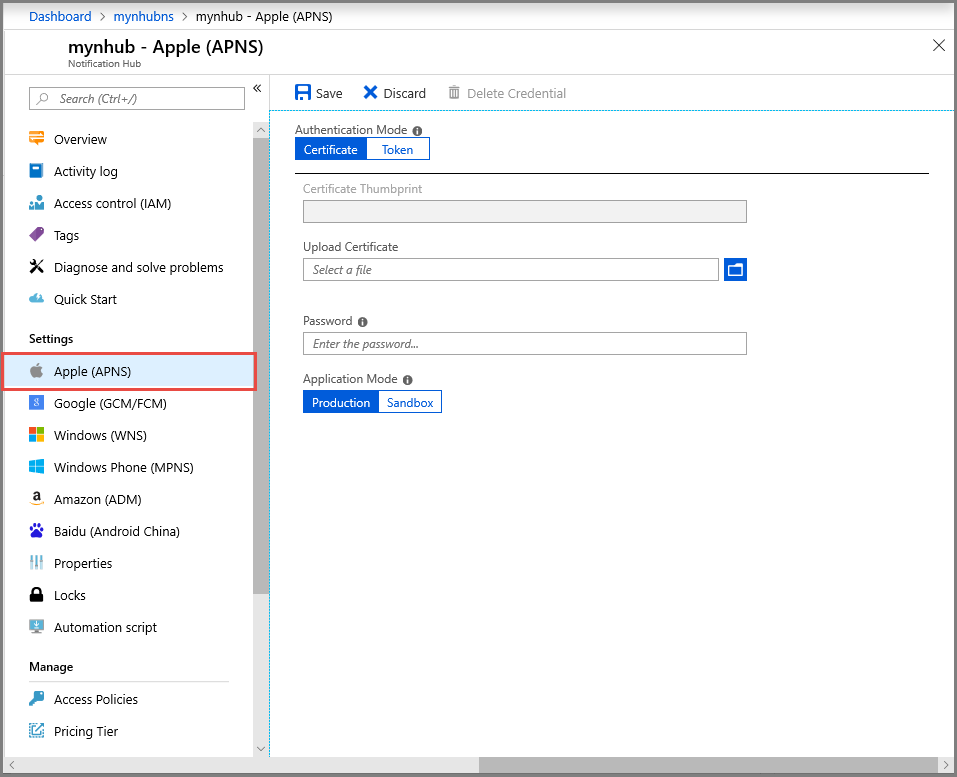
Select Save.
Option 2: Use token-based authentication
Select Token.
Enter the following values that you acquired earlier:
- Key ID
- Bundle ID
- Team ID
- Token
Choose Sandbox
Select Save.
You've now configured your notification hub with APNS. You also have the connection strings needed to register your app and send push notifications.
Next steps
In this tutorial, you created and configured a notification hub in Azure and configured it to allow notifications to be sent to your application through Apple Push Notification Service (APNS). Next, we’ll create a sample iOS application and integrate the Azure Notifications Hubs SDK so that it can receive push notifications sent through the Azure portal. Advance to the following tutorial based on your language of choice:
Feedback
Coming soon: Throughout 2024 we will be phasing out GitHub Issues as the feedback mechanism for content and replacing it with a new feedback system. For more information see: https://aka.ms/ContentUserFeedback.
Submit and view feedback for