Create and manage read replicas in Azure Database for PostgreSQL - Flexible Server from the Azure portal, CLI or REST API
Article
APPLIES TO:
Azure Database for PostgreSQL - Flexible Server
In this article, you learn how to create and manage read replicas in Azure Database for PostgreSQL flexible server from the Azure portal, CLI, and REST API. To learn more about read replicas, see the overview.
When deploying read replicas for persistent heavy write-intensive primary workloads, the replication lag could continue to grow and might never catch up with the primary. This might also increase storage usage at the primary as the WAL files are only deleted once received at the replica.
Review primary settings
Before setting up a read replica for Azure Database for PostgreSQL flexible server, ensure the primary server is configured to meet the necessary prerequisites. Specific settings on the primary server can affect the ability to create replicas.
Storage auto-grow: The storage autogrow setting must be consistent between the primary server and it's read replicas. If the primary server has this feature enabled, the read replicas must also have it enabled to prevent inconsistencies in storage behavior that could interrupt replication. If it's disabled on the primary server, it should also be turned off on the replicas.
Premium SSD v2: The current release doesn't support the creation of read replicas for primary servers using Premium SSD v2 storage. If your workload requires read replicas, choose a different storage option for the primary server.
Private link: Review the networking configuration of the primary server. For the read replica creation to be allowed, the primary server must be configured with either public access using allowed IP addresses or combined public and private access using virtual network integration.
In the Azure portal, choose the Azure Database for PostgreSQL flexible server instance you want for the replica.
On the Overview dialog, note the PostgreSQL version (ex 15.4). Also, note the region your primary is deployed to (ex., East US).
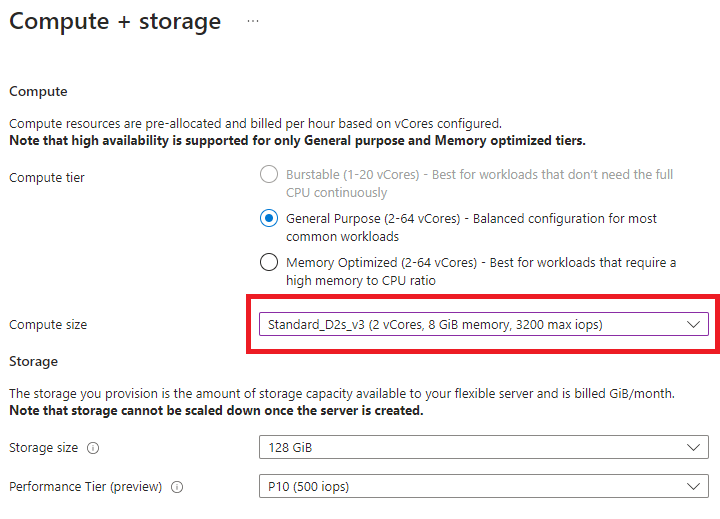
On the server sidebar, under Settings, select Compute + storage.
Review and note the following settings:
Compute Tier, Processor, Size (ex Standard_D4ads_v5).
Storage
Storage size (ex 128GB)
Autogrowth
High Availability
Enabled / Disabled
Availability zone settings
Backup settings
Retention period
Redundancy Options
Under Settings, select Networking.
Review the network settings.
Note
The commands provided in this guide are applicable for Azure CLI version 2.56.0 or higher. Ensure that you have the required version or a later one installed to execute these commands successfully. You can check your current Azure CLI version by running az --version in your command line interface. To update Azure CLI to the latest version, follow the instructions provided in the Azure CLI documentation.
To view the configuration and current status of an Azure PostgreSQL Flexible Server, use the az postgres flexible-server show command. This command provides detailed information about the specified server.
az postgres flexible-server show \
  --resource-group <resource-group> \
  --name <server-name>
Replace <resource-group> and <server-name> with your specific resource group and the name of the server you wish to view.
Review and note the following settings:
Compute Tier, Processor, Size (ex Standard_D8ads_v5).
To obtain information about the configuration of a server in Azure Database for PostgreSQL flexible server, especially to view settings for recently introduced features like storage auto-grow or private link, you should use the latest API version 2023-06-01-preview. The GET request for this would be formatted as follows:
Replace {subscriptionId}, {resourceGroupName}, and {serverName} with your Azure subscription ID, the resource group name, and the name of the primary server you want to review, respectively. This request will give you access to the configuration details of your primary server, ensuring it is properly set up for creating a read replica.
Review and note the following settings:
Compute Tier, Processor, Size (ex Standard_D8ads_v5).
Select an existing Azure Database for PostgreSQL flexible server instance to use as the primary server.
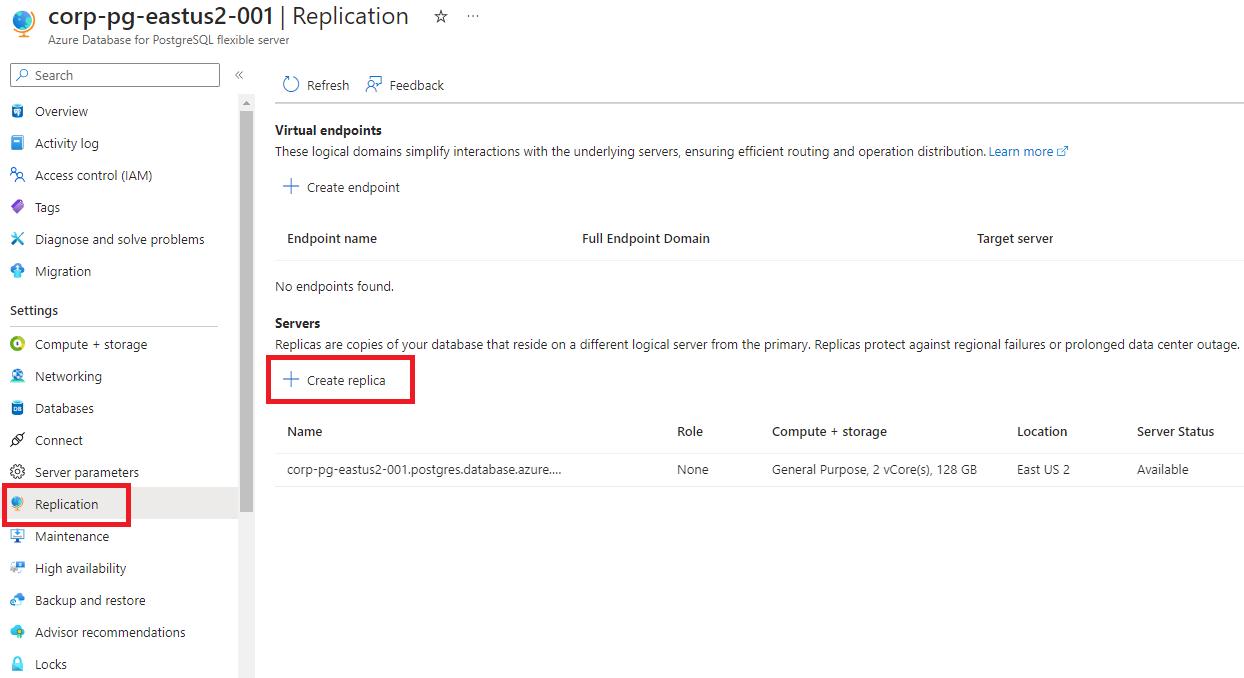
On the server sidebar, under Settings, select Replication.
Select Create replica.
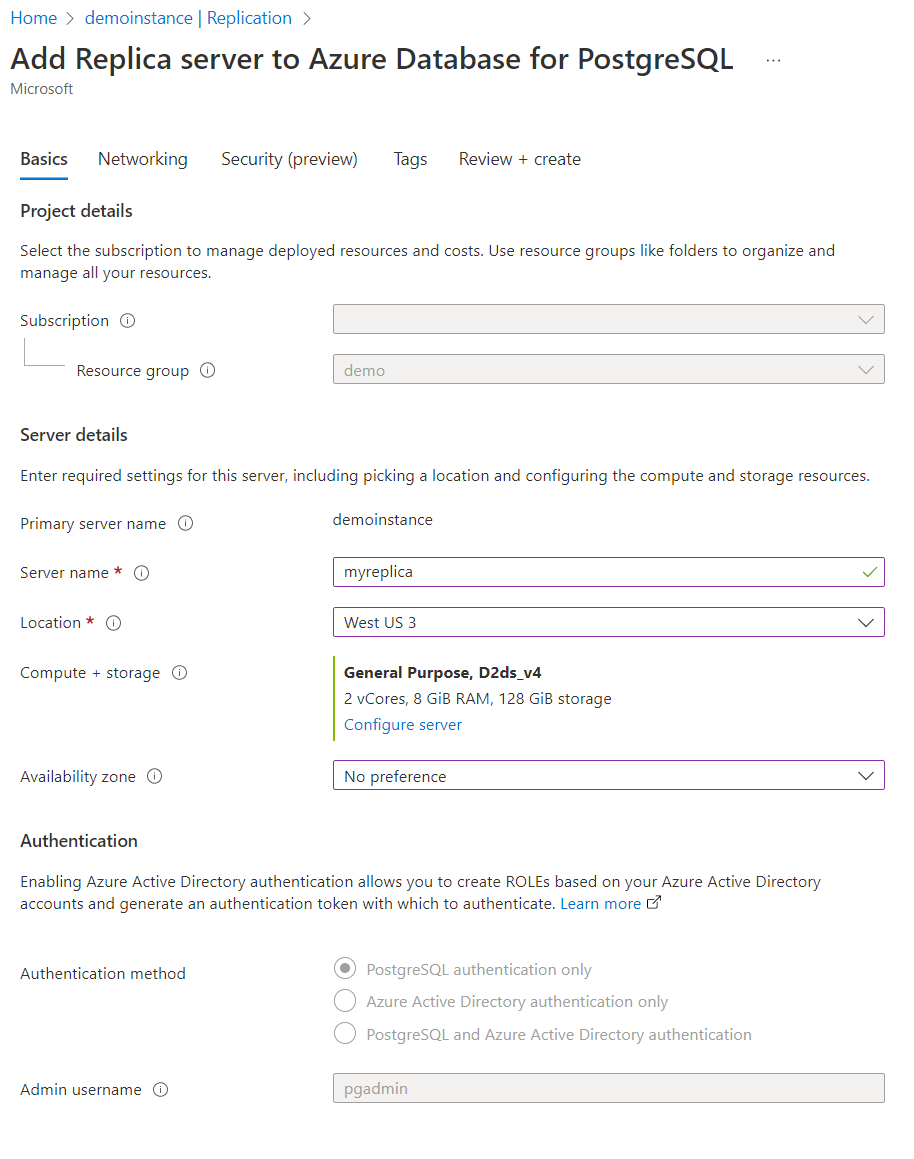
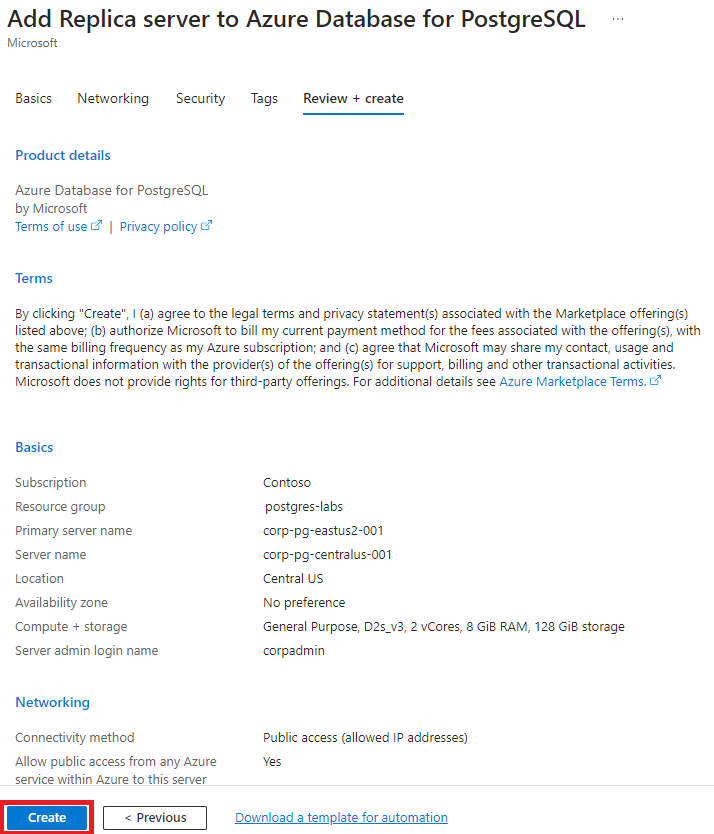
Enter the Basics form with the following information.
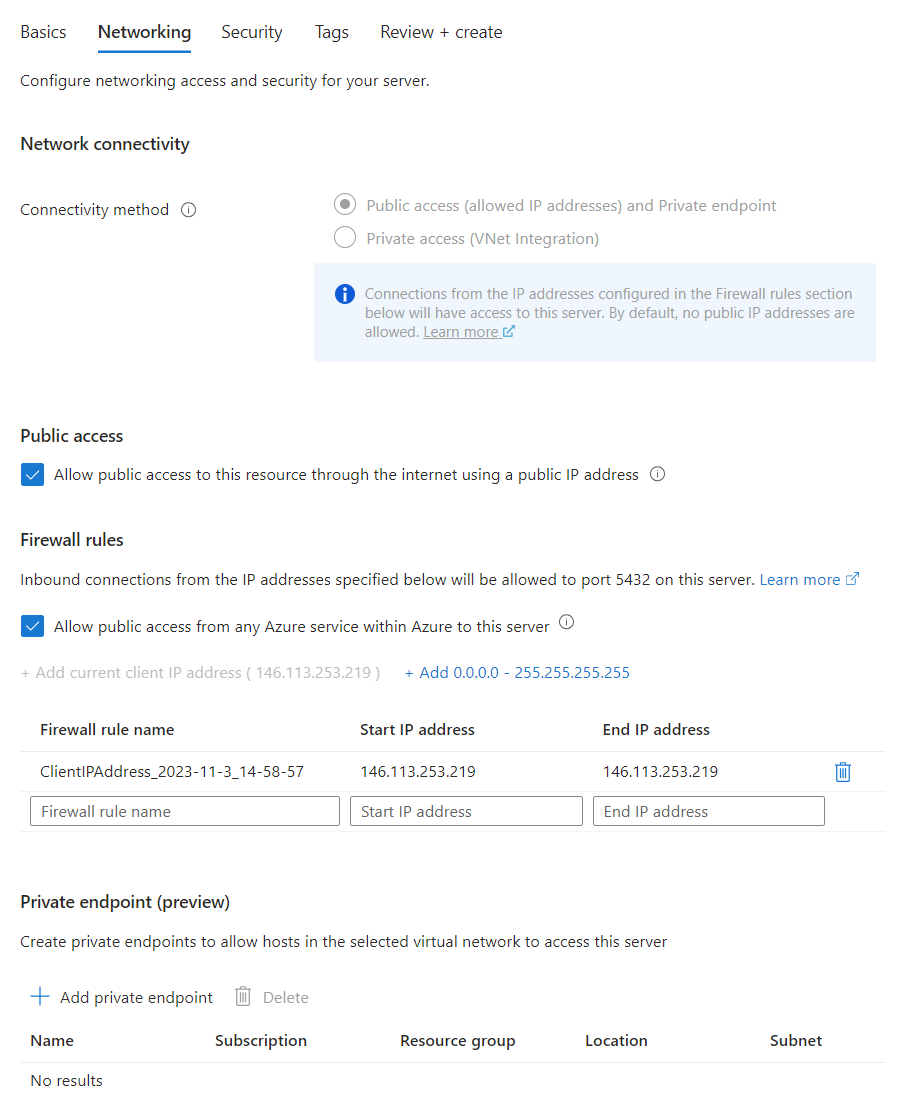
Select Review + create to confirm the creation of the replica or Next: Networking if you want to add, delete or modify any firewall rules.
Leave the remaining defaults and then select the Review + create button at the bottom of the page or proceed to the next forms to add tags or change data encryption method.
Review the information in the final confirmation window. When you're ready, select Create. A new deployment will be created and executed.
During the deployment, you see the primary in Updating state.
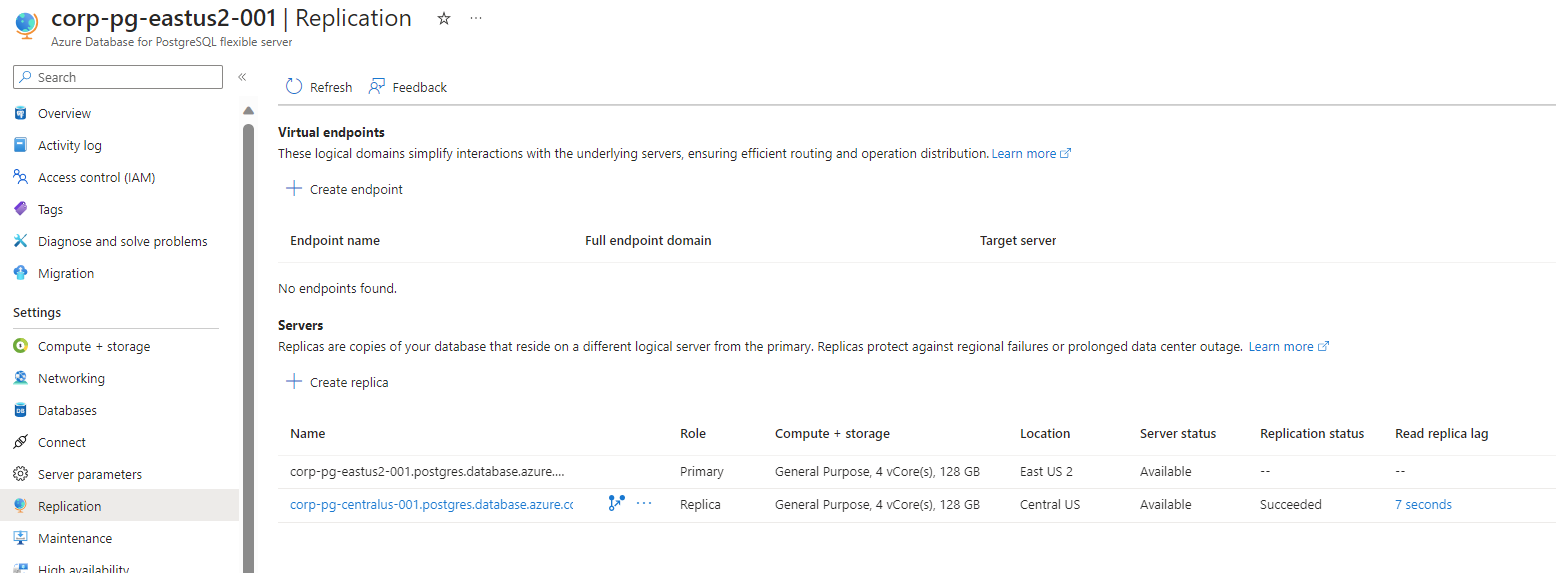
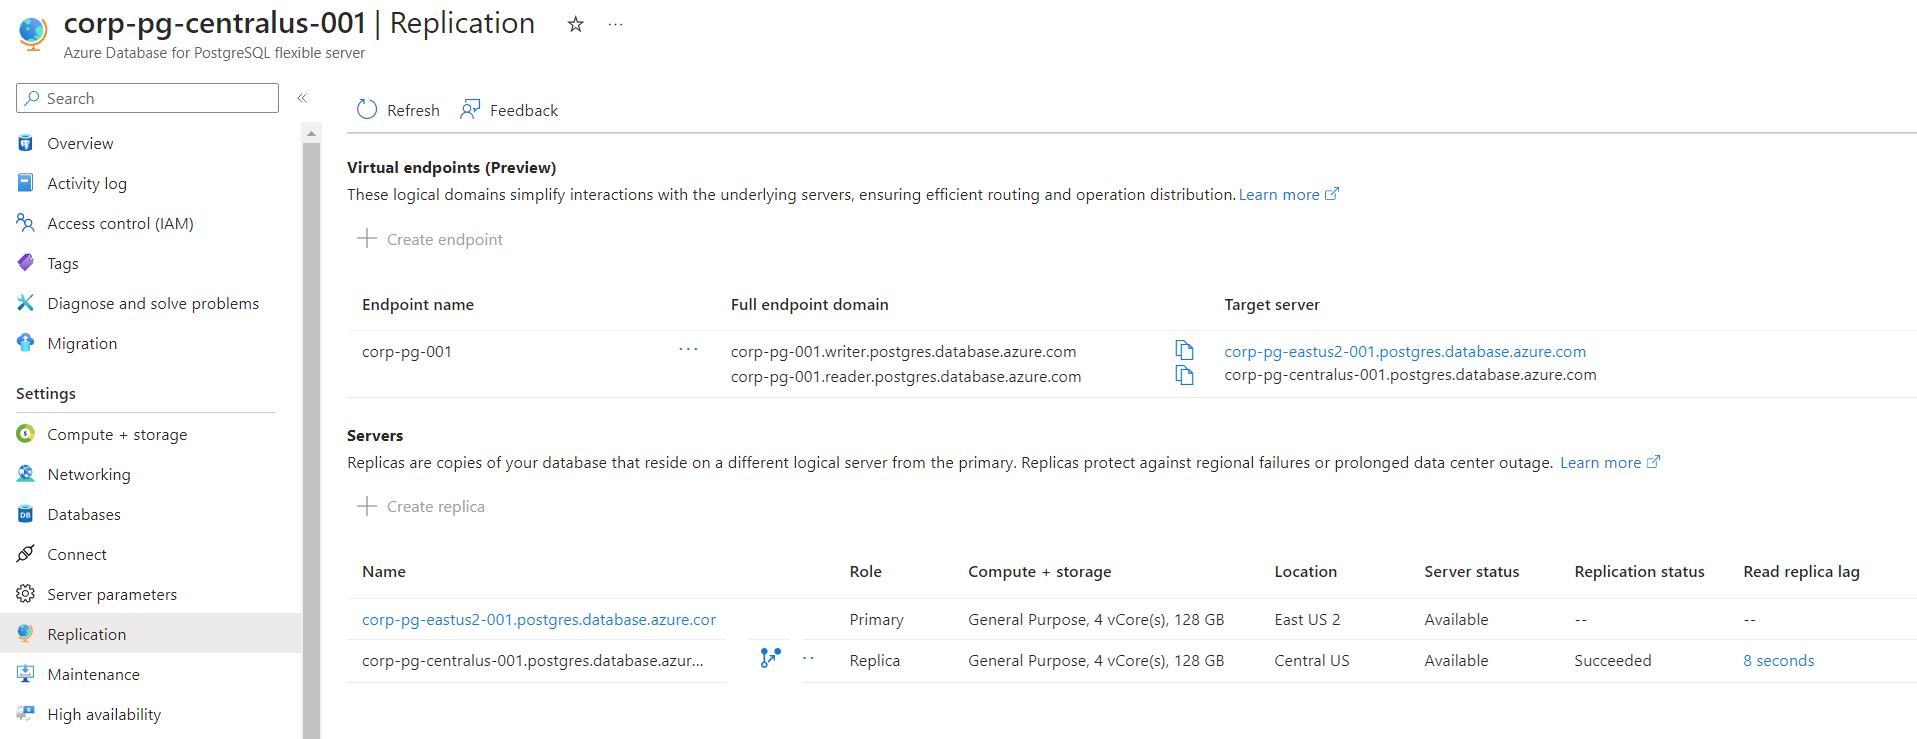
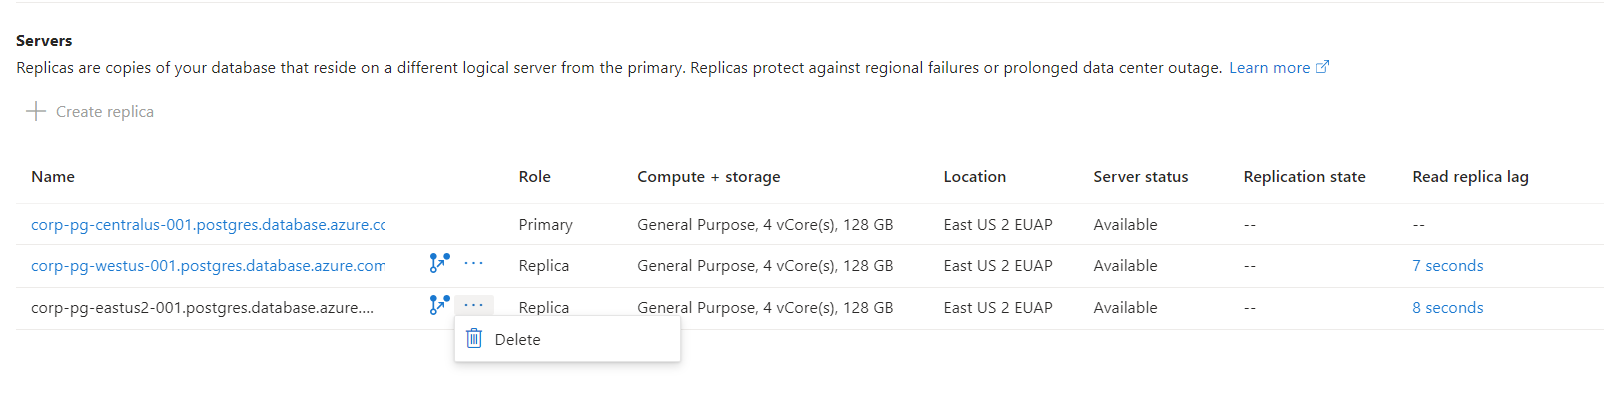
After the read replica is created, it can be viewed from the Replication window.
Replace <replica-name>, <resource-group>, <source-server-name> and <location> with your specific values.
After the read replica is created, the properties of all servers which are replicas of a primary replica can be obtained by using the az postgres flexible-server replica create command.
az postgres flexible-server replica list \
  --name <source-server-name> \
  --resource-group <resource-group>
Replace <source-server-name>, and <resource-group> with your specific values.
PUT https://management.azure.com/subscriptions/{subscriptionId}/resourceGroups/{resourceGroupName}/providers/Microsoft.DBForPostgreSql/flexibleServers/{replicaserverName}?api-version=2022-12-01
Here, you need to replace {subscriptionId}, {resourceGroupName}, and {replicaserverName} with your specific Azure subscription ID, the name of your resource group, and the desired name for your read replica, respectively.
After the read replica is created, the properties of all servers which are replicas of a primary replica can be obtained by initiating an HTTP GET request by using replicas list by server API:
GET https://management.azure.com/subscriptions/{subscriptionId}/resourceGroups/{resourceGroupName}/providers/Microsoft.DBForPostgreSql/flexibleServers/{sourceserverName}/replicas?api-version=2022-12-01
Here, you need to replace {subscriptionId}, {resourceGroupName}, and {sourceserverName} with your specific Azure subscription ID, the name of your resource group, and the name you assigned to your primary replica, respectively.
It is a Cloud Adoption Framework (CAF) best practice to use a resource naming convention that will allow you to easily determine what instance you are connecting to or managing and where it resides.
Select a location different from your primary but note that you can select the same region.
Set the compute and storage to what you recorded from your primary. If the displayed compute doesn't match, select Configure server and select the appropriate one.
Note
If you select a compute size smaller than the primary, the deployment will fail. Also be aware that the compute size might not be available in a different region.
To avoid issues during promotion of replicas constantly change the following server parameters on the replicas first, before applying them on the primary: max_connections, max_prepared_transactions, max_locks_per_transaction, max_wal_senders, max_worker_processes.
Create virtual endpoints
Note
All operations involving virtual endpoints - like adding, editing, or removing - are executed in the context of the primary server.
Replace <resource-group>, <primary-name>, <virtual-endpoint-name>, and <replica-name> with your specific values.
To create a virtual endpoint using Azure's REST API, you would use an HTTP PUT request. The request would look like this:
PUT https://management.azure.com/subscriptions/{subscriptionId}/resourceGroups/{resourceGroupName}/providers/Microsoft.DBForPostgreSql/flexibleServers/{sourceserverName}/virtualendpoints/{virtualendpointName}?api-version=2023-06-01-preview
The accompanying JSON body for this request is as follows:
Here, {replicaserverName} should be replaced with the name of the replica server you're including as a reader endpoint target in this virtual endpoint.
List virtual endpoints
To list virtual endpoints use the following steps:
On the server sidebar, under Settings, select Replication.
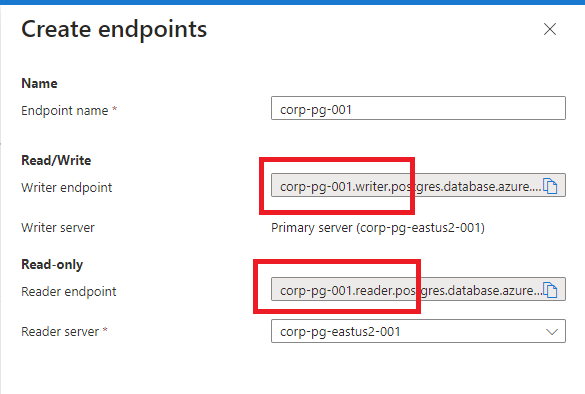
At the top of the page, you will see both the reader and writer endpoints displayed, along with the names of the servers they are pointing to.
You can view the details of the virtual endpoint using either the list or show command. Given that only one virtual endpoint is allowed per primary-replica pair, both commands will yield the same result.
Here's an example of how to use the list command:
az postgres flexible-server virtual-endpoint list \
      --resource-group <resource-group> \
      --server-name <server-name>
Replace <server-name> with the name of your primary server and <resource-group> with the name of your resource group.
Here's how you can use the show command:
az postgres flexible-server virtual-endpoint show \
      --name <virtual-endpoint-name>
      --resource-group <resource-group> \
      --server-name <server-name>
In this command, replace <virtual-endpoint-name>,<server-name>, and <resource-group> with the respective names. <server-name> is the name of your primary server.
GET https://management.azure.com/subscriptions/{subscriptionId}/resourceGroups/{resourceGroupName}/providers/Microsoft.DBForPostgreSql/flexibleServers/{sourceserverName}/virtualendpoints?api-version=2023-06-01-preview
Here, {sourceserverName} should be the name of the primary server from which you're managing the virtual endpoints.
Modify application(s) to point to virtual endpoint
Modify any applications that are using your Azure Database for PostgreSQL flexible server instance to use the new virtual endpoints (ex: corp-pg-001.writer.postgres.database.azure.com and corp-pg-001.reader.postgres.database.azure.com).
Promote replicas
With all the necessary components in place, you're ready to perform a promote replica to primary operation.
To promote replica from the Azure portal, follow these steps:
In the Azure portal, select your primary Azure Database for PostgreSQL flexible server instance.
On the server menu, under Settings, select Replication.
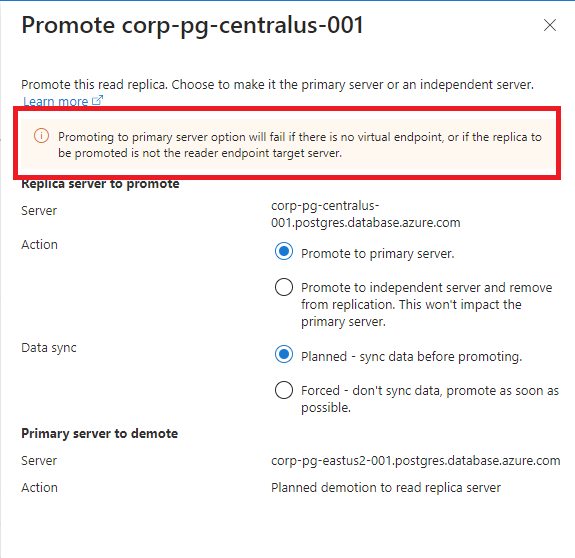
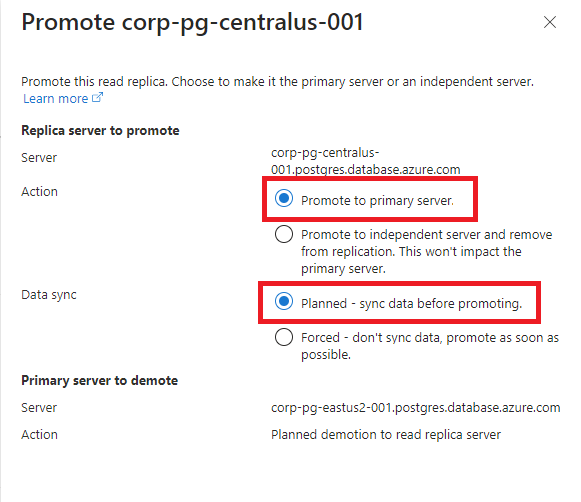
Under Servers, select the Promote icon for the replica.
In the dialog, ensure the action is Promote to primary server.
For Data sync, ensure Planned - sync data before promoting is selected.
Select Promote to begin the process. Once it's completed, the roles reverse: the replica becomes the primary, and the primary will assume the role of the replica.
When promoting a replica to a primary server in Azure PostgreSQL Flexible Server, use the az postgres flexible-server replica promote command. This process is essential for elevating a replica server to function as the primary server and demotion of current primary to replica role. Specify --promote-mode switchover and --promote-option planned in the command.
Replace <resource-group> and <replica-server-name> with your specific resource group and replica server name. This command ensures a smooth transition of the replica to a primary role in a planned manner.
When promoting a replica to a primary server, use an HTTP PATCH request with a specific JSON body to set the promotion options. This process is crucial when you need to elevate a replica server to act as the primary server.
In this JSON, the promotion is set to occur in switchover mode with a planned promotion option. While there are two options for promotion - planned or forced - chose planned for this exercise.
Note
The replica you are promoting must have the reader virtual endpoint assigned, or you will receive an error on promotion.
Test applications
Restart your applications and attempt to perform some operations. Your applications should function seamlessly without modifying the virtual endpoint connection string or DNS entries. Leave your applications running this time.
Failback to the original server and region
Repeat the same operations to promote the original server to the primary.
On the server sidebar, under Settings, select Replication
Under Servers, select the Promote icon for the replica.
In the dialog, ensure the action is Promote to primary server.
For Data sync, ensure Planned - sync data before promoting is selected.
Select Promote, the process begins. Once it's completed, the roles reverse: the replica becomes the primary, and the primary will assume the role of the replica.
This time, change the <replica-server-name> in the az postgres flexible-server replica promote command to refer to your old primary server, which is currently acting as a replica, and execute the request again.
Replace <resource-group> and <replica-server-name> with your specific resource group and current replica server name.
This time, change the {replicaserverName} in the API request to refer to your old primary server, which is currently acting as a replica, and execute the request again.
In this JSON, the promotion is set to occur in switchover mode with a planned promotion option. While there are two options for promotion - planned or forced - chose planned for this exercise.
Test applications
Again, switch to one of the consuming applications. Wait for the primary and replica status to change to Updating and then attempt to perform some operations. During the replica promote, your application might encounter temporary connectivity issues to the endpoint:
Add secondary read replica
Create a secondary read replica in a separate region to modify the reader virtual endpoint and to allow for creating an independent server from the first replica.
In the Azure portal, choose the primary Azure Database for PostgreSQL flexible server instance.
On the server sidebar, under Settings, select Replication.
Select Create replica.
Enter the Basics form with information in a third region (ex westus and corp-pg-westus-001)
Select Review + create to confirm the creation of the replica or Next: Networking if you want to add, delete, or modify any firewall rules.
Verify the firewall settings. Notice how the primary settings have been copied automatically.
Leave the remaining defaults and then select the Review + create button at the bottom of the page or proceed to the following forms to configure security or add tags.
Review the information in the final confirmation window. When you're ready, select Create. A new deployment will be created and executed.
During the deployment, you see the primary in Updating state.
Choose a distinct name for <replica-name> to differentiate it from the primary server and any other replicas.
Replace <resource-group>, <source-server-name> and <location> with your specific values.
You can create a secondary read replica by using the servers create API:
PUT https://management.azure.com/subscriptions/{subscriptionId}/resourceGroups/{resourceGroupName}/providers/Microsoft.DBForPostgreSql/flexibleServers/{replicaserverName}?api-version=2022-12-01
Choose a distinct name for {replicaserverName} to differentiate it from the primary server and any other replicas.
In the Azure portal, choose the primary Azure Database for PostgreSQL flexible server instance.
On the server sidebar, under Settings, select Replication.
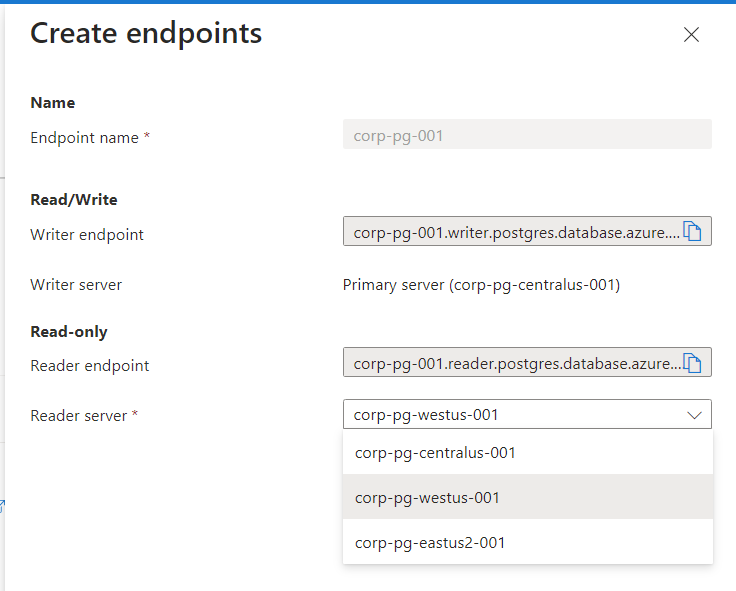
Select the ellipses and then select Edit.
In the dialog, select the new secondary replica.
Select Save. The reader endpoint will now be pointed at the secondary replica, and the promote operation will now be tied to this replica.
You can now modify your reader endpoint to point to the newly created secondary replica by using a az postgres flexible-server virtual-endpoint update command. Remember to replace <replica-name> with the name of the newly created read replica.
Replace <resource-group>, <server-name>, <virtual-endpoint-name> and <replica-name> with your specific values.
You can now modify your reader endpoint to point to the newly created secondary replica by using a PATCH request. Remember to replace {replicaserverName} with the name of the newly created read replica.
In the Azure portal, choose the Azure Database for PostgreSQL flexible server primary server.
On the server sidebar, on the server menu, under Settings, select Replication.
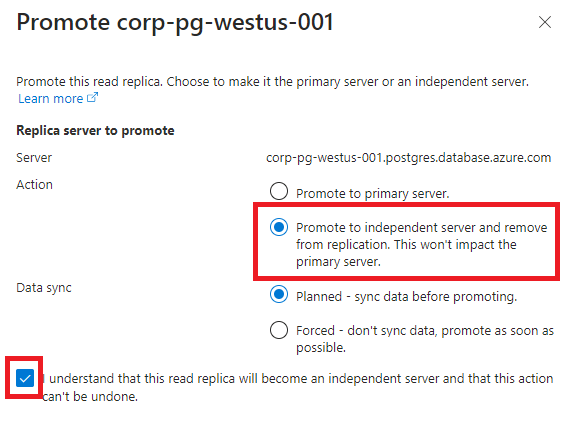
Under Servers, select the Promote icon for the replica you want to promote to an independent server.
In the dialog, ensure the action is Promote to independent server and remove from replication. This won't impact the primary server.
For Data sync, ensure Planned - sync data before promoting is selected.
Select Promote, the process begins. Once completed, the server will no longer be a replica of the primary.
When promoting a replica in Azure PostgreSQL Flexible Server, the default behavior is to promote it to an independent server. This is achieved using the az postgres flexible-server replica promote command without specifying the --promote-mode option, as standalone mode is assumed by default.
In this command, replace <resource-group> and <replica-server-name> with your specific resource group name and the name of the first replica server that you created, that is not part of virtual endpoint anymore.
You can promote a replica to a standalone server using a PATCH request. To do this, send a PATCH request to the specified Azure Management REST API URL with the first JSON body, where PromoteMode is set to standalone and PromoteOption to planned. The second JSON body format, setting ReplicationRole to None, is deprecated but still mentioned here for backward compatibility.
On the server sidebar, under Settings, select Replication.
At the top of the page, locate the Virtual endpoints section. Navigate to the three dots (menu options) next to the endpoint name, expand it, and choose Delete.
A delete confirmation dialog will appear. It will warn you: "This action will delete the virtual endpoint virtualendpointName. Any clients connected using these domains may lose access." Acknowledge the implications and confirm by clicking on Delete.
To remove a virtual endpoint from an Azure PostgreSQL Flexible Server, you can use the az postgres flexible-server virtual-endpoint delete command. This action permanently deletes the specified virtual endpoint.
In this command, replace <resource-group>, <server-name>, and <virtual-endpoint-name> with your specific resource group, server name, and the name of the virtual endpoint you wish to delete.
To delete a virtual endpoint using Azure's REST API, you would issue an HTTP DELETE request. The request URL would be structured as follows:
You can delete a read replica similar to how you delete a standalone Azure Database for PostgreSQL flexible server instance.
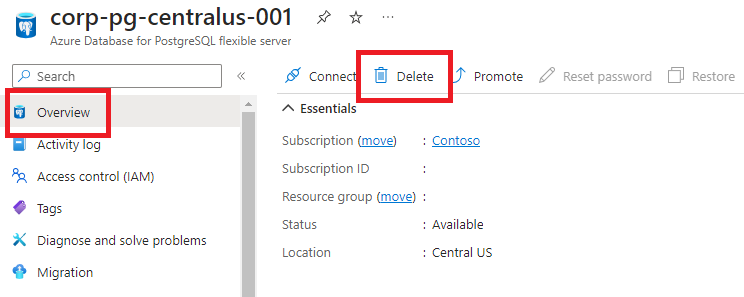
In the Azure portal, open the Overview page for the read replica. Select Delete.
You can also delete the read replica from the Replication window by following these steps:
In the Azure portal, select your primary Azure Database for PostgreSQL flexible server instance.
On the server menu, under Settings, select Replication.
Select the read replica to delete and then select the ellipses. Select Delete.
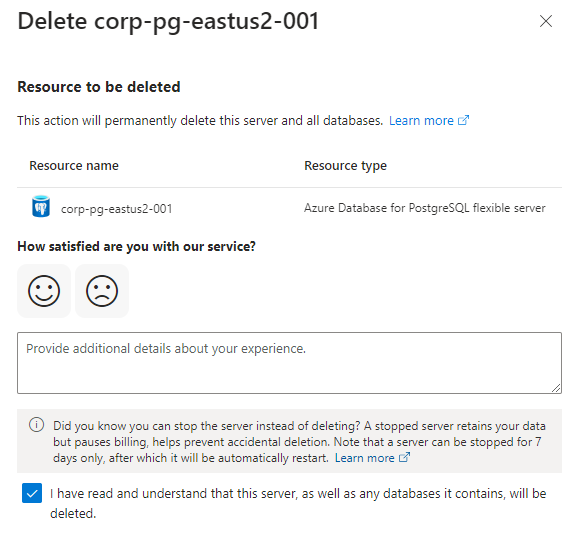
Acknowledge Delete operation.
To delete a primary or replica server, use the az postgres flexible-server delete command. If server has read replicas then read replicas should be deleted first before deleting the primary server.
az postgres flexible-server delete \
  --resource-group <resource-group> \
  --name <server-name>
Replace <resource-group> and <server-name> with the name of your resource group name and the replica server name you wish to delete.
To delete a primary or replica server, use the servers delete API. If server has read replicas then read replicas should be deleted first before deleting the primary server.
You can only delete the primary server once all read replicas have been deleted. Follow the instructions in the Delete a replica section to delete replicas and then proceed with the steps below.
To delete a server from the Azure portal, follow these steps:
In the Azure portal, select your primary Azure Database for PostgreSQL flexible server instance.
Open the Overview page for the server and select Delete.
Enter the name of the primary server to delete. Select Delete to confirm the deletion of the primary server.
To delete a primary or replica server, use the az postgres flexible-server delete command. If server has read replicas then read replicas should be deleted first before deleting the primary server.
az postgres flexible-server delete \
  --resource-group <resource-group> \
  --name <server-name>
Replace <resource-group> and <server-name> with the name of your resource group name and the primary server name you wish to delete.
To delete a primary or replica server, use the servers delete API. If server has read replicas then read replicas should be deleted first before deleting the primary server.
Two metrics are available to monitor read replicas.
Max Physical Replication Lag
Available only on the primary.
The Max Physical Replication Lag metric shows the byte lag between the primary server and the most lagging replica.
In the Azure portal, select the primary server.
Select Metrics. In the Metrics window, select Max Physical Replication Lag.
For your Aggregation, select Max.
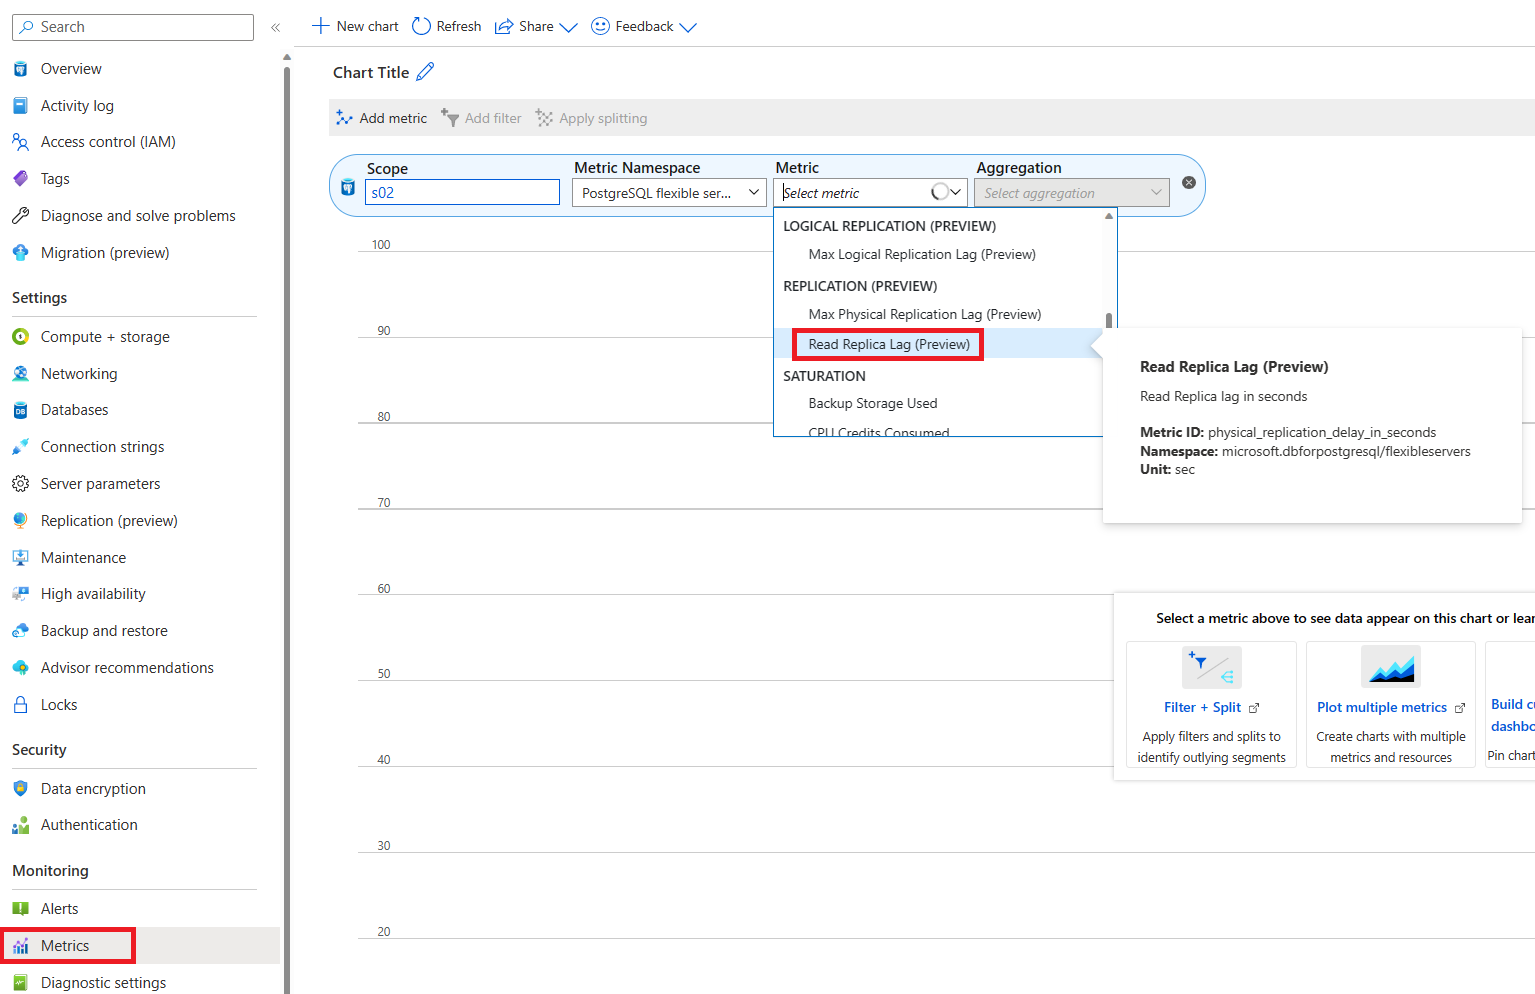
Read Replica Lag metric
The Read Replica Lag metric shows the time since the last replayed transaction on a replica. If no transactions occur on your primary, the metric reflects this time lag. For instance, if no transactions occur on your primary server, and the last transaction was replayed 5 seconds ago, then the Read Replica Lag shows a 5-second delay.
In the Azure portal, select read replica.
Select Metrics. In the Metrics window, select Read Replica Lag.
Coming soon: Throughout 2024 we will be phasing out GitHub Issues as the feedback mechanism for content and replacing it with a new feedback system. For more information see: https://aka.ms/ContentUserFeedback.
 Azure Database for PostgreSQL - Flexible Server
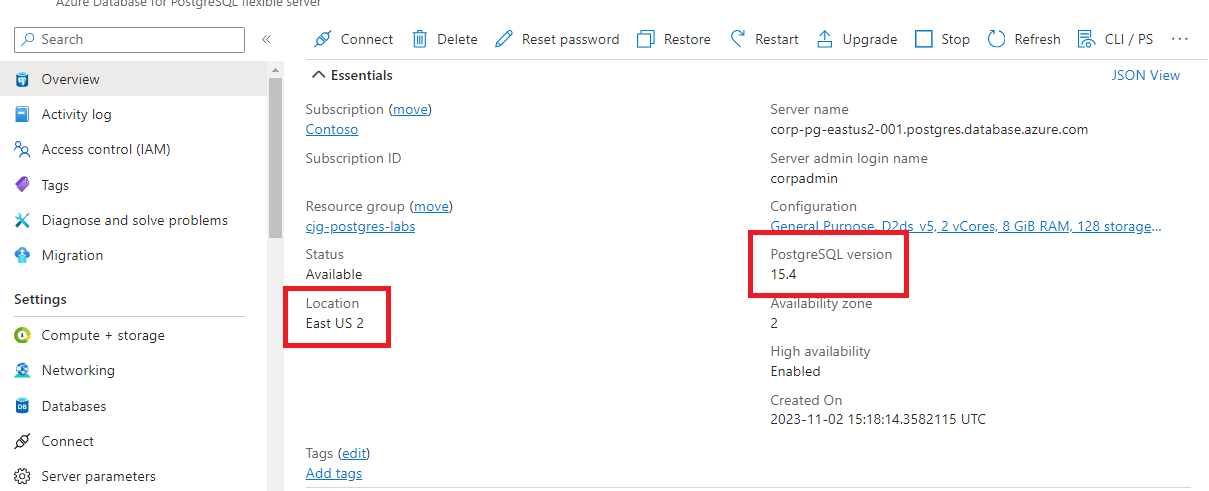


 After the read replica is created, it can be viewed from the Replication window.