Amazon S3 Multicloud Scanning Connector for Microsoft Purview
The Multicloud Scanning Connector for Microsoft Purview allows you to explore your organizational data across cloud providers, including Amazon Web Services in addition to Azure storage services.
This article describes how to use Microsoft Purview to scan your unstructured data currently stored in Amazon S3 standard buckets, and discover what types of sensitive information exist in your data. This how-to guide also describes how to identify the Amazon S3 Buckets where the data is currently stored for easy information protection and data compliance.
For this service, use Microsoft Purview to provide a Microsoft account with secure access to AWS, where the Multicloud Scanning Connector for Microsoft Purview will run. The Multicloud Scanning Connector for Microsoft Purview uses this access to your Amazon S3 buckets to read your data, and then reports the scanning results, including only the metadata and classification, back to Azure. Use the Microsoft Purview classification and labeling reports to analyze and review your data scan results.
Important
The Multicloud Scanning Connector for Microsoft Purview is a separate add-on to Microsoft Purview. The terms and conditions for the Multicloud Scanning Connector for Microsoft Purview are contained in the agreement under which you obtained Microsoft Azure Services. For more information, see Microsoft Azure Legal Information at https://azure.microsoft.com/support/legal/.
Supported capabilities
| Metadata Extraction | Full Scan | Incremental Scan | Scoped Scan | Classification | Labeling | Access Policy | Lineage | Data Sharing | Live view |
|---|---|---|---|---|---|---|---|---|---|
| Yes | Yes | Yes | Yes | Yes | Yes | Yes (preview) | Limited** | No | No |
** Lineage is supported if dataset is used as a source/sink in Data Factory Copy activity
Known limitations
When scanning Amazon S3 of Glacier storage classes, schema extraction, classification and sensitivity labels aren't supported.
Microsoft Purview private endpoints aren't supported when scanning Amazon S3.
For more information about Microsoft Purview limits, see:
- Manage and increase quotas for resources with Microsoft Purview
- Supported data sources and file types in Microsoft Purview
Storage and scanning regions
The Microsoft Purview connector for the Amazon S3 service is currently deployed in specific regions only. The following table maps the regions where your data is stored to the region where it would be scanned by Microsoft Purview.
Important
Customers will be charged for all related data transfer charges according to the region of their bucket.
| Storage region | Scanning region |
|---|---|
| US East (Ohio) | US East (Ohio) |
| US East (N. Virginia) | US East (N. Virginia) |
| US West (N. California) | US West (N. California) |
| US West (Oregon) | US West (Oregon) |
| Africa (Cape Town) | Europe (Frankfurt) |
| Asia Pacific (Hong Kong Special Administrative Region) | Asia Pacific (Tokyo) |
| Asia Pacific (Mumbai) | Asia Pacific (Singapore) |
| Asia Pacific (Osaka-Local) | Asia Pacific (Tokyo) |
| Asia Pacific (Seoul) | Asia Pacific (Tokyo) |
| Asia Pacific (Singapore) | Asia Pacific (Singapore) |
| Asia Pacific (Sydney) | Asia Pacific (Sydney) |
| Asia Pacific (Tokyo) | Asia Pacific (Tokyo) |
| Canada (Central) | US East (Ohio) |
| China (Beijing) | Not supported |
| China (Ningxia) | Not supported |
| Europe (Frankfurt) | Europe (Frankfurt) |
| Europe (Ireland) | Europe (Ireland) |
| Europe (London) | Europe (London) |
| Europe (Milan) | Europe (Paris) |
| Europe (Paris) | Europe (Paris) |
| Europe (Stockholm) | Europe (Frankfurt) |
| Middle East (Bahrain) | Europe (Frankfurt) |
| South America (São Paulo) | US East (Ohio) |
Prerequisites
Ensure that you've performed the following prerequisites before adding your Amazon S3 buckets as Microsoft Purview data sources and scanning your S3 data.
- You need to be a Microsoft Purview Data Source Admin.
- Create a Microsoft Purview account if you don't yet have one
- Create a new AWS role for use with Microsoft Purview
- Create a Microsoft Purview credential for your AWS bucket scan
- Configure scanning for encrypted Amazon S3 buckets, if relevant
- Make sure that your bucket policy does not block the connection. For more information, see Bucket policy requirements and SCP policy requirements. For these items, you may need to consult with an AWS expert to ensure that your policies allow required access.
- When adding your buckets as Microsoft Purview resources, you'll need the values of your AWS ARN, bucket name, and sometimes your AWS account ID.
Create a Microsoft Purview account
If you already have a Microsoft Purview account, you can continue with the configurations required for AWS S3 support. Start with Create a Microsoft Purview credential for your AWS bucket scan.
If you need to create a Microsoft Purview account, follow the instructions in Create a Microsoft Purview account instance. After creating your account, return here to complete configuration and begin using Microsoft Purview connector for Amazon S3.
Create a new AWS role for Microsoft Purview
The Microsoft Purview scanner is deployed in a Microsoft account in AWS. To allow the Microsoft Purview scanner to read your S3 data, you must create a dedicated role in the AWS portal, in the IAM area, to be used by the scanner.
This procedure describes how to create the AWS role, with the required Microsoft Account ID and External ID from Microsoft Purview, and then enter the Role ARN value in Microsoft Purview.
To locate your Microsoft Account ID and External ID:
In Microsoft Purview, go to the Management Center > Security and access > Credentials.
Select New to create a new credential.
In the New credential pane that appears, in the Authentication method dropdown, select Role ARN.
Then copy the Microsoft account ID and External ID values that appear to a separate file, or have them handy for pasting into the relevant field in AWS. For example:


To create your AWS role for Microsoft Purview:
Open your Amazon Web Services console, and under Security, Identity, and Compliance, select IAM.
Select Roles and then Create role.
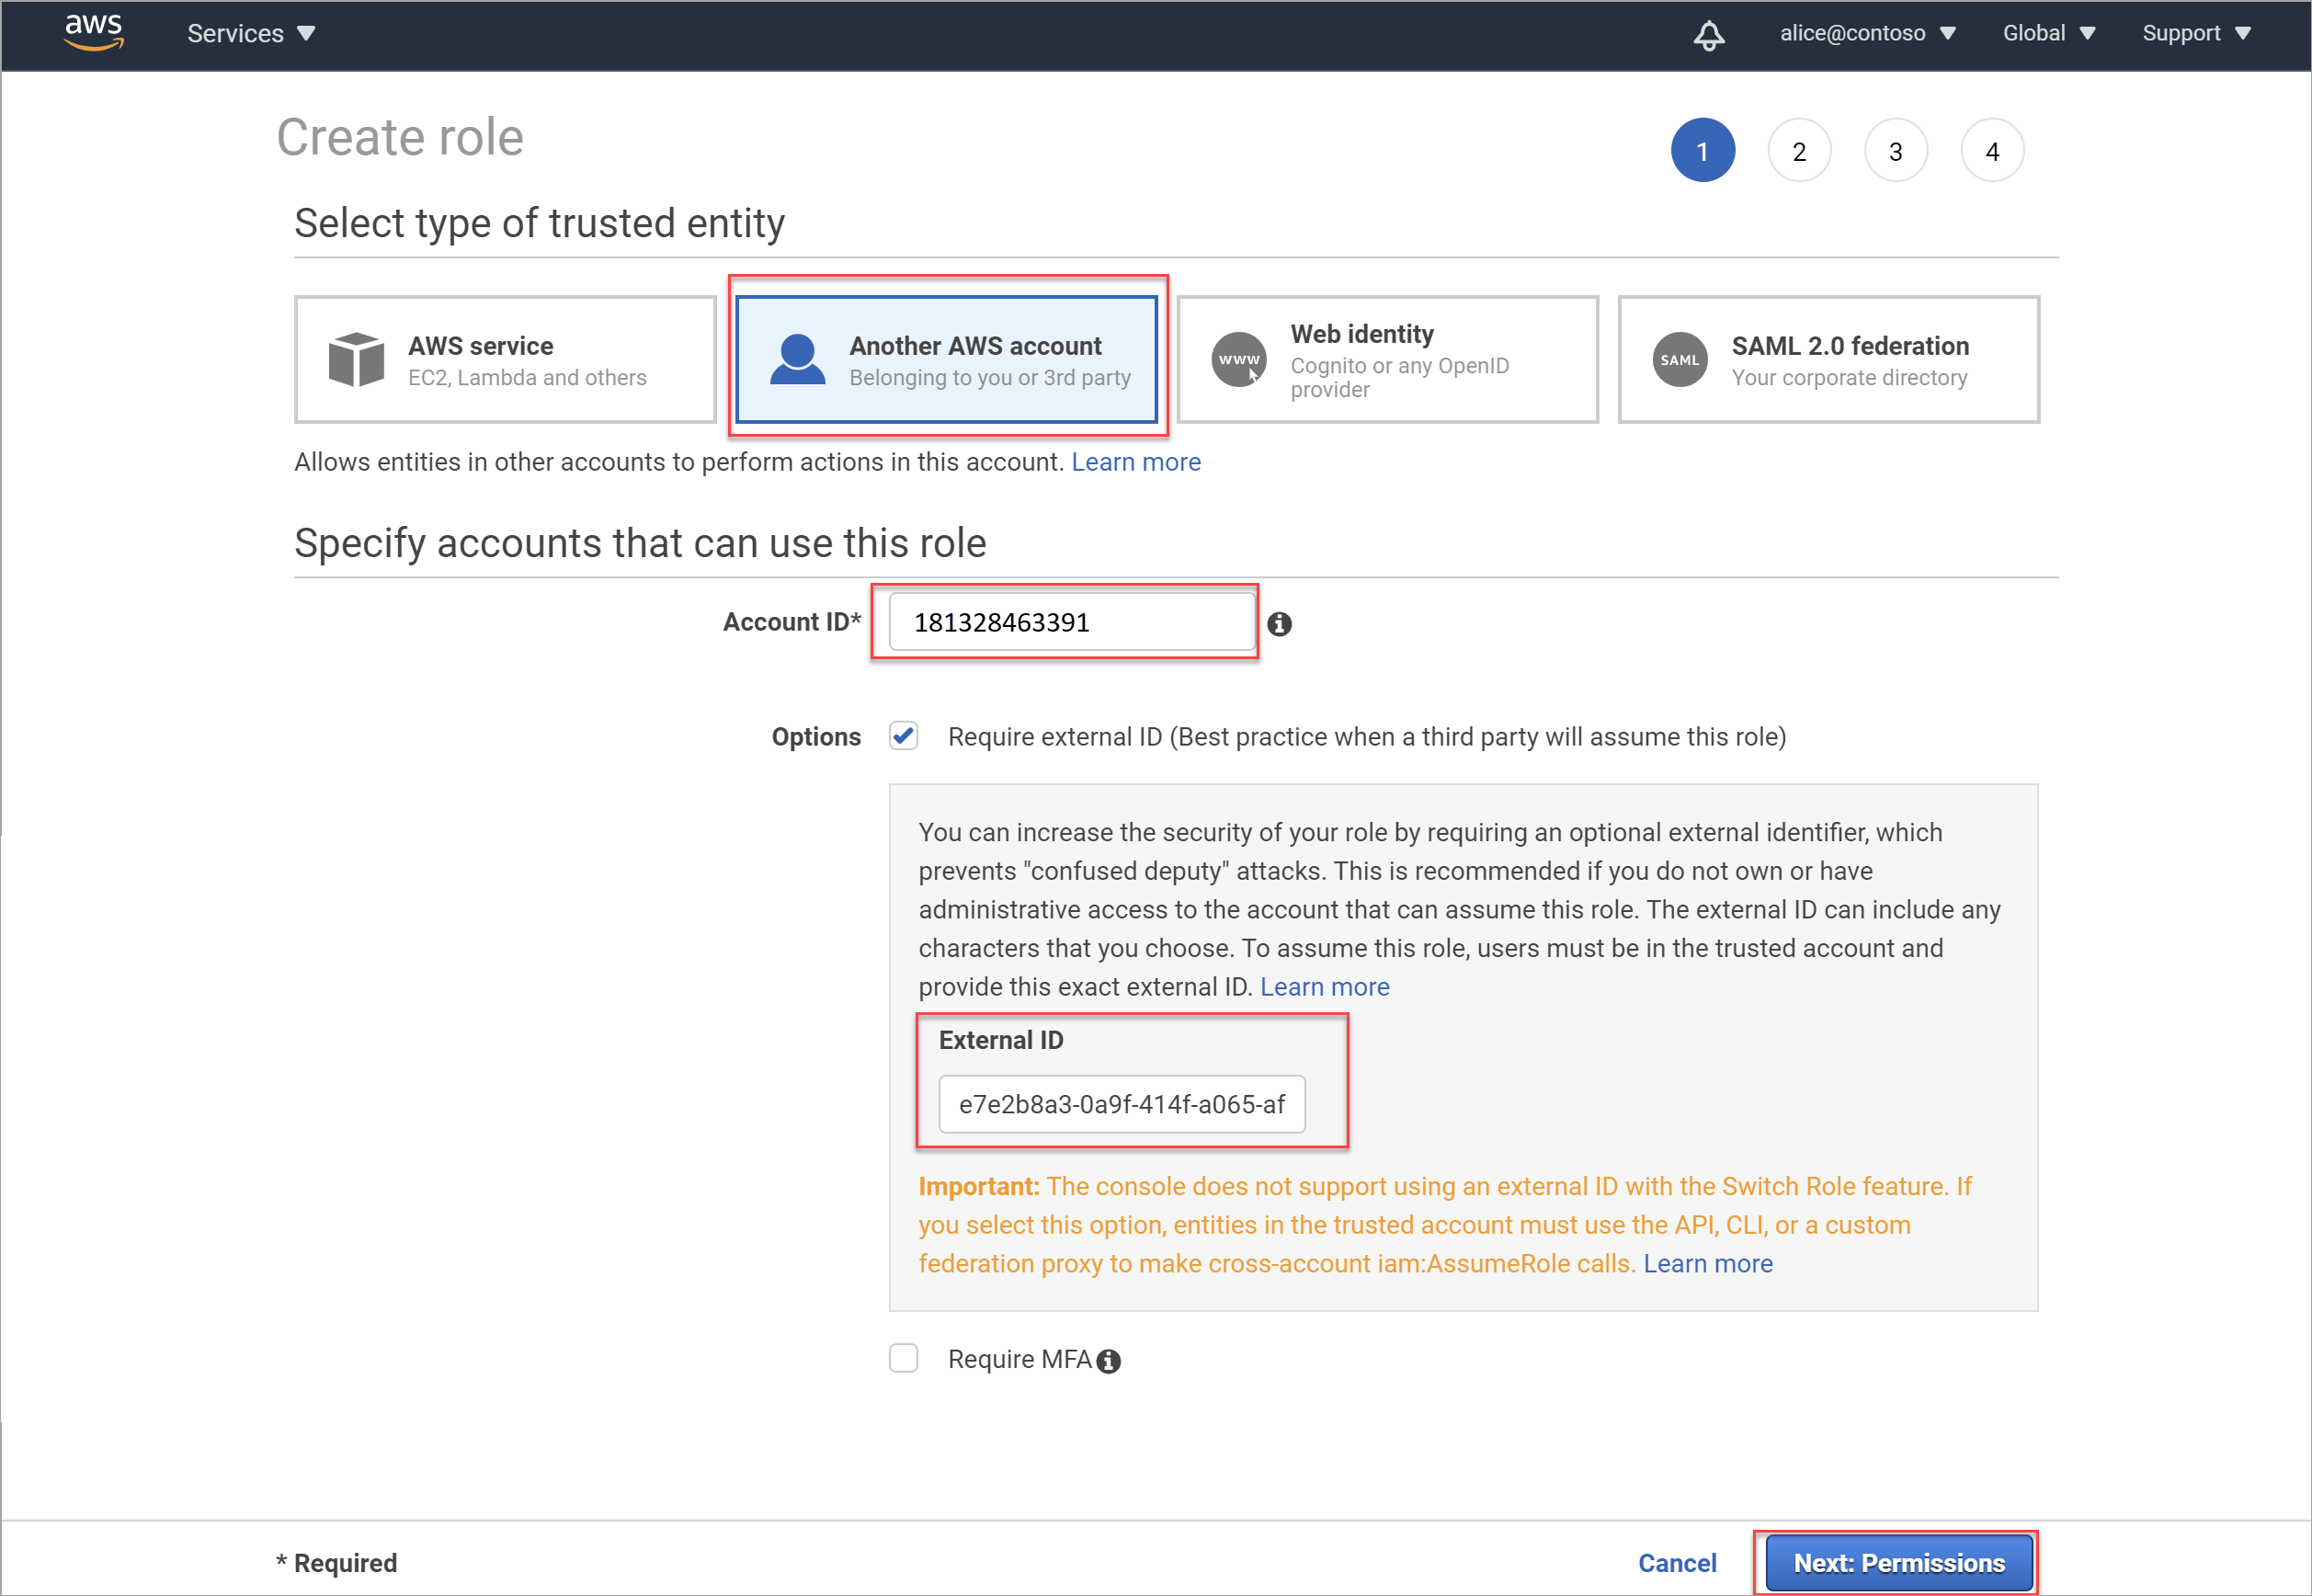
Select Another AWS account, and then enter the following values:
Field Description Account ID Enter your Microsoft Account ID. For example: 181328463391External ID Under options, select Require external ID..., and then enter your External ID in the designated field.
For example:e7e2b8a3-0a9f-414f-a065-afaf4ac6d994For example:
In the Create role > Attach permissions policies area, filter the permissions displayed to S3. Select AmazonS3ReadOnlyAccess. If you also want to be able to apply protection policies, add these permissions also:
- GetBucketLocation
- GetBucketPublicAccessBlock
- GetObject
- PutBucketPolicy
- PutObjectTagging
- DeleteBucketPolicy
- List Bucket

Important
The AmazonS3ReadOnlyAccess policy provides minimum permissions required for scanning your S3 buckets, and may include other permissions as well.
To apply only the minimum permissions required for scanning your buckets, create a new policy with the permissions listed in Minimum permissions for your AWS policy, depending on whether you want to scan a single bucket or all the buckets in your account.
Apply your new policy to the role instead of AmazonS3ReadOnlyAccess.
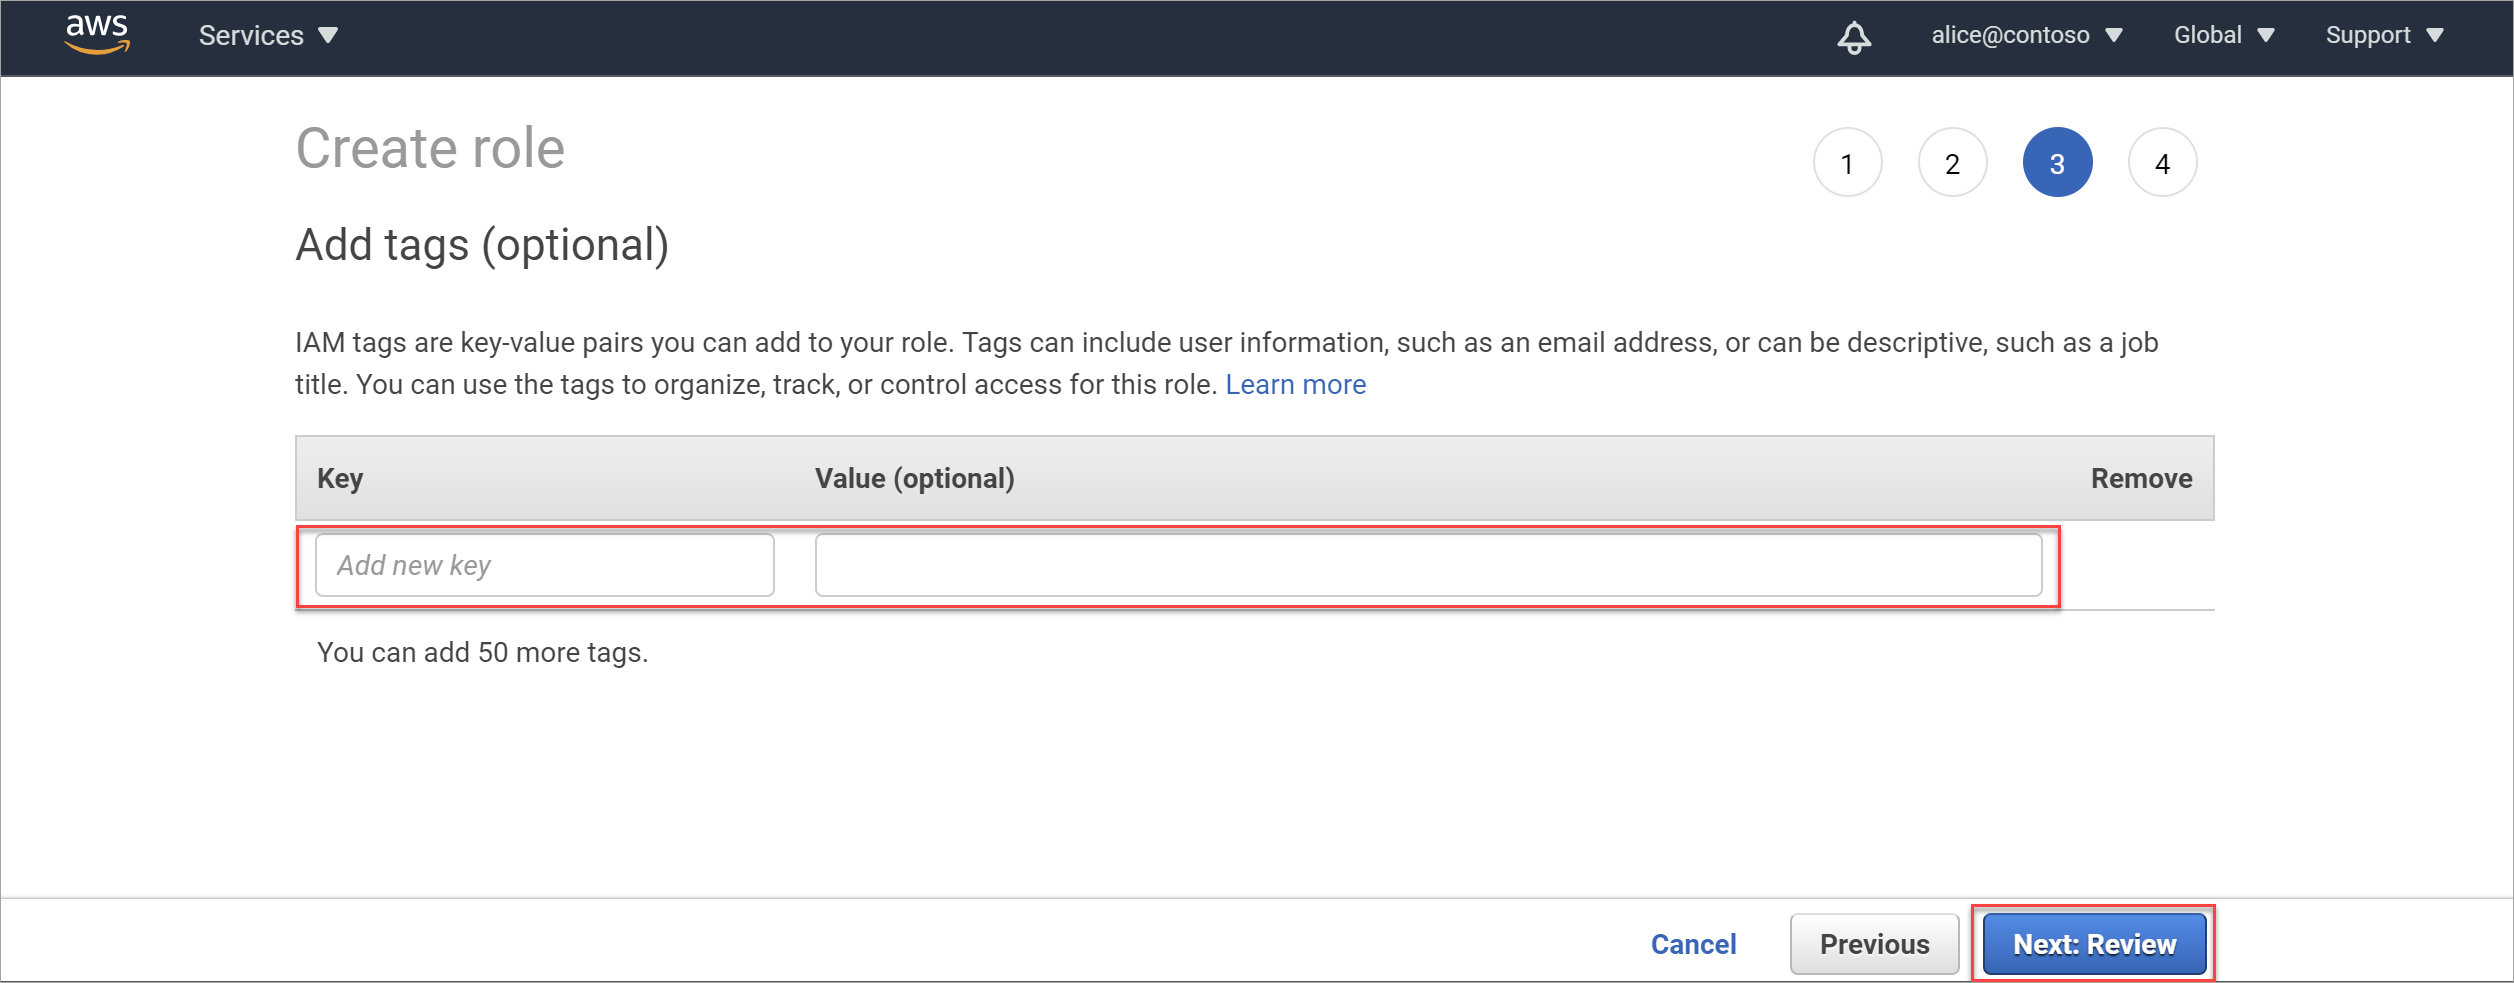
Select Next: Tags.
In the Add tags (optional) area, you can optionally choose to create a meaningful tag for this new role. Useful tags enable you to organize, track, and control access for each role you create.
If you also want to be able to apply protection policies, add a tag with the key:
msftpurview_allowlistedand the valuetrue.Enter a new key and value for your tag as needed. When you're done, or if you want to skip this step, select Next: Review to review the role details and complete the role creation.
In the Review area, do the following:
- In the Role name field, enter a meaningful name for your role
- In the Role description box, enter an optional description to identify the role's purpose
- In the Policies section, confirm that the correct policy (AmazonS3ReadOnlyAccess) is attached to the role.
Then select Create role to complete the process. For example:

Extra required configurations:
For buckets that use AWS-KMS encryption, special configuration is required to enable scanning.
Make sure that your bucket policy doesn't block the connection. For more information, see:
Create a Microsoft Purview credential for your AWS S3 scan
This procedure describes how to create a new Microsoft Purview credential to use when scanning your AWS buckets.
Tip
If you're continuing directly on from Create a new AWS role for Microsoft Purview, you may already have the New credential pane open in Microsoft Purview.
You can also create a new credential in the middle of the process, while configuring your scan. In that case, in the Credential field, select New.
In Microsoft Purview, go to the Management Center, and under Security and access, select Credentials.
Select New, and in the New credential pane that appears on the right, use the following fields to create your Microsoft Purview credential:
Field Description Name Enter a meaningful name for this credential. Description Enter an optional description for this credential, such as Used to scan the tutorial S3 bucketsAuthentication method Select Role ARN, since you're using a role ARN to access your bucket. Role ARN Once you've created your Amazon IAM role, navigate to your role in the AWS IAM area, copy the Role ARN value, and enter it here. For example: arn:aws:iam::181328463391:role/S3Role.
For more information, see Retrieve your new Role ARN.The Microsoft account ID and the External ID values are used when creating your Role ARN in AWS..
Select Create when you're done to finish creating the credential.
For more information about Microsoft Purview credentials, see Credentials for source authentication in Microsoft Purview.
Configure scanning for encrypted Amazon S3 buckets
AWS buckets support multiple encryption types. For buckets that use AWS-KMS encryption, special configuration is required to enable scanning.
Note
For buckets that use no encryption, AES-256 or AWS-KMS S3 encryption, skip this section and continue to Retrieve your Amazon S3 bucket name.
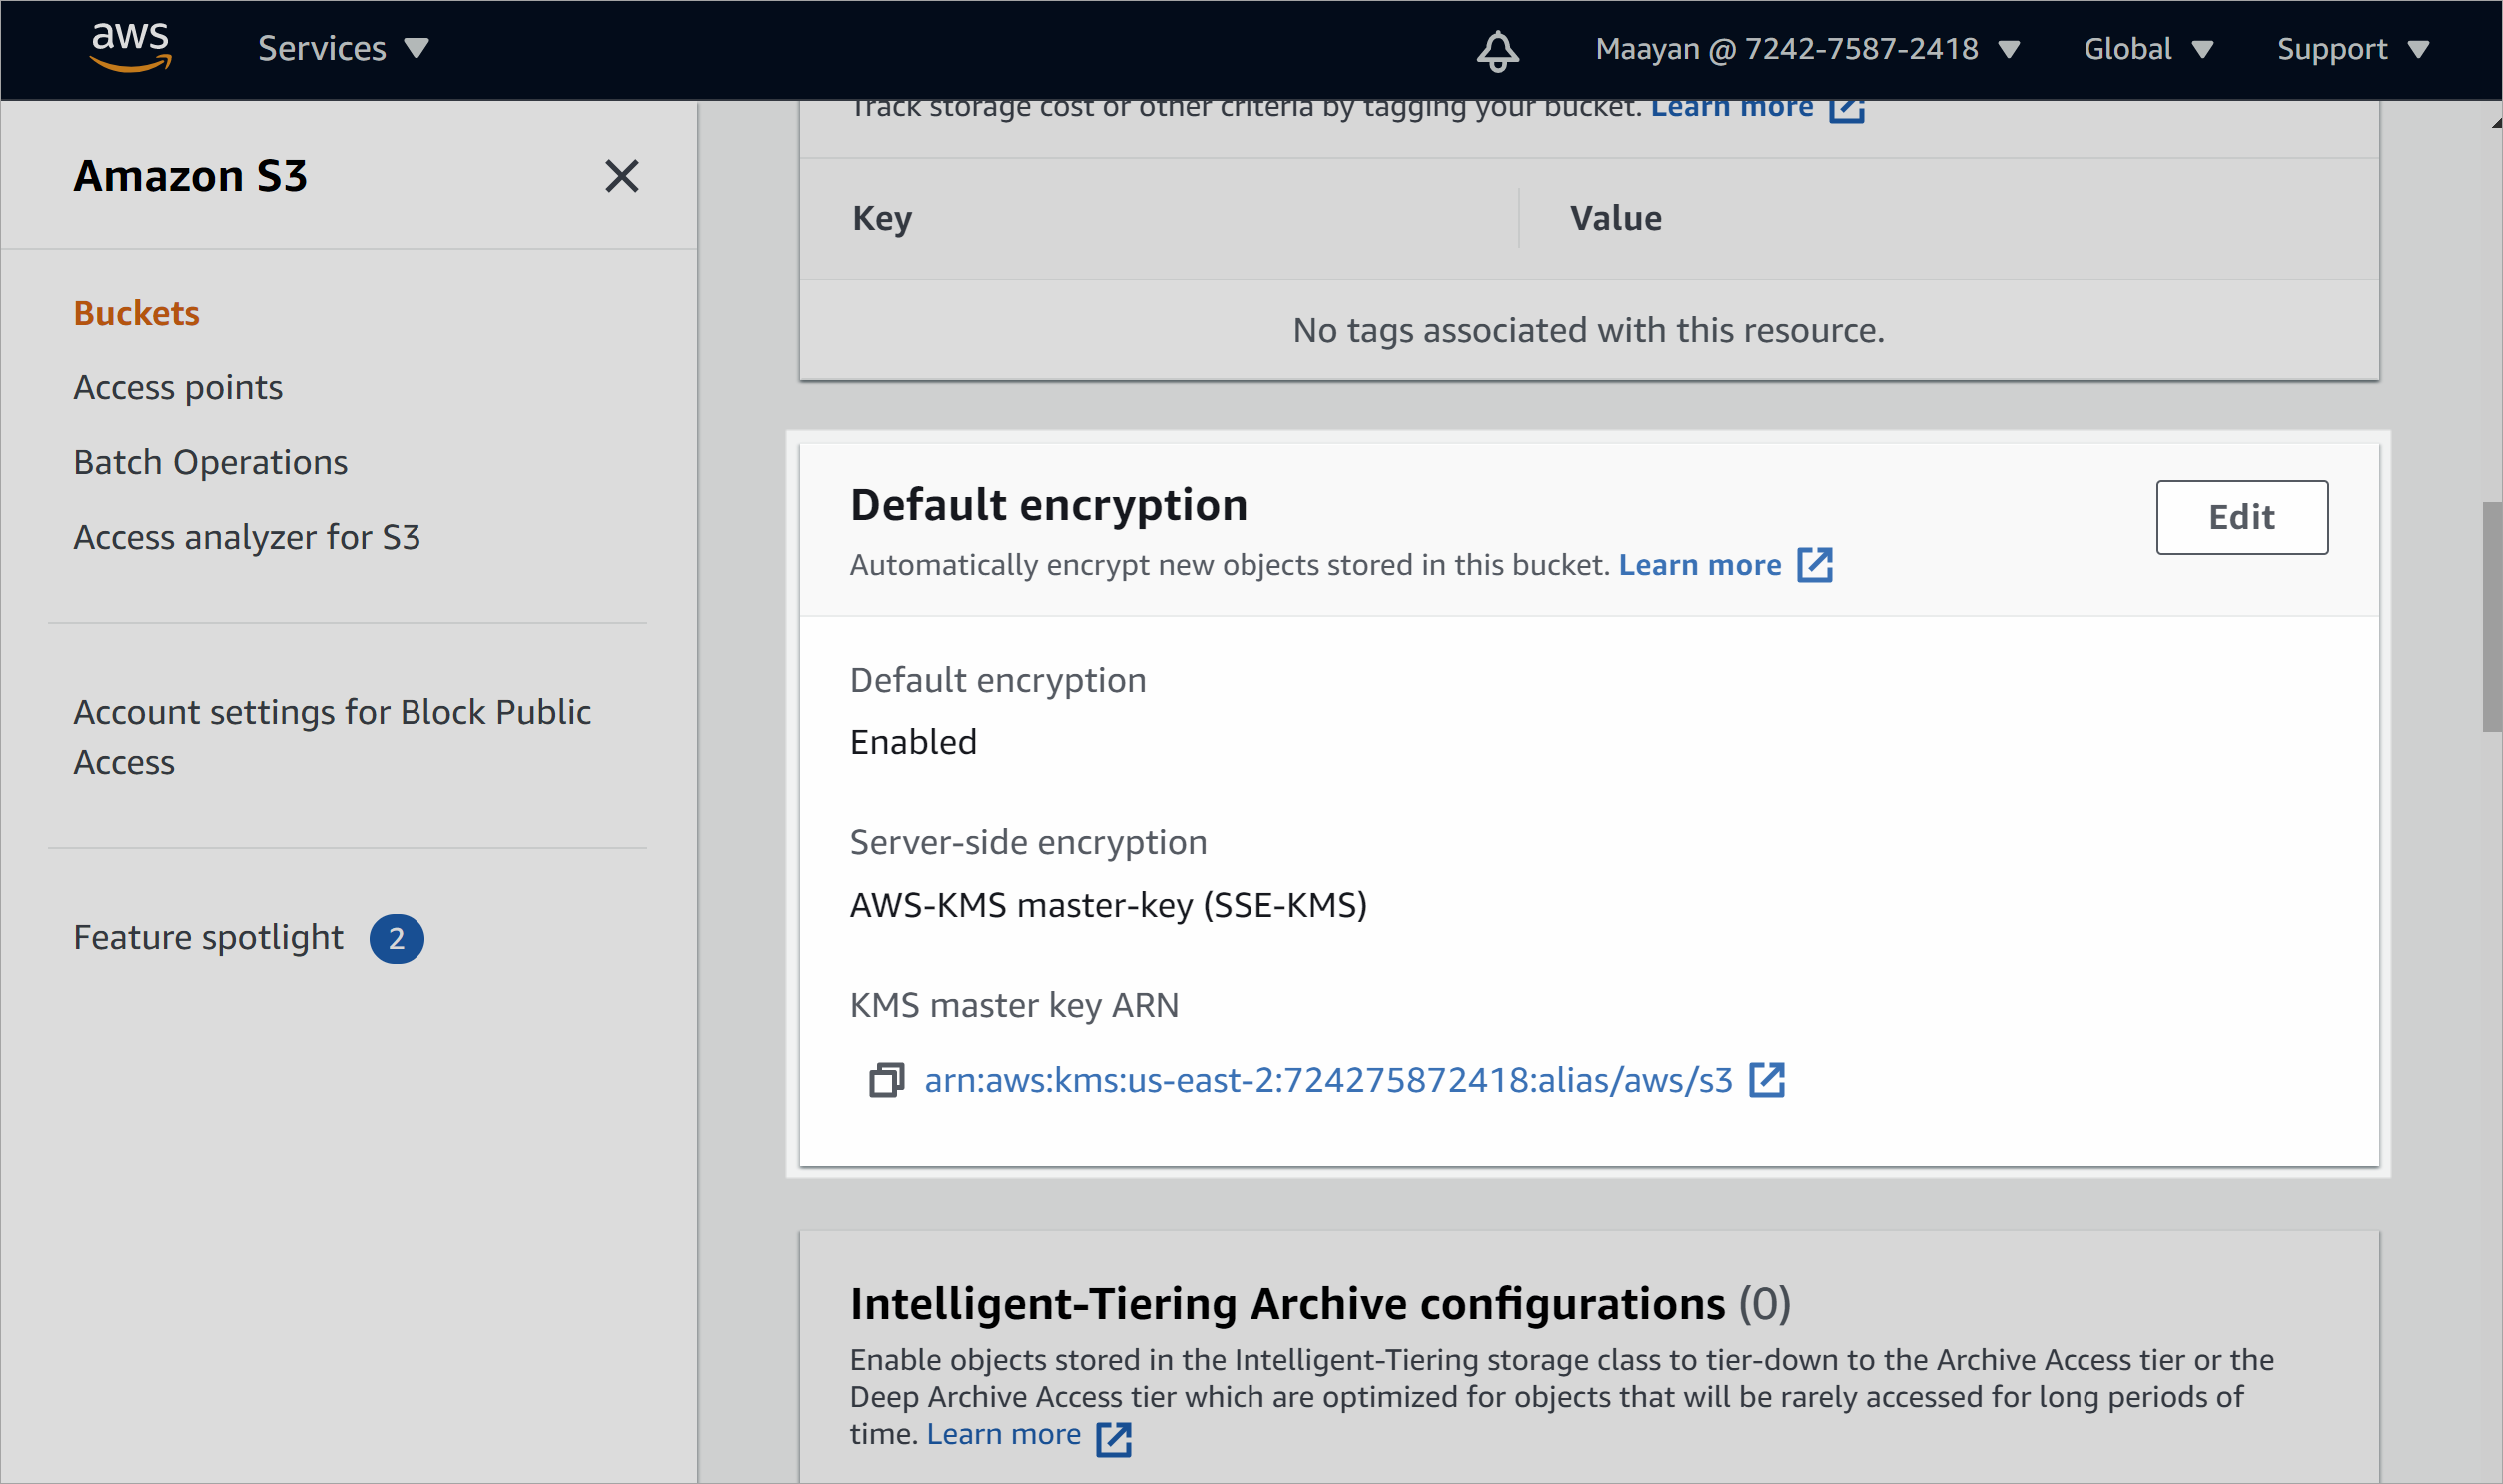
To check the type of encryption used in your Amazon S3 buckets:
In AWS, navigate to Storage > S3 > and select Buckets from the menu on the left.

Select the bucket you want to check. On the bucket's details page, select the Properties tab and scroll down to the Default encryption area.
If the bucket you selected is configured for anything but AWS-KMS encryption, including if default encryption for your bucket is Disabled, skip the rest of this procedure and continue with Retrieve your Amazon S3 bucket name.
If the bucket you selected is configured for AWS-KMS encryption, continue as described below to add a new policy that allows for scanning a bucket with custom AWS-KMS encryption.
For example:
To add a new policy to allow for scanning a bucket with custom AWS-KMS encryption:
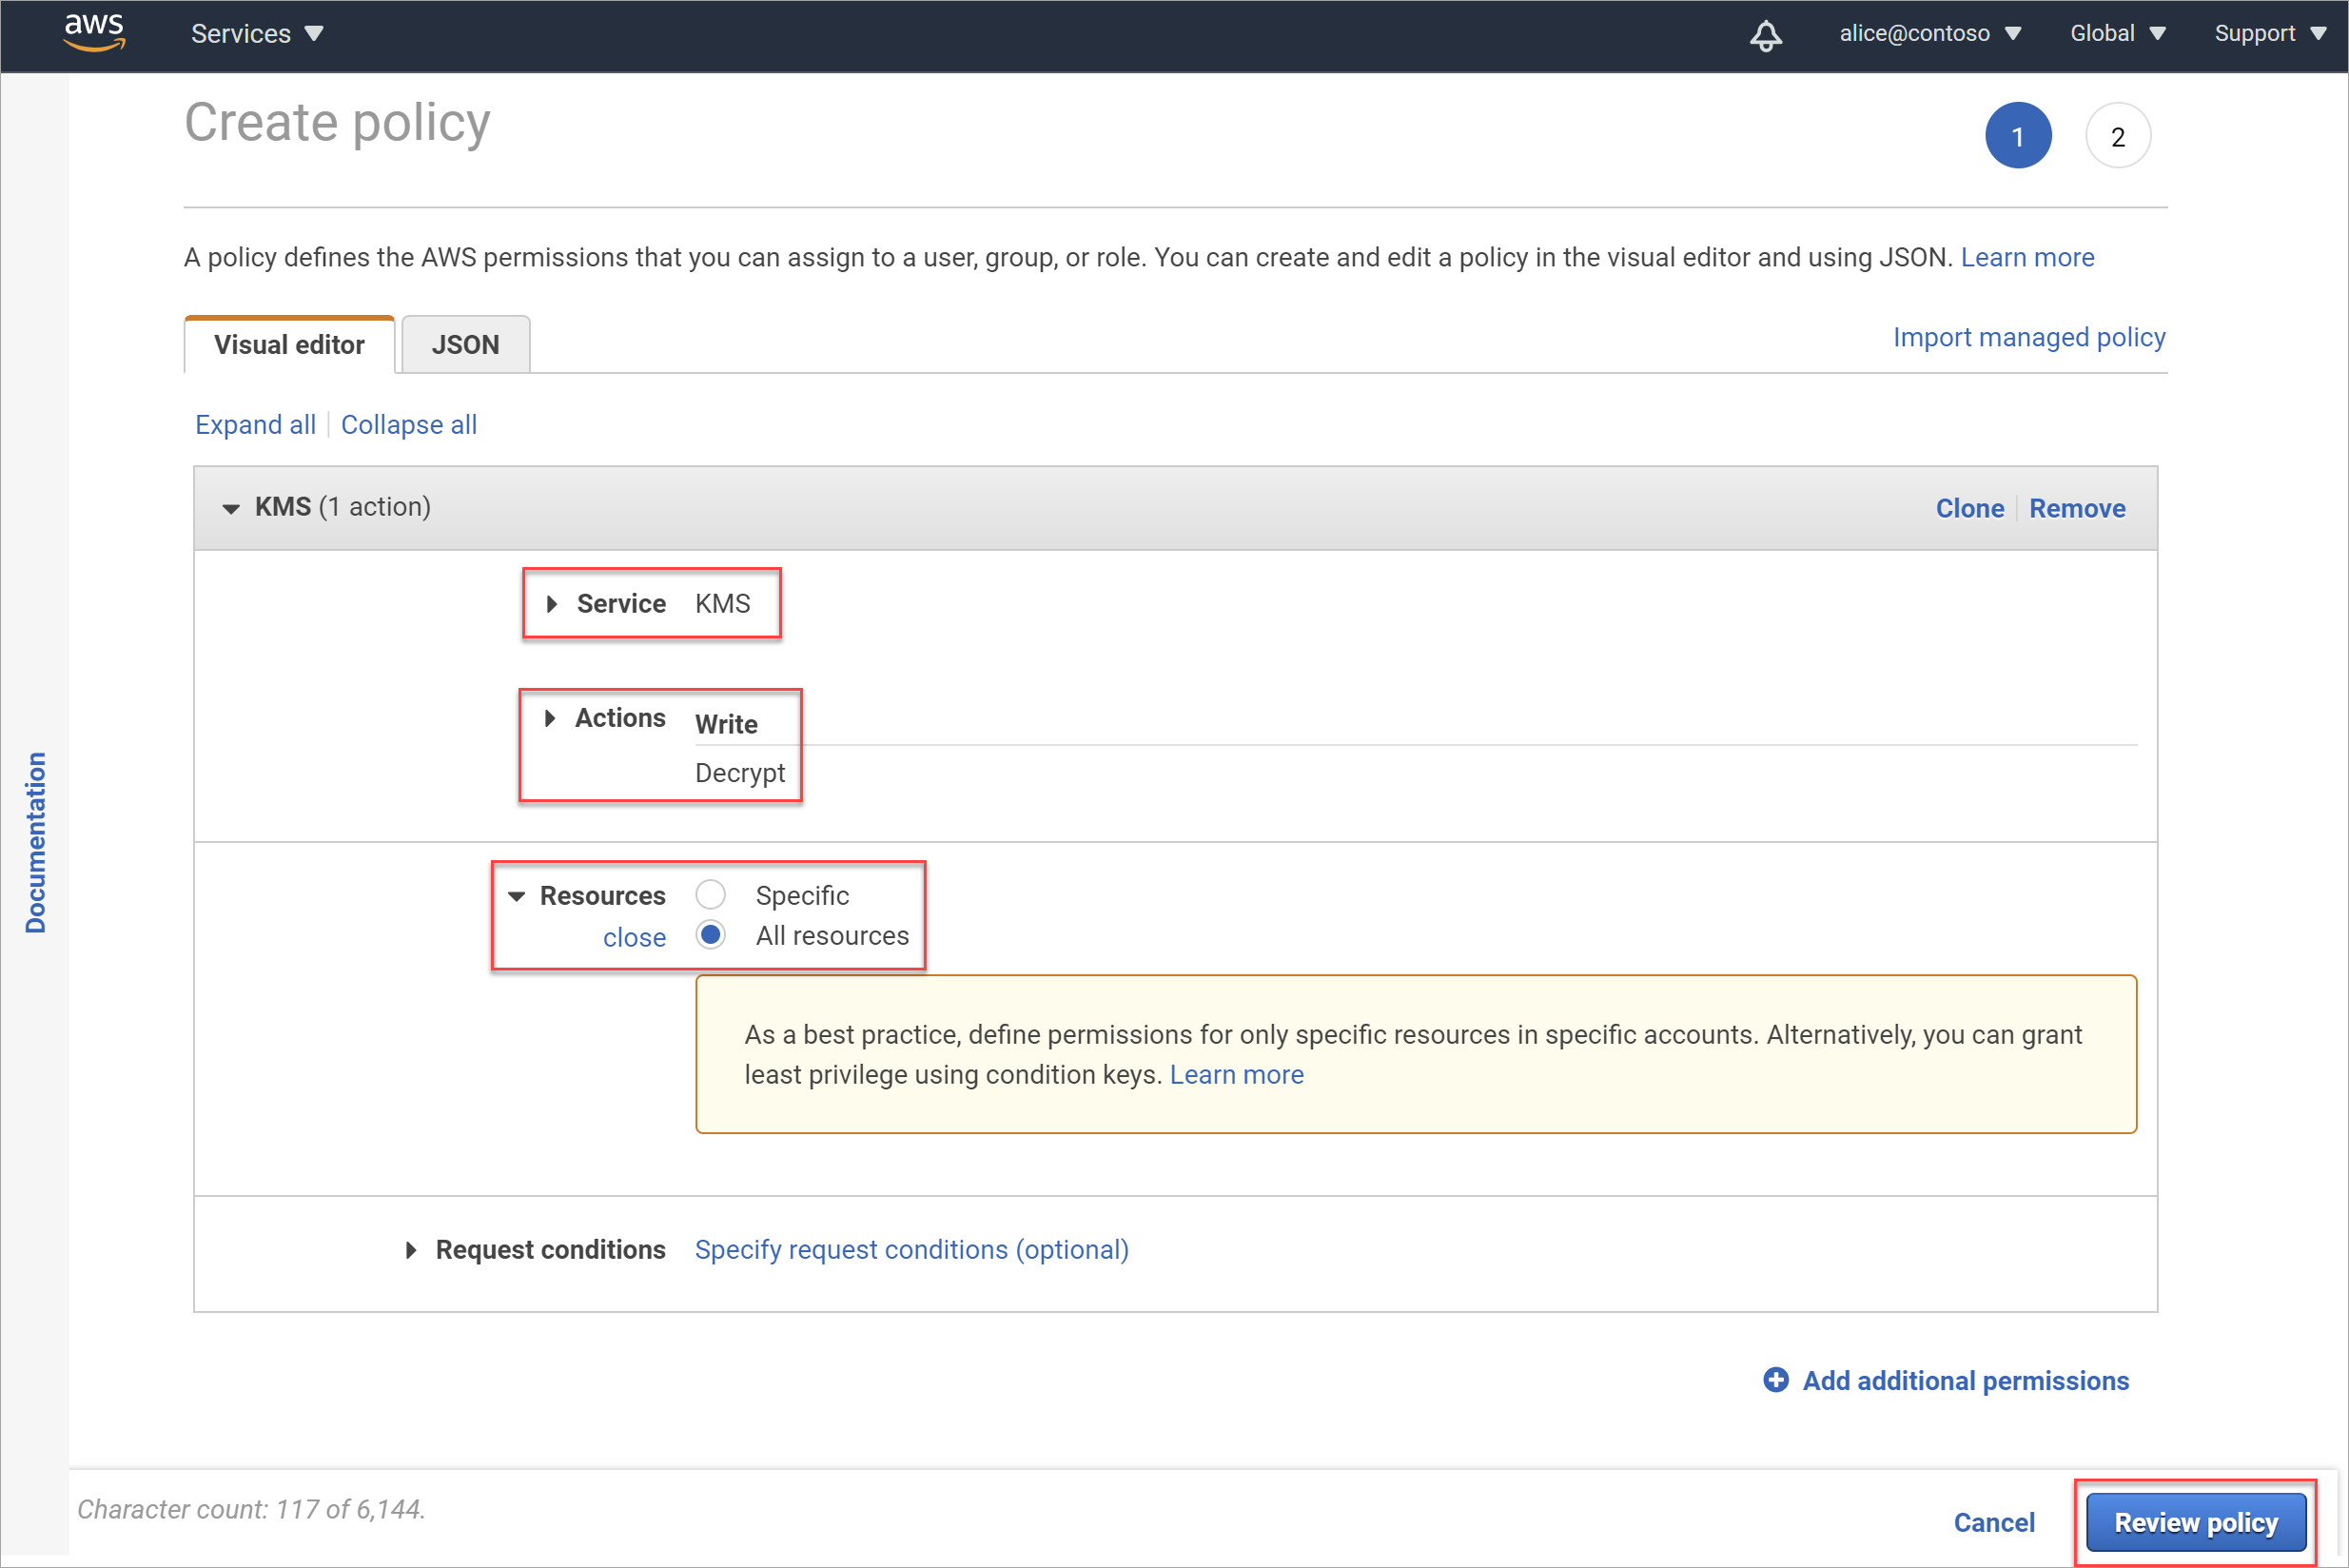
In AWS, navigate to Services > IAM > Policies, and select Create policy.
On the Create policy > Visual editor tab, define your policy with the following values:
Field Description Service Enter and select KMS. Actions Under Access level, select Write to expand the Write section.
Once expanded, select only the Decrypt option.Resources Select a specific resource or All resources. When you're done, select Review policy to continue.
On the Review policy page, enter a meaningful name for your policy and an optional description, and then select Create policy.
The newly created policy is added to your list of policies.
Attach your new policy to the role you added for scanning.
Navigate back to the IAM > Roles page, and select the role you added earlier.
On the Permissions tab, select Attach policies.
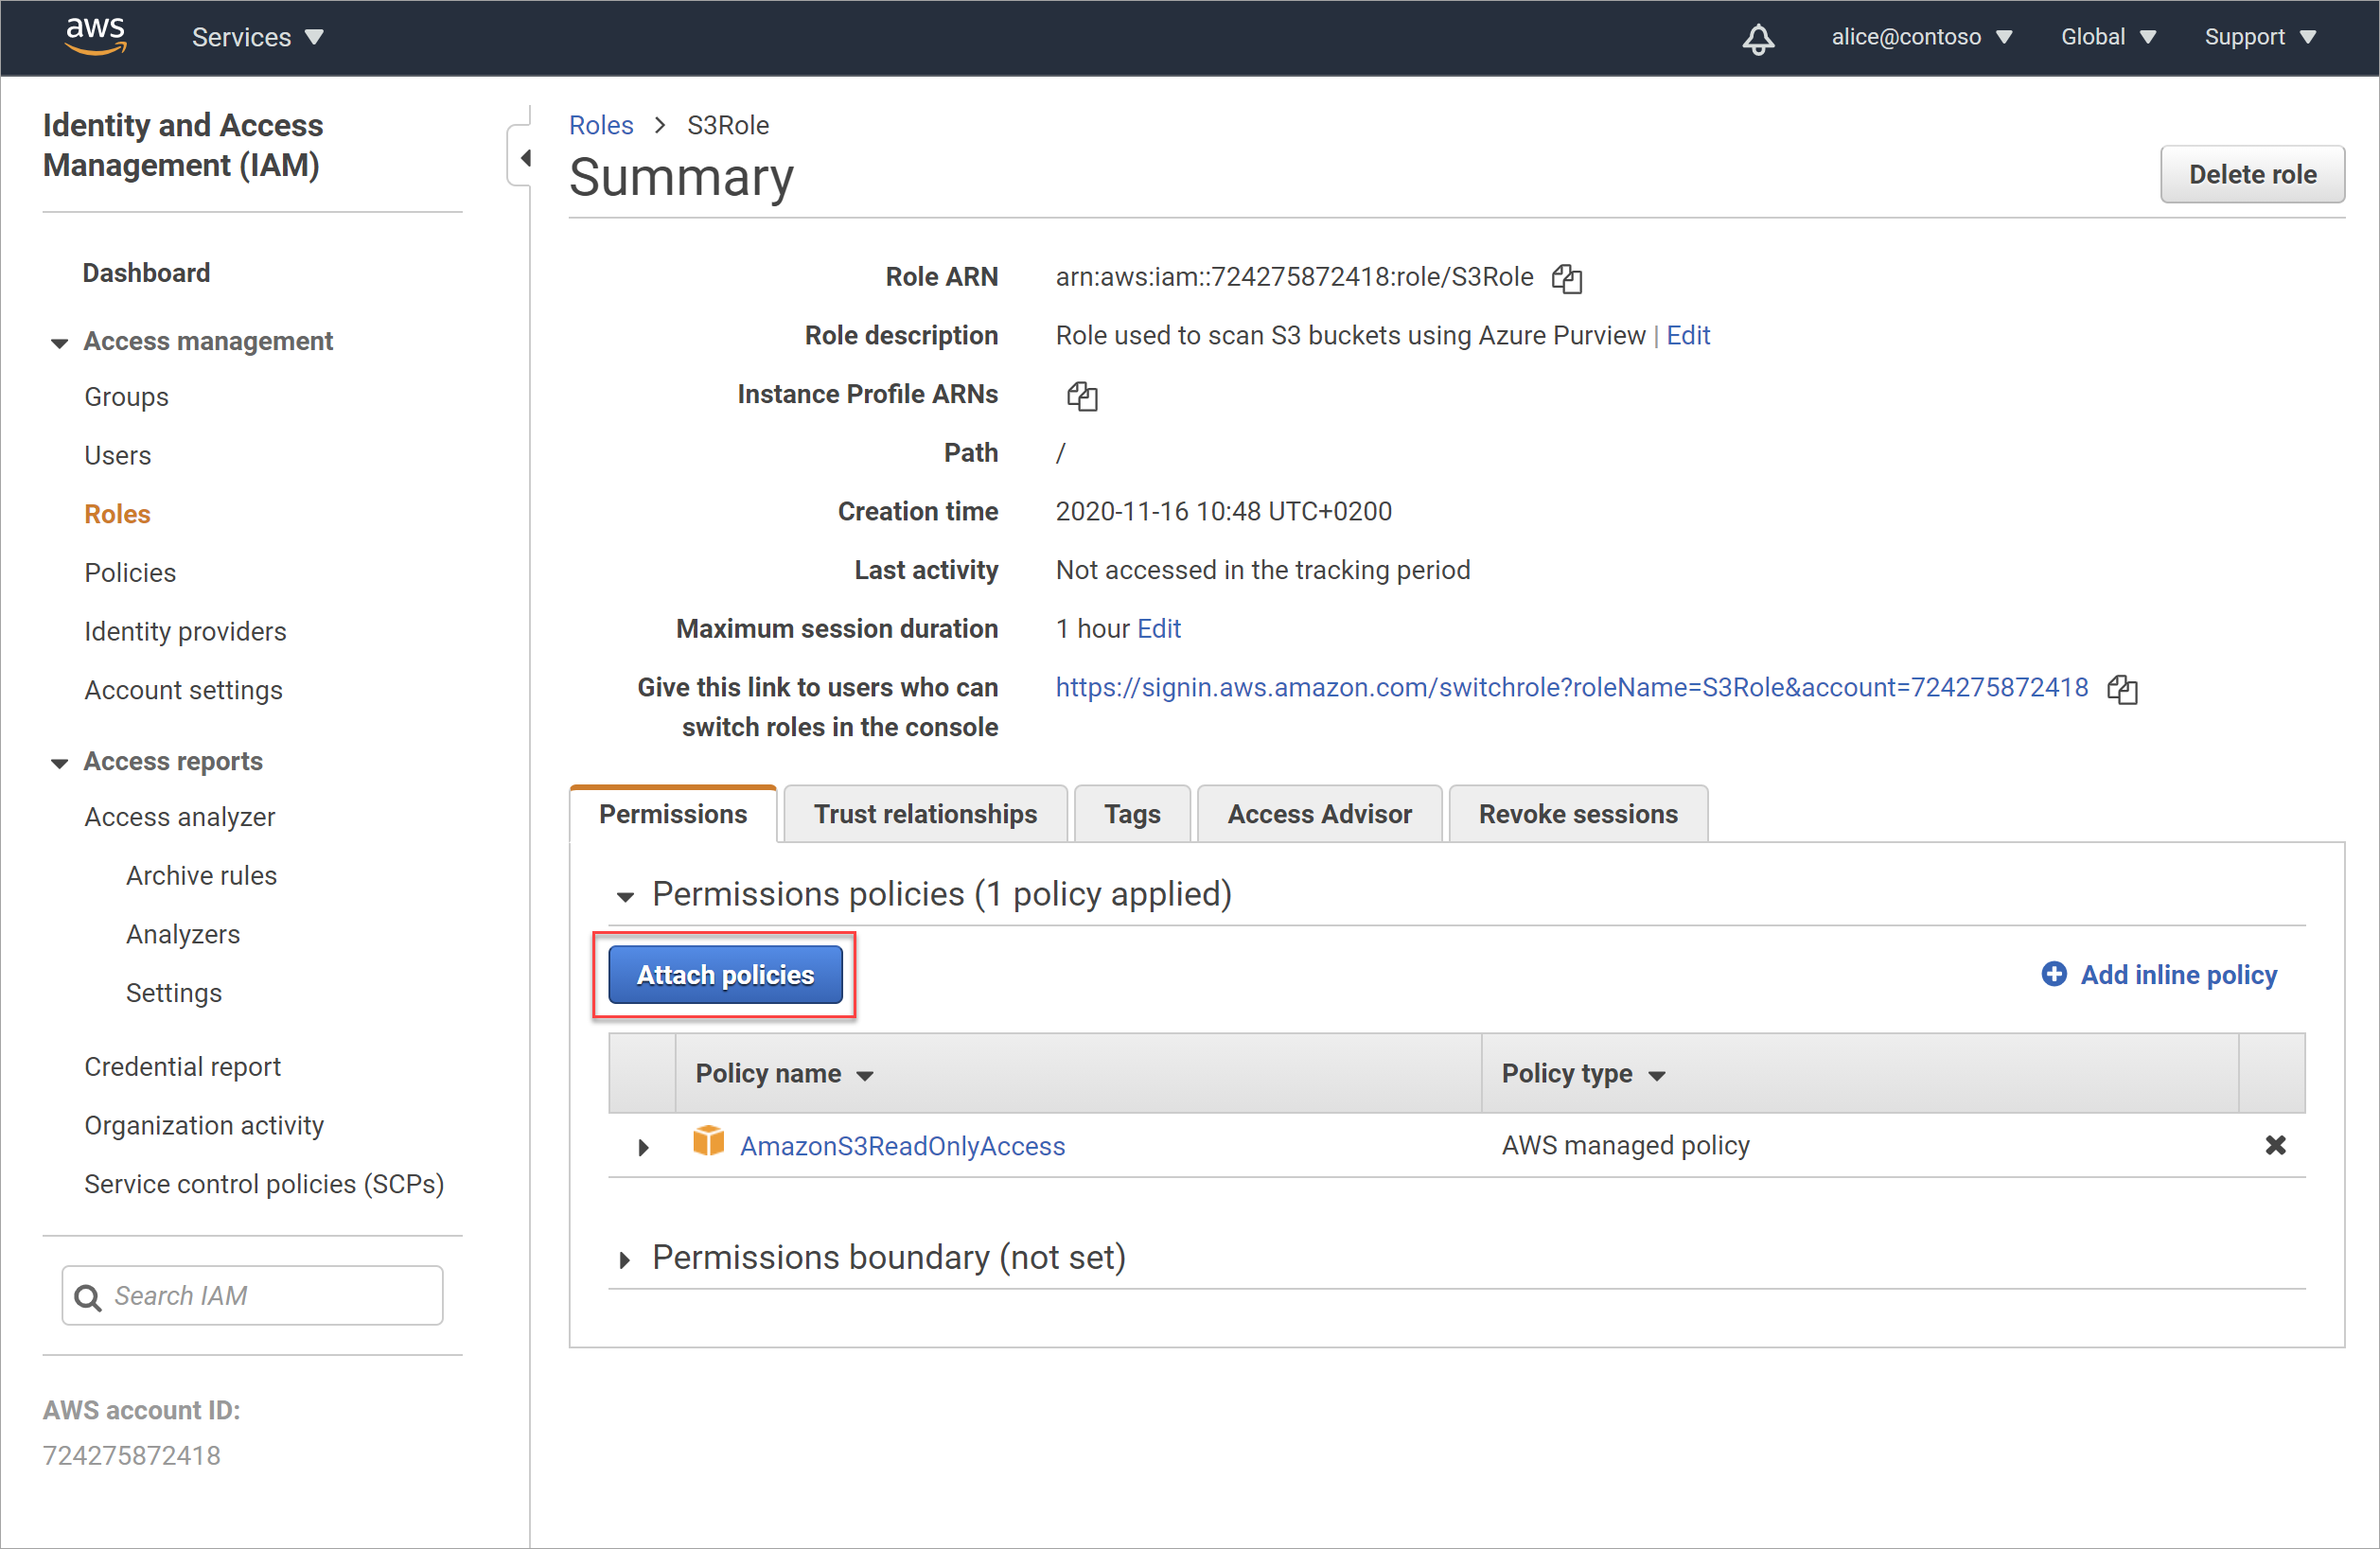
On the Attach Permissions page, search for and select the new policy you created above. Select Attach policy to attach your policy to the role.
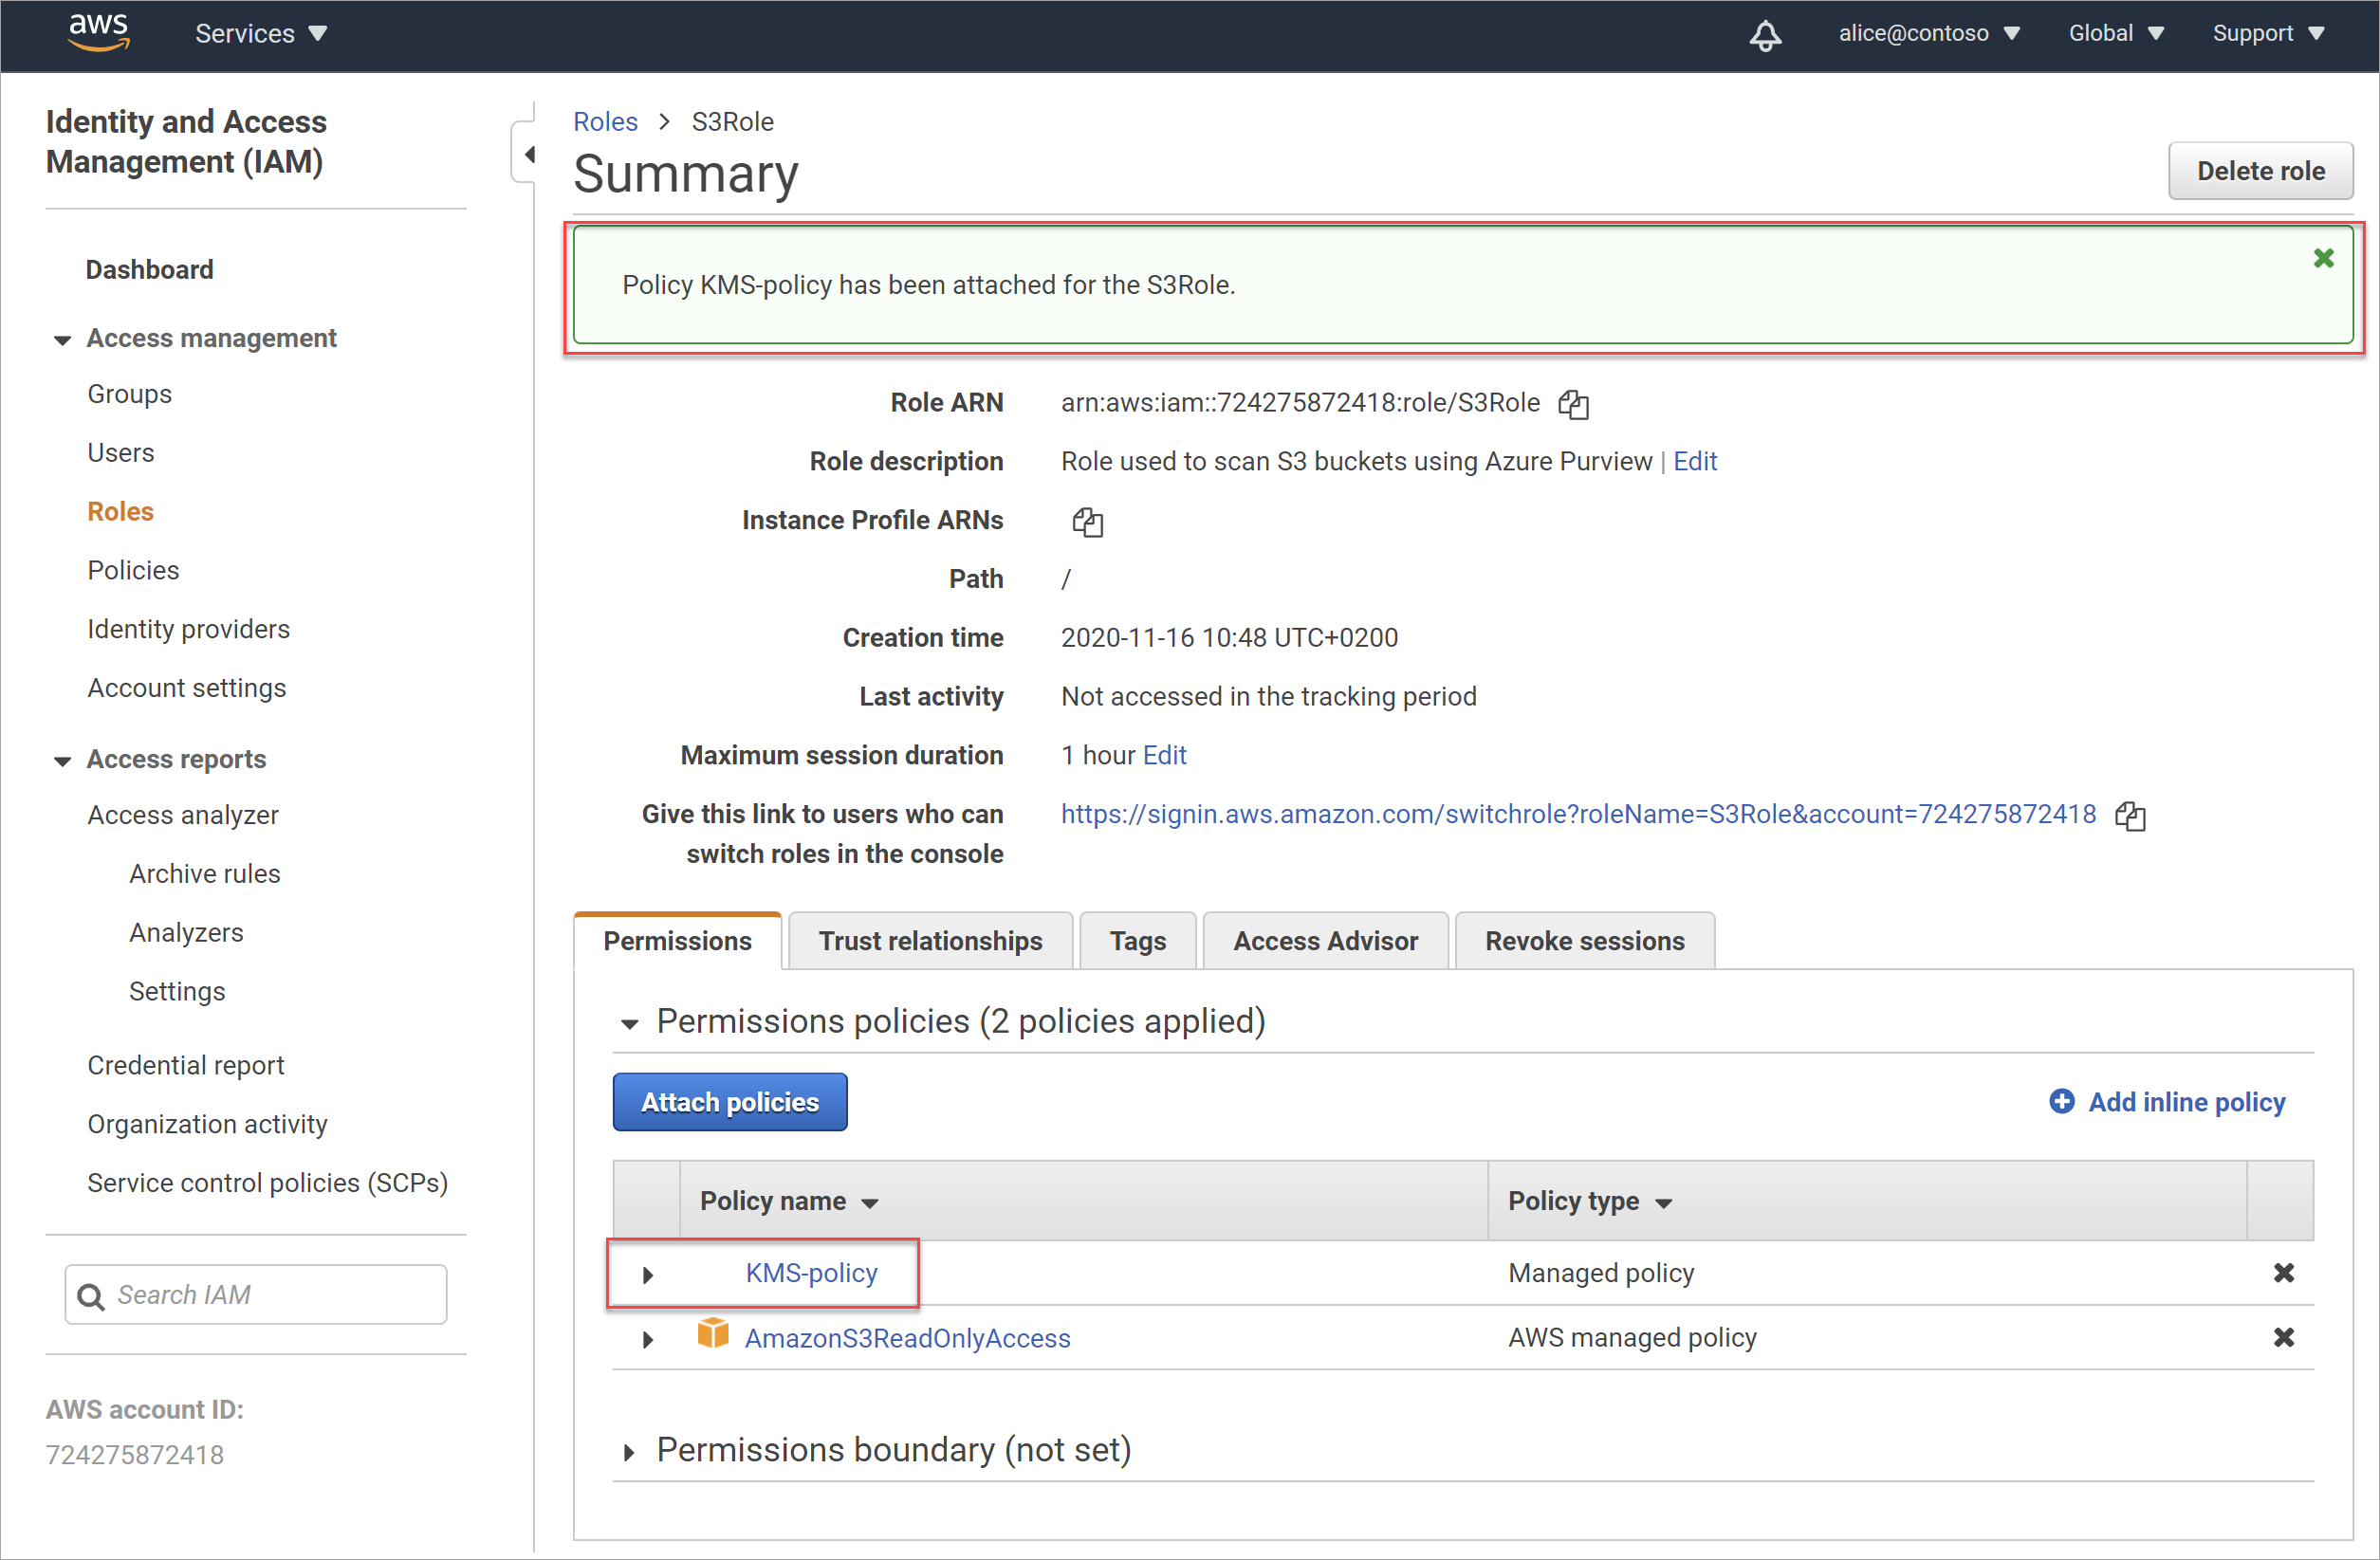
The Summary page is updated, with your new policy attached to your role.
Confirm your bucket policy access
Make sure that the S3 bucket policy doesn't block the connection:
- In AWS, navigate to your S3 bucket, and then select the Permissions tab > Bucket policy.
- Check the policy details to make sure that it doesn't block the connection from the Microsoft Purview scanner service.
Confirm your SCP policy access
Make sure that there's no SCP policy that blocks the connection to the S3 bucket.
For example, your SCP policy might block read API calls to the AWS Region where your S3 bucket is hosted.
- Required API calls, which must be allowed by your SCP policy, include:
AssumeRole,GetBucketLocation,GetObject,ListBucket,GetBucketPublicAccessBlock. - Your SCP policy must also allow calls to the us-east-1 AWS Region, which is the default Region for API calls. For more information, see the AWS documentation.
Follow the SCP documentation, review your organization’s SCP policies, and make sure all the permissions required for the Microsoft Purview scanner are available.
Retrieve your new Role ARN
You'll need to record your AWS Role ARN and copy it in to Microsoft Purview when creating a scan for your Amazon S3 bucket.
To retrieve your role ARN:
In the AWS Identity and Access Management (IAM) > Roles area, search for and select the new role you created for Microsoft Purview.
On the role's Summary page, select the Copy to clipboard button to the right of the Role ARN value.
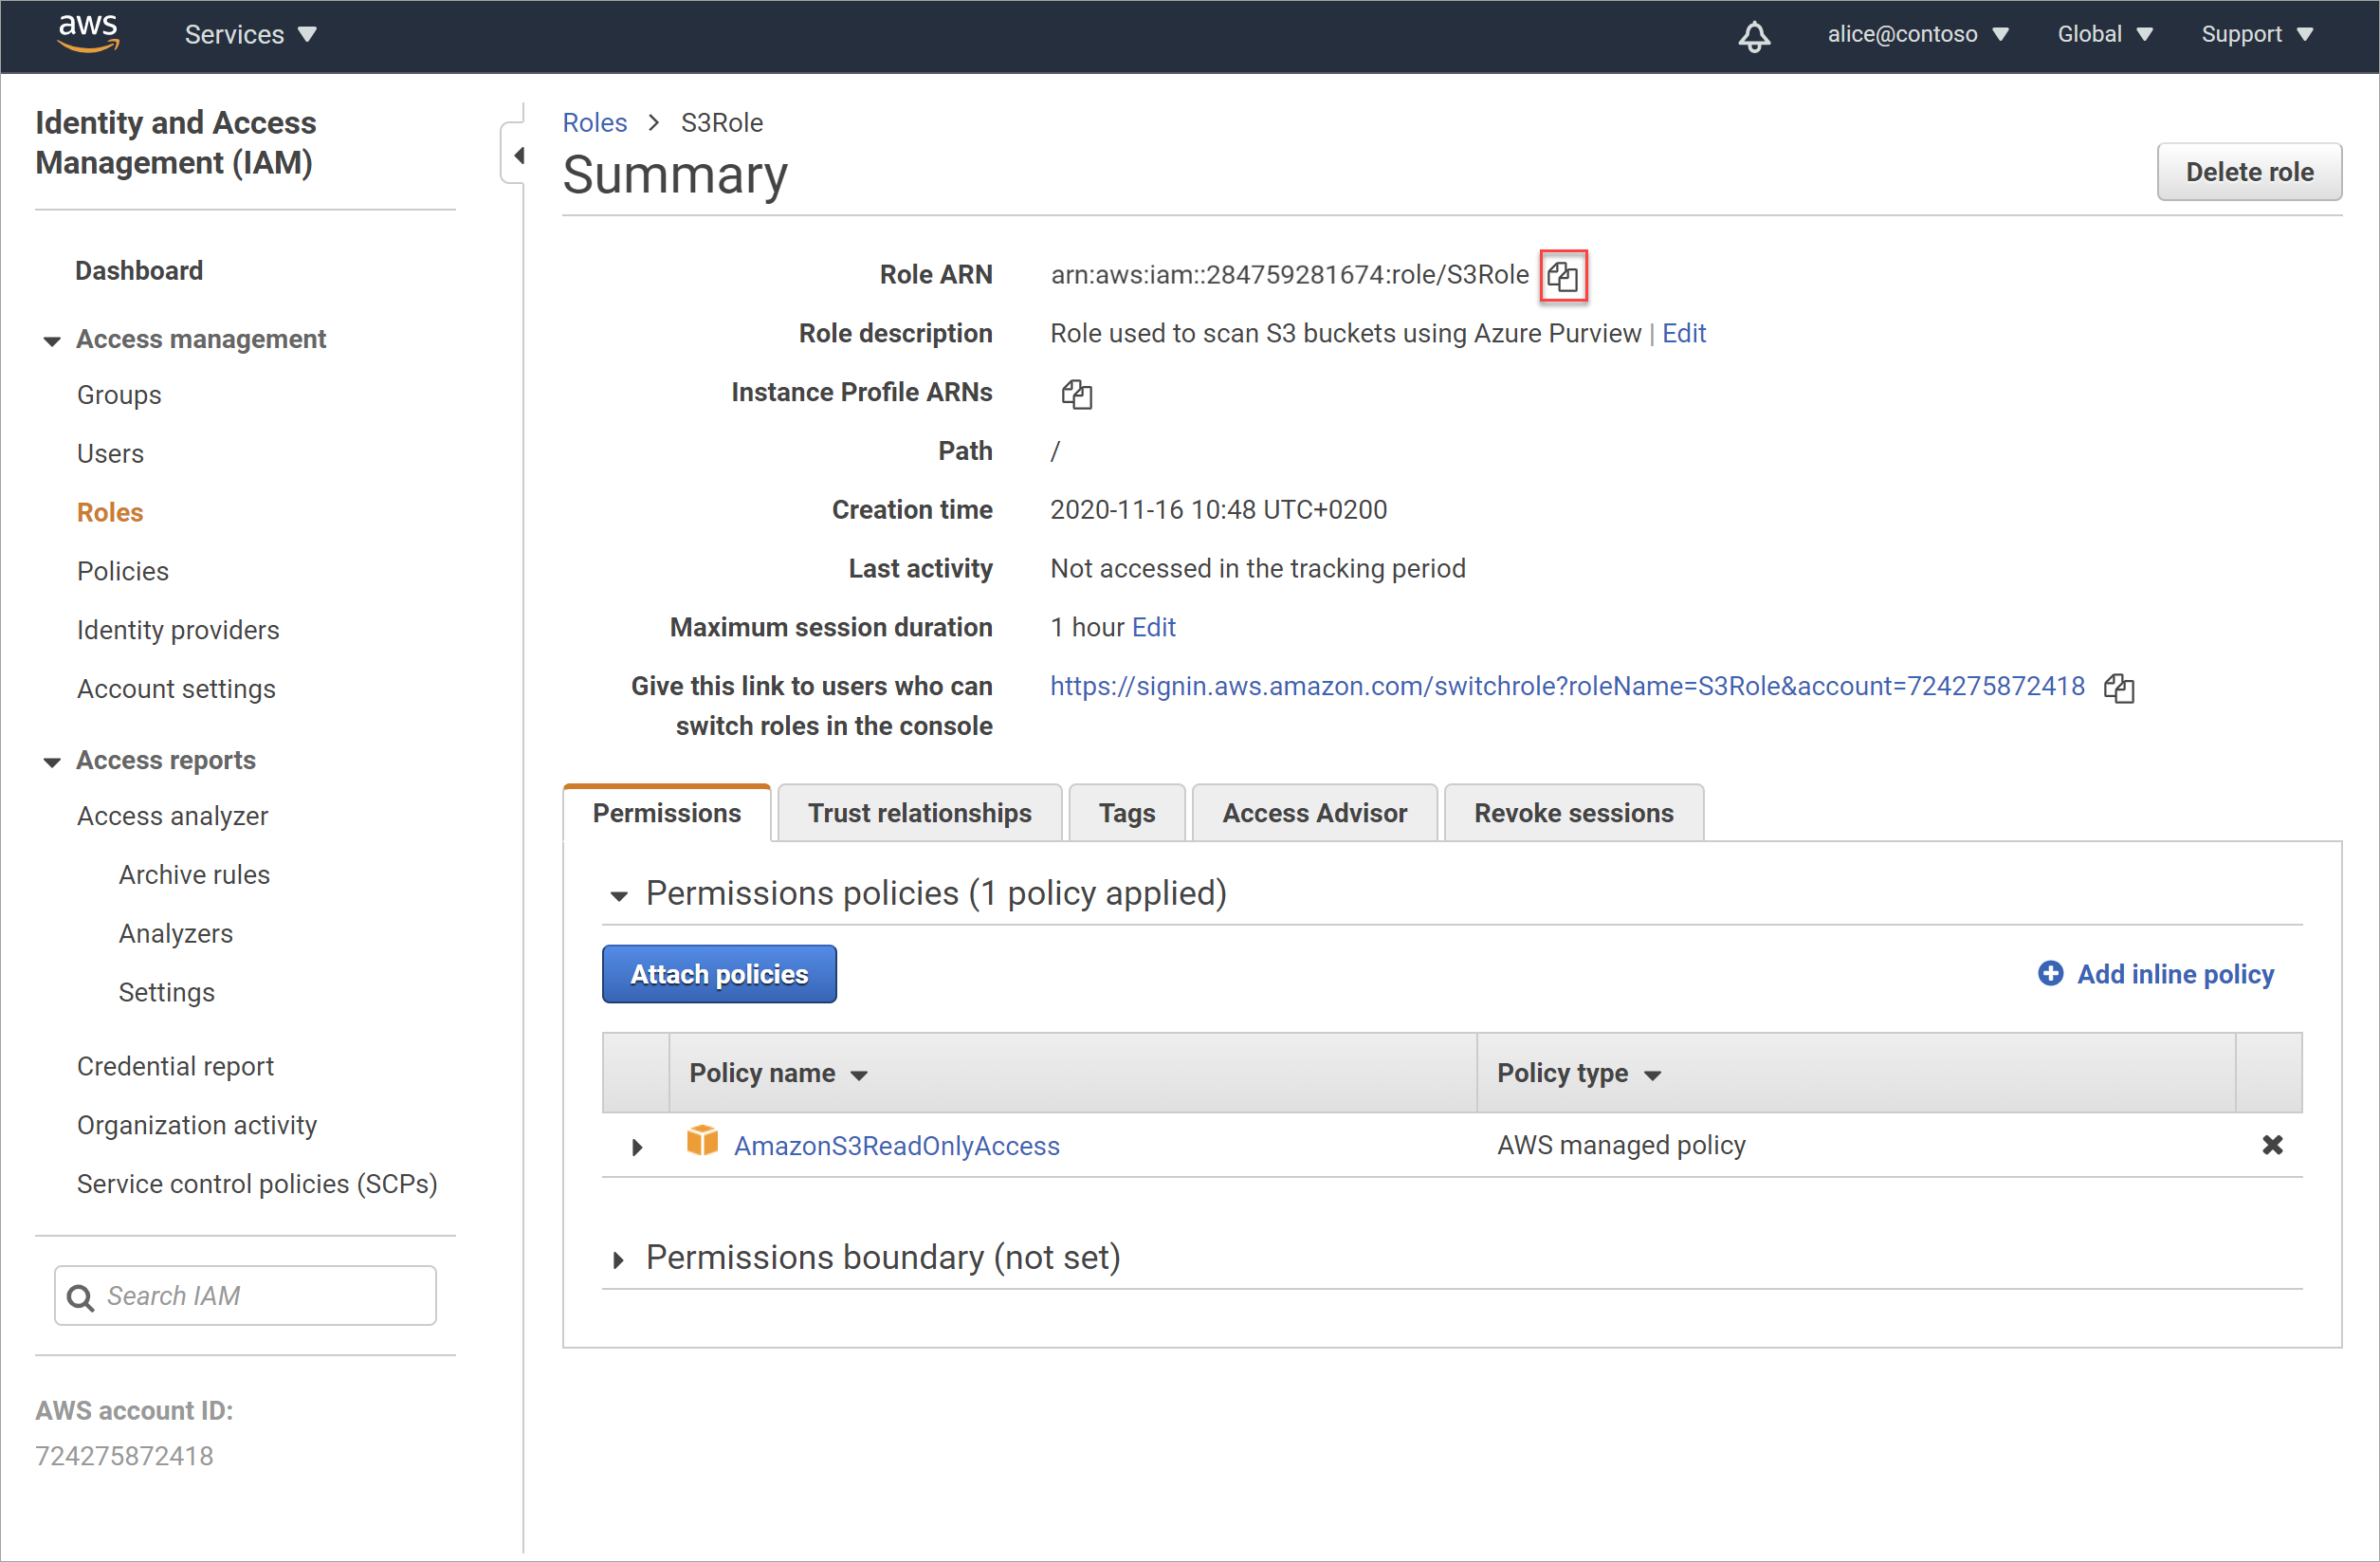
In Microsoft Purview, you can edit your credential for AWS S3, and paste the retrieved role in the Role ARN field. For more information, see Create a scan for one or more Amazon S3 buckets.
Retrieve your Amazon S3 bucket name
You'll need the name of your Amazon S3 bucket to copy it in to Microsoft Purview when creating a scan for your Amazon S3 bucket
To retrieve your bucket name:
In AWS, navigate to Storage > S3 > and select Buckets from the menu on the left.
Search for and select your bucket to view the bucket details page, and then copy the bucket name to the clipboard.
For example:
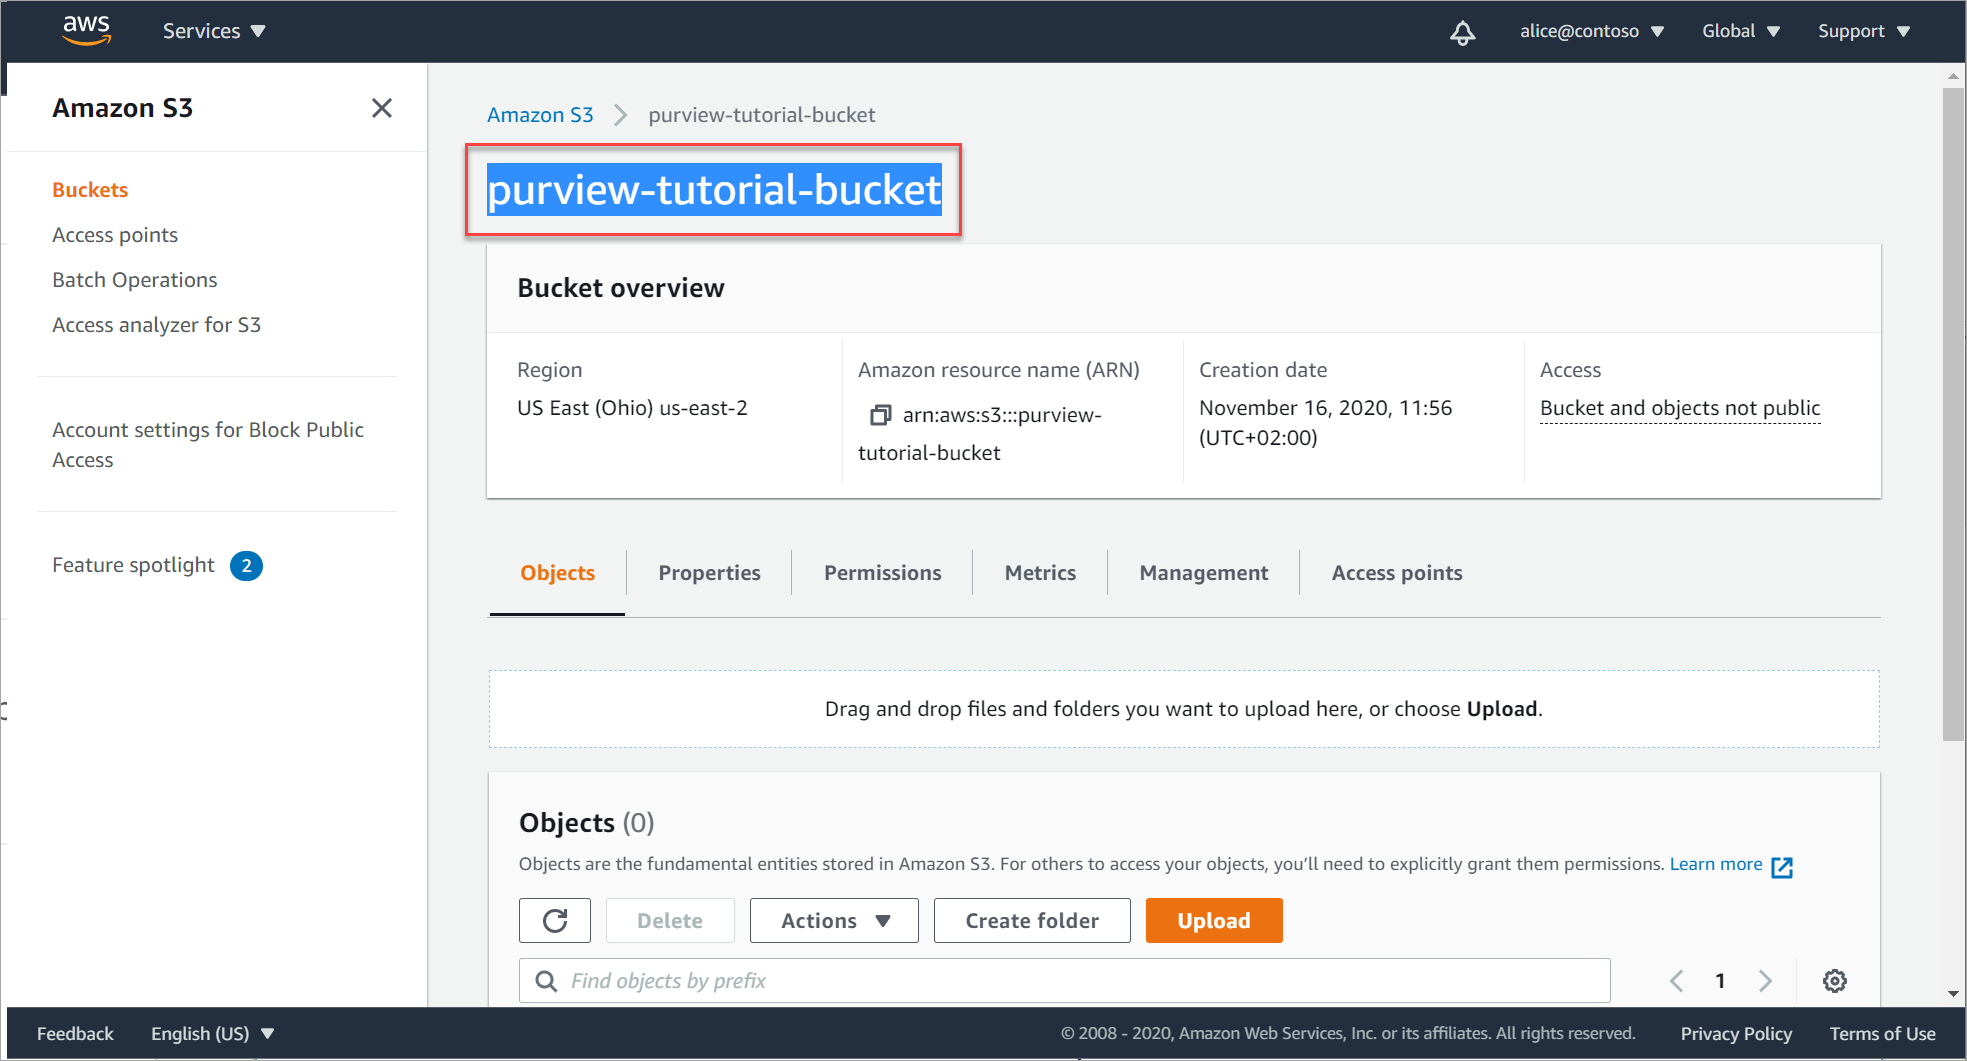
Paste your bucket name in a secure file, and add an
s3://prefix to it to create the value you'll need to enter when configuring your bucket as a Microsoft Purview account.For example:
s3://purview-tutorial-bucket
Tip
Only the root level of your bucket is supported as a Microsoft Purview data source. For example, the following URL, which includes a sub-folder is not supported: s3://purview-tutorial-bucket/view-data
However, if you configure a scan for a specific S3 bucket, you can select one or more specific folders for your scan. For more information, see the step to scope your scan.
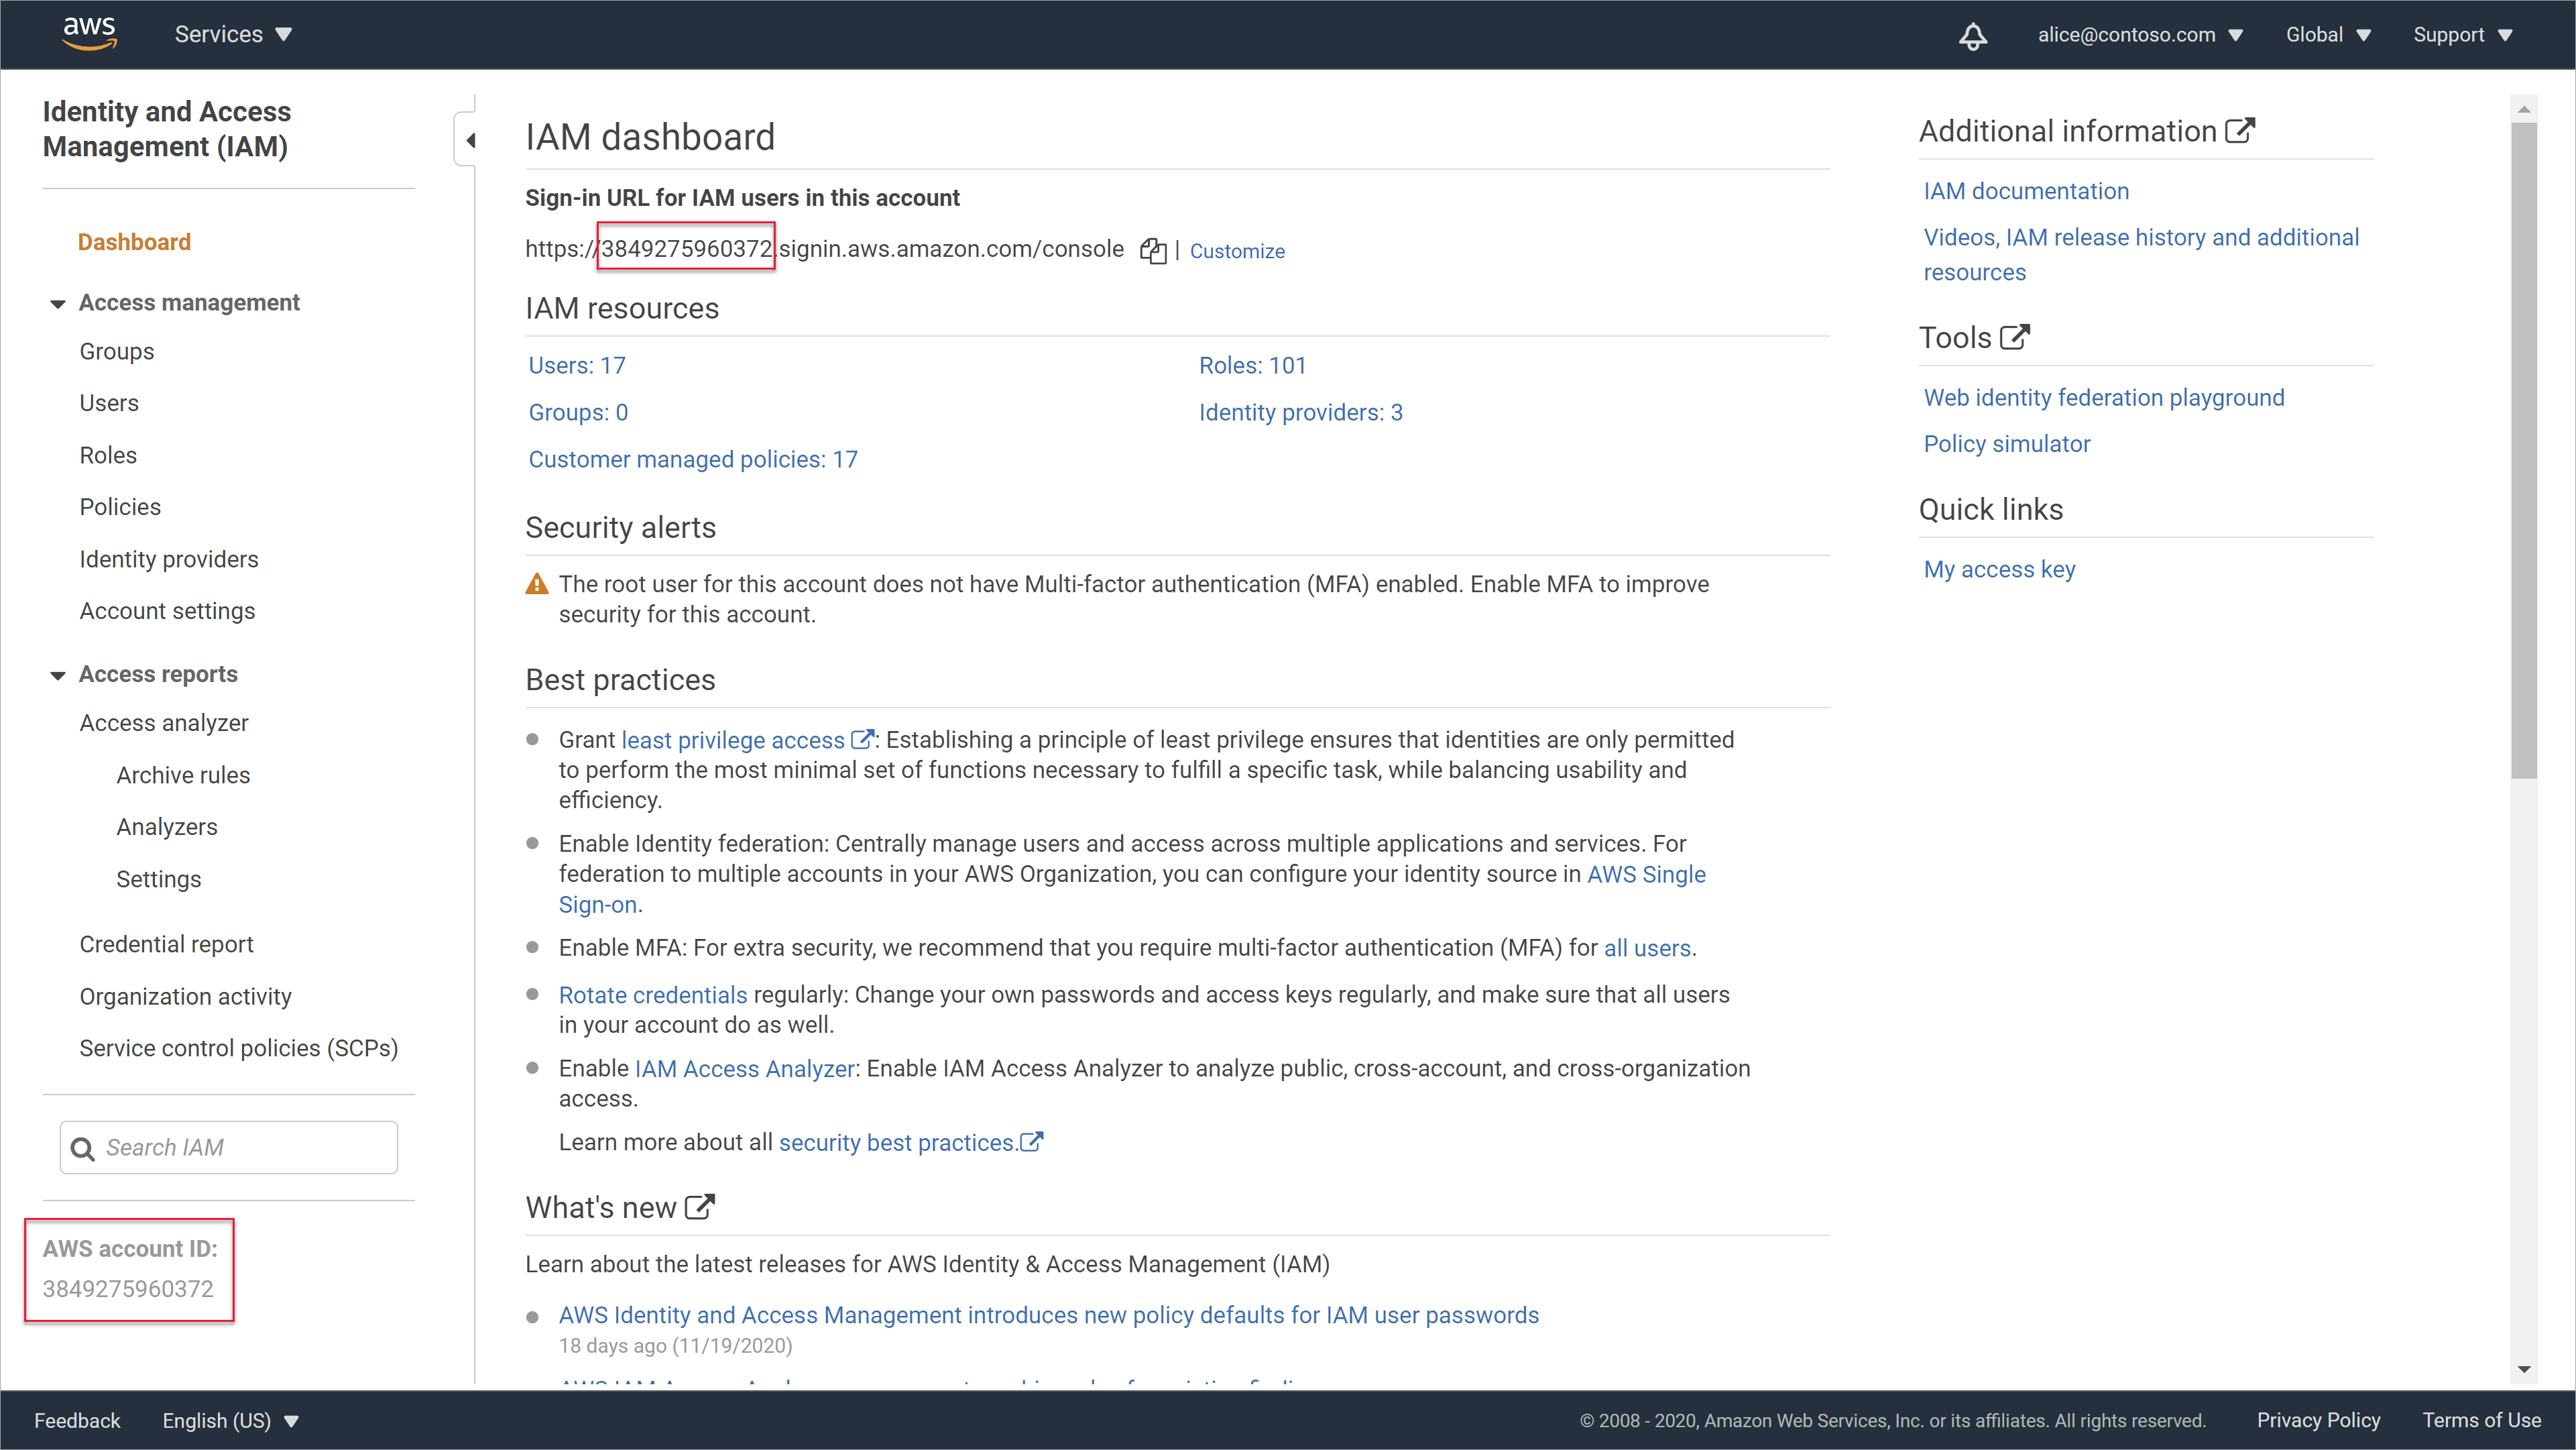
Locate your AWS account ID
You'll need your AWS account ID to register your AWS account as a Microsoft Purview data source, together with all of its buckets.
Your AWS account ID is the ID you use to sign in to the AWS console. You can also find it once you're logged in on the IAM dashboard, on the left under the navigation options, and at the top, as the numerical part of your sign-in URL:
For example:
Add a single Amazon S3 bucket as a Microsoft Purview account
Use this procedure if you only have a single S3 bucket that you want to register to Microsoft Purview as a data source, or if you have multiple buckets in your AWS account, but don't want to register all of them to Microsoft Purview.
To add your bucket:
In Microsoft Purview, go to the Data Map page, and select Register
 > Amazon S3 > Continue.
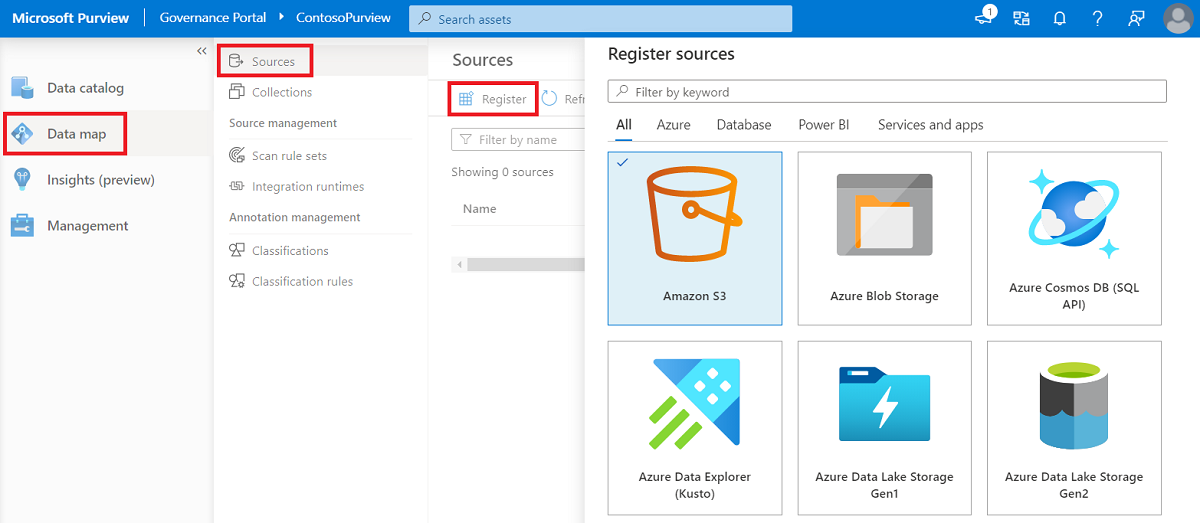
Tip
If you have multiple collections and want to add your Amazon S3 to a specific collection, select the Map view at the top right, and then select the Register
button inside your collection.In the Register sources (Amazon S3) pane that opens, enter the following details:
Field Description Name Enter a meaningful name, or use the default provided. Bucket URL Enter your AWS bucket URL, using the following syntax: s3://<bucketName>
Note: Make sure to use only the root level of your bucket. For more information, see Retrieve your Amazon S3 bucket name.Select a collection If you selected to register a data source from within a collection, that collection already listed.
Select a different collection as needed, None to assign no collection, or New to create a new collection now.
For more information about Microsoft Purview collections, see Manage data sources in Microsoft Purview.When you're done, select Finish to complete the registration.
Continue with Create a scan for one or more Amazon S3 buckets..
Add an AWS account as a Microsoft Purview account
Use this procedure if you have multiple S3 buckets in your Amazon account, and you want to register all of them as Microsoft Purview data sources.
When configuring your scan, you'll be able to select the specific buckets you want to scan, if you don't want to scan all of them together.
To add your Amazon account:
In Microsoft Purview, go to the Data Map page, and select Register
> Amazon accounts > Continue.
Tip
If you have multiple collections and want to add your Amazon S3 to a specific collection, select the Map view at the top right, and then select the Register
button inside your collection.In the Register sources (Amazon S3) pane that opens, enter the following details:
Field Description Name Enter a meaningful name, or use the default provided. AWS account ID Enter your AWS account ID. For more information, see Locate your AWS account ID Select a collection If you selected to register a data source from within a collection, that collection already listed.
Select a different collection as needed, None to assign no collection, or New to create a new collection now.
For more information about Microsoft Purview collections, see Manage data sources in Microsoft Purview.When you're done, select Finish to complete the registration.
Continue with Create a scan for one or more Amazon S3 buckets.
Create a scan for one or more Amazon S3 buckets
Once you've added your buckets as Microsoft Purview data sources, you can configure a scan to run at scheduled intervals or immediately.
Select the Data Map tab on the left pane in the Microsoft Purview governance portal, and then do one of the following:
- In the Map view, select New scan
 in your data source box.
 - In the List view, hover over the row for your data source, and select New scan .
- In the Map view, select New scan
On the Scan... pane that opens on the right, define the following fields and then select Continue:
Field Description Name Enter a meaningful name for your scan or use the default. Type Displayed only if you've added your AWS account, with all buckets included.
Current options include only All > Amazon S3. Stay tuned for more options to select as Microsoft Purview's support matrix expands.Credential Select a Microsoft Purview credential with your role ARN.
Tip: If you want to create a new credential at this time, select New. For more information, see Create a Microsoft Purview credential for your AWS bucket scan.Amazon S3 Displayed only if you've added your AWS account, with all buckets included.
Select one or more buckets to scan, or Select all to scan all the buckets in your account.Microsoft Purview automatically checks that the role ARN is valid, and that the buckets and objects within the buckets are accessible, and then continues if the connection succeeds.
Tip
To enter different values and test the connection yourself before continuing, select Test connection at the bottom right before selecting Continue.
On the Scope your scan pane, select the specific buckets or folders you want to include in your scan.
When creating a scan for an entire AWS account, you can select specific buckets to scan. When creating a scan for a specific AWS S3 bucket, you can select specific folders to scan.
On the Select a scan rule set pane, either select the AmazonS3 default rule set, or select New scan rule set to create a new custom rule set. Once you have your rule set selected, select Continue.
If you select to create a new custom scan rule set, use the wizard to define the following settings:
Pane Description New scan rule set /
Scan rule descriptionEnter a meaningful name and an optional description for your rule set Select file types Select all the file types you want to include in the scan, and then select Continue.
To add a new file type, select New file type, and define the following:
- The file extension you want to add
- An optional description
- Whether the file contents have a custom delimiter, or are a system file type. Then, enter your custom delimiter, or select your system file type.
Select Create to create your custom file type.Select classification rules Navigate to and select the classification rules you want to run on your dataset. Select Create when you're done to create your rule set.
On the Set a scan trigger pane, select one of the following, and then select Continue:
- Recurring to configure a schedule for a recurring scan
- Once to configure a scan that starts immediately
On the Review your scan pane, check your scanning details to confirm that they're correct, and then select Save or Save and Run if you selected Once in the previous pane.
Note
Once started, scanning can take up to 24 hours to complete. You'll be able to review your Insight Reports and search the catalog 24 hours after you started each scan.
For more information, see Explore Microsoft Purview scanning results.
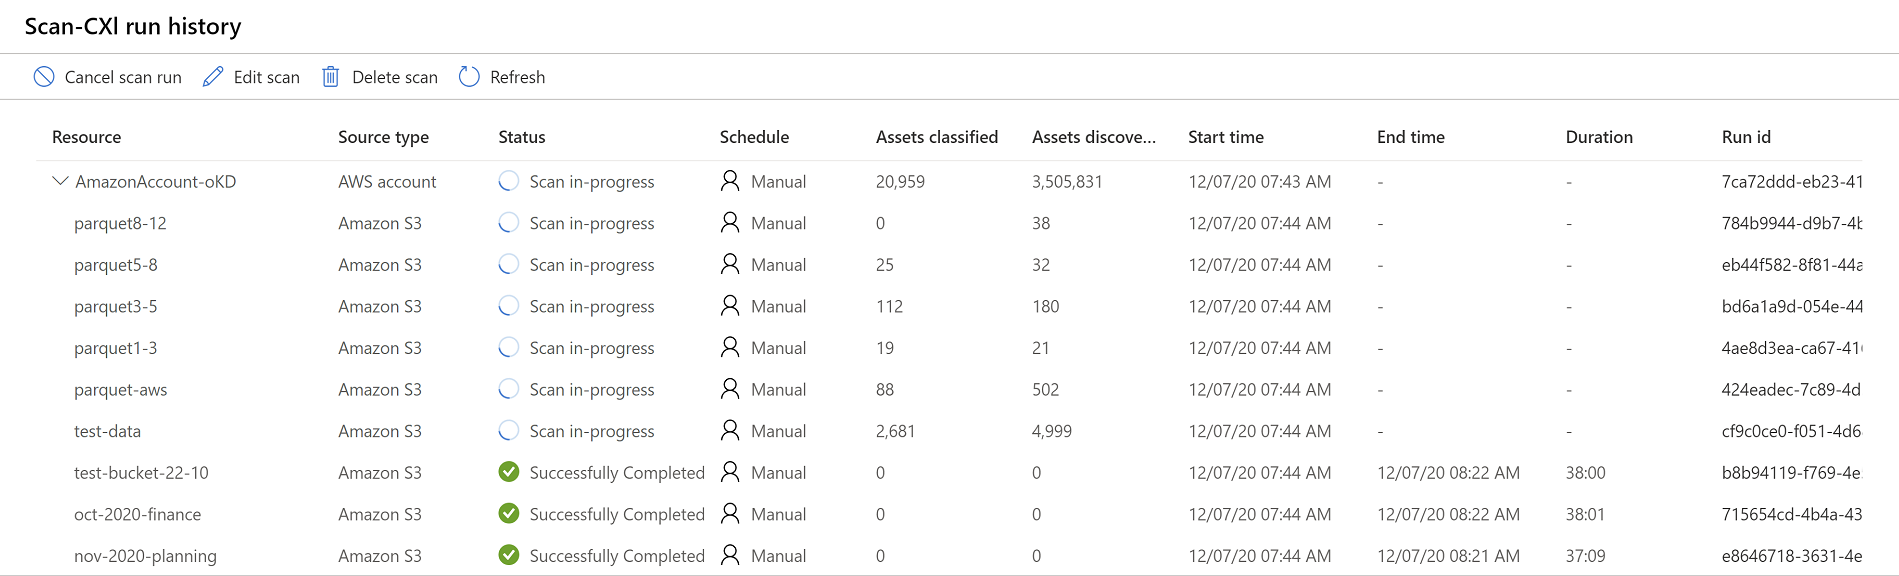
Explore Microsoft Purview scanning results
Once a Microsoft Purview scan is complete on your Amazon S3 buckets, drill down in the Microsoft Purview Data Map area to view the scan history.
Select a data source to view its details, and then select the Scans tab to view any currently running or completed scans. If you've added an AWS account with multiple buckets, the scan history for each bucket is shown under the account.
For example:
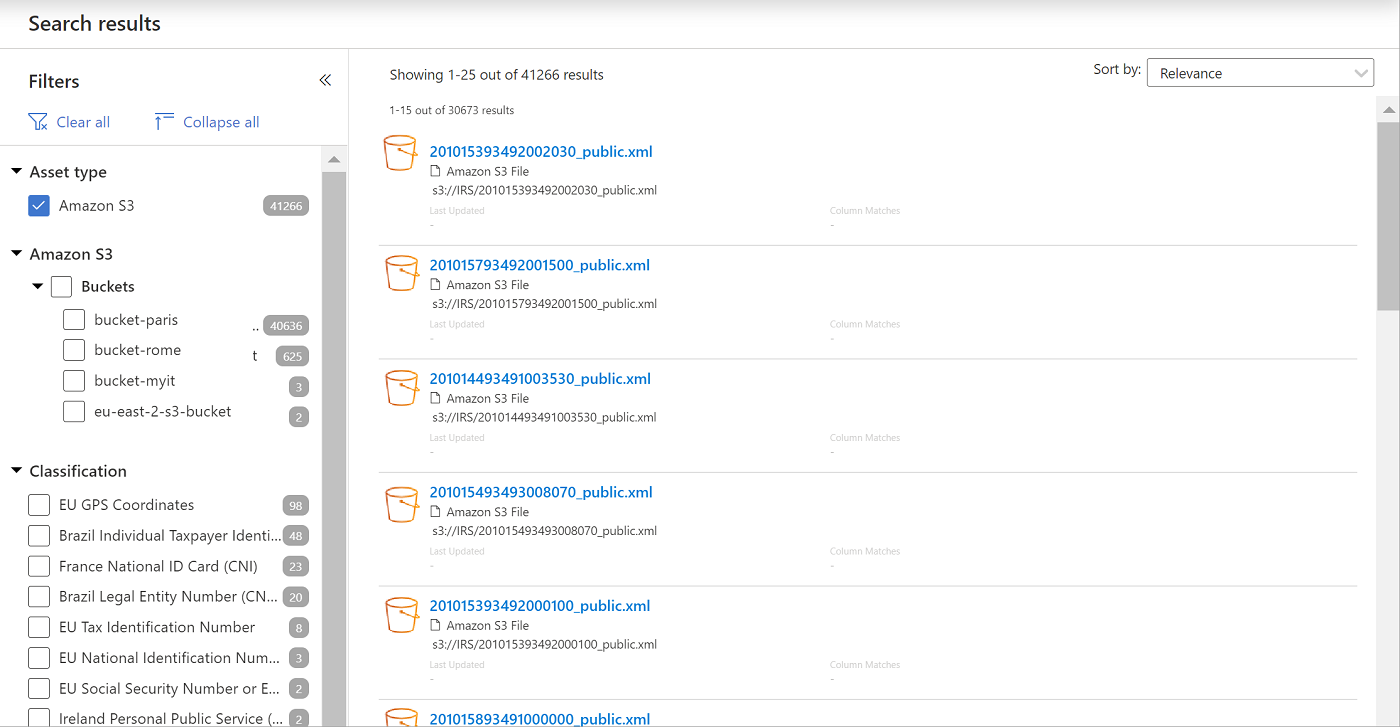
Use the other areas of Microsoft Purview to find out details about the content in your data estate, including your Amazon S3 buckets:
Search the Microsoft Purview data catalog, and filter for a specific bucket. For example:
View Insight reports to view statistics for the classification, sensitivity labels, file types, and more details about your content.
All Microsoft Purview Insight reports include the Amazon S3 scanning results, along with the rest of the results from your Azure data sources. When relevant, another Amazon S3 asset type was added to the report filtering options.
For more information, see the Understand Data Estate Insights in Microsoft Purview.
Minimum permissions for your AWS policy
The default procedure for creating an AWS role for Microsoft Purview to use when scanning your S3 buckets uses the AmazonS3ReadOnlyAccess policy.
The AmazonS3ReadOnlyAccess policy provides minimum permissions required for scanning your S3 buckets, and might include other permissions as well.
To apply only the minimum permissions required for scanning your buckets, create a new policy with the permissions listed in the following sections, depending on whether you want to scan a single bucket or all the buckets in your account.
Apply your new policy to the role instead of AmazonS3ReadOnlyAccess.
Individual buckets
When scanning individual S3 buckets, minimum AWS permissions include:
GetBucketLocationGetBucketPublicAccessBlockGetObjectListBucket
Make sure to define your resource with the specific bucket name. For example:
{
"Version": "2012-10-17",
"Statement": [
        {
            "Effect": "Allow",
            "Action": [
                "s3:GetBucketLocation",
                "s3:GetBucketPublicAccessBlock",
                "s3:GetObject",
                "s3:ListBucket"
            ],
            "Resource": "arn:aws:s3:::<bucketname>"
        },
        {
            "Effect": "Allow",
            "Action": [
                "s3:GetObject"
            ],
            "Resource": "arn:aws:s3::: <bucketname>/*"
        }
    ]
}
All buckets in your account
When scanning all the buckets in your AWS account, minimum AWS permissions include:
GetBucketLocationGetBucketPublicAccessBlockGetObjectListAllMyBucketsListBucket.
Make sure to define your resource with a wildcard. For example:
{
"Version": "2012-10-17",
"Statement": [
        {
            "Effect": "Allow",
            "Action": [
                "s3:GetBucketLocation",
                "s3:GetBucketPublicAccessBlock",
                "s3:GetObject",
                "s3:ListAllMyBuckets",
                "s3:ListBucket"
            ],
            "Resource": "*"
        },
        {
            "Effect": "Allow",
            "Action": [
                "s3:GetObject"
            ],
            "Resource": "*"
        }
    ]
}
Troubleshooting
Scanning Amazon S3 resources requires creating a role in AWS IAM to allow the Microsoft Purview scanner service running in a Microsoft account in AWS to read the data.
Configuration errors in the role can lead to connection failure. This section describes some examples of connection failures that might occur while setting up the scan, and the troubleshooting guidelines for each case.
If all of the items described in the following sections are properly configured, and scanning S3 buckets still fails with errors, contact Microsoft support.
Note
For policy access issues, make sure that neither your bucket policy, nor your SCP policy are blocking access to your S3 bucket from Microsoft Purview.
For more information, see Confirm your bucket policy access and Confirm your SCP policy access.
Bucket is encrypted with KMS
Make sure that the AWS role has KMS Decrypt permissions. For more information, see Configure scanning for encrypted Amazon S3 buckets.
AWS role is missing an external ID
Make sure that the AWS role has the correct external ID:
- In the AWS IAM area, select the Role > Trust relationships tab.
- Follow the steps in Create a new AWS role for Microsoft Purview again to verify your details.
Error found with the role ARN
This is a general error that indicates an issue when using the Role ARN. For example, you may want to troubleshoot as follows:
Make sure that the AWS role has the required permissions to read the selected S3 bucket. Required permissions include
AmazonS3ReadOnlyAccessor the minimum read permissions, andKMS Decryptfor encrypted buckets.Make sure that the AWS role has the correct Microsoft account ID. In the AWS IAM area, select the Role > Trust relationships tab and then follow the steps in Create a new AWS role for Microsoft Purview again to verify your details.
For more information, see Can't find the specified bucket,
Can't find the specified bucket
Make sure that the S3 bucket URL is properly defined:
- In AWS, navigate to your S3 bucket, and copy the bucket name.
- In Microsoft Purview, edit the Amazon S3 data source, and update the bucket URL to include your copied bucket name, using the following syntax:
s3://<BucketName>
Protection policy
Protection access control policies (protection policies) enable organizations to automatically protect sensitive data across data sources. Microsoft Purview already scans data assets and identifies sensitive data elements, and this new feature allows you to automatically restrict access to that data using sensitivity labels from Microsoft Purview Information Protection.
To set up protection policies for Amazon S3 sources, see: How to create protection policies for Amazon S3.
Next steps
Learn more about Microsoft Purview Insight reports:
Feedback
Coming soon: Throughout 2024 we will be phasing out GitHub Issues as the feedback mechanism for content and replacing it with a new feedback system. For more information see: https://aka.ms/ContentUserFeedback.
Submit and view feedback for