How to submit a circuit with Qiskit to Azure Quantum
Learn how to submit a Qiskit quantum circuit using the azure-quantum Python package. You can submit Qiskit circuits to Azure Quantum using the Azure Quantum notebook, which have built-in azure-quantum Python package, or from your local machine.
For more information, see Quantum circuits.
Note
The Microsoft Quantum Development Kit (Classic QDK) will no longer be supported after June 30, 2024. If you are an existing QDK developer, we recommend that you transition to the new Azure Quantum Development Kit (Modern QDK) to continue developing quantum solutions. For more information, see Migrate your Q# code to the Modern QDK.
Prerequisites
For installation details, see Installing the Modern QDK on VS Code.
An Azure Quantum workspace in your Azure subscription. To create a workspace, see Create an Azure Quantum workspace.
A Python environment with Python and Pip installed.
VS Code with the Azure Quantum Development Kit, Python, and Jupyter extensions installed.
The Azure Quantum
azure-quantumPython package with the [qiskit] tag. Ensure that you have the latest version of Qiskit. For more information, see Update the azure-quantum Python package.The
qsharpand theipykernelPython packages.python -m pip install --upgrade azure-quantum[qiskit] qsharp ipykernelNote
If the Jupyter Python kernel
ipykernelis not detected, VS Code will prompt you to install it.
Create a new Jupyter Notebook
- In VS Code, select View > Command palette and select Create: New Jupyter Notebook.
- In the top-right, VS Code will detect and display the version of Python and the virtual Python environment that was selected for the notebook. If you have multiple Python environments, you may need to select a kernel using the kernel picker in the top right. If no environment was detected, see Jupyter Notebooks in VS Code for setup information.
Load the required imports
In the first cell of your notebook, run the following code to load the required imports:
import azure.quantum
from qiskit import QuantumCircuit
from qiskit.visualization import plot_histogram
from azure.quantum.qiskit import AzureQuantumProvider
Connect to the Azure Quantum service
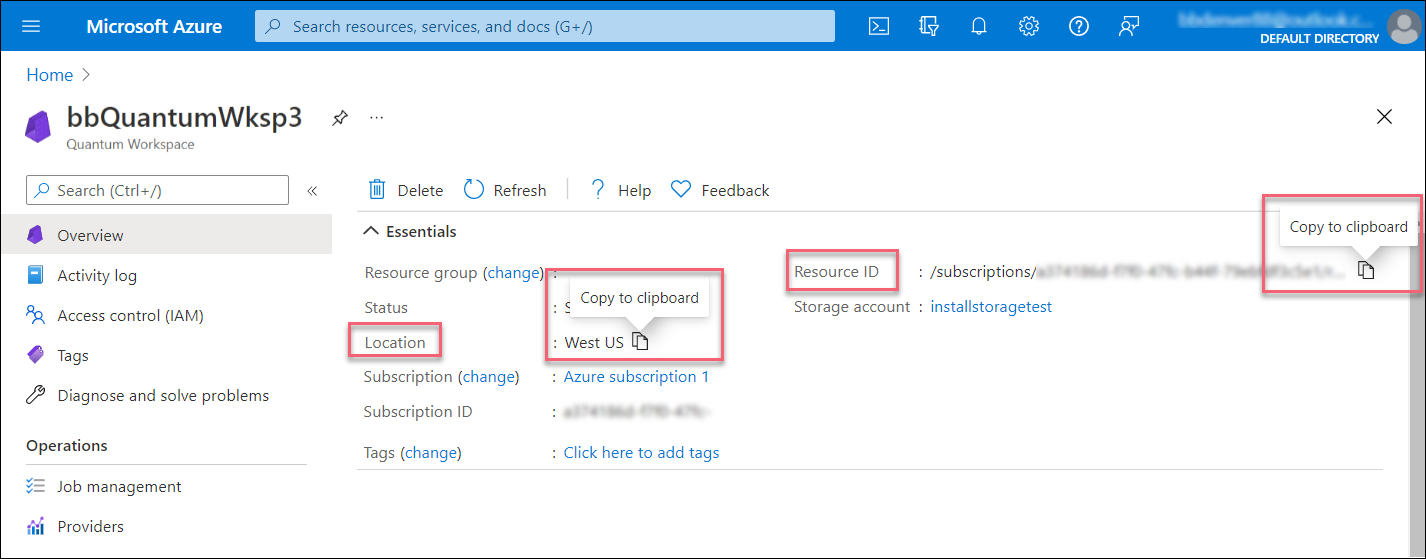
To connect to the Azure Quantum service, your need the resource ID and the location of your Azure Quantum workspace. Log in to your Azure account, https://portal.azure.com, navigate to your Azure Quantum workspace, and copy the values from the header.
Add a new cell and use your account information to create Workspace and AzureQuantumProvider objects to connect to your Azure Quantum workspace.
workspace = Workspace(
    resource_id = "", # Add the resourceID of your workspace
    location = "" # Add the location of your workspace (for example "westus")
    )

provider = AzureQuantumProvider(workspace)
List all backends
You can now print all of the quantum computing backends that are available on your workspace:
print("This workspace's targets:")
for backend in provider.backends():
    print("- " + backend.name())
This workspace's targets:
- ionq.qpu
- ionq.qpu.aria-1
- ionq.simulator
- microsoft.estimator
- quantinuum.hqs-lt-s1
- quantinuum.hqs-lt-s1-apival
- quantinuum.hqs-lt-s2
- quantinuum.hqs-lt-s2-apival
- quantinuum.hqs-lt-s1-sim
- quantinuum.hqs-lt-s2-sim
- quantinuum.qpu.h1-1
- quantinuum.sim.h1-1sc
- quantinuum.sim.h1-1e
- rigetti.sim.qvm
- rigetti.qpu.ankaa-2
Run a simple circuit
First, create a simple Qiskit circuit to run.
# Create a Quantum Circuit acting on the q register
circuit = QuantumCircuit(3, 3)
circuit.name = "Qiskit Sample - 3-qubit GHZ circuit"
circuit.h(0)
circuit.cx(0, 1)
circuit.cx(1, 2)
circuit.measure([0,1,2], [0, 1, 2])

# Print out the circuit
circuit.draw()
     ┌───┐          ┌─┐
q_0: ┤ H ├──■───────┤M├──────
     └───┘┌─┴─┐     └╥┘┌─┐
q_1: ─────┤ X ├──■───╫─┤M├───
          └───┘┌─┴─┐ ║ └╥┘┌─┐
q_2: ──────────┤ X ├─╫──╫─┤M├
               └───┘ ║  ║ └╥┘
c: 3/════════════════╩══╩══╩═
                     0  1  2
Select a target to run your program
Run on the IonQ simulator
Before running on real hardware, let's test the circuit in the simulator. Use get_backend to create a Backend object to connect to the IonQ Simulator backend:
simulator_backend = provider.get_backend("ionq.simulator")
IonQ backends support gates from a defined gateset, which are compiled to run optimally on the hardware. If your circuit contains gates that aren't in this list, you need to transpile into the supported gateset using the transpile function provided by Qiskit:
from qiskit import transpile
circuit = transpile(circuit, simulator_backend)
The transpile function returns a new circuit object where gates are decomposed into gates that are supported on the specified backend.
You can now run the program via the Azure Quantum service and get the result. The following cell submits a job that runs the circuit with 100 shots:
job = simulator_backend.run(circuit, shots=100)
job_id = job.id()
print("Job id", job_id)
Job id 00000000-0000-0000-0000-000000000000
To wait until the job is complete and return the results, run:
result = job.result()
print(result)
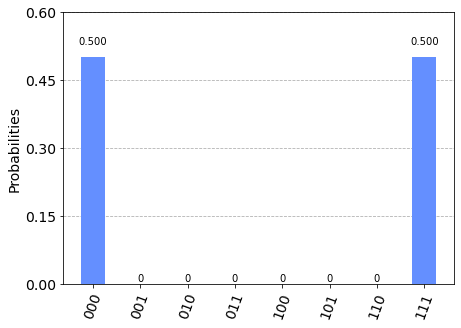
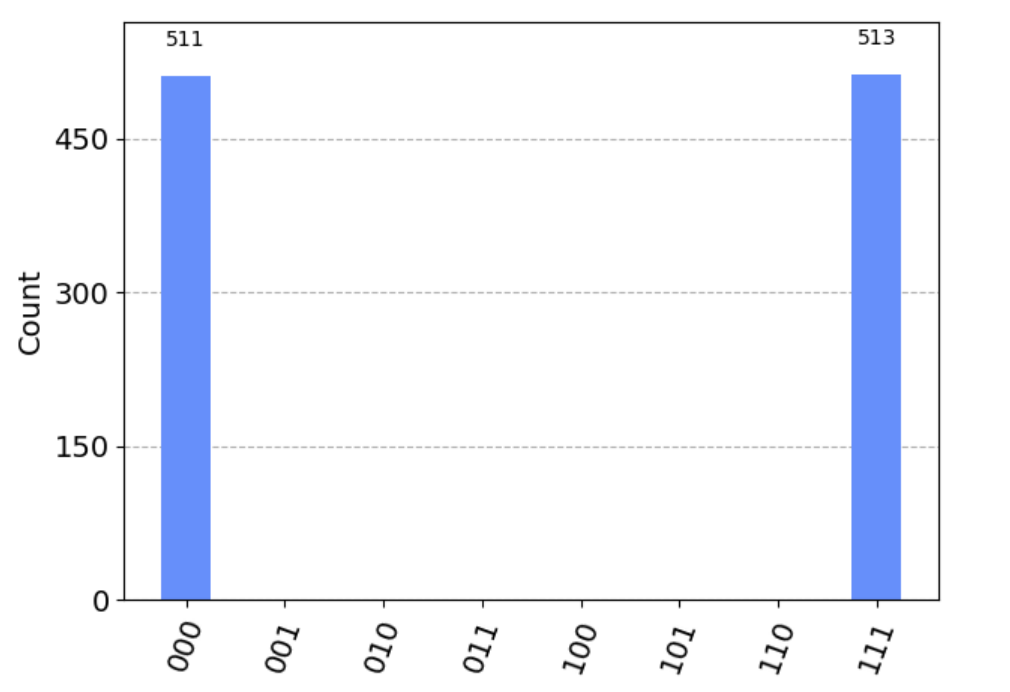
Result(backend_name='ionq.simulator', backend_version='1', qobj_id='Qiskit Sample - 3-qubit GHZ circuit', job_id='00000000-0000-0000-0000-000000000000', success=True, results=[ExperimentResult(shots=100, success=True, meas_level=2, data=ExperimentResultData(counts={'000': 50, '111': 50}, probabilities={'000': 0.5, '111': 0.5}), header=QobjExperimentHeader(meas_map='[0, 1, 2]', name='Qiskit Sample - 3-qubit GHZ circuit', num_qubits='3', qiskit='True'))])
Because the result is an object native to the Qiskit package, you can use
Qiskit's result.get_counts and plot_histogram to visualize the
results. To make sure that all possible bitstring labels are represented,
add them to counts.
counts = {format(n, "03b"): 0 for n in range(8)}
counts.update(result.get_counts(circuit))
print(counts)
plot_histogram(counts)
{'000': 50, '001': 0, '010': 0, '011': 0, '100': 0, '101': 0, '110': 0, '111': 50}
Estimate job cost
Before running a job on the QPU, you can estimate how much it costs to run. To estimate the cost of running a job on the QPU, you can use the estimate_cost method:
backend = provider.get_backend("ionq.qpu")
cost = backend.estimate_cost(circuit, shots=1024)

print(f"Estimated cost: {cost.estimated_total}")
This prints the estimated cost in USD.
For the most current pricing details, see IonQ Pricing, or find your workspace and view pricing options in the "Provider" tab of your workspace via: aka.ms/aq/myworkspaces.
Run on IonQ QPU
To connect to real hardware (a Quantum Processor Unit (QPU)), simply
provide the name of the target "ionq.qpu" to the get_backend method:
qpu_backend = provider.get_backend("ionq.qpu")
Submit the circuit to run on Azure Quantum, get the results, and run plot_histogram to plot the results.
Note
The time required to run a circuit on the QPU may vary depending on current queue times.
# Submit the circuit to run on Azure Quantum
job = qpu_backend.run(circuit, shots=1024)
job_id = job.id()
print("Job id", job_id)
# Get the job results (this method waits for the Job to complete):
result = job.result()
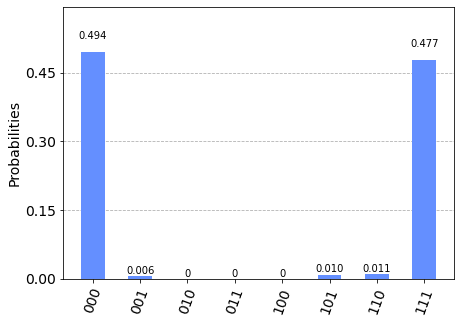
print(result)
counts = {format(n, "03b"): 0 for n in range(8)}
counts.update(result.get_counts(circuit))
print(counts)
plot_histogram(counts)
Job id 00000000-0000-0000-0000-000000000000
Job Status: job has successfully run
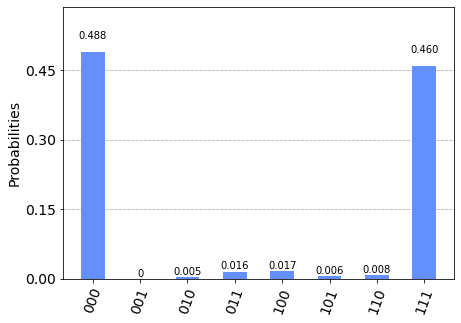
Result(backend_name='ionq.simulator', backend_version='1', qobj_id='Qiskit Sample - 3-qubit GHZ circuit', job_id='00000000-0000-0000-0000-000000000000', success=True, results=[ExperimentResult(shots=1024, success=True, meas_level=2, data=ExperimentResultData(counts={'0': 505, '1': 6, '2': 1, '3': 1, '4': 1, '5': 10, '6': 11, '7': 488}, probabilities={'0': 0.4932, '1': 0.0059, '2': 0.001, '3': 0.001, '4': 0.001, '5': 0.0098, '6': 0.0117, '7': 0.4766}), header=QobjExperimentHeader(name='Qiskit Sample - 3-qubit GHZ circuit', num_qubits='3', qiskit='True'))])
{'000': 505, '001': 6, '010': 1, '011': 1, '100': 1, '101': 10, '110': 11, '111': 488}
Important
Submitting multiple circuits on a single job is currently not supported. As a workaround you can call the backend.run method to submit each circuit asynchronously, then fetch the results of each job. For example:
jobs = []
for circuit in circuits:
jobs.append(backend.run(circuit, shots=N))
results = []
for job in jobs:
results.append(job.result())
Prerequisites
- An Azure account with an active subscription. If you don’t have an Azure account, register for free and sign up for a pay-as-you-go subscription.
- An Azure Quantum workspace. For more information, see Create an Azure Quantum workspace.
Create a new notebook in your workspace
- Log in to the Azure portal and select the workspace you created in the previous step.
- In the left blade, select Notebooks.
- Click My Notebooks and click Add New.
- Type a name for the file, for example Qiskit.ipynb, and click Create file.
When your new notebook opens, it automatically creates the code for the first cell, based on your subscription and workspace information.
from azure.quantum import Workspace
workspace = Workspace (
resource_id = "", # Add your resource_id
location = "" # Add your workspace location (for example, "westus")
)
Note
Unless otherwise noted, you should run each cell in order as you create it to avoid any compilation issues.
Click the triangular "play" icon to the left of the cell to run the code.
Load the required imports
First, you'll need to import some additional modules.
Click + Code to add a new cell, then add and run the following code:
from qiskit import QuantumCircuit
from qiskit.visualization import plot_histogram
from azure.quantum.qiskit import AzureQuantumProvider
Connect to the Azure Quantum service
Next, create an AzureQuantumProvider object using the Workspace object from the previous cell to connect to your Azure Quantum workspace. Add a new cell with the following code:
provider = AzureQuantumProvider(workspace)
Define a simple circuit
In a new cell, create a circuit object. This example is a simple quantum random bit generator. Add the following code to define and display the circuit:
# Create a Quantum Circuit acting on the q register
circuit = QuantumCircuit(3, 3)
circuit.name = "Qiskit Sample - 3-qubit GHZ circuit"
circuit.h(0)
circuit.cx(0, 1)
circuit.cx(1, 2)
circuit.measure([0, 1, 2], [0, 1, 2])
# Print out the circuit
circuit.draw()
┌───┐ ┌─┐
q_0: ┤ H ├──■───────┤M├──────
└───┘┌─┴─┐ └╥┘┌─┐
q_1: ─────┤ X ├──■───╫─┤M├───
└───┘┌─┴─┐ ║ └╥┘┌─┐
q_2: ──────────┤ X ├─╫──╫─┤M├
└───┘ ║ ║ └╥┘
c: 3/════════════════╩══╩══╩═
0 1 2
List all targets
You can now display all of the quantum computing targets, or backends, that are available in your workspace. Add a new cell and run the following line:
print("This workspace's targets:")
for backend in provider.backends():
print("- " + backend.name())
This workspace's targets:
- ionq.qpu
- ionq.simulator
- ionq.qpu.aria-1
- microsoft.estimator
- quantinuum.qpu.h1-1
- quantinuum.sim.h1-1sc
- quantinuum.sim.h1-1e
- rigetti.sim.qvm
- rigetti.qpu.ankaa-2
Select a target to run your program
To check your code before running it on actual quantum hardware, you can use the IonQ quantum simulator, ionq.simulator.
Add a new cell and create an object to represent the IonQ quantum simulator target:
# Get IonQ quantum simulator target:
simulator_backend = provider.get_backend("ionq.simulator")
Run on the IonQ simulator
To run your circuit on the simulator, add the following code. This example use the run method of the target to submit your job, and then monitors the job status.
# Submit the circuit to run on Azure Quantum
job = simulator_backend.run(circuit, shots=100)
job_id = job.id()
print("Job id", job_id)
When the job successfully runs, get the job results and display them:
# Get the job results:
result = job.result()
print(result)
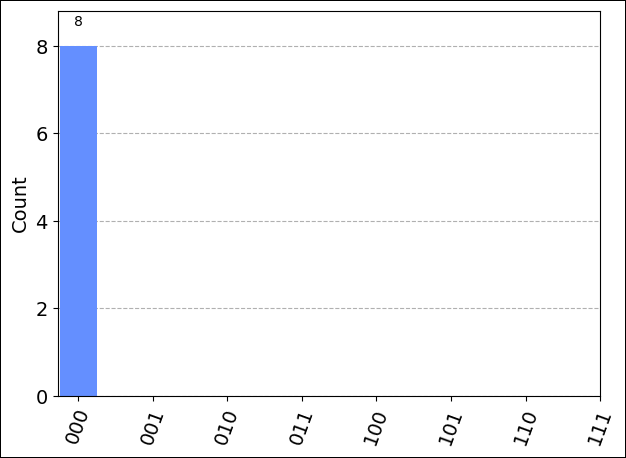
Result(backend_name='ionq.simulator', backend_version='1', qobj_id='Qiskit Sample - 3-qubit GHZ circuit', job_id='7d909574-98d4-11ec-b382-00155d957f5d', success=True, results=[ExperimentResult(shots=100, success=True, meas_level=2, data=ExperimentResultData(counts=defaultdict(<class 'int'>, {'000': 50, '111': 50}), probabilities=defaultdict(<class 'int'>, {'000': 0.5, '111': 0.5})), header=QobjExperimentHeader(meas_map='[0, 1, 2]', name='Qiskit Sample - 3-qubit GHZ circuit', num_qubits='3', qiskit='True'))])
Because this result type is an object native to the Qiskit package, you can use
Qiskit's result.get_counts and plot_histogram to visualize the
results. To make sure that all possible bitstring labels are represented,
add them to counts.
counts = {format(n, "03b"): 0 for n in range(8)}
counts.update(result.get_counts(circuit))
print(counts)
plot_histogram(counts)
{'000': 50, '001': 0, '010': 0, '011': 0, '100': 0, '101': 0, '110': 0, '111': 50}
Estimate job cost
Before running a job on actual quantum hardware, or a quantum processing unit (QPU), you can estimate how much it costs to run.
First, get the list of available providers again:
print("This workspace's targets:")
for backend in provider.backends():
print("- " + backend.name())
This workspace's targets:
- ionq.qpu
- ionq.simulator
- ionq.qpu.aria-1
- microsoft.estimator
- quantinuum.qpu.h1-1
- quantinuum.sim.h1-1sc
- quantinuum.sim.h1-1e
- rigetti.sim.qvm
- rigetti.qpu.ankaa-2
Next, create an object to represent the IonQ quantum computer:
qpu_backend = provider.get_backend("ionq.qpu")
To estimate the cost of running a job on the QPU, add and run a new cell using the estimate_cost method of the target:
cost = qpu_backend.estimate_cost(circuit, shots=100)
print(f"Estimated cost: {cost.estimated_total}")
This displays the estimated cost in USD.
For the most current pricing details, see IonQ Pricing, or find your workspace and view pricing options in the Providers blade of your workspace.
Run on IonQ QPU
After you run your job successfully on the IonQ simulator and estimate the QPU cost, it's time to run your circuit on the hardware.
Note
The time required to run a circuit on the QPU varies depending on current queue times. You can view the average queue time for a target by selecting the Providers blade of your workspace.
Use the same run method and operations that you used previously with the API Validator to submit and monitor your job:
# Submit the circuit to run on Azure Quantum
job = qpu_backend.run(circuit, shots=1024)
job_id = job.id()
print("Job id", job_id)
When the job finishes, get the job results as before and display them in a chart:
result = job.result()
print(result)
counts = {format(n, "03b"): 0 for n in range(8)}
counts.update(result.get_counts(circuit))
print(counts)
plot_histogram(counts)
Job id 910b5ac8-98cd-11ec-b3ba-00155d5528cf
Job Status: job has successfully run
Result(backend_name='ionq.simulator', backend_version='1', qobj_id='Qiskit Sample - 3-qubit GHZ circuit', job_id='Job id 54e8c740-98d9-11ec-b382-00155d957f5d', success=True, results=[ExperimentResult(shots=1024, success=True, meas_level=2, data=ExperimentResultData(counts={'0': 505, '1': 6, '2': 1, '3': 1, '4': 1, '5': 10, '6': 11, '7': 488}, probabilities={'0': 0.4932, '1': 0.0059, '2': 0.001, '3': 0.001, '4': 0.001, '5': 0.0098, '6': 0.0117, '7': 0.4766}), header=QobjExperimentHeader(name='Qiskit Sample - 3-qubit GHZ circuit', num_qubits='3', qiskit='True'))])
{'000': 505, '001': 6, '010': 1, '011': 1, '100': 1, '101': 10, '110': 11, '111': 488}
Important
Submitting multiple circuits on a single job is currently not supported. As a workaround you can call the backend.run method to submit each circuit asynchronously, then fetch the results of each job. For example:
jobs = []
for circuit in circuits:
    jobs.append(backend.run(circuit, shots=N))

results = []
for job in jobs:
    results.append(job.result())
Next steps
Feedback
Coming soon: Throughout 2024 we will be phasing out GitHub Issues as the feedback mechanism for content and replacing it with a new feedback system. For more information see: https://aka.ms/ContentUserFeedback.
Submit and view feedback for