Authorize access to a search app using Microsoft Entra ID
Search applications that are built on Azure AI Search can now use the Microsoft identity platform for authenticated and authorized access. On Azure, the identity provider is Microsoft Entra ID. A key benefit of using Microsoft Entra ID is that your credentials and API keys no longer need to be stored in your code. Microsoft Entra authenticates the security principal (a user, group, or service) running the application. If authentication succeeds, Microsoft Entra ID returns the access token to the application, and the application can then use the access token to authorize requests to Azure AI Search.
This article shows you how to configure your client for Microsoft Entra ID:
For authentication, you'll create a managed identity as the security principle. You could also use a different type of service principal object, but this article uses managed identities because they eliminate the need to manage credentials.
For authorization, you'll assign an Azure role to the managed identity that grants permissions to run queries or manage indexing jobs.
Update your client code to call
TokenCredential(). For example, you can get started with new SearchClient(endpoint, newDefaultAzureCredential()) to authenticate via a Microsoft Entra ID using Azure.Identity.
Configure role-based access for data plane
Applies to: Search Index Data Contributor, Search Index Data Reader, Search Service Contributor
In this step, configure your search service to recognize an authorization header on data requests that provide an OAuth2 access token.
Sign in to the Azure portal and open the search service page.
Select Keys in the left navigation pane.
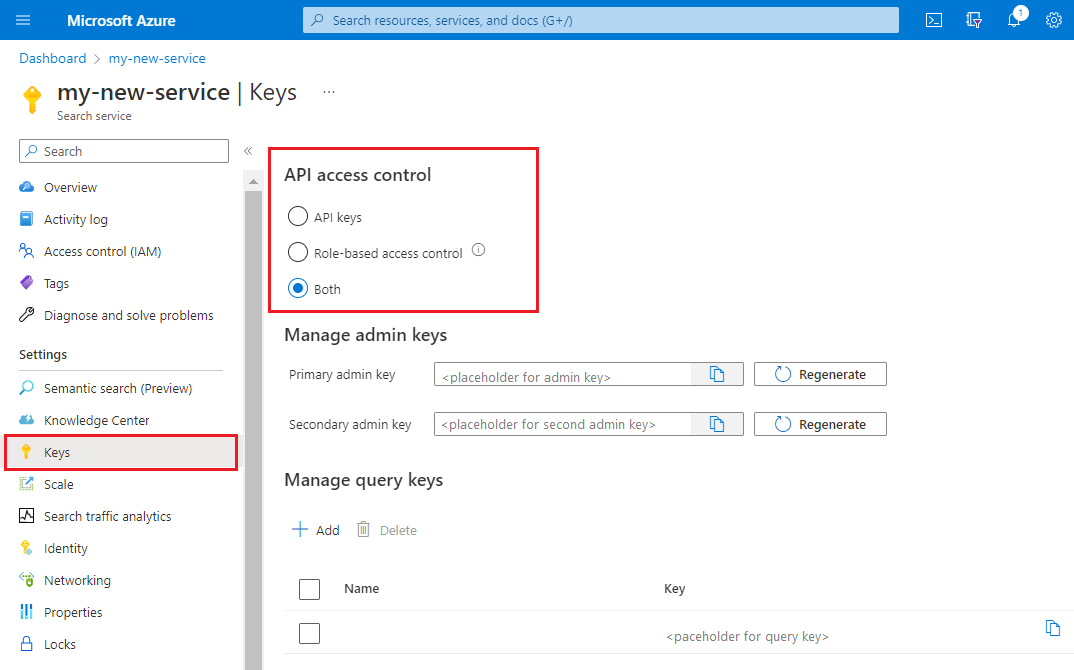
Choose an API access control option. We recommend Both if you want flexibility or need to migrate apps.
Option Description API Key (default) Requires an admin or query API keys on the request header for authorization. No roles are used. Role-based access control Requires membership in a role assignment to complete the task, described in the next step. It also requires an authorization header. Both Requests are valid using either an API key or role-based access control.

The change is effective immediately, but wait a few seconds before testing.
All network calls for search service operations and content will respect the option you select: API keys, bearer token, or either one if you select Both.
When you enable role-based access control in the portal, the failure mode will be "http401WithBearerChallenge" if authorization fails.
Create a managed identity
In this step, create a managed identity for your client application.
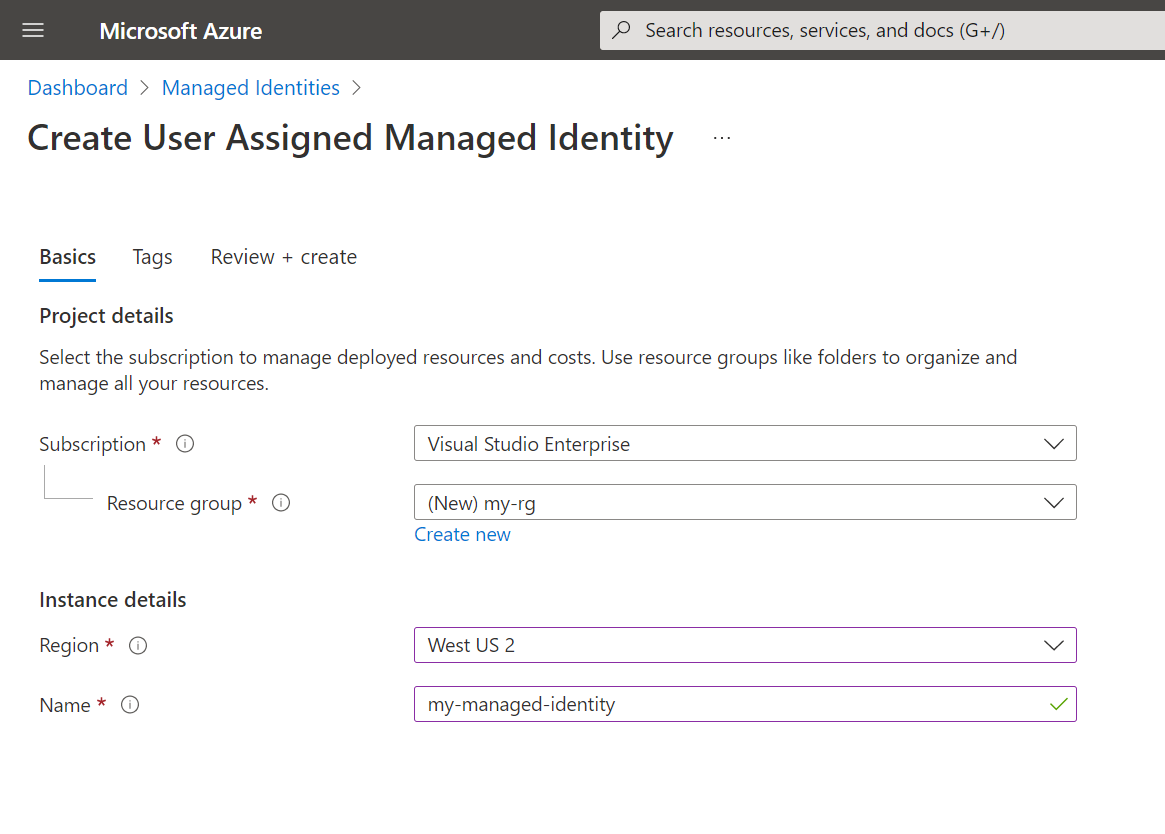
Sign in to the Azure portal.
Search for Managed Identities.
Select + Create.
Give your managed identity a name and select a region. Then, select Create.
Assign a role to the managed identity
Next, you need to grant your managed identity access to your search service. Azure AI Search has various built-in roles. You can also create a custom role.
It's a best practice to grant minimum permissions. If your application only needs to handle queries, you should assign the Search Index Data Reader role. Alternatively, if it needs both read and write access on a search index, you should use the Search Index Data Contributor role.
Sign in to the Azure portal.
Navigate to your search service.
Select Access control (IAM) in the left navigation pane.
Select + Add > Add role assignment.

Select an applicable role:
- Owner
- Contributor
- Reader
- Search Service Contributor
- Search Index Data Contributor
- Search Index Data Reader
For more information on the available roles, see Built-in roles used in Search.
Note
The Owner, Contributor, Reader, and Search Service Contributor roles don't give you access to the data within a search index, so you can't query a search index or index data using those roles. For data access to a search index, you need either the Search Index Data Contributor or Search Index Data Reader role.
On the Members tab, select the managed identity that you want to give access to your search service.
On the Review + assign tab, select Review + assign to assign the role.
You can assign multiple roles, such as Search Service Contributor and Search Index Data Contributor, if your application needs comprehensive access to the search services, objects, and content.
You can also assign roles using PowerShell.
Set up Microsoft Entra authentication in your client
Once you have a managed identity and a role assignment on the search service, you're ready to add code to your application to authenticate the security principal and acquire an OAuth 2.0 token.
Use the following client libraries for role-based access control:
- azure.search.documents (Azure SDK for .NET)
- azure-search-documents (Azure SDK for Java)
- azure/search-documents (Azure SDK for JavaScript)
- azure.search.documents (Azure SDK for Python)
Note
To learn more about the OAuth 2.0 code grant flow used by Microsoft Entra ID, see Authorize access to Microsoft Entra web applications using the OAuth 2.0 code grant flow.
The following instructions reference an existing C# sample to demonstrate the code changes.
As a starting point, clone the source code for the C# section of Quickstart: Full text search using the Azure SDKs.
The sample currently uses key-based authentication and the
AzureKeyCredentialto create theSearchClientandSearchIndexClientbut you can make a small change to switch over to role-based authentication.Update the Azure.Search.Documents NuGet package to version 11.4 or later.
Import the Azure.Identity library to get access to other authentication techniques.
Instead of using
AzureKeyCredentialin the beginning ofMain()in Program.cs, useDefaultAzureCredentiallike in the code snippet below:// Create a SearchIndexClient to send create/delete index commands SearchIndexClient adminClient = new SearchIndexClient(serviceEndpoint, new DefaultAzureCredential()); // Create a SearchClient to load and query documents SearchClient srchclient = new SearchClient(serviceEndpoint, indexName, new DefaultAzureCredential());
Local testing
User-assigned managed identities work only in Azure environments. If you run this code locally, DefaultAzureCredential will fall back to authenticating with your credentials. Make sure you've also given yourself the required access to the search service if you plan to run the code locally.
Verify your account has role assignments to run all of the operations in the quickstart sample. To both create and query an index, you'll need "Search Index Data Reader" and "Search Index Data Contributor".
Go to Tools > Options > Azure Service Authentication to choose your Azure sign-on account.
You should now be able to run the project from Visual Studio on your local system, using role-based access control for authorization.
Note
The Azure.Identity documentation has more details about DefaultAzureCredential and using Microsoft Entra authentication with the Azure SDK for .NET. DefaultAzureCredential is intended to simplify getting started with the SDK by handling common scenarios with reasonable default behaviors. Developers who want more control or whose scenario isn't served by the default settings should use other credential types.
See also
Feedback
Coming soon: Throughout 2024 we will be phasing out GitHub Issues as the feedback mechanism for content and replacing it with a new feedback system. For more information see: https://aka.ms/ContentUserFeedback.
Submit and view feedback for