Troubleshoot Azure-to-Azure VM replication errors
Caution
This article references CentOS, a Linux distribution that is nearing End Of Life (EOL) status. Please consider your use and plan accordingly. For more information, see the CentOS End Of Life guidance.
This article describes how to troubleshoot common errors in Azure Site Recovery during replication and recovery of Azure virtual machines (VM) from one region to another. For more information about supported configurations, see the support matrix for replicating Azure VMs.
Azure resource quota issues (error code 150097)
Make sure your subscription is enabled to create Azure VMs in the target region that you plan to use as your disaster recovery (DR) region. Your subscription needs sufficient quota to create VMs of the necessary sizes. By default, Site Recovery chooses a target VM size that's the same as the source VM size. If the matching size isn't available, Site Recovery automatically chooses the closest available size.
If there's no size that supports the source VM configuration, the following message is displayed:
Replication couldn't be enabled for the virtual machine <VmName>.
Possible causes
- Your subscription ID isn't enabled to create any VMs in the target region location.
- Your subscription ID isn't enabled, or doesn't have sufficient quota, to create specific VM sizes in the target region location.
- No suitable target VM size is found to match the source VM's network interface card (NIC) count (2), for the subscription ID in the target region location.
Fix the problem
Contact Azure billing support to enable your subscription to create VMs of the required sizes in the target location. Then retry the failed operation.
If the target location has a capacity constraint, disable replication to that location. Then, enable replication to a different location where your subscription has sufficient quota to create VMs of the required sizes.
Trusted root certificates (error code 151066)
If not all the latest trusted root certificates are present on the VM, your job to enable replication for Site Recovery might fail. Authentication and authorization of Site Recovery service calls from the VM fail without these certificates.
If the enable replication job fails, the following message is displayed:
Site Recovery configuration failed.
Possible cause
The trusted root certificates required for authorization and authentication aren't present on the virtual machine.
Fix the problem
Windows
For a VM running the Windows operating system, install the latest Windows updates so that all the trusted root certificates are present on the VM. Follow the typical Windows update management or certificate update management process in your organization to get the latest root certificates and the updated certificate revocation list on the VMs.
- If you're in a disconnected environment, follow the standard Windows update process in your organization to get the certificates.
- If the required certificates aren't present on the VM, the calls to the Site Recovery service fail for security reasons.
To verify that the issue is resolved, go to login.microsoftonline.com from a browser in your VM.
For more information, see Configure trusted roots and disallowed certificates.
Linux
Follow the guidance provided by the distributor of your Linux operating system version to get the latest trusted root certificates and the latest certificate revocation list on the VM.
Because SUSE Linux uses symbolic links, or symlinks, to maintain a certificate list, follow these steps:
Sign in as a root user. The hash symbol (
#) is the default command prompt.To change the directory, run this command:
cd /etc/ssl/certsCheck whether the Symantec root CA certificate is present:
ls VeriSign_Class_3_Public_Primary_Certification_Authority_G5.pemIf the Symantec root CA certificate isn't found, run the following command to download the file. Check for any errors and follow recommended actions for network failures.
wget https://docs.broadcom.com/docs-and-downloads/content/dam/symantec/docs/other-resources/verisign-class-3-public-primary-certification-authority-g5-en.pem -O VeriSign_Class_3_Public_Primary_Certification_Authority_G5.pem
Check whether the Baltimore root CA certificate is present:
ls Baltimore_CyberTrust_Root.pemIf the Baltimore root CA certificate isn't found, run this command to download the certificate:
wget https://www.digicert.com/CACerts/BaltimoreCyberTrustRoot.crt.pem -O Baltimore_CyberTrust_Root.pem
Check whether the DigiCert_Global_Root_CA certificate is present:
ls DigiCert_Global_Root_CA.pemIf the DigiCert_Global_Root_CA isn't found, run the following commands to download the certificate:
wget http://www.digicert.com/CACerts/DigiCertGlobalRootCA.crt

openssl x509 -in DigiCertGlobalRootCA.crt -inform der -outform pem -out DigiCert_Global_Root_CA.pem
To update the certificate subject hashes for the newly downloaded certificates, run the rehash script:
c_rehashTo check whether the subject hashes as symlinks were created for the certificates, run these commands:
ls -l | grep Baltimorelrwxrwxrwx 1 root root 29 Jan 8 09:48 3ad48a91.0 -> Baltimore_CyberTrust_Root.pem -rw-r--r-- 1 root root 1303 Jun 5 2014 Baltimore_CyberTrust_Root.pemls -l | grep VeriSign_Class_3_Public_Primary_Certification_Authority_G5-rw-r--r-- 1 root root 1774 Jun 5 2014 VeriSign_Class_3_Public_Primary_Certification_Authority_G5.pem lrwxrwxrwx 1 root root 62 Jan 8 09:48 facacbc6.0 -> VeriSign_Class_3_Public_Primary_Certification_Authority_G5.pemls -l | grep DigiCert_Global_Rootlrwxrwxrwx 1 root root 27 Jan 8 09:48 399e7759.0 -> DigiCert_Global_Root_CA.pem -rw-r--r-- 1 root root 1380 Jun 5 2014 DigiCert_Global_Root_CA.pemCreate a copy of the file VeriSign_Class_3_Public_Primary_Certification_Authority_G5.pem with filename b204d74a.0:
cp VeriSign_Class_3_Public_Primary_Certification_Authority_G5.pem b204d74a.0Create a copy of the file Baltimore_CyberTrust_Root.pem with filename 653b494a.0:
cp Baltimore_CyberTrust_Root.pem 653b494a.0Create a copy of the file DigiCert_Global_Root_CA.pem with filename 3513523f.0:
cp DigiCert_Global_Root_CA.pem 3513523f.0Check that the files are present:
ls -l 653b494a.0 b204d74a.0 3513523f.0-rw-r--r-- 1 root root 1774 Jan 8 09:52 3513523f.0 -rw-r--r-- 1 root root 1303 Jan 8 09:52 653b494a.0 -rw-r--r-- 1 root root 1774 Jan 8 09:52 b204d74a.0
Outbound URLs or IP ranges (error code 151037 or 151072)
For Site Recovery replication to work, outbound connectivity to specific URLs is required from the VM. If your VM is behind a firewall or uses network security group (NSG) rules to control outbound connectivity, you might face one of these issues. While we continue to support outbound access via URLs, using an allow list of IP ranges is no longer supported.
Possible causes
- A connection can't be established to Site Recovery endpoints because of a Domain Name System (DNS) resolution failure.
- This problem is more common during reprotection when you have failed over the virtual machine but the DNS server isn't reachable from the disaster recovery (DR) region.
Fix the problem
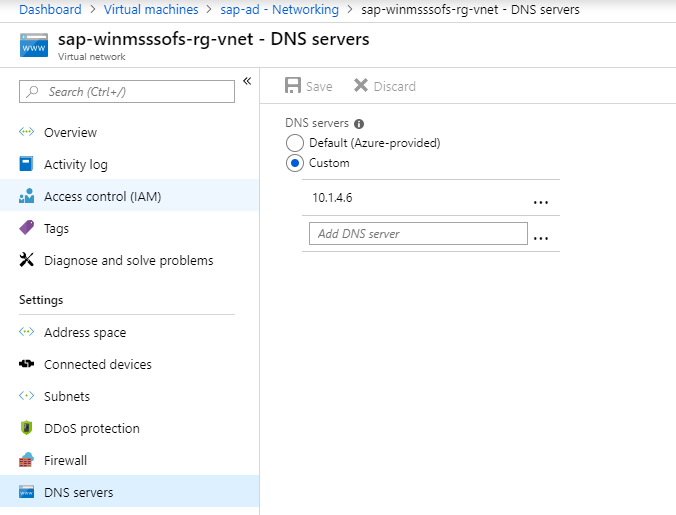
If you're using custom DNS, make sure that the DNS server is accessible from the disaster recovery region.
To check if the VM uses a custom DNS setting:
- Open Virtual machines and select the VM.
- Navigate to the VMs Settings and select Networking.
- In Virtual network/subnet, select the link to open the virtual network's resource page.
- Go to Settings and select DNS servers.
Try to access the DNS server from the virtual machine. If the DNS server isn't accessible, make it accessible by either failing over the DNS server or creating the line of site between DR network and DNS.
Note
If you use private endpoints, ensure that the VMs can resolve the private DNS records.
Issue 2: Site Recovery configuration failed (151196)
Possible cause
A connection can't be established to Microsoft 365 authentication and identity IP4 endpoints.
Fix the problem
Azure Site Recovery required access to Microsoft 365 IP ranges for authentication. If you're using Azure Network Security Group (NSG) rules/firewall proxy to control outbound network connectivity on the VM, ensure that you use Microsoft Entra service tag based NSG rule for allowing access to Microsoft Entra ID. We no longer support IP address-based NSG rules.
Issue 3: Site Recovery configuration failed (151197)
Possible cause
A connection can't be established to Azure Site Recovery service endpoints.
Fix the problem
If you're using Azure Network Security Group (NSG) rules/firewall proxy to control outbound network connectivity on the VM, ensure that you use service tags. We no longer support using an allow list of IP addresses via NSGs for Azure Site Recovery.
Issue 4: Replication fails when network traffic uses on-premises proxy server (151072)
Possible cause
The custom proxy settings are invalid and the Mobility service agent didn't autodetect the proxy settings from Internet Explorer (IE).
Fix the problem
The Mobility service agent detects the proxy settings from IE on Windows and
/etc/environmenton Linux.If you prefer to set proxy only for the Mobility service, then you can provide the proxy details in ProxyInfo.conf located at:
- Linux:
/usr/local/InMage/config/ - Windows:
C:\ProgramData\Microsoft Azure Site Recovery\Config
- Linux:
The ProxyInfo.conf should have the proxy settings in the following INI format.
[proxy]
Address=http://1.2.3.4
Port=567
Note
The Mobility service agent only supports unauthenticated proxies.
More information
To specify the required URLs or the required IP ranges, follow the guidance in About networking in Azure to Azure replication.
Disk not found in VM (error code 150039)
A new disk attached to the VM must be initialized. If the disk isn't found, the following message is displayed:
Azure data disk <DiskName> <DiskURI> with logical unit number <LUN> <LUNValue> was not mapped to a corresponding disk being reported from within the VM that has the same LUN value.
Possible causes
- A new data disk was attached to the VM but wasn't initialized.
- The data disk inside the VM isn't correctly reporting the logical unit number (LUN) value at which the disk was attached to the VM.
Fix the problem
Make sure that the data disks are initialized, and then retry the operation.
- Windows: Attach and initialize a new disk.
- Linux: Initialize a new data disk in Linux.
If the problem persists, contact support.
Multiple disks available for protection (error code 153039)
Possible causes
- One or more disks were recently added to the virtual machine after protection.
- One or more disks were initialized after protection of the virtual machine.
Fix the problem
To make the replication status of the VM healthy again, you can choose either to protect the disks or to dismiss the warning.
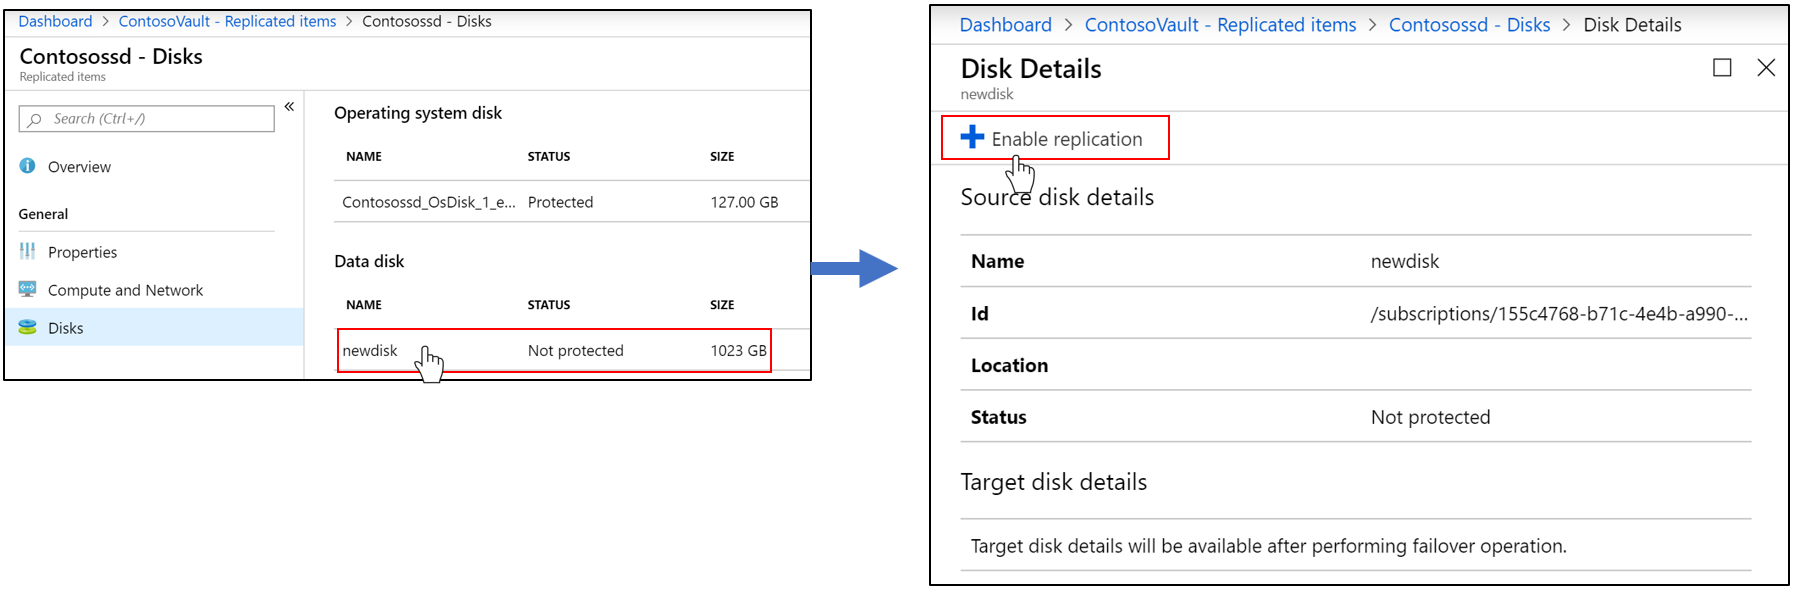
To protect the disks
Go to Replicated Items > VM name > Disks.
Select the unprotected disk, and then select Enable replication:
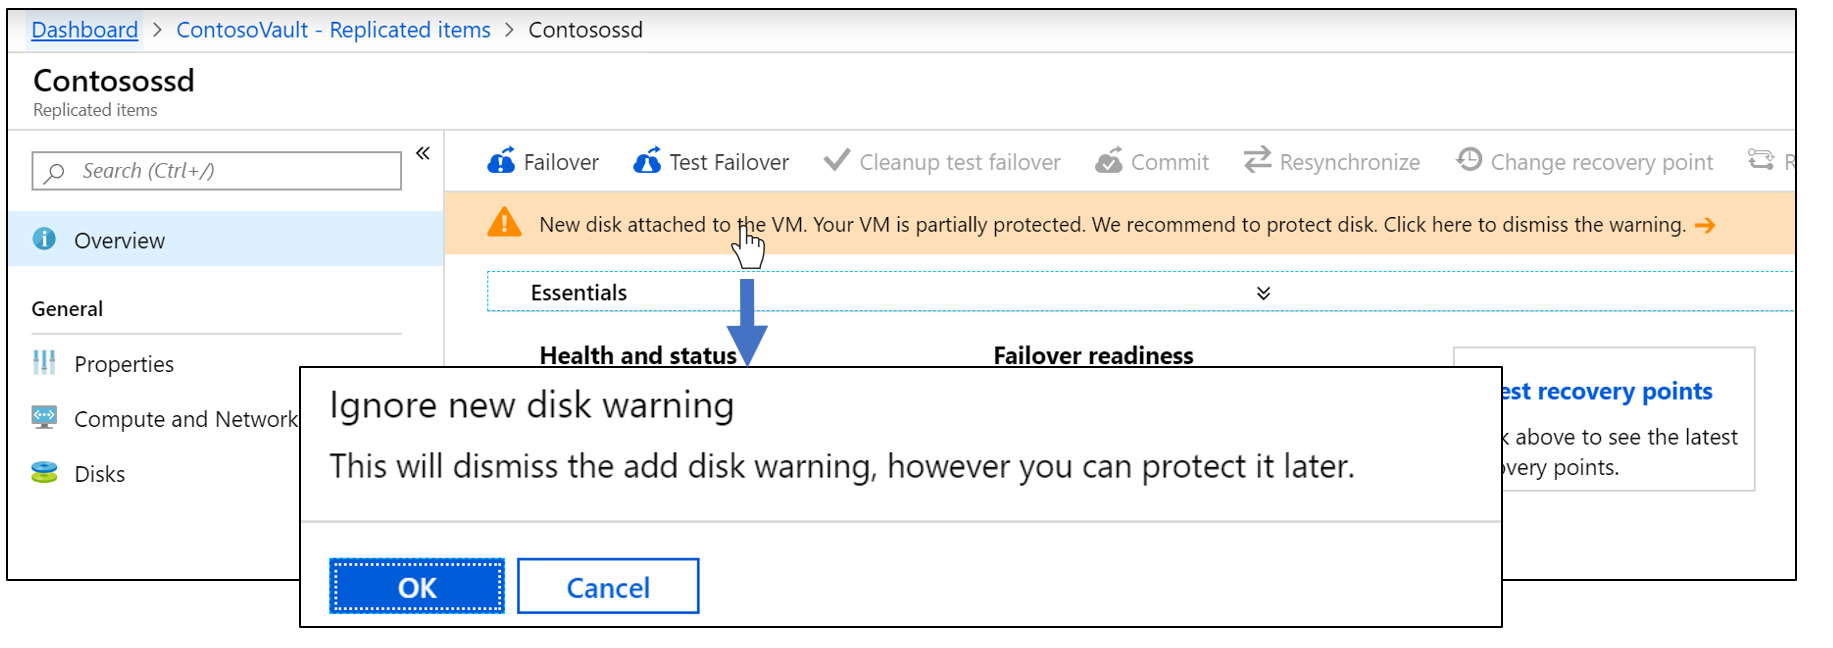
To dismiss the warning
Go to Replicated items > VM name.
Select the warning in the Overview section, and then select OK.
VM removed from vault completed with information (error code 150225)
When Site Recovery protects the virtual machine, it creates links on the source virtual machine. When you remove the protection or disable replication, Site Recovery removes these links as a part of the cleanup job. If the virtual machine has a resource lock, the cleanup job gets completed with the information. The information says that the virtual machine has been removed from the Recovery Services vault, but that some of the stale links couldn't be cleaned up on the source machine.
You can ignore this warning if you never intend to protect this virtual machine again. But if you have to protect this virtual machine later, follow the steps in this section to clean up the links.
Warning
If you don't do the cleanup:
- When you enable replication by means of the Recovery Services vault, the virtual machine won't be listed.
- If you try to protect the VM by using Virtual machine > Settings > Disaster Recovery, the operation will fail with the message Replication cannot be enabled because of the existing stale resource links on the VM.
Fix the problem
Note
Site Recovery doesn't delete the source virtual machine or affect it in any way while you perform these steps.
Remove the lock from the VM or VM resource group. For example, in the following image, the resource lock on the VM named
MoveDemomust be deleted: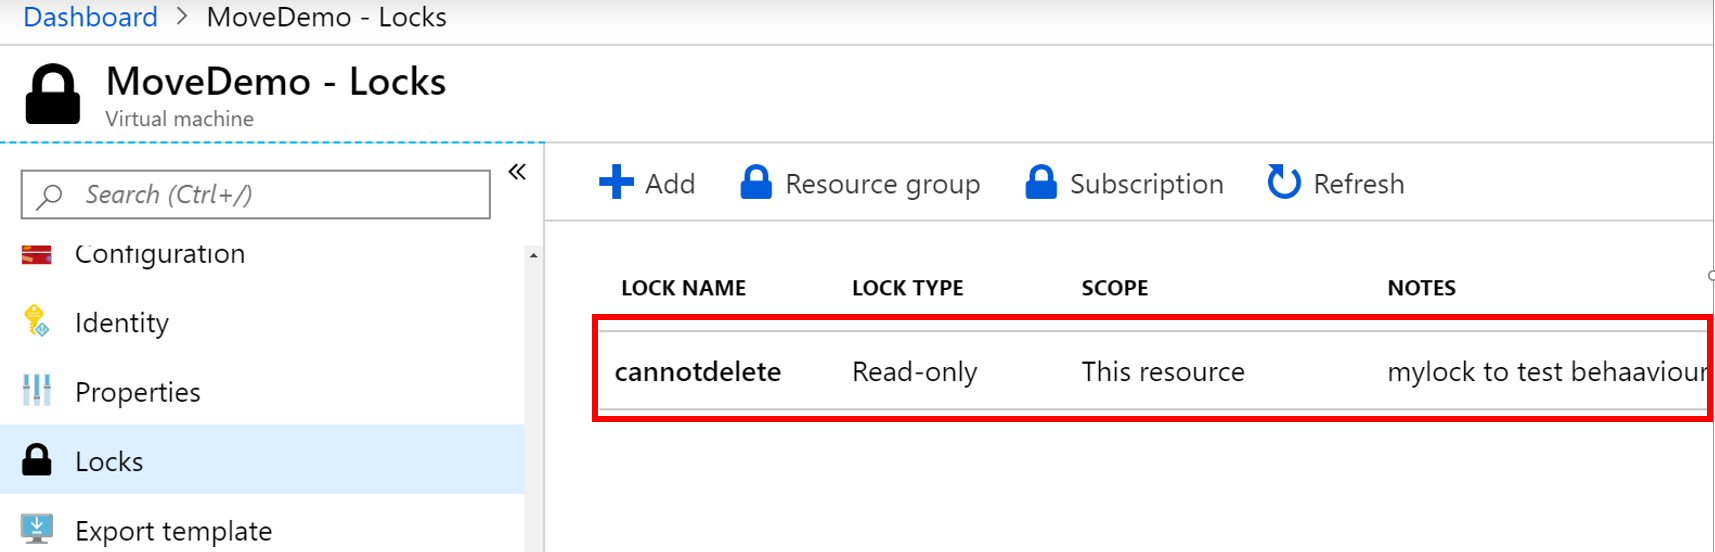
Download the script to remove a stale Site Recovery configuration.
Run the script, Cleanup-stale-asr-config-Azure-VM.ps1. Provide the Subscription ID, VM Resource Group, and VM name as parameters.
If you're prompted for Azure credentials, provide them. Then verify that the script runs without any failures.
Replication not enabled on VM with stale resources (error code 150226)
Possible causes
The virtual machine has a stale configuration from previous Site Recovery protection.
A stale configuration can occur on an Azure VM if you enabled replication for the Azure VM by using Site Recovery, and then:
- You disabled replication, but the source VM had a resource lock.
- You deleted the Site Recovery vault without explicitly disabling replication on the VM.
- You deleted the resource group containing the Site Recovery vault without explicitly disabling replication on the VM.
Fix the problem
Note
Site Recovery doesn't delete the source virtual machine or affect it in any way while you perform these steps.
Remove the lock from the VM or VM resource group. For example, in the following image, the resource lock on the VM named
MoveDemomust be deleted:
Download the script to remove a stale Site Recovery configuration.
Run the script, Cleanup-stale-asr-config-Azure-VM.ps1. Provide the Subscription ID, VM Resource Group, and VM name as parameters.
If you're prompted for Azure credentials, provide them. Then verify that the script runs without any failures.
Can't select VM or resource group in enable replication job
Issue 1: The resource group and source VM are in different locations
Site Recovery currently requires the source region resource group and virtual machines to be in the same location. If they aren't, you won't be able to find the virtual machine or resource group when you try to apply protection.
As a workaround, you can enable replication from the VM instead of the Recovery Services vault. Go to Source VM > Properties > Disaster Recovery and enable the replication.
Issue 2: The resource group isn't part of the selected subscription
You might not be able to find the resource group at the time of protection if the resource group isn't part of the selected subscription. Make sure that the resource group belongs to the subscription that you're using.
Issue 3: Stale configuration
You might not see the VM that you want to enable for replication if a stale Site Recovery configuration exists on the Azure VM. This condition could occur if you enabled replication for the Azure VM by using Site Recovery, and then:
- You deleted the Site Recovery vault without explicitly disabling replication on the VM.
- You deleted the resource group containing the Site Recovery vault without explicitly disabling replication on the VM.
- You disabled replication, but the source VM had a resource lock.
Fix the problem
Note
Make sure to update the AzureRM.Resources module before using the script mentioned in this section. Site Recovery doesn't delete the source virtual machine or affect it in any way while you perform these steps.
Remove the lock, if any, from the VM or VM resource group. For example, in the following image, the resource lock on the VM named
MoveDemomust be deleted:
Download the script to remove a stale Site Recovery configuration.
Run the script, Cleanup-stale-asr-config-Azure-VM.ps1. Provide the Subscription ID, VM Resource Group, and VM name as parameters.
If you're prompted for Azure credentials, provide them. Then verify that the script runs without any failures.
Unable to select a VM for protection
Possible cause
The virtual machine has an extension installed in a failed or unresponsive state
Fix the problem
Go to Virtual machines > Settings > Extensions and check for any extensions in a failed state. Uninstall any failed extension, and then try again to protect the virtual machine.
VM provisioning state isn't valid (error code 150019)
To enable replication on the VM, its provisioning state must be Succeeded. Perform the following steps to check the provisioning state:
- In the Azure portal, select the Resource Explorer from All Services.
- Expand the Subscriptions list and select your subscription.
- Expand the ResourceGroups list and select the resource group of the VM.
- Expand the Resources list and select your VM.
- Check the provisioningState field in the instance view on the right side.
Fix the problem
- If the provisioningState is Failed, contact support with details to troubleshoot.
- If the provisioningState is Updating, another extension might be being deployed. Check whether there are any ongoing operations on the VM, wait for them to finish, and then retry the failed Site Recovery job to enable replication.
Unable to select target VM
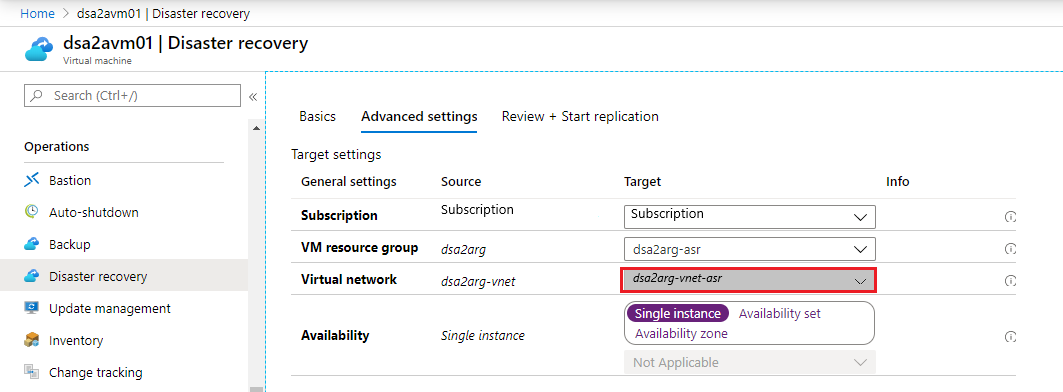
Issue 1: VM is attached to a network that's already mapped to a target network
During disaster recovery configuration, if the source VM is part of a virtual network, and another VM from the same virtual network is already mapped with a network in the target resource group, the network selection drop-down list box is unavailable (appears dimmed) by default.
Issue 2: You previously protected the VM and then you disabled the replication
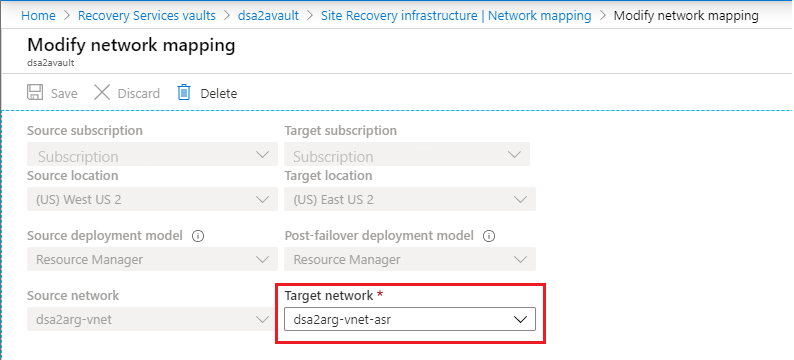
Disabling replication of a VM doesn't delete the network mapping. The mapping must be deleted from the Recovery Services vault where the VM was protected. Select the Recovery Services vault and go to Manage > Site Recovery Infrastructure > For Azure virtual machines > Network Mapping.

The target network that was configured during the disaster recovery setup can be changed after the initial setup, and after the VM is protected. To Modify network mapping select the network name:
COM+ or VSS (error code 151025)
When the COM+ or Volume Shadow Copy Service (VSS) error occurs, the following message is displayed:
Site Recovery extension failed to install.
Possible causes
- The COM+ System Application service is disabled.
- The Volume Shadow Copy Service is disabled.
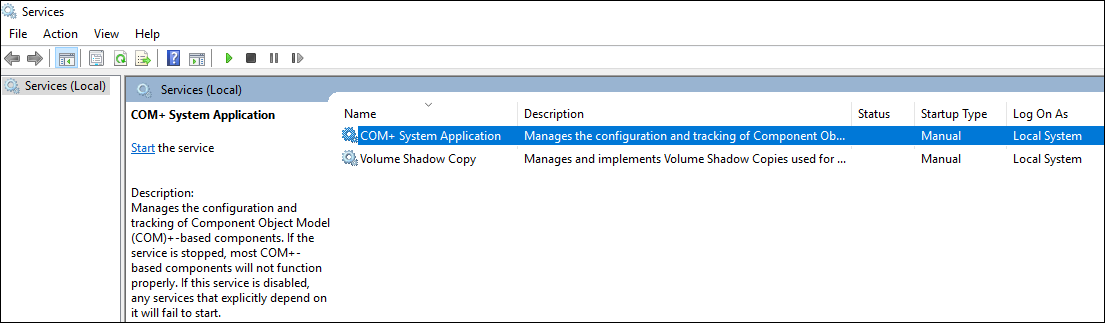
Fix the problem
Set the COM+ System Application and Volume Shadow Copy Service to automatic or manual startup mode.
Open the Services console in Windows.
Make sure the COM+ System Application and Volume Shadow Copy Service aren't set to Disabled as their Startup Type.
Unsupported managed-disk size (error code 150172)
When this error occurs, the following message is displayed:
Protection couldn't be enabled for the virtual machine as it has <DiskName> with size <DiskSize> that is lesser than the minimum supported size 1024 MB.
Possible cause
The disk is smaller than the supported size of 1024 MB.
Fix the problem
Make sure that the disk size is within the supported size range, and then retry the operation.
Protection not enabled when GRUB uses device name (error code 151126)
Possible causes
The Linux Grand Unified Bootloader (GRUB) configuration files (/boot/grub/menu.lst, /boot/grub/grub.cfg, /boot/grub2/grub.cfg, or /etc/default/grub) might specify the actual device names instead of universally unique identifier (UUID) values for the root and resume parameters. Site Recovery requires UUIDs because device names can change. Upon restart, a VM might not come up with the same name on failover, resulting in problems.
The following examples are lines from GRUB files where device names appear instead of the required UUIDs:
File /boot/grub2/grub.cfg:
linux /boot/vmlinuz-3.12.49-11-default root=/dev/sda2 ${extra_cmdline} resume=/dev/sda1 splash=silent quiet showoptsFile: /boot/grub/menu.lst
kernel /boot/vmlinuz-3.0.101-63-default root=/dev/sda2 resume=/dev/sda1 splash=silent crashkernel=256M-:128M showopts vga=0x314
Fix the problem
Replace each device name with the corresponding UUID:
Find the UUID of the device by executing the command
blkid <device name>. For example:blkid /dev/sda1 /dev/sda1: UUID="6f614b44-433b-431b-9ca1-4dd2f6f74f6b" TYPE="swap" blkid /dev/sda2 /dev/sda2: UUID="62927e85-f7ba-40bc-9993-cc1feeb191e4" TYPE="ext3"Replace the device name with its UUID, in the formats
root=UUID=<UUID>andresume=UUID=<UUID>. For example, after replacement, the line from /boot/grub/menu.lst would look like the following line:kernel /boot/vmlinuz-3.0.101-63-default root=UUID=62927e85-f7ba-40bc-9993-cc1feeb191e4 resume=UUID=6f614b44-433b-431b-9ca1-4dd2f6f74f6b splash=silent crashkernel=256M-:128M showopts vga=0x314Retry the protection.
Protection failed because GRUB device doesn't exist (error code 151124)
Possible cause
The GRUB configuration files (/boot/grub/menu.lst, /boot/grub/grub.cfg, /boot/grub2/grub.cfg, or /etc/default/grub) might contain the parameters rd.lvm.lv or rd_LVM_LV. These parameters identify the Logical Volume Manager (LVM) devices that are to be discovered at boot time. If these LVM devices don't exist, the protected system itself won't boot and will be stuck in the boot process. The same problem will also be seen with the failover VM. Here are few examples:
File: /boot/grub2/grub.cfg on RHEL7:
linux16 /vmlinuz-3.10.0-957.el7.x86_64 root=/dev/mapper/rhel_mup--rhel7u6-root ro crashkernel=128M\@64M rd.lvm.lv=rootvg/root rd.lvm.lv=rootvg/swap rhgb quiet LANG=en_US.UTF-8File: /etc/default/grub on RHEL7:
GRUB_CMDLINE_LINUX="crashkernel=auto rd.lvm.lv=rootvg/root rd.lvm.lv=rootvg/swap rhgb quietFile: /boot/grub/menu.lst on RHEL6:
kernel /vmlinuz-2.6.32-754.el6.x86_64 ro root=UUID=36dd8b45-e90d-40d6-81ac-ad0d0725d69e rd_NO_LUKS LANG=en_US.UTF-8 rd_NO_MD SYSFONT=latarcyrheb-sun16 crashkernel=auto rd_LVM_LV=rootvg/lv_root KEYBOARDTYPE=pc KEYTABLE=us rd_LVM_LV=rootvg/lv_swap rd_NO_DM rhgb quiet
In each example, GRUB has to detect two LVM devices with the names root and swap from the volume group rootvg.
Fix the problem
If the LVM device doesn't exist, either create it or remove the corresponding parameters from the GRUB configuration files. Then, try again to enable protection.
Mobility service update finished with warnings (error code 151083)
The Site Recovery Mobility service has many components, one of which is called the filter driver. The filter driver is loaded into system memory only during system restart. Whenever a Mobility service update includes filter driver changes, the machine is updated but you still see a warning that some fixes require a restart. The warning appears because the filter driver fixes can take effect only when the new filter driver is loaded, which happens only during a restart.
Note
This is only a warning. The existing replication continues to work even after the new agent update. You can choose to restart whenever you want the benefits of the new filter driver, but the old filter driver keeps working if you don't restart.
Apart from the filter driver, the benefits of any other enhancements and fixes in the Mobility service update take effect without requiring a restart.
Protection not enabled if replica managed disk exists
This error occurs when the replica managed disk already exists, without expected tags, in the target resource group.
Possible cause
This problem can occur if the virtual machine was previously protected, and when replication was disabled, the replica disk wasn't removed.
Fix the problem
Delete the replica disk identified in the error message and retry the failed protection job.
Enable protection failed as the installer is unable to find the root disk (error code 151137)
This error occurs for Linux machines where the OS disk is encrypted using Azure Disk Encryption (ADE). This is a valid issue in Agent version 9.35 only.
Possible Causes
The installer is unable to find the root disk that hosts the root file-system.
Fix the problem
Perform the following steps to fix this issue.
Find the agent bits under the directory /var/lib/waagent on RHEL and CentOS machines using the below command:
# find /var/lib/ -name Micro\*.gzExpected output:
/var/lib/waagent/Microsoft.Azure.RecoveryServices.SiteRecovery.LinuxRHEL7-1.0.0.9139/UnifiedAgent/Microsoft-ASR_UA_9.35.0.0_RHEL7-64_GA_30Jun2020_release.tar.gzCreate a new directory and change the directory to this new directory.
Extract the Agent file found in the first step here, using the below command:
tar -xf <Tar Ball File>Open the file prereq_check_installer.json and delete the following lines. Save the file after that.
   {
      "CheckName": "SystemDiskAvailable",
      "CheckType": "MobilityService"
   },
Invoke the installer using the command:
./install -d /usr/local/ASR -r MS -q -v AzureIf the installer succeeds, retry the enable replication job.
Troubleshoot and handle time changes on replicated servers
This error occurs when the source machine's time moves forward and then moves back in short time, to correct the change. You may not notice the change as the time is corrected very quickly.
How to fix: To resolve this issue, wait till system time crosses the skewed future time. Another option is to disable and enable replication once again, which is only feasible for forward replication (data replicated from primary to secondary region) and is not applicable for reverse replication (data replicated from secondary to primary region).
Next steps
Feedback
Coming soon: Throughout 2024 we will be phasing out GitHub Issues as the feedback mechanism for content and replacing it with a new feedback system. For more information see: https://aka.ms/ContentUserFeedback.
Submit and view feedback for