Quickstart: Automate deployments
Note
Azure Spring Apps is the new name for the Azure Spring Cloud service. Although the service has a new name, you'll see the old name in some places for a while as we work to update assets such as screenshots, videos, and diagrams.
This article applies to: ❌ Basic/Standard ✔️ Enterprise
This quickstart shows you how to automate deployments to the Azure Spring Apps Enterprise plan by using GitHub Actions and Terraform.
Prerequisites
- An Azure account with an active subscription. Create an account for free.
- Understand and fulfill the Requirements section of Enterprise plan in Azure Marketplace.
- The Azure CLI version 2.45.0 or higher.
- Git.
- jq
-
The Azure Spring Apps Enterprise plan extension. Use the following command to remove previous versions and install the latest Enterprise plan extension. If you previously installed the
spring-cloudextension, uninstall it to avoid configuration and version mismatches.az extension add --upgrade --name spring az extension remove --name spring-cloud
Set up a GitHub repository and authenticate
The automation associated with the sample application requires a Storage account for maintaining Terraform state. The following steps show you how to create a Storage Account for use with GitHub Actions and Terraform.
Use the following command to create a new resource group to contain the Storage Account:
az group create \
    --name <storage-resource-group> \
    --location <location>
Use the following command to create a Storage Account:
az storage account create \
    --resource-group <storage-resource-group> \
    --name <storage-account-name> \
    --location <location> \
    --sku Standard_RAGRS \
    --kind StorageV2
Use the following command to create a Storage Container within the Storage Account:
az storage container create \
    --resource-group <storage-resource-group> \
    --name terraform-state-container \
    --account-name <storage-account-name> \
    --auth-mode login
Use the following commands to get an Azure credential. You need an Azure service principal credential to authorize Azure login action.
az login
az ad sp create-for-rbac \
    --role contributor \
    --scopes /subscriptions/<SUBSCRIPTION_ID> \
    --json-auth
The command should output a JSON object:
{
    "clientId": "<GUID>",
    "clientSecret": "<GUID>",
    "subscriptionId": "<GUID>",
    "tenantId": "<GUID>",
    ...
}
This example uses the fitness store sample on GitHub. Fork the sample, open the GitHub repository page, and then select the Settings tab. Open the Secrets menu, then select Add a new secret, as shown in the following screenshot.
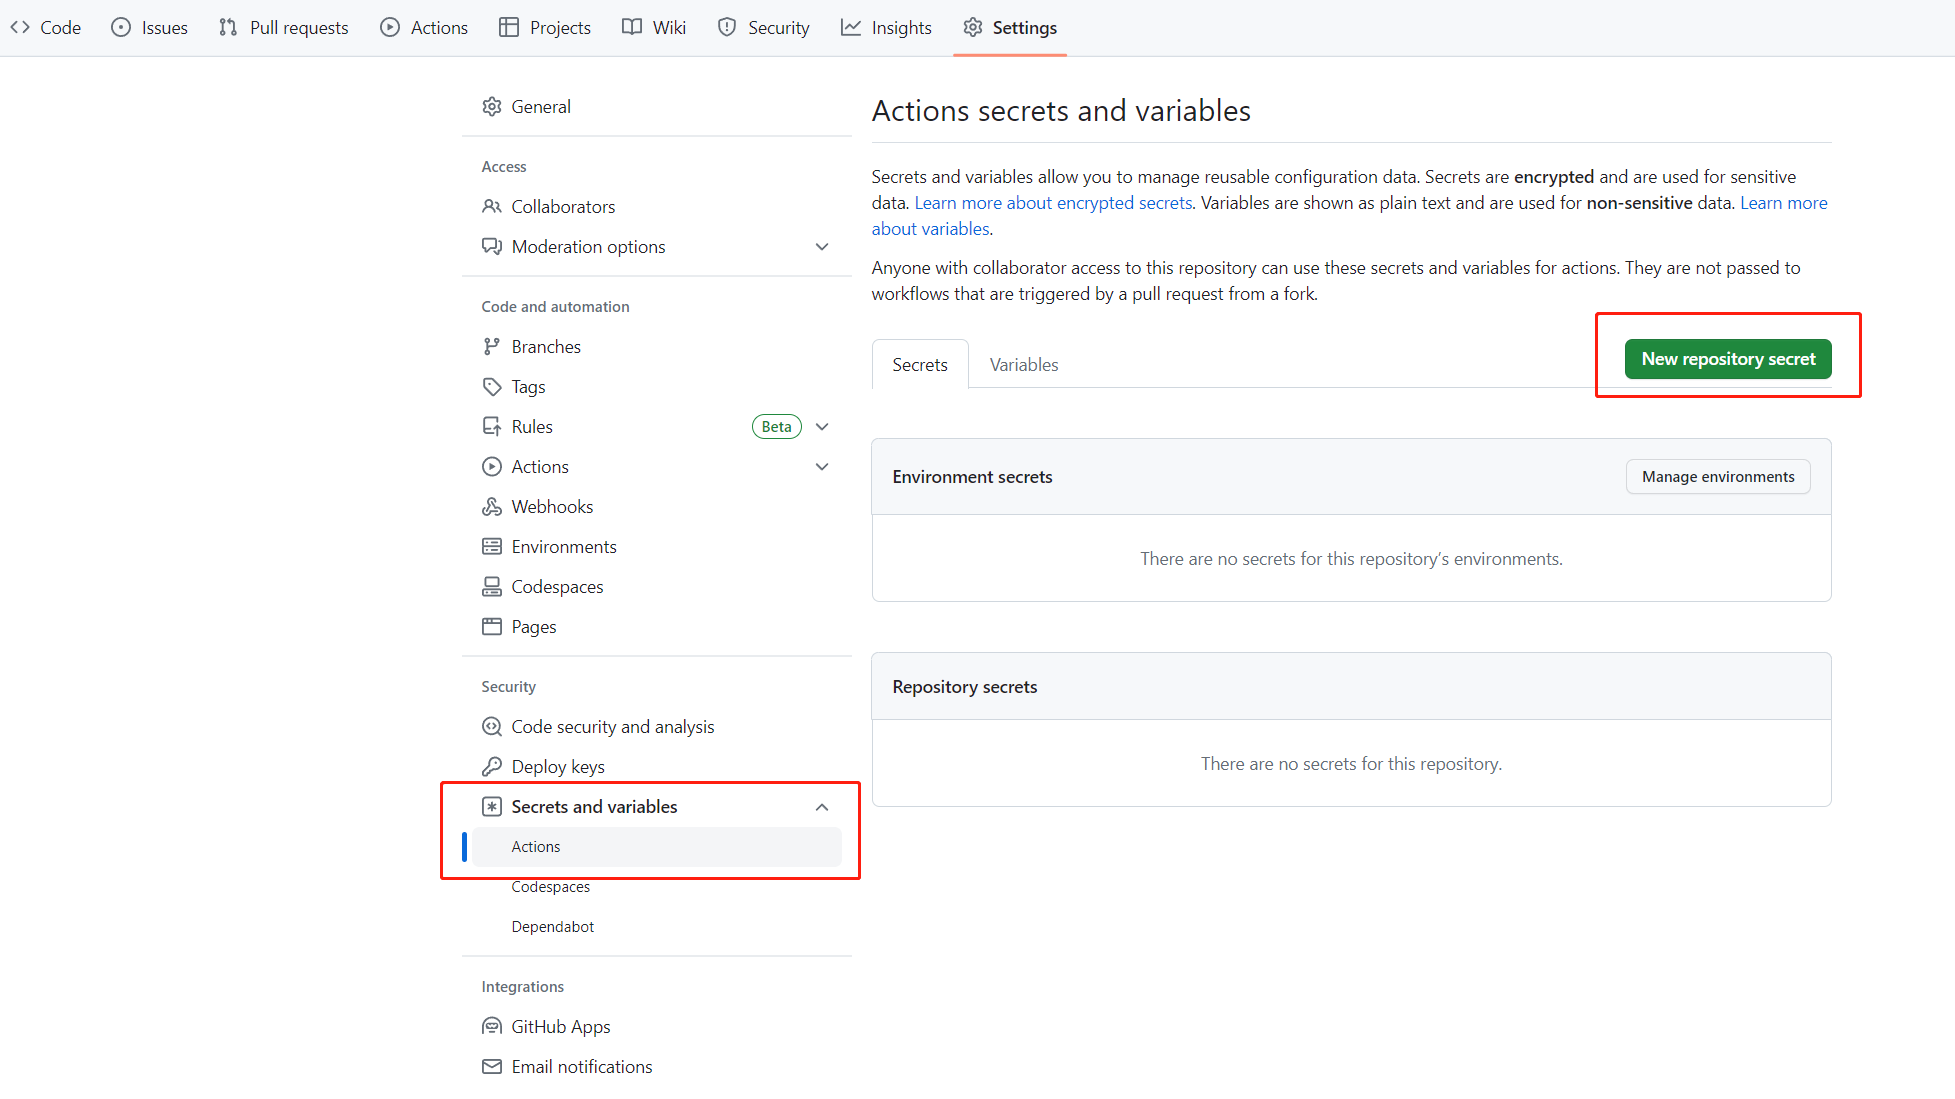
Set the secret name to
AZURE_CREDENTIALSand set its value to the JSON string that you found under the heading Set up your GitHub repository and authenticate.
Add the following secrets to GitHub Actions:
TF_PROJECT_NAME: Use a value of your choosing. This value will be the name of your Terraform Project.AZURE_LOCATION: The Azure Region your resources will be created in.OIDC_JWK_SET_URI: Use theJWK_SET_URIdefined in Quickstart: Configure single sign-on for applications using the Azure Spring Apps Enterprise plan.OIDC_CLIENT_ID: Use theCLIENT_IDdefined in Quickstart: Configure single sign-on for applications using the Azure Spring Apps Enterprise plan.OIDC_CLIENT_SECRET: Use theCLIENT_SECRETdefined in Quickstart: Configure single sign-on for applications using the Azure Spring Apps Enterprise plan.OIDC_ISSUER_URI: Use theISSUER_URIdefined in Quickstart: Configure single sign-on for applications using the Azure Spring Apps Enterprise plan.
Add the secret
TF_BACKEND_CONFIGto GitHub Actions with the following value:resource_group_name = "<storage-resource-group>" storage_account_name = "<storage-account-name>" container_name = "terraform-state-container" key = "dev.terraform.tfstate"


Automate with GitHub Actions
Now you can run GitHub Actions in your repository. The provision workflow provisions all resources necessary to run the example application. The following screenshot shows an example run:

Each application has a deploy workflow that will redeploy the application when changes are made to that application. The following screenshot shows some example output from the catalog service:

The cleanup workflow can be manually run to delete all resources created by the provision workflow. The following screenshot shows the output:

Clean up resources
If you plan to continue working with subsequent quickstarts and tutorials, you might want to leave these resources in place. When no longer needed, delete the resource group, which deletes the resources in the resource group. To delete the resource group by using Azure CLI, use the following commands:
echo "Enter the Resource Group name:" &&
read resourceGroupName &&
az group delete --name $resourceGroupName &&
echo "Press [ENTER] to continue ..."
Next steps
Continue on to any of the following optional quickstarts:
Feedback
Coming soon: Throughout 2024 we will be phasing out GitHub Issues as the feedback mechanism for content and replacing it with a new feedback system. For more information see: https://aka.ms/ContentUserFeedback.
Submit and view feedback for