You can set a blob's access tier in any of the following ways:
By setting the default online access tier for the storage account. Blobs in the account inherit this access tier unless you explicitly override the setting for an individual blob.
By explicitly setting a blob's tier on upload. You can create a blob in the hot, cool, cold, or archive tier.
By changing an existing blob's tier with a Set Blob Tier operation. Typically, you would use this operation to move from a hotter tier to a cooler one.
By copying a blob with a Copy Blob operation. Typically, you would use this operation to move from a cooler tier to a hotter one.
This article describes how to manage a blob in an online access tier. For more information about how to move a blob to the archive tier, see Archive a blob. For more information about how to rehydrate a blob from the archive tier, see Rehydrate an archived blob to an online tier.
The default access tier setting for a general-purpose v2 storage account determines in which online tier a new blob is created by default. You can set the default access tier for a general-purpose v2 storage account at the time that you create the account or by updating an existing account's configuration.
When you change the default access tier setting for an existing general-purpose v2 storage account, the change applies to all blobs in the account for which an access tier hasn't been explicitly set. Changing the default access tier may have a billing impact. For details, see Default account access tier setting.
To set the default access tier for a storage account at create time in the Azure portal, follow these steps:
Navigate to the Storage accounts page, and select the Create button.
Fill out the Basics tab.
On the Advanced tab, under Blob storage, set the Access tier to either Hot, Cool or Cold. The default setting is Hot.
Select Review + Create to validate your settings and create your storage account.
To update the default access tier for an existing storage account in the Azure portal, follow these steps:
Navigate to the storage account in the Azure portal.
Under Settings, select Configuration.
Locate the Blob access tier (default) setting, and select either Hot, Cool, or Cold. The default setting is Hot, if you have not previously set this property.
Save your changes.
To change the default access tier setting for a storage account with PowerShell, call the Set-AzStorageAccount command, specifying the new default access tier.
Azure PowerShell
$rgName = <resource-group>
$accountName = <storage-account>
# Change the storage account tier to coolSet-AzStorageAccount -ResourceGroupName$rgName -Name$accountName -AccessTier Cool
To change the default access tier setting for a storage account with PowerShell, call the Set-AzStorageAccount command, specifying the new default access tier.
Azure CLI
# Change the storage account tier to coolaz storage account update \
--resource-group<resource-group> \
--name<storage-account> \
--access-tier Cool
N/A
Set a blob's tier on upload
When you upload a blob to Azure Storage, you have two options for setting the blob's tier on upload:
You can explicitly specify the tier in which the blob will be created. This setting overrides the default access tier for the storage account. You can set the tier for a blob or set of blobs on upload to hot, cool, cold or archive.
You can upload a blob without specifying a tier. In this case, the blob will be created in the default access tier specified for the storage account (either hot or cool).
If you are uploading a new blob that uses an encryption scope, you cannot change the access tier for that blob.
The following sections describe how to specify that a blob is uploaded to either the hot or cool tier. For more information about archiving a blob on upload, see Archive blobs on upload.
Upload a blob to a specific online tier
To create a blob in the hot, cool, or cold tier, specify that tier when you create the blob. The access tier specified on upload overrides the default access tier for the storage account.
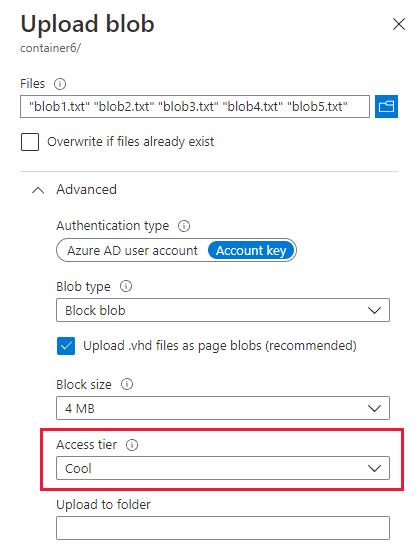
To upload a blob or set of blobs to a specific tier from the Azure portal, follow these steps:
Navigate to the target container.
Select the Upload button.
Select the file or files to upload.
Expand the Advanced section, and set the Access tier to Hot or Cool.
Select the Upload button.
To upload a blob or set of blobs to a specific tier with PowerShell, call the Set-AzStorageBlobContent command, as shown in the following example. Remember to replace the placeholder values in brackets with your own values:
Azure PowerShell
$rgName = <resource-group>
$storageAccount = <storage-account>
$containerName = <container>
# tier can be hot, cool, cold, or archive$tier = <tier>
# Get context object$ctx = New-AzStorageContext -StorageAccountName$storageAccount -UseConnectedAccount# Create new container.New-AzStorageContainer -Name$containerName -Context$ctx# Upload a single file named blob1.txt to the cool tier.Set-AzStorageBlobContent -Container$containerName `
-File"blob1.txt" `
-Blob"blob1.txt" `
-Context$ctx `
-StandardBlobTier Cool
# Upload the contents of a sample-blobs directory to the cool tier, recursively.Get-ChildItem -Path"C:\sample-blobs" -File -Recurse |
Set-AzStorageBlobContent -Container$containerName `
-Context$ctx `
-StandardBlobTier$tier
To upload a blob to a specific tier with Azure CLI, call the az storage blob upload command, as shown in the following example. Remember to replace the placeholder values in brackets with your own values. Replace the <tier> placeholder with hot, cool, cold, or archive.
To upload a set of blobs to a specific tier with Azure CLI, call the az storage blob upload-batch command, as shown in the following example. Remember to replace the placeholder values in brackets with your own values. Replace the <tier> placeholder with hot, cool, cold, or archive.
To upload a blob to a specific tier by using AzCopy, use the azcopy copy command and set the --block-blob-tier parameter to hot, cool, or archive.
Note
This example encloses path arguments with single quotes (''). Use single quotes in all command shells except for the Windows Command Shell (cmd.exe). If you're using a Windows Command Shell (cmd.exe), enclose path arguments with double quotes ("") instead of single quotes (''). This example excludes the SAS token because it assumes that you've provided authorization credentials by using Microsoft Entra ID. See the Get started with AzCopy article to learn about the ways that you can provide authorization credentials to the storage service.
To upload a set of blobs to a specific tier by using AzCopy, refer to the local directory or local directory contents, and then append --recursive=true to the command.
Storage accounts have a default access tier setting that indicates in which online tier a new blob is created. The default access tier setting can be set to either hot or cool. The behavior of this setting is slightly different depending on the type of storage account:
The default access tier for a new general-purpose v2 storage account is set to the hot tier by default. You can change the default access tier setting when you create a storage account or after it's created.
When you create a legacy Blob Storage account, you must specify the default access tier setting as hot or cool when you create the storage account. You can change the default access tier setting for the storage account after it's created.
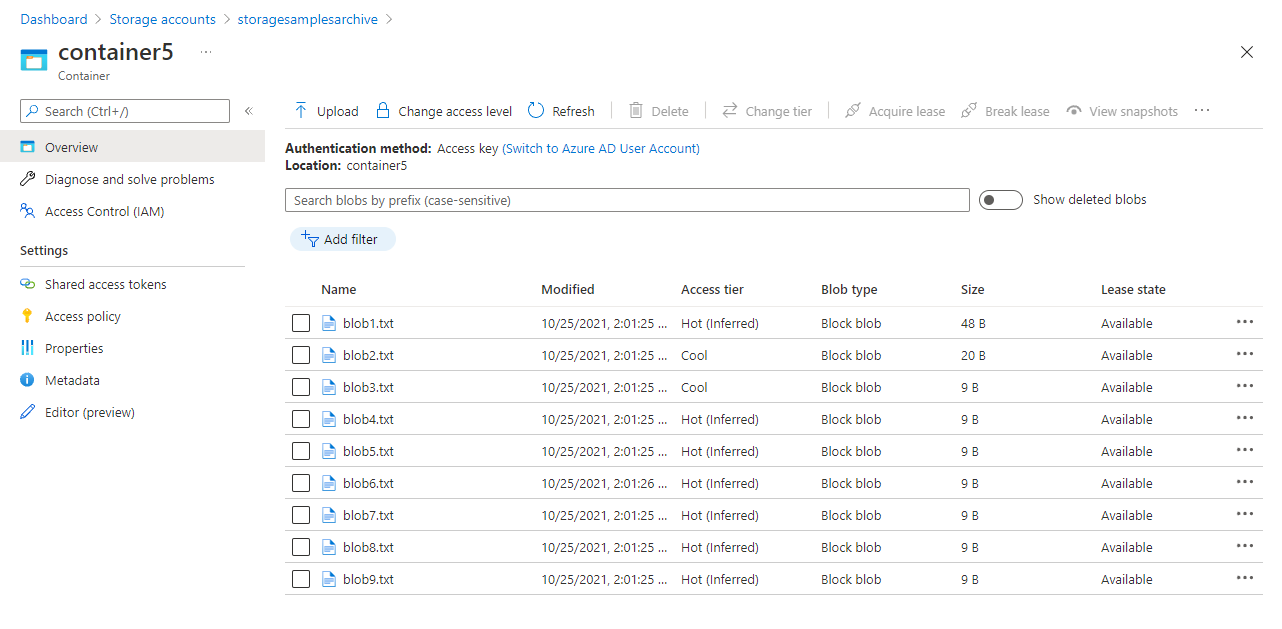
A blob that doesn't have an explicitly assigned tier infers its tier from the default account access tier setting. You can determine whether a blob's access tier is inferred by using the Azure portal, PowerShell, or Azure CLI.
If a blob's access tier is inferred from the default account access tier setting, then the Azure portal displays the access tier as Hot (inferred), Cool (inferred), or Cold (inferred).
To determine a blob's access tier and whether it's inferred from Azure PowerShell, retrieve the blob, then check its AccessTier and AccessTierInferred properties.
Azure PowerShell
$rgName = "<resource-group>"$storageAccount = "<storage-account>"$containerName = "<container>"$blobName = "<blob>"# Get the storage account context.$ctx = New-AzStorageContext -StorageAccountName$storageAccount -UseConnectedAccount# Get the blob from the service.$blob = Get-AzStorageBlob -Context$ctx -Container$containerName -Blob$blobName# Check the AccessTier and AccessTierInferred properties.# If the access tier is inferred, that property returns true.$blob.BlobProperties.AccessTier
$blob.BlobProperties.AccessTierInferred
To determine a blob's access tier and whether it's inferred from Azure CLI, retrieve the blob, then check its blobTier and blobTierInferred properties.
Azure CLI
az storage blob show \
--container-name<container> \
--name<blob> \
--account-name<storage-account> \
--query'[properties.blobTier, properties.blobTierInferred]' \
--output tsv \
--auth-mode login
N/A
Move a blob to a different online tier
You can move a blob to a different online tier in one of two ways:
Use PowerShell, Azure CLI, AzCopy v10, or one of the Azure Storage client libraries to move a blob to a different tier.
Change a blob's tier
When you change a blob's tier, you move that blob and all of its data to the target tier by calling the Set Blob Tier operation (either directly or via a lifecycle management policy), or by using the azcopy set-properties command with AzCopy. This option is typically the best when you're changing a blob's tier from a hotter tier to a cooler one.
Tip
You can use a storage task to change the access tier of blobs at scale across multiple storage accounts based on a set of conditions that you define. A storage task is a resource available in Azure Storage Actions; a serverless framework that you can use to perform common data operations on millions of objects across multiple storage accounts. To learn more, see What is Azure Storage Actions?.
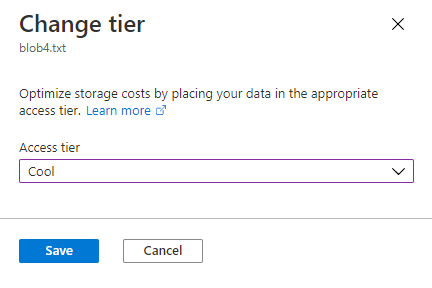
To change a blob's tier to a cooler tier in the Azure portal, follow these steps:
Navigate to the blob for which you want to change the tier.
Select the blob, then select the Change tier button.
In the Change tier dialog, select the target tier.
Select the Save button.
To change a blob's tier to a cooler tier with PowerShell, use the blob's BlobClient property to return a .NET reference to the blob, then call the SetAccessTier method on that reference. Remember to replace placeholders in angle brackets with your own values:
Azure PowerShell
# Initialize these variables with your values.$rgName = "<resource-group>"$accountName = "<storage-account>"$containerName = "<container>"$blobName = "<blob>"$tier = "<tier>"# Get the storage account context$ctx = (Get-AzStorageAccount `
-ResourceGroupName$rgName `
-Name$accountName).Context
# Change the blob's access tier.$blob = Get-AzStorageBlob -Container$containerName -Blob$blobName -Context$ctx$blob.BlobClient.SetAccessTier($tier, $null, "Standard")
To change a blob's tier to a cooler tier with Azure CLI, call the az storage blob set-tier command. Remember to replace placeholders in angle brackets with your own values:
To change a blob's tier to a cooler tier, use the azcopy set-properties command and set the -block-blob-tier parameter.
Important
Using AzCopy to change a blob's access tier is currently in PREVIEW.
See the Supplemental Terms of Use for Microsoft Azure Previews for legal terms that apply to Azure features that are in beta, preview, or otherwise not yet released into general availability.
Note
This example encloses path arguments with single quotes (''). Use single quotes in all command shells except for the Windows Command Shell (cmd.exe). If you're using a Windows Command Shell (cmd.exe), enclose path arguments with double quotes ("") instead of single quotes (''). This example excludes the SAS token because it assumes that you've provided authorization credentials by using Microsoft Entra ID. See the Get started with AzCopy article to learn about the ways that you can provide authorization credentials to the storage service.
To change the access tier for all blobs in a virtual directory, refer to the virtual directory name instead of the blob name, and then append --recursive=true to the command.
Call Copy Blob operation to copy a blob from one tier to another. When you copy a blob to a different tier, you move that blob and all of its data to the target tier. The source blob remains in the original tier, and a new blob is created in the target tier. Calling Copy Blob is recommended for most scenarios where you're moving a blob to a warmer tier, or rehydrating a blob from the archive tier.
To copy a blob to from cool to hot with PowerShell, call the Start-AzStorageBlobCopy command and specify the target tier. Remember to replace placeholders in angle brackets with your own values:
Azure PowerShell
# Initialize these variables with your values.$rgName = "<resource-group>"$accountName = "<storage-account>"$srcContainerName = "<source-container>"$destContainerName = "<dest-container>"$srcBlobName = "<source-blob>"$destBlobName = "<dest-blob>"# Get the storage account context$ctx = (Get-AzStorageAccount `
-ResourceGroupName$rgName `
-Name$accountName).Context
# Copy the source blob to a new destination blob in hot tier.Start-AzStorageBlobCopy -SrcContainer$srcContainerName `
-SrcBlob$srcBlobName `
-DestContainer$destContainerName `
-DestBlob$destBlobName `
-StandardBlobTier Hot `
-Context$ctx
To copy a blob to a warmer tier with Azure CLI, call the az storage blob copy start command and specify the target tier. Remember to replace placeholders in angle brackets with your own values:
To copy a blob from cool to hot with AzCopy, use azcopy copy command and set the --block-blob-tier parameter to hot.
Note
This example encloses path arguments with single quotes (''). Use single quotes in all command shells except for the Windows Command Shell (cmd.exe). If you're using a Windows Command Shell (cmd.exe), enclose path arguments with double quotes ("") instead of single quotes ('').
This example excludes the SAS token because it assumes that you've provided authorization credentials by using Microsoft Entra ID. See the Get started with AzCopy article to learn about the ways that you can provide authorization credentials to the storage service.
AzCopy doesn't support copy from a source blob in archive tier.
The copy operation is synchronous so when the command returns, all files are copied.
Bulk tiering
To move blobs to another tier in a container or a folder, enumerate blobs and call the Set Blob Tier operation on each one. The following example shows how to perform this operation:
# Initialize these variables with your values.$rgName = "<resource-group>"$accountName = "<storage-account>"$containerName = "<container>"$folderName = "<folder>/"$ctx = (Get-AzStorageAccount -ResourceGroupName$rgName -Name$accountName).Context
$blobCount = 0$Token = $Null$MaxReturn = 5000do {
$Blobs = Get-AzStorageBlob -Context$ctx -Container$containerName -Prefix$folderName -MaxCount$MaxReturn -ContinuationToken$Tokenif($Blobs -eq$Null) { break }
#Set-StrictMode will cause Get-AzureStorageBlob returns result in different data types when there is only one blobif($Blobs.GetType().Name -eq"AzureStorageBlob")
{
$Token = $Null
}
else
{
$Token = $Blobs[$Blobs.Count - 1].ContinuationToken;
}
$Blobs | ForEach-Object {
if($_.BlobType -eq"BlockBlob") {
$_.BlobClient.SetAccessTier("Cold", $null)
}
}
}
While ($Token -ne$Null)
Azure CLI
az storage blob list --account-name$accountName--account-key$key \
--container-name$containerName--prefix$folderName \
--query"[?properties.blobTier == 'Cool'].name"--output tsv \
| xargs -I {} -P10 \
az storage blob set-tier--account-name$accountName--account-key$key \
--container-name$containerName--tier Cold --name"{}"
N/A
When moving a large number of blobs to another tier, use a batch operation for optimal performance. A batch operation sends multiple API calls to the service with a single request. The suboperations supported by the Blob Batch operation include Delete Blob and Set Blob Tier.
To change access tier of blobs with a batch operation, use one of the Azure Storage client libraries. The following code example shows how to perform a basic batch operation with the .NET client library:
C#
staticasync Task BulkArchiveContainerContents(string accountName, string containerName)
{
string containerUri = string.Format("https://{0}.blob.core.windows.net/{1}",
accountName,
containerName);
// Get container client, using Azure AD credentials.
BlobUriBuilder containerUriBuilder = new BlobUriBuilder(new Uri(containerUri));
BlobContainerClient blobContainerClient = new BlobContainerClient(containerUriBuilder.ToUri(),
new DefaultAzureCredential());
// Get URIs for blobs in this container and add to stack.var uris = new Stack<Uri>();
awaitforeach (var item in blobContainerClient.GetBlobsAsync())
{
uris.Push(blobContainerClient.GetBlobClient(item.Name).Uri);
}
// Get the blob batch client.
BlobBatchClient blobBatchClient = blobContainerClient.GetBlobBatchClient();
try
{
// Perform the bulk operation to archive blobs.await blobBatchClient.SetBlobsAccessTierAsync(blobUris: uris, accessTier: AccessTier.Archive);
}
catch (RequestFailedException e)
{
Console.WriteLine(e.Message);
}
}
For an in-depth sample application that shows how to change tiers with a batch operation, see AzBulkSetBlobTier.