Enable Microsoft Entra Kerberos authentication for hybrid identities on Azure Files
This article focuses on enabling and configuring Microsoft Entra ID (formerly Azure AD) for authenticating hybrid user identities, which are on-premises AD DS identities that are synced to Microsoft Entra ID. Cloud-only identities aren't currently supported.
This configuration allows hybrid users to access Azure file shares using Kerberos authentication, using Microsoft Entra ID to issue the necessary Kerberos tickets to access the file share with the SMB protocol. This means your end users can access Azure file shares over the internet without requiring unimpeded network connectivity to domain controllers from Microsoft Entra hybrid joined and Microsoft Entra joined clients. However, configuring Windows access control lists (ACLs)/directory and file-level permissions for a user or group requires unimpeded network connectivity to the on-premises domain controller.
For more information on supported options and considerations, see Overview of Azure Files identity-based authentication options for SMB access. For more information, see this deep dive.
Important
You can only use one AD method for identity-based authentication with Azure Files. If Microsoft Entra Kerberos authentication for hybrid identities doesn't fit your requirements, you might be able to use on-premises Active Directory Domain Service (AD DS) or Microsoft Entra Domain Services instead. The configuration steps and supported scenarios are different for each method.
Applies to
| File share type | SMB | NFS |
|---|---|---|
| Standard file shares (GPv2), LRS/ZRS | ||
| Standard file shares (GPv2), GRS/GZRS | ||
| Premium file shares (FileStorage), LRS/ZRS |
Prerequisites
Before you enable Microsoft Entra Kerberos authentication over SMB for Azure file shares, make sure you've completed the following prerequisites.
Note
Your Azure storage account can't authenticate with both Microsoft Entra ID and a second method like AD DS or Microsoft Entra Domain Services. If you've already chosen another AD method for your storage account, you must disable it before enabling Microsoft Entra Kerberos.
The Microsoft Entra Kerberos functionality for hybrid identities is only available on the following operating systems:
- Windows 11 Enterprise/Pro single or multi-session.
- Windows 10 Enterprise/Pro single or multi-session, versions 2004 or later with the latest cumulative updates installed, especially the KB5007253 - 2021-11 Cumulative Update Preview for Windows 10.
- Windows Server, version 2022 with the latest cumulative updates installed, especially the KB5007254 - 2021-11 Cumulative Update Preview for Microsoft server operating system version 21H2.
To learn how to create and configure a Windows VM and log in by using Microsoft Entra ID-based authentication, see Log in to a Windows virtual machine in Azure by using Microsoft Entra ID.
Clients must be Microsoft Entra joined or Microsoft Entra hybrid joined. Microsoft Entra Kerberos isn’t supported on clients joined to Microsoft Entra Domain Services or joined to AD only.
This feature doesn't currently support user accounts that you create and manage solely in Microsoft Entra ID. User accounts must be hybrid user identities, which means you'll also need AD DS and either Microsoft Entra Connect or Microsoft Entra Connect cloud sync. You must create these accounts in Active Directory and sync them to Microsoft Entra ID. To assign Azure Role-Based Access Control (RBAC) permissions for the Azure file share to a user group, you must create the group in Active Directory and sync it to Microsoft Entra ID.
You must disable multifactor authentication (MFA) on the Microsoft Entra app representing the storage account.
With Microsoft Entra Kerberos, the Kerberos ticket encryption is always AES-256. But you can set the SMB channel encryption that best fits your needs.
Regional availability
This feature is supported in the Azure Public, Azure US Gov, and Azure China 21Vianet clouds.
Enable Microsoft Entra Kerberos authentication for hybrid user accounts
You can enable Microsoft Entra Kerberos authentication on Azure Files for hybrid user accounts using the Azure portal, PowerShell, or Azure CLI.
To enable Microsoft Entra Kerberos authentication using the Azure portal, follow these steps.
Sign in to the Azure portal and select the storage account you want to enable Microsoft Entra Kerberos authentication for.
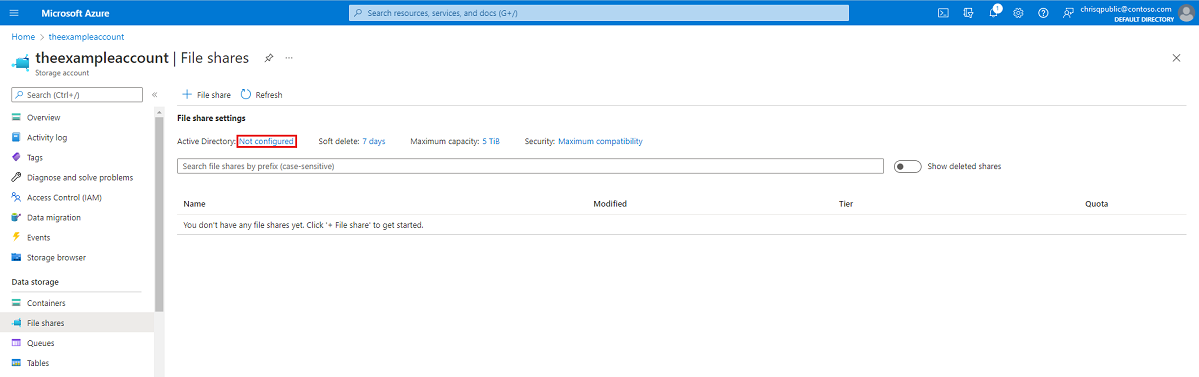
Under Data storage, select File shares.
Next to Active Directory, select the configuration status (for example, Not configured).
Under Microsoft Entra Kerberos, select Set up.
Select the Microsoft Entra Kerberos checkbox.
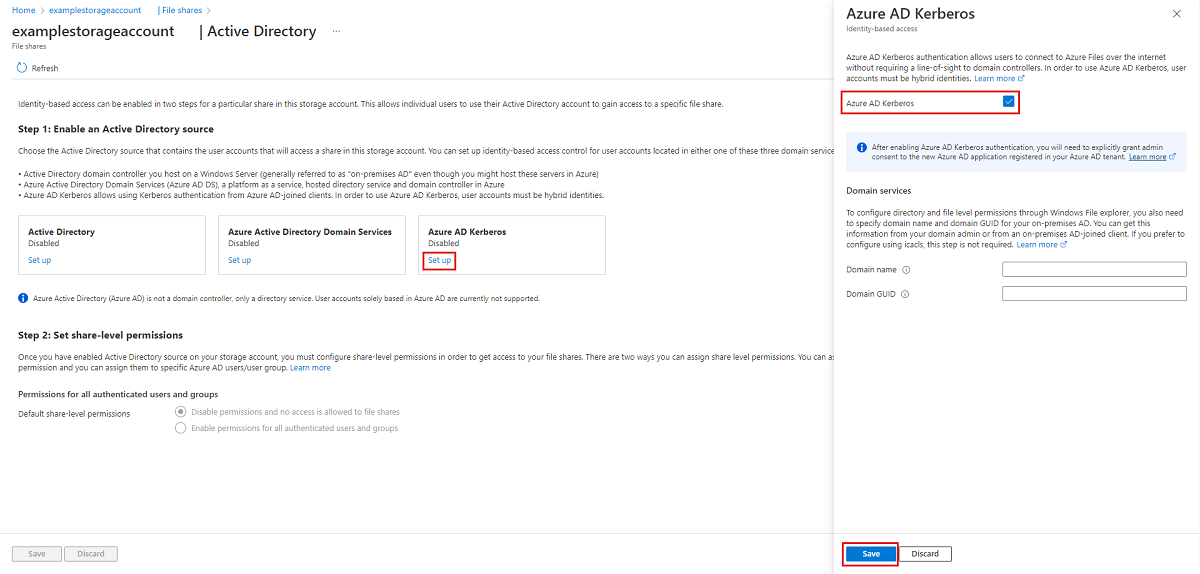
Optional: If you want to configure directory and file-level permissions through Windows File Explorer, then you need to specify the domain name and domain GUID for your on-premises AD. You can get this information from your domain admin or by running the following Active Directory PowerShell cmdlet from an on-premises AD-joined client:
Get-ADDomain. Your domain name should be listed in the output underDNSRootand your domain GUID should be listed underObjectGUID. If you'd prefer to configure directory and file-level permissions using icacls, you can skip this step. However, if you want to use icacls, the client will need unimpeded network connectivity to the on-premises AD.Select Save.


Warning
If you've previously enabled Microsoft Entra Kerberos authentication through manual limited preview steps to store FSLogix profiles on Azure Files for Microsoft Entra joined VMs, the password for the storage account's service principal is set to expire every six months. Once the password expires, users won't be able to get Kerberos tickets to the file share. To mitigate this, see "Error - Service principal password has expired in Microsoft Entra ID" under Potential errors when enabling Microsoft Entra Kerberos authentication for hybrid users.
Grant admin consent to the new service principal
After enabling Microsoft Entra Kerberos authentication, you'll need to explicitly grant admin consent to the new Microsoft Entra application registered in your Microsoft Entra tenant. This service principal is auto-generated and isn't used for authorization to the file share, so don't make any edits to the service principal other than those documented here. If you do, you might get an error.
You can configure the API permissions from the Azure portal by following these steps:
Open Microsoft Entra ID.
Select App registrations on the left pane.
Select All Applications.
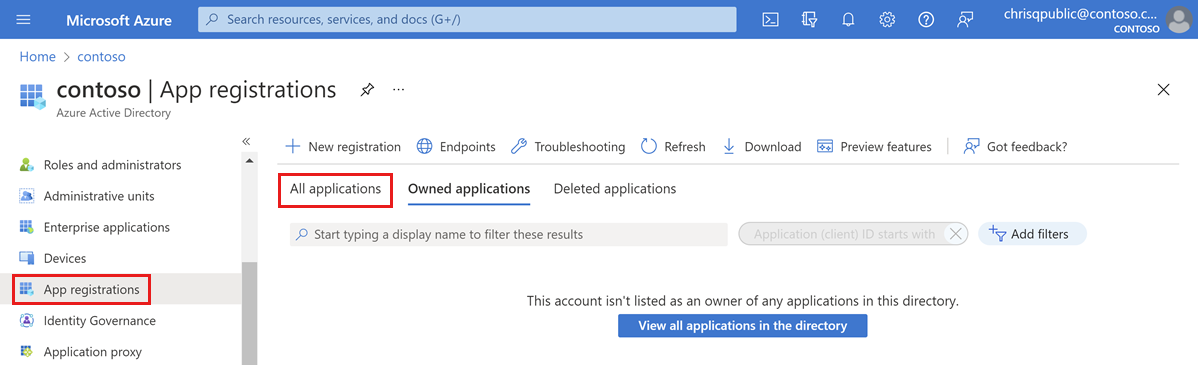
Select the application with the name matching [Storage Account]
<your-storage-account-name>.file.core.windows.net.Select API permissions in the left pane.
Select Grant admin consent for [Directory Name] to grant consent for the three requested API permissions (openid, profile, and User.Read) for all accounts in the directory.
Select Yes to confirm.

Important
If you're connecting to a storage account via a private endpoint/private link using Microsoft Entra Kerberos authentication, you'll also need to add the private link FQDN to the storage account's Microsoft Entra application. For instructions, see the entry in our troubleshooting guide.
Disable multifactor authentication on the storage account
Microsoft Entra Kerberos doesn't support using MFA to access Azure file shares configured with Microsoft Entra Kerberos. You must exclude the Microsoft Entra app representing your storage account from your MFA conditional access policies if they apply to all apps.
The storage account app should have the same name as the storage account in the conditional access exclusion list. When searching for the storage account app in the conditional access exclusion list, search for: [Storage Account] <your-storage-account-name>.file.core.windows.net
Remember to replace <your-storage-account-name> with the proper value.
Important
If you don't exclude MFA policies from the storage account app, you won't be able to access the file share. Trying to map the file share using net use will result in an error message that says "System error 1327: Account restrictions are preventing this user from signing in. For example: blank passwords aren't allowed, sign-in times are limited, or a policy restriction has been enforced."
For guidance on disabling MFA, see the following:
Assign share-level permissions
When you enable identity-based access, you can set for each share which users and groups have access to that particular share. Once a user is allowed into a share, Windows ACLs (also called NTFS permissions) on individual files and directories take over. This allows for fine-grained control over permissions, similar to an SMB share on a Windows server.
To set share-level permissions, follow the instructions in Assign share-level permissions to an identity.
Configure directory and file-level permissions
Once share-level permissions are in place, you can assign directory/file-level permissions to the user or group. This requires using a device with unimpeded network connectivity to an on-premises AD. To use Windows File Explorer, the device also needs to be domain-joined.
There are two options for configuring directory and file-level permissions with Microsoft Entra Kerberos authentication:
- Windows File Explorer: If you choose this option, then the client must be domain-joined to the on-premises AD.
- icacls utility: If you choose this option, then the client doesn't need to be domain-joined, but needs unimpeded network connectivity to the on-premises AD.
To configure directory and file-level permissions through Windows File Explorer, you also need to specify domain name and domain GUID for your on-premises AD. You can get this information from your domain admin or from an on-premises AD-joined client. If you prefer to configure using icacls, this step is not required.
Important
You can set file/directory level ACLs for identities which are not synced to Microsoft Entra ID. However, these ACLs will not be enforced because the Kerberos ticket used for authentication/authorization will not contain these not-synced identities. In order to enforce set ACLs, identities need to be synced to Microsoft Entra ID.
Tip
If Microsoft Entra hybrid joined users from two different forests will be accessing the share, it's best to use icacls to configure directory and file-level permissions. This is because Windows File Explorer ACL configuration requires the client to be domain joined to the Active Directory domain that the storage account is joined to.
To configure directory and file-level permissions, follow the instructions in Configure directory and file-level permissions over SMB.
Configure the clients to retrieve Kerberos tickets
Enable the Microsoft Entra Kerberos functionality on the client machine(s) you want to mount/use Azure File shares from. You must do this on every client on which Azure Files will be used.
Use one of the following three methods:
- Configure this Intune Policy CSP and apply it to the client(s): Kerberos/CloudKerberosTicketRetrievalEnabled, set to 1
- Configure this group policy on the client(s) to "Enabled":
Administrative Templates\System\Kerberos\Allow retrieving the Azure AD Kerberos Ticket Granting Ticket during logon - Set the following registry value on the client(s) by running this command from an elevated command prompt:
reg add HKLM\SYSTEM\CurrentControlSet\Control\Lsa\Kerberos\Parameters /v CloudKerberosTicketRetrievalEnabled /t REG_DWORD /d 1
Changes are not instant, and require a policy refresh or a reboot to take effect.
Important
Once this change is applied, the client(s) won't be able to connect to storage accounts that are configured for on-premises AD DS integration without configuring Kerberos realm mappings. If you want the client(s) to be able to connect to storage accounts configured for AD DS as well as storage accounts configured for Microsoft Entra Kerberos, follow the steps in Configure coexistence with storage accounts using on-premises AD DS.
Configure coexistence with storage accounts using on-premises AD DS
If you want to enable client machines to connect to storage accounts that are configured for AD DS as well as storage accounts configured for Microsoft Entra Kerberos, follow these steps. If you're only using Microsoft Entra Kerberos, skip this section.
Add an entry for each storage account that uses on-premises AD DS integration. Use one of the following three methods to configure Kerberos realm mappings. Changes aren't instant, and require a policy refresh or a reboot to take effect.
- Configure this Intune Policy CSP and apply it to the client(s): Kerberos/HostToRealm
- Configure this group policy on the client(s):
Administrative Template\System\Kerberos\Define host name-to-Kerberos realm mappings - Run the
ksetupWindows command on the client(s):ksetup /addhosttorealmmap <hostname> <REALMNAME>- For example,
ksetup /addhosttorealmmap <your storage account name>.file.core.windows.net CONTOSO.LOCAL
- For example,
Important
In Kerberos, realm names are case sensitive and upper case. Your Kerberos realm name is usually the same as your domain name, in upper-case letters.
Undo the client configuration to retrieve Kerberos tickets
If you no longer want to use a client machine for Microsoft Entra Kerberos authentication, you can disable the Microsoft Entra Kerberos functionality on that machine. Use one of the following three methods, depending on how you enabled the functionality:
- Configure this Intune Policy CSP and apply it to the client(s): Kerberos/CloudKerberosTicketRetrievalEnabled, set to 0
- Configure this group policy on the client(s) to "Disabled":
Administrative Templates\System\Kerberos\Allow retrieving the Azure AD Kerberos Ticket Granting Ticket during logon - Set the following registry value on the client(s) by running this command from an elevated command prompt:
reg add HKLM\SYSTEM\CurrentControlSet\Control\Lsa\Kerberos\Parameters /v CloudKerberosTicketRetrievalEnabled /t REG_DWORD /d 0
Changes are not instant, and require a policy refresh or a reboot to take effect.
If you followed the steps in Configure coexistence with storage accounts using on-premises AD DS, you can optionally remove all host name to Kerberos realm mappings from the client machine. Use one of the following three methods:
- Configure this Intune Policy CSP and apply it to the client(s): Kerberos/HostToRealm
- Configure this group policy on the client(s):
Administrative Template\System\Kerberos\Define host name-to-Kerberos realm mappings - Run the
ksetupWindows command on the client(s):ksetup /delhosttorealmmap <hostname> <realmname>- For example,
ksetup /delhosttorealmmap <your storage account name>.file.core.windows.net contoso.local - You can view the list of current host name to Kerberos realm mappings by inspecting the registry key
HKEY_LOCAL_MACHINE\SYSTEM\CurrentControlSet\Control\Lsa\Kerberos\HostToRealm.
- For example,
Changes aren't instant, and require a policy refresh or a reboot to take effect.
Important
Once this change is applied, the client(s) won't be able to connect to storage accounts that are configured for Microsoft Entra Kerberos authentication. However, they will be able to connect to storage accounts configured to AD DS, without any additional configuration.
Disable Microsoft Entra authentication on your storage account
If you want to use another authentication method, you can disable Microsoft Entra authentication on your storage account by using the Azure portal, Azure PowerShell, or Azure CLI.
Note
Disabling this feature means that there will be no Active Directory configuration for file shares in your storage account until you enable one of the other Active Directory sources to reinstate your Active Directory configuration.
To disable Microsoft Entra Kerberos authentication on your storage account by using the Azure portal, follow these steps.
- Sign in to the Azure portal and select the storage account you want to disable Microsoft Entra Kerberos authentication for.
- Under Data storage, select File shares.
- Next to Active Directory, select the configuration status.
- Under Microsoft Entra Kerberos, select Configure.
- Uncheck the Microsoft Entra Kerberos checkbox.
- Select Save.
Next steps
For more information, see these resources:
Feedback
Coming soon: Throughout 2024 we will be phasing out GitHub Issues as the feedback mechanism for content and replacing it with a new feedback system. For more information see: https://aka.ms/ContentUserFeedback.
Submit and view feedback for