Connect to a Linux VM
When hosting a Linux virtual machine on Azure, the most common method for accessing that VM is through the Secure Shell Protocol (SSH). Any standard SSH client commonly found in Linux and Windows allows you to connect. You can also use Azure Cloud Shell from any browser.
This document describes how to connect, via SSH, to a VM that has a public IP. If you need to connect to a VM without a public IP, see Azure Bastion Service.
Prerequisites
You need an SSH key pair. If you don't already have one, Azure creates a key pair during the deployment process. If you need help with creating one manually, see Create and use an SSH public-private key pair for Linux VMs in Azure.
You need an existing Network Security Group (NSG). Most VMs have an NSG by default, but if you don't already have one you can create one and attach it manually. For more information, see Create, change, or delete a network security group.
To connect to a Linux VM, you need the appropriate port open. Typically SSH uses port 22. The following instructions assume port 22 but the process is the same for other port numbers. You can validate an appropriate port is open for SSH using the troubleshooter or by checking manually in your VM settings. To check if port 22 is open:
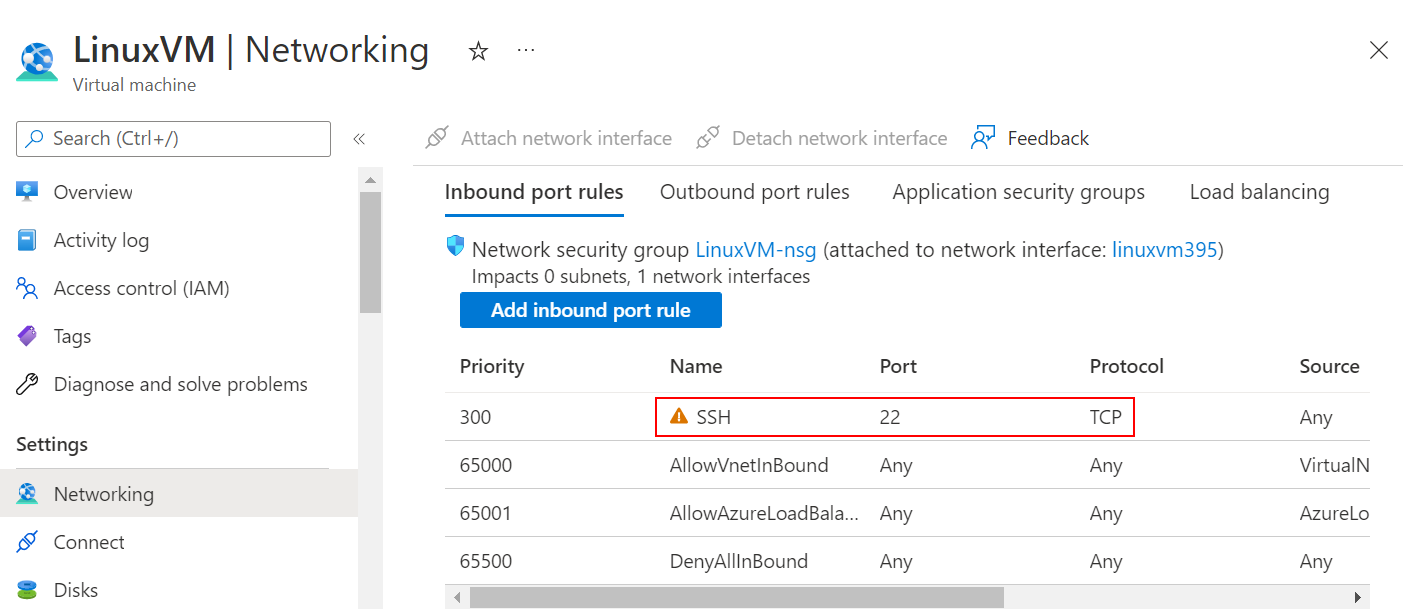
On the page for the VM, select Networking from the left menu.
On the Networking page, check to see if there's a rule that allows TCP on port 22 from the IP address of the computer you're using to connect to the VM. If the rule exists, you can move to the next section.
If there isn't a rule, add one by selecting Add inbound port rule.
For Service, select SSH from the dropdown.
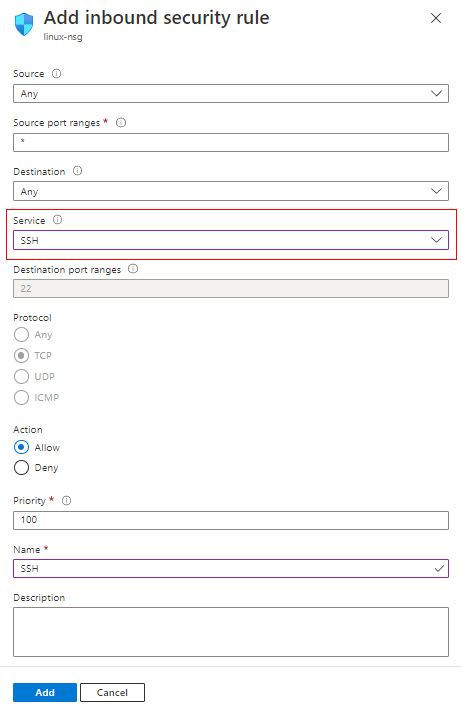
Edit Priority and Source if necessary
For Name, type SSH.
When you're done, select Add.
You should now have an SSH rule in the table of inbound port rules.
Your VM must have a public IP address. To check if your VM has a public IP address, select Overview from the left menu and look at the Networking section. If you see an IP address next to Public IP address, then your VM has a public IP
If your VM doesn't have a public IP Address, it looks like this:
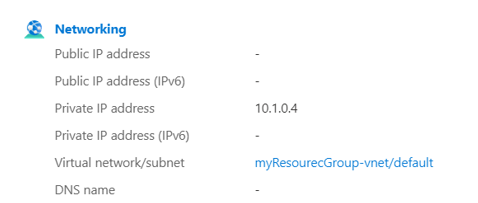
To learn more about adding a public IP address to an existing VM, see Associate a public IP address to a virtual machine
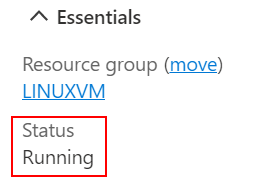
Verify your VM is running. On the Overview tab, in the Essentials section, verify the status of the VM is Running. To start the VM, select Start at the top of the page.
If you're having trouble connecting, you can also use portal:
- Go to the Azure portal to connect to a VM. Search for and select Virtual machines.
- Select the virtual machine from the list.
- Select Connect from the left menu.
- Select the option that fits with your preferred way of connecting. The portal helps walk you through the prerequisites for connecting.
Connect to the VM
Once the above prerequisites are met, you're ready to connect to your VM. Open your SSH client of choice. The SSH client command is typically included in Linux, macOS, and Windows. If you're using Windows 7 or older, where Win32 OpenSSH isn't included by default, consider installing WSL or using Azure Cloud Shell from the browser.
Note
The following examples assume the SSH key is in the key.pem format. If you used CLI or Azure PowerShell to download your keys, they may be in the id_rsa format.
SSH with a new key pair
Ensure your public and private keys are in the correct directory. The directory is usually
~/.ssh.If you generated keys manually or generated them with the CLI, then the keys are probably already there. However, if you downloaded them in pem format from the Azure portal, you may need to move them to the right location. Moving the keys is done with the following syntax:
mv PRIVATE_KEY_SOURCE PRIVATE_KEY_DESTINATIONFor example, if the key is in the
Downloadsfolder, andmyKey.pemis the name of your SSH key, type:mv /Downloads/myKey.pem ~/.sshNote
If you're using WSL, local files are found in the
mnt/c/directory. Accordingly, the path to the downloads folder and SSH key would be/mnt/c/Users/{USERNAME}/Downloads/myKey.pemEnsure you have read-only access to the private key by running
chmod 400 ~/.ssh/myKey.pemRun the SSH command with the following syntax:
ssh -i PATH_TO_PRIVATE_KEY USERNAME@EXTERNAL_IPFor example, if your
azureuseris the username you created and20.51.230.13is the public IP address of your VM, type:ssh -i ~/.ssh/myKey.pem azureuser@20.51.230.13Validate the returned fingerprint.
If you have never connected to this VM before, you're asked to verify the hosts fingerprint. It's tempting to accept the fingerprint presented, but that exposes you to a potential person in the middle attack. You should always validate the hosts fingerprint. You only need to do this the first time you connect from a client. To get the host fingerprint via the portal, use the Run Command feature to execute the command:
ssh-keygen -lf /etc/ssh/ssh_host_ecdsa_key.pub | awk '{print $2}'Success! You should now be connected to your VM. If you're unable to connect, see Troubleshoot SSH connections.
SSH With existing public key
Run the following command in your SSH client. In this example, 20.51.230.13 is the public IP Address of your VM and azureuser is the username you created when you created the VM.
ssh azureuser@20.51.230.13Validate the returned fingerprint.
If you have never connected to the desired VM from your current SSH client before you're asked to verify the host's fingerprint. While the default option is to accept the fingerprint presented, you're exposed to a possible "person in the middle attack". You should always validate the host's fingerprint, which only needs to be done the first time your client connects. To obtain the host fingerprint via the portal, use the Run Command feature to execute the command:
ssh-keygen -lf /etc/ssh/ssh_host_ecdsa_key.pub | awk '{print $2}'Success! You should now be connected to your VM. If you're unable to connect, see our troubleshooting guide.
Password authentication
Warning
This type of authentication method is not as secure as an SSH key pair and is not recommended.
Run the following command in your SSH client. In this example, 20.51.230.13 is the public IP Address of your VM and azureuser is the username you created when you created the VM.
ssh azureuser@20.51.230.13If you forgot your password or username see Reset Access to an Azure VM
Validate the returned fingerprint.
If you have never connected to the desired VM from your current SSH client before you're asked to verify the host's fingerprint. While the default option is to accept the fingerprint presented, you're exposed to a possible "person in the middle attack". You should always validate the host's fingerprint, which only needs to be done the first time your client connects. To obtain the host fingerprint via the portal, use the Run Command feature to execute the command:
ssh-keygen -lf /etc/ssh/ssh_host_ecdsa_key.pub | awk '{print $2}'Success! You should now be connected to your VM. If you're unable to connect, see Troubleshoot SSH connections.
Next steps
Learn how to transfer files to an existing VM, see Use SCP to move files to and from a VM.
Feedback
Coming soon: Throughout 2024 we will be phasing out GitHub Issues as the feedback mechanism for content and replacing it with a new feedback system. For more information see: https://aka.ms/ContentUserFeedback.
Submit and view feedback for