VM Applications are a resource type in Azure Compute Gallery (formerly known as Shared Image Gallery) that simplifies management, sharing and global distribution of applications for your virtual machines.
Ensure the storage account has public level access or use an SAS URI with read privilege, as other restriction levels fail deployments. You can use Storage Explorer to quickly create a SAS URI if you don't already have one.
If you're using PowerShell, you need to be using version 3.11.0 of the Az.Storage module.
- Go to the Azure portal, then search for and select Azure Compute Gallery.
- Select the gallery you want to use from the list.
- On the page for your gallery, select Add from the top of the page and then select VM application definition from the drop-down. The Create a VM application definition page opens.
- In the Basics tab, enter a name for your application and choose whether the application is for VMs running Linux or Windows.
- Select the Publishing options tab if you want to specify any of the following optional settings for your VM application definition:
- A description of the VM application definition.
- End of life date
- Link to a Eula
- URI of a privacy statement
- URI for release notes
- When you're done, select Review + create.
- When validation completes, select Create to have the definition deployed.
- Once the deployment is complete, select Go to resource.
- On the page for the application, select Create a VM application version. The Create a VM Application Version page opens.
- Enter a version number like 1.0.0.
- Select the region where you've uploaded your application package.
- Under Source application package, select Browse. Select the storage account, then the container where your package is located. Select the package from the list and then select Select when you're done. Alternatively, you can paste the SAS URI in this field if preferred.
- Type in the Install script. You can also provide the Uninstall script and Update script. See the Overview for information on how to create the scripts.
- If you have a default configuration file uploaded to a storage account, you can select it in Default configuration.
- Select Exclude from latest if you don't want this version to appear as the latest version when you create a VM.
- For End of life date, choose a date in the future to track when this version should be retired. It isn't deleted or removed automatically, it's only for your own tracking.
- To replicate this version to other regions, select the Replication tab and add more regions and make changes to the number of replicas per region. The original region where your version was created must be in the list and can't be removed.
- When you're done making changes, select Review + create at the bottom of the page.
- When validation shows as passed, select Create to deploy your VM application version.
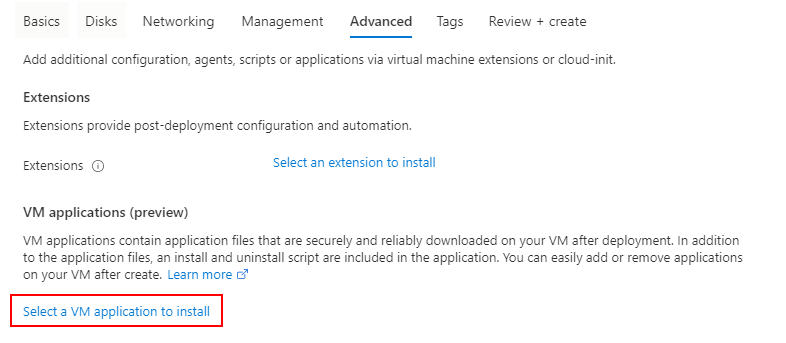
Now you can create a VM and deploy the VM application to it using the portal. Just create the VM as usual, and under the Advanced tab, choose Select a VM application to install.
Select the VM application from the list, and then select Save at the bottom of the page.

If you have more than one VM application to install, you can set the install order for each VM application back on the Advanced tab.
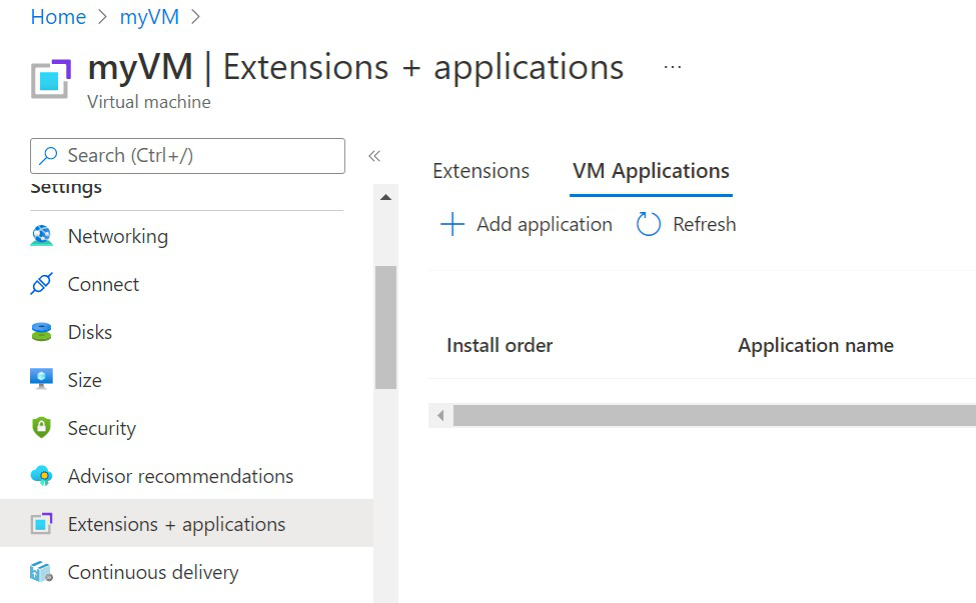
You can also deploy the VM application to currently running VMs. Select the Extensions + applications option under Settings in the left menu when viewing the VM details in the portal.
Choose VM applications and then select Add application to add your VM application.
Select the VM application from the list, and then select Save at the bottom of the page.
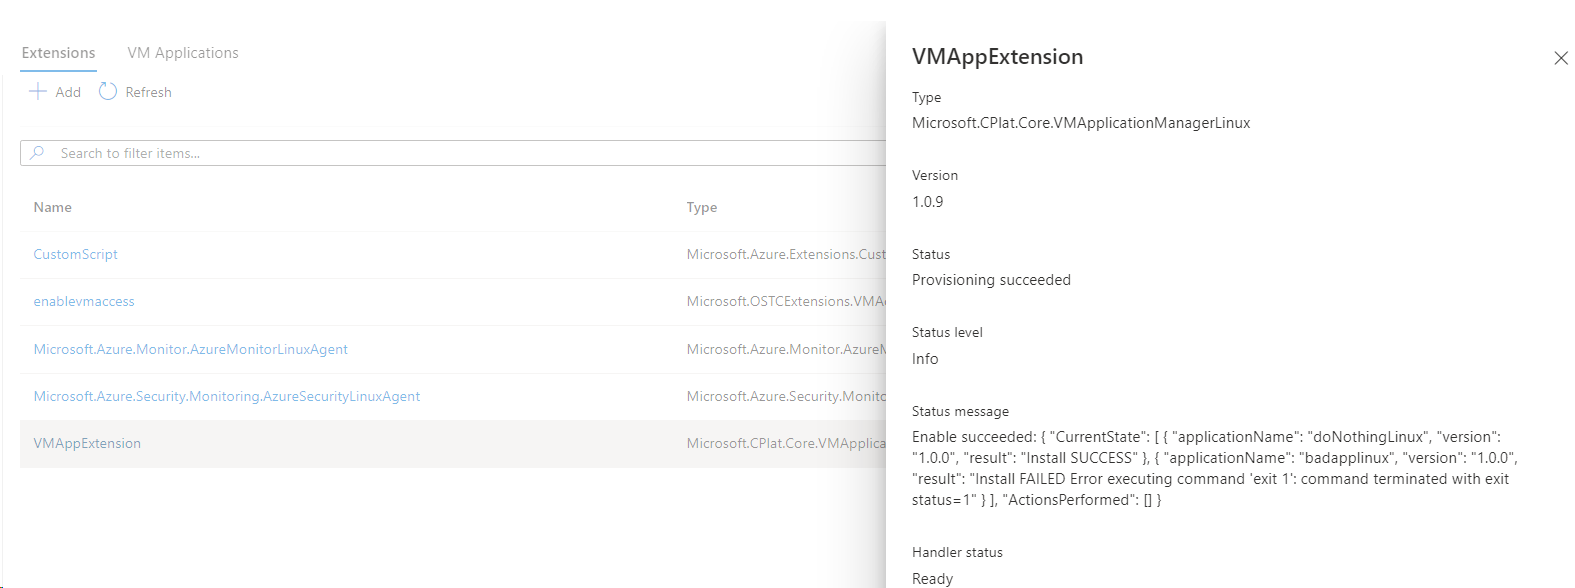
To show the VM application status, go to the Extensions + applications tab/settings and check the status of the VMAppExtension:
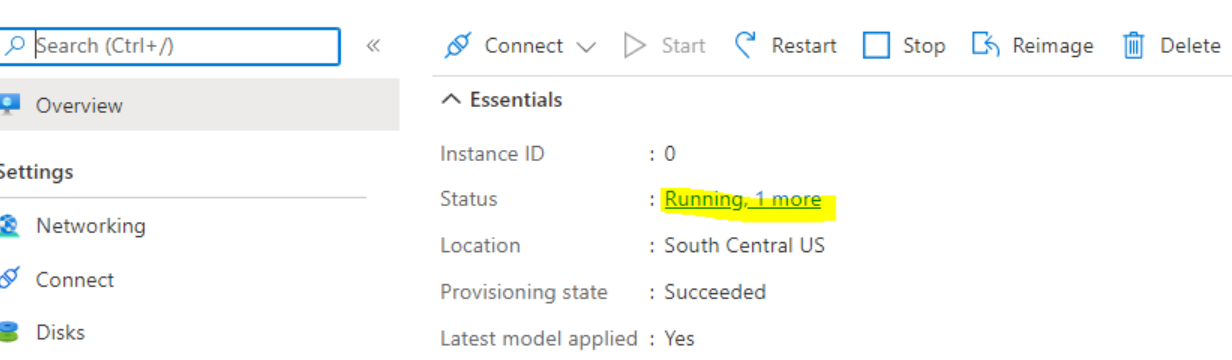
To show the VM application status for VMSS, go to the VMSS page, Instances, select one of them, then go to VMAppExtension:
VM applications require Azure CLI version 2.30.0 or later.
Create the VM application definition using az sig gallery-application create. In this example, we're creating a VM application definition named myApp for Linux-based VMs.
az sig gallery-application create \
    --application-name myApp \
    --gallery-name myGallery \
    --resource-group myResourceGroup \
    --os-type Linux \
    --location "East US"
Create a VM application version using az sig gallery-application version create. Allowed characters for version are numbers and periods. Numbers must be within the range of a 32-bit integer. Format: MajorVersion.MinorVersion.Patch.
Replace the values of the parameters with your own.
az sig gallery-application version create \
   --version-name 1.0.0 \
   --application-name myApp \
   --gallery-name myGallery \
   --location "East US" \
   --resource-group myResourceGroup \
   --package-file-link "https://<storage account name>.blob.core.windows.net/<container name>/<filename>" \
   --install-command "mv myApp .\myApp\myApp" \
   --remove-command "rm .\myApp\myApp" \
   --update-command  "mv myApp .\myApp\myApp" \
   --default-configuration-file-link "https://<storage account name>.blob.core.windows.net/<container name>/<filename>"\
Set a VM application to an existing VM using az vm application set and replace the values of the parameters with your own.
az vm application set \
	--resource-group myResourceGroup \
	--name myVM \
  	--app-version-ids /subscriptions/{subID}/resourceGroups/MyResourceGroup/providers/Microsoft.Compute/galleries/myGallery/applications/myApp/versions/1.0.0 \
  	--treat-deployment-as-failure true
For setting multiple applications on a VM:
az vm application set \
	--resource-group myResourceGroup \
	--name myVM \
	--app-version-ids /subscriptions/{subId}/resourceGroups/myResourceGroup/providers/Microsoft.Compute/galleries/myGallery/applications/myApp/versions/1.0.0 /subscriptions/{subId}/resourceGroups/myResourceGroup/providers/Microsoft.Compute/galleries/myGallery/applications/myApp2/versions/1.0.1 \
	--treat-deployment-as-failure true true
To add an application to a VMSS, use az vmss application set:
az vmss application set \
	--resource-group myResourceGroup \
	--name myVmss \
	--app-version-ids /subscriptions/{subId}/resourceGroups/myResourceGroup/providers/Microsoft.Compute/galleries/myGallery/applications/myApp/versions/1.0.0 \
	--treat-deployment-as-failure true
To add multiple applications to a VMSS:
az vmss application set \
	--resource-group myResourceGroup \
	--name myVmss
	--app-version-ids /subscriptions/{subId}/resourceGroups/myResourceGroup/providers/Microsoft.Compute/galleries/myGallery/applications/myApp/versions/1.0.0 /subscriptions/{subId}/resourceGroups/myResourceGroup/providers/Microsoft.Compute/galleries/myGallery/applications/myApp2/versions/1.0.0 \
	--treat-deployment-as-failure true
To verify application VM deployment status, use az vm get-instance-view:
az vm get-instance-view -g myResourceGroup -n myVM --query "instanceView.extensions[?name == 'VMAppExtension']"
To verify application VMSS deployment status, use az vmss get-instance-view:
az vmss get-instance-view --ids (az vmss list-instances -g myResourceGroup -n myVmss --query "[*].id" -o tsv) --query "[*].extensions[?name == 'VMAppExtension']"
Note
The above VMSS deployment status command does not list the instance ID with the result. To show the instance ID with the status of the extension in each instance, some additional scripting is required. Refer to the below VMSS CLI example that contains PowerShell syntax:
$ids = az vmss list-instances -g myResourceGroup -n myVmss --query "[*].{id: id, instanceId: instanceId}" | ConvertFrom-Json
$ids | Foreach-Object {
    $iid = $_.instanceId
    Write-Output "instanceId: $iid"
    az vmss get-instance-view --ids $_.id --query "extensions[?name == 'VMAppExtension']"
}
Create the VM application definition using New-AzGalleryApplication. In this example, we're creating a Linux app named myApp in the myGallery Azure Compute Gallery, in the myGallery resource group and I've given a short description of the VM application for my own use. Replace the values as needed.
$galleryName = "myGallery"
$rgName = "myResourceGroup"
$applicationName = "myApp"
New-AzGalleryApplication `
  -ResourceGroupName $rgName `
  -GalleryName $galleryName `
  -Location "East US" `
  -Name $applicationName `
  -SupportedOSType Linux `
  -Description "Backend Linux application for finance."
Create a version of your application using New-AzGalleryApplicationVersion. Allowed characters for version are numbers and periods. Numbers must be within the range of a 32-bit integer. Format: MajorVersion.MinorVersion.Patch.
In this example, we're creating version number 1.0.0. Replace the values of the variables as needed.
$galleryName = "myGallery"
$rgName = "myResourceGroup"
$applicationName = "myApp"
$version = "1.0.0"
New-AzGalleryApplicationVersion `
   -ResourceGroupName $rgName `
   -GalleryName $galleryName `
   -GalleryApplicationName $applicationName `
   -Name $version `
   -PackageFileLink "https://<storage account name>.blob.core.windows.net/<container name>/<filename>" `
   -DefaultConfigFileLink "https://<storage account name>.blob.core.windows.net/<container name>/<filename>" `
   -Location "East US" `
   -Install "mv myApp .\myApp\myApp" `
   -Remove "rm .\myApp\myApp" `
To add the application to an existing VM, get the application version and use that to get the VM application version ID. Use the ID to add the application to the VM configuration.
$galleryName = "myGallery"
$rgName = "myResourceGroup"
$applicationName = "myApp"
$version = "1.0.0"
$vmName = "myVM"
$vm = Get-AzVM -ResourceGroupName $rgname -Name $vmName
$appVersion = Get-AzGalleryApplicationVersion `
   -GalleryApplicationName $applicationName `
   -GalleryName $galleryName `
   -Name $version `
   -ResourceGroupName $rgName
$packageId = $appVersion.Id
$app = New-AzVmGalleryApplication -PackageReferenceId $packageId
Add-AzVmGalleryApplication -VM $vm -GalleryApplication $app -TreatFailureAsDeploymentFailure true
Update-AzVM -ResourceGroupName $rgName -VM $vm
To add the application to a VMSS:
$vmss = Get-AzVmss -ResourceGroupName $rgname -Name $vmssName
$appVersion = Get-AzGalleryApplicationVersion `
   -GalleryApplicationName $applicationName `
   -GalleryName $galleryName `
   -Name $version `
   -ResourceGroupName $rgName
$packageId = $appVersion.Id
$app = New-AzVmssGalleryApplication -PackageReferenceId $packageId
Add-AzVmssGalleryApplication -VirtualMachineScaleSetVM $vmss.VirtualMachineProfile -GalleryApplication $app
Update-AzVmss -ResourceGroupName $rgName -VirtualMachineScaleSet $vmss -VMScaleSetName $vmssName
Verify the application succeeded:
$rgName = "myResourceGroup"
$vmName = "myVM"
$result = Get-AzVM -ResourceGroupName $rgName -VMName $vmName -Status
$result.Extensions | Where-Object {$_.Name -eq "VMAppExtension"} | ConvertTo-Json
To verify for VMSS:
$rgName = "myResourceGroup"
$vmssName = "myVMss"
$result = Get-AzVmssVM -ResourceGroupName $rgName -VMScaleSetName $vmssName -InstanceView
$resultSummary  = New-Object System.Collections.ArrayList
$result | ForEach-Object {
    $res = @{ instanceId = $_.InstanceId; vmappStatus = $_.InstanceView.Extensions | Where-Object {$_.Name -eq "VMAppExtension"}}
    $resultSummary.Add($res) | Out-Null
}
$resultSummary | ConvertTo-Json -Depth 5
Create the application definition.
PUT
/subscriptions/\<**subscriptionId**\>/resourceGroups/\<**resourceGroupName**\>/providers/Microsoft.Compute/galleries/\<**galleryName**\>/applications/\<**applicationName**\>?api-version=2019-03-01

{
    "location": "West US",
    "name": "myApp",
    "properties": {
        "supportedOSType": "Windows | Linux",
        "endOfLifeDate": "2020-01-01"
    }
}
| Field Name |
Description |
Limitations |
| name |
A unique name for the VM Application within the gallery |
Max length of 117 characters. Allowed characters are uppercase or lowercase letters, digits, hyphen(-), period (.), underscore (_). Names not allowed to end with period(.). |
| supportedOSType |
Whether this is a Windows or Linux application |
“Windows” or “Linux” |
| endOfLifeDate |
A future end of life date for the application. Note this is for reference only, and isn't enforced. |
Valid future date |
Create a VM application version.
PUT
/subscriptions/\<**subscriptionId**\>/resourceGroups/\<**resourceGroupName**\>/providers/Microsoft.Compute/galleries/\<**galleryName**\>/applications/\<**applicationName**\>/versions/\<**versionName**\>?api-version=2019-03-01

{
  "location": "$location",
  "properties": {
    "publishingProfile": {
      "source": {
        "mediaLink": "$mediaLink",
        "defaultConfigurationLink": "$configLink"
      },
      "manageActions": {
        "install": "echo installed",
        "remove": "echo removed",
        "update": "echo update"
      },
      "targetRegions": [
        {
          "name": "$location1",
          "regionalReplicaCount": 1
        },
        { "name": "$location1" }
      ]
    },
    "endofLifeDate": "datetime",
    "excludeFromLatest": "true | false"
  }
}
| Field Name |
Description |
Limitations |
| location |
Source location for the VM Application version |
Valid Azure region |
| mediaLink |
The url containing the application version package |
Valid and existing storage url |
| defaultConfigurationLink |
Optional. The url containing the default configuration, which may be overridden at deployment time. |
Valid and existing storage url |
| Install |
The command to install the application |
Valid command for the given OS |
| Remove |
The command to remove the application |
Valid command for the given OS |
| Update |
Optional. The command to update the application. If not specified and an update is required, the old version is removed and the new one installed. |
Valid command for the given OS |
| targetRegions/name |
The name of a region to which to replicate |
Validate Azure region |
| targetRegions/regionalReplicaCount |
Optional. The number of replicas in the region to create. Defaults to 1. |
Integer between 1 and 3 inclusive |
| endOfLifeDate |
A future end of life date for the application version. Note this is for customer reference only, and isn't enforced. |
Valid future date |
| excludeFromLatest |
If specified, this version won't be considered for latest. |
True or false |
To add a VM application version to a VM, perform a PUT on the VM.
PUT
/subscriptions/\<**subscriptionId**\>/resourceGroups/\<**resourceGroupName**\>/providers/Microsoft.Compute/virtualMachines/\<**VMName**\>?api-version=2019-03-01

{
  "properties": {
    "applicationProfile": {
      "galleryApplications": [
        {
          "order": 1,
          "packageReferenceId": "/subscriptions/{subscriptionId}/resourceGroups/<resource group>/providers/Microsoft.Compute/galleries/{gallery name}/applications/{application name}/versions/{version}",
          "configurationReference": "{path to configuration storage blob}",
          "treatFailureAsDeploymentFailure": false
        }
      ]
    }
  },
  "name": "{vm name}",
  "id": "/subscriptions/{subscriptionId}/resourceGroups/{resource group}/providers/Microsoft.Compute/virtualMachines/{vm name}",
  "location": "{vm location}"
}
To apply the VM application to a uniform scale set:
PUT
/subscriptions/\<**subscriptionId**\>/resourceGroups/\<**resourceGroupName**\>/providers/Microsoft.Compute/
virtualMachineScaleSets/\<**VMSSName**\>?api-version=2019-03-01

{
  "properties": {
    "virtualMachineProfile": {
      "applicationProfile": {
        "galleryApplications": [
          {
            "order": 1,
            "packageReferenceId": "/subscriptions/{subscriptionId}/resourceGroups/<resource group>/providers/Microsoft.Compute/galleries/{gallery name}/applications/{application name}/versions/{version}",
            "configurationReference": "{path to configuration storage blob}",
            "treatFailureAsDeploymentFailure": false
          }
        ]
      }
    }
  },
  "name": "{vm name}",
  "id": "/subscriptions/{subscriptionId}/resourceGroups/{resource group}/providers/Microsoft.Compute/virtualMachines/{vm name}",
  "location": "{vm location}"
}
| Field Name |
Description |
Limitations |
| order |
Optional. The order in which the applications should be deployed. See below. |
Validate integer |
| packageReferenceId |
A reference the gallery application version |
Valid application version reference |
| configurationReference |
Optional. The full url of a storage blob containing the configuration for this deployment. This will override any value provided for defaultConfiguration earlier. |
Valid storage blob reference |
| treatFailureAsDeploymentFailure |
Optional. Provisioning status for VM App. When set to false, provisioning status will always show 'succeeded' regardless of app deployment failure. |
True or False |
The order field may be used to specify dependencies between applications. The rules for order are the following:
| Case |
Install Meaning |
Failure Meaning |
| No order specified |
Unordered applications are installed after ordered applications. There's no guarantee of installation order amongst the unordered applications. |
Installation failures of other applications, be it ordered or unordered doesn’t affect the installation of unordered applications. |
| Duplicate order values |
Application is installed in any order compared to other applications with the same order. All applications of the same order will be installed after those with lower orders and before those with higher orders. |
If a previous application with a lower order failed to install, no applications with this order install. If any application with this order fails to install, no applications with a higher order install. |
| Increasing orders |
Application will be installed after those with lower orders and before those with higher orders. |
If a previous application with a lower order failed to install, this application won't install. If this application fails to install, no application with a higher order installs. |
The response includes the full VM model. The following are the
relevant parts.
{
  "name": "{vm name}",
  "id": "{vm id}",
  "type": "Microsoft.Compute/virtualMachines",
  "location": "{vm location}",
  "properties": {
    "applicationProfile": {
      "galleryApplications": ""
    },
    "provisioningState": "Updating"
  },
  "resources": [
    {
      "name": "VMAppExtension",
      "id": "{extension id}",
      "type": "Microsoft.Compute/virtualMachines/extensions",
      "location": "centraluseuap",
      "properties": "@{autoUpgradeMinorVersion=True; forceUpdateTag=7c4223fc-f4ea-4179-ada8-c8a85a1399f5; provisioningState=Creating; publisher=Microsoft.CPlat.Core; type=VMApplicationManagerLinux; typeHandlerVersion=1.0; settings=}"
    }
  ]
}
If the VM applications haven't yet been installed on the VM, the value will be empty.
To get the result of VM instance view:
GET
/subscriptions/\<**subscriptionId**\>/resourceGroups/\<**resourceGroupName**\>/providers/Microsoft.Compute/virtualMachines/\<**VMName**\>/instanceView?api-version=2019-03-01
The result looks like this:
{
    ...
    "extensions"  [
    ...
        {
            "name":  "VMAppExtension",
            "type":  "Microsoft.CPlat.Core.VMApplicationManagerLinux",
            "typeHandlerVersion":  "1.0.9",
            "statuses":  [
                            {
                                "code":  "ProvisioningState/succeeded",
                                "level":  "Info",
                                "displayStatus":  "Provisioning succeeded",
                                "message":  "Enable succeeded: {\n \"CurrentState\": [\n  {\n   \"applicationName\": \"doNothingLinux\",\n   \"version\": \"1.0.0\",\n   \"result\": \"Install SUCCESS\"\n  },\n  {
        \n   \"applicationName\": \"badapplinux\",\n   \"version\": \"1.0.0\",\n   \"result\": \"Install FAILED Error executing command \u0027exit 1\u0027: command terminated with exit status=1\"\n  }\n ],\n \"ActionsPerformed\": []\n}
        "
                            }
                        ]
        }
    ...
    ]
}
The VM App status is in the status message of the result of the VM App extension in the instance view.
To get the status for a VMSS Application:
GET
/subscriptions/\<**subscriptionId**\>/resourceGroups/\<**resourceGroupName**\>/providers/Microsoft.Compute/ virtualMachineScaleSets/\<**VMSSName**\>/virtualMachines/<**instanceId**>/instanceView?api-version=2019-03-01
The output is similar to the VM example earlier.