Migrate to Premium Storage by using Azure Site Recovery
Applies to: ✔️ Linux VMs ✔️ Windows VMs
Azure premium SSDs deliver high-performance, low-latency disk support for virtual machines (VMs) that are running I/O-intensive workloads. This guide helps you migrate your VM disks from a standard storage account to a premium storage account by using Azure Site Recovery.
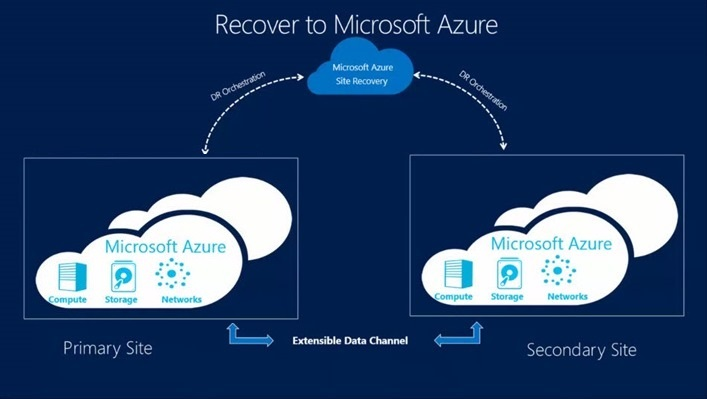
Site Recovery is an Azure service that contributes to your strategy for business continuity and disaster recovery by orchestrating the replication of on-premises physical servers and VMs to the cloud (Azure) or to a secondary datacenter. When outages occur in your primary location, you fail over to the secondary location to keep applications and workloads available. You fail back to your primary location when it returns to normal operation.
Site Recovery provides test failovers to support disaster recovery drills without affecting production environments. You can run failovers with minimal data loss (depending on replication frequency) for unexpected disasters. In the scenario of migrating to Premium Storage, you can use the failover in Site Recovery to migrate target disks to a premium storage account.
We recommend migrating to Premium Storage by using Site Recovery because this option provides minimal downtime. This option also avoids the manual execution of copying disks and creating new VMs. Site Recovery will systematically copy your disks and create new VMs during failover.
Site Recovery supports a number of types of failover with minimal or no downtime. To plan your downtime and estimate data loss, see the types of failover in Site Recovery. If you prepare to connect to Azure VMs after failover, you should be able to connect to the Azure VM by using RDP after failover.
Azure Site Recovery components
These Site Recovery components are relevant to this migration scenario:
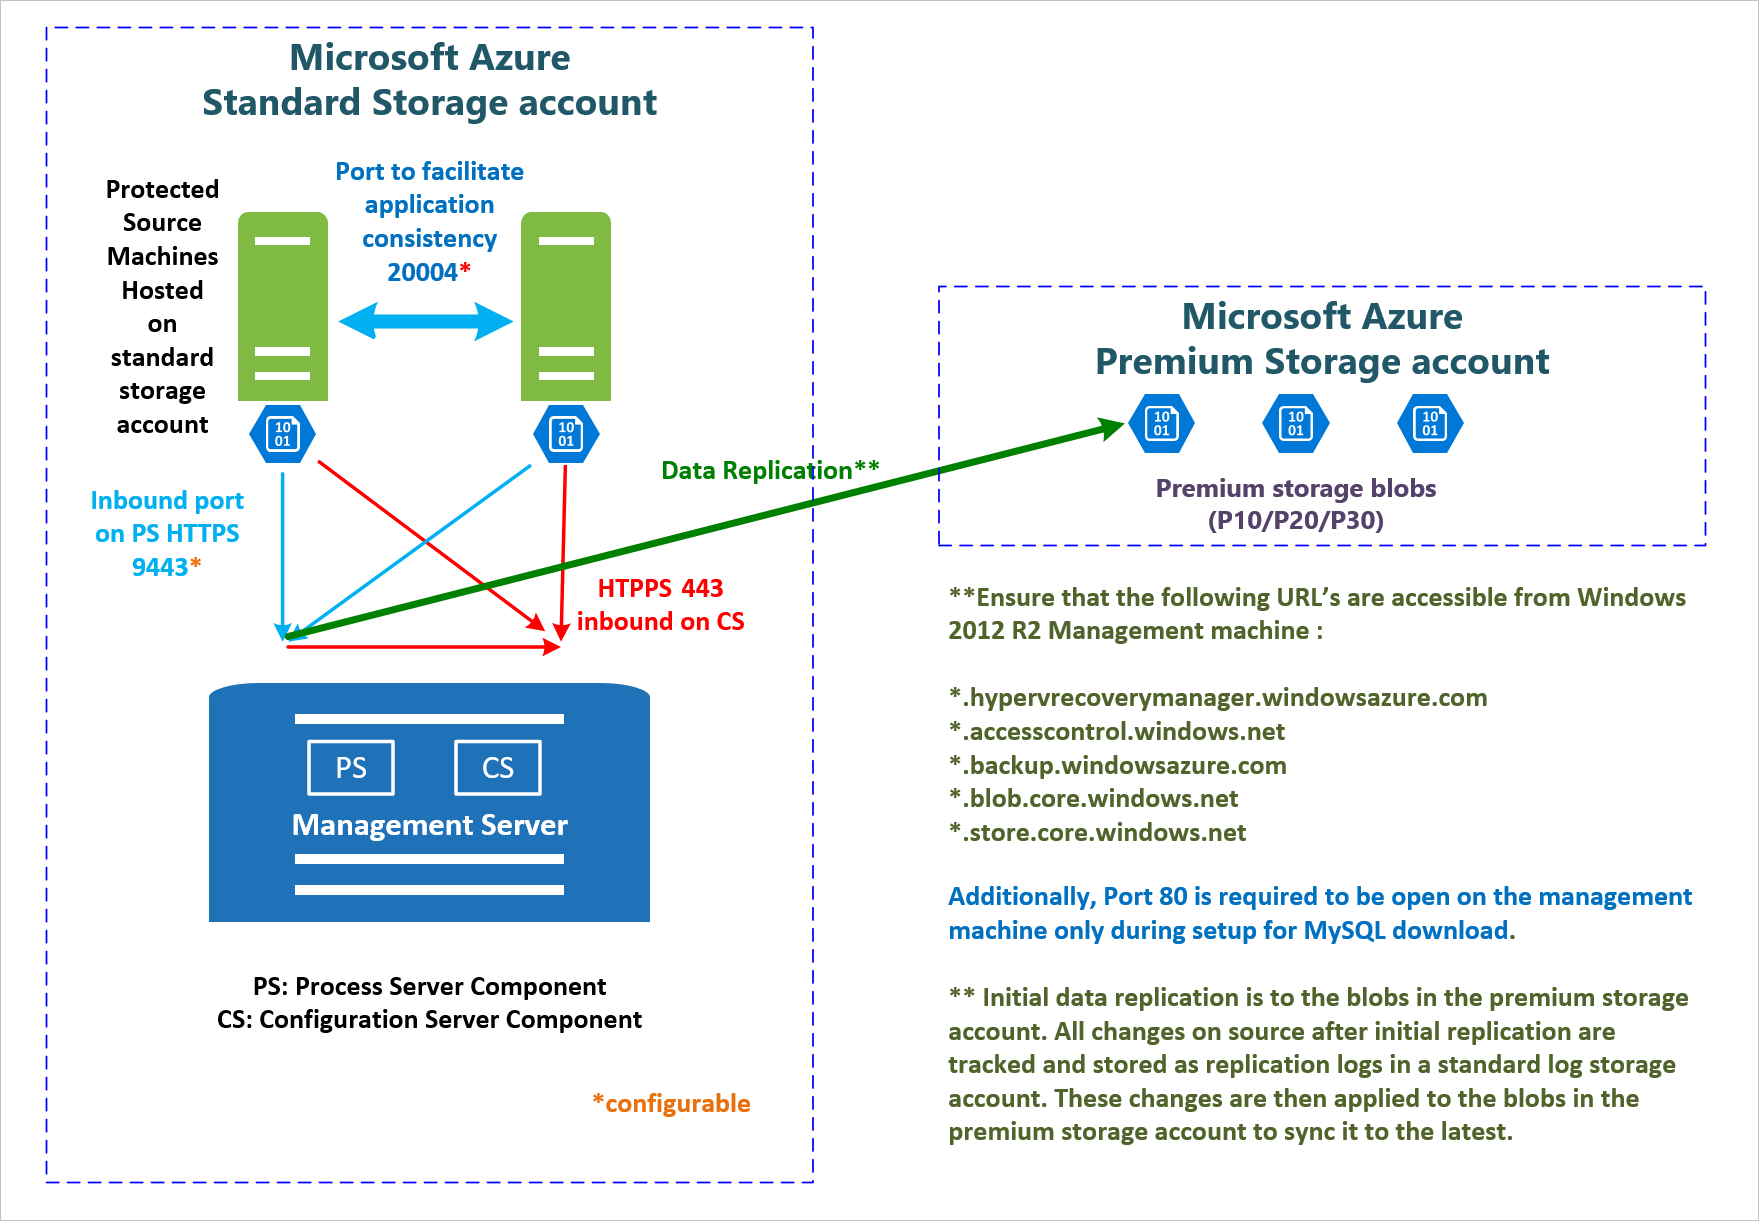
Configuration server is an Azure VM that coordinates communication and manages data replication and recovery processes. On this VM, you run a single setup file to install the configuration server and an additional component, called a process server, as a replication gateway. Read about configuration server prerequisites. You set up the configuration server only once, and you can use it for all migrations to the same region.
Process server is a replication gateway that:
- Receives replication data from source VMs.
- Optimizes the data with caching, compression, and encryption.
- Sends the data to a storage account.
It also handles push installation of the mobility service to source VMs and performs automatic discovery of source VMs. The default process server is installed on the configuration server. You can deploy additional standalone process servers to scale your deployment. Read about best practices for process server deployment and deploying additional process servers. You set up the process server only once, and you can use it for all migrations to the same region.
Mobility service is a component that is deployed on every standard VM that you want to replicate. It captures data writes on the standard VM and forwards them to the process server. Read about replicated machine prerequisites.
This graphic shows how these components interact:
Note
Site Recovery does not support the migration of Storage Spaces disks.
For additional components for other scenarios, see Scenario architecture.
Azure essentials
These are the Azure requirements for this migration scenario:
- An Azure subscription.
- An Azure premium storage account to store replicated data.
- An Azure virtual network to which VMs will connect when they're created at failover. The Azure virtual network must be in the same region as the one in which Site Recovery runs.
- An Azure standard storage account to store replication logs. This can be the same storage account for the VM disks that are being migrated.
Prerequisites
- Understand the relevant migration scenario components in the preceding section.
- Plan your downtime by learning about failover in Site Recovery.
Setup and migration steps
You can use Site Recovery to migrate Azure IaaS VMs between regions or within same region. The following instructions are tailored for this migration scenario from the article Replicate VMware VMs or physical servers to Azure. Please follow the links for detailed steps in addition to the instructions in this article.
Step 1: Create a Recovery Services vault
- Open the Azure portal.
- Select Create a resource > Management > Backup and Site Recovery (OMS). Alternatively, you can select Browse > Recovery Services Vault > Add.
Note
Backup and Site Recovery was formerly part of the OMS suite.
- Specify a region that VMs will be replicated to. For the purpose of migration in the same region, select the region where your source VMs and source storage accounts are.
Step 2: Choose your protection goals
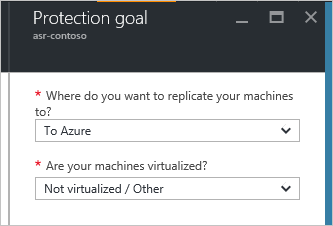
On the VM where you want to install the configuration server, open the Azure portal.
Go to Recovery Services vaults > Settings > Site Recovery > Step 1: Prepare Infrastructure > Protection goal.
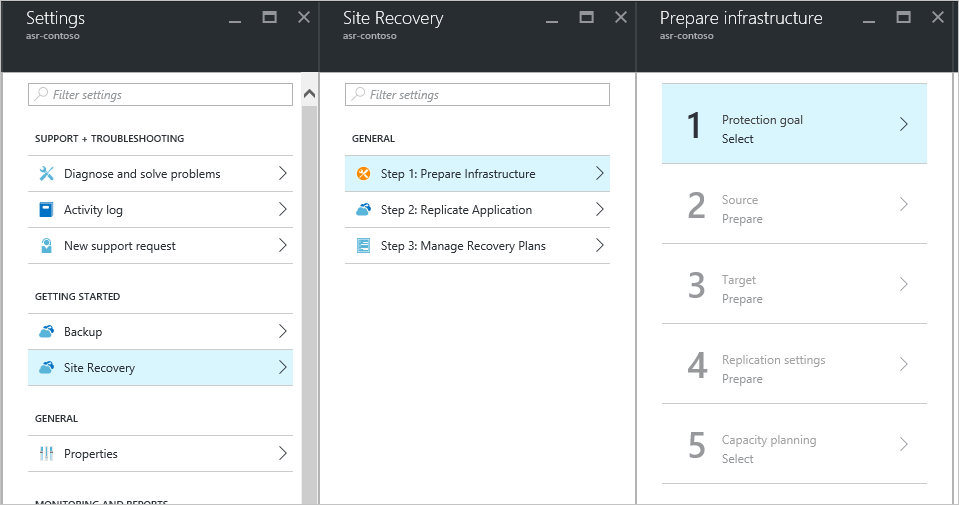
Under Protection goal, in the first drop-down list, select To Azure. In the second drop-down list, select Not virtualized / Other, and then select OK.
Step 3: Set up the source environment (configuration server)
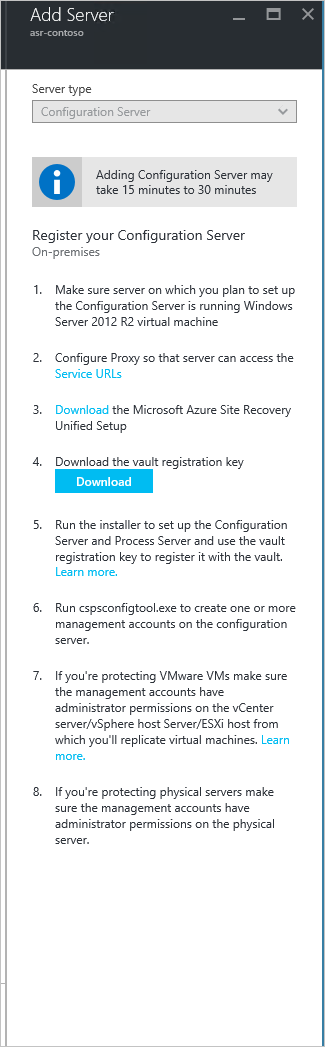
Download Azure Site Recovery Unified Setup and the vault registration key by going to the Prepare infrastructure > Prepare source > Add Server panes.
You will need the vault registration key to run the unified setup. The key is valid for five days after you generate it.
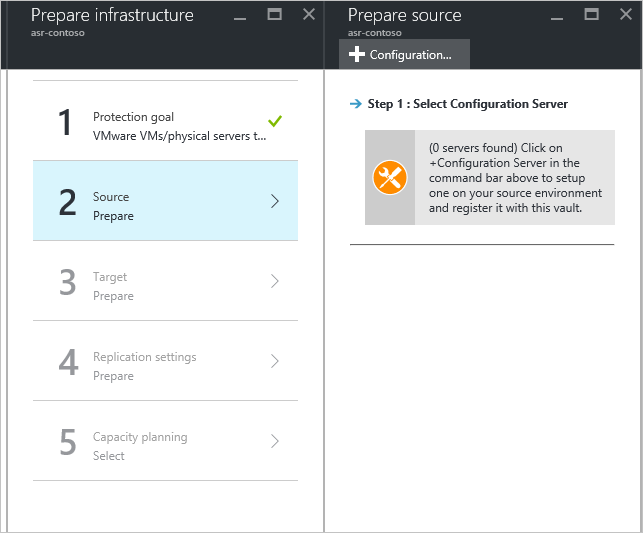
In the Add Server pane, add a configuration server.
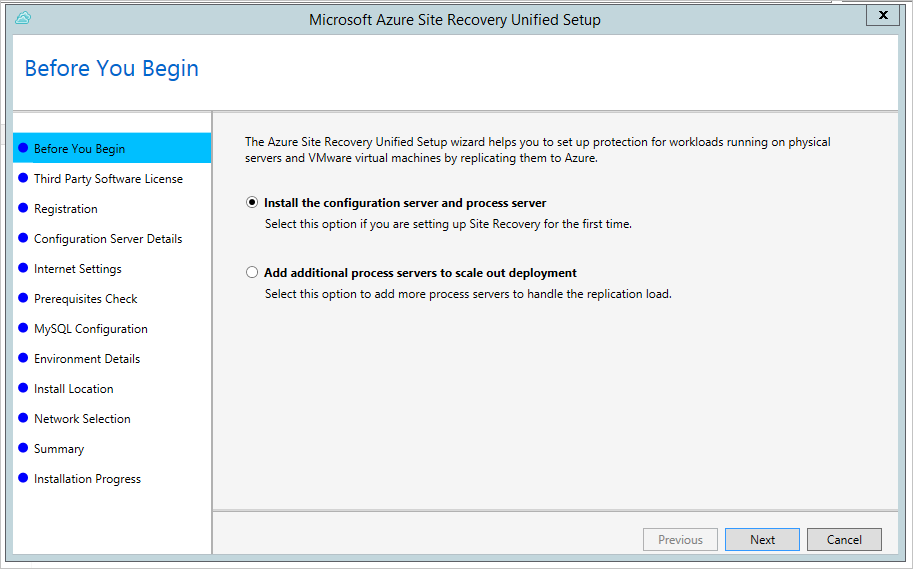
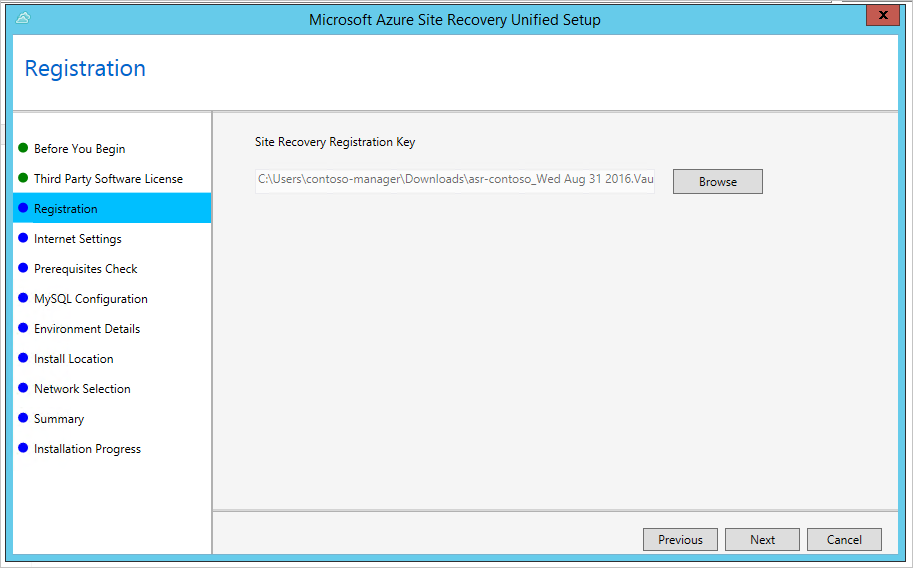
On the VM that you're using as the configuration server, run Unified Setup to install the configuration server and the process server. You can walk through the screenshots to complete the installation. You can refer to the following screenshots for steps specified for this migration scenario.
In Before You Begin, select Install the configuration server and process server.
In Registration, browse and select the registration key that you downloaded from the vault.
In Environment Details, select whether you're going to replicate VMware VMs. For this migration scenario, choose No.

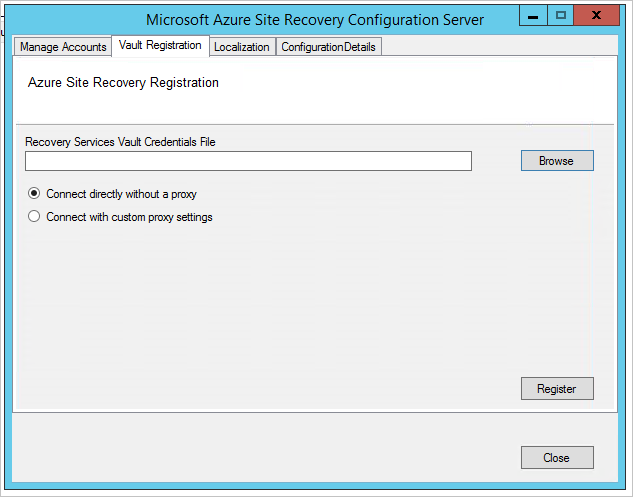
After the installation is complete, do the following in the Microsoft Azure Site Recovery Configuration Server window:
Use the Manage Accounts tab to create the account that Site Recovery can use for automatic discovery. (In the scenario about protecting physical machines, setting up the account isn't relevant, but you need at least one account to enable one of the following steps. In this case, you can name the account and password as any.)
Use the Vault Registration tab to upload the vault credential file.
Step 4: Set up the target environment
Select Prepare infrastructure > Target, and specify the deployment model that you want to use for VMs after failover. You can choose Classic or Resource Manager, depending on your scenario.
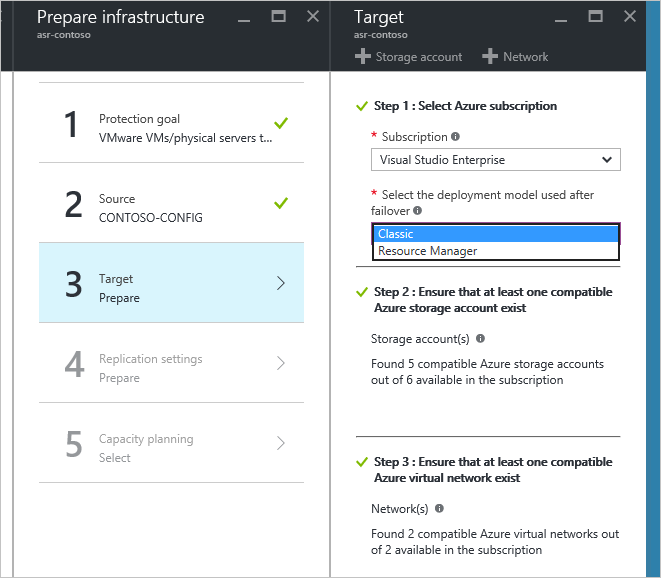
Site Recovery checks that you have one or more compatible Azure storage accounts and networks.
Note
If you're using a premium storage account for replicated data, you need to set up an additional standard storage account to store replication logs.
Step 5: Set up replication settings
To verify that your configuration server is successfully associated with the replication policy that you create, follow Set up replication settings.
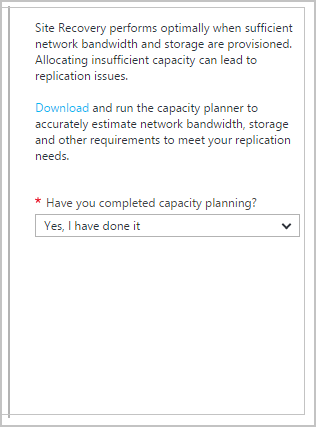
Step 6: Plan capacity
Use the capacity planner to accurately estimate network bandwidth, storage, and other requirements to meet your replication needs.
When you're done, select Yes, I have done it in Have you completed capacity planning?.
Step 7: Install the mobility service and enable replication
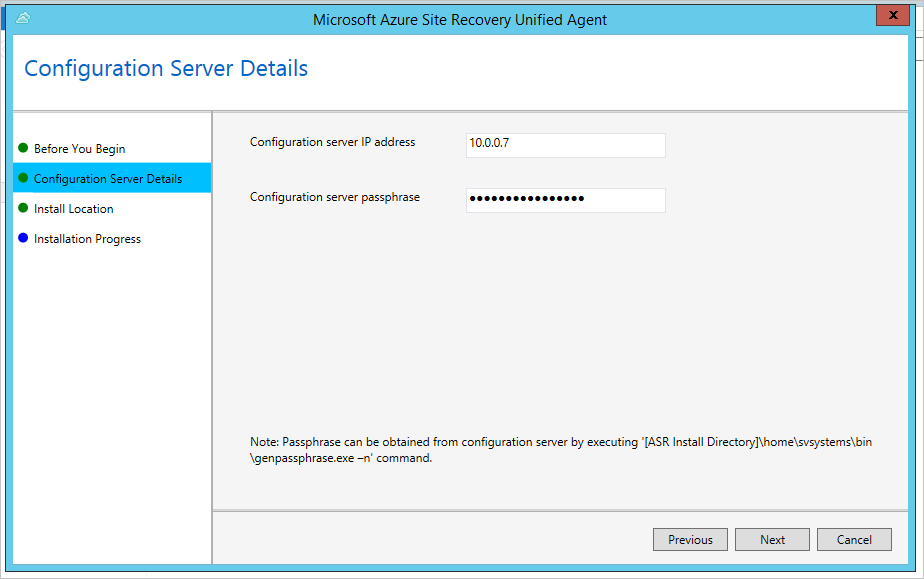
You can choose to push installation to your source VMs or to manually install the mobility service on your source VMs. You can find the requirement of pushing installation and the path of the manual installer in the provided link. If you're doing a manual installation, you might need to use an internal IP address to find the configuration server.
The failed-over VM will have two temporary disks: one from the primary VM and the other created during the provisioning of the VM in the recovery region. To exclude the temporary disk before replication, install the mobility service before you enable replication. To learn more about how to exclude the temporary disk, see Exclude disks from replication.
Enable replication as follows:
- Select Replicate Application > Source. After you've enabled replication for the first time, select +Replicate in the vault to enable replication for additional machines.
- In step 1, set up Source as your process server.
- In step 2, specify the post-failover deployment model, a premium storage account to migrate to, a standard storage account to save logs, and a virtual network to fail to.
- In step 3, add protected VMs by IP address. (You might need an internal IP address to find them.)
- In step 4, configure the properties by selecting the accounts that you set up previously on the process server.
- In step 5, choose the replication policy that you created previously in "Step 5: Set up replication settings."
- Select OK.
Note
When an Azure VM is deallocated and started again, there is no guarantee that it will get the same IP address. If the IP address of the configuration server/process server or the protected Azure VMs changes, the replication in this scenario might not work correctly.

When you design your Azure Storage environment, we recommend that you use separate storage accounts for each VM in an availability set. We recommend that you follow the best practice in the storage layer to use multiple storage accounts for each availability set. Distributing VM disks to multiple storage accounts helps to improve storage availability and distributes the I/O across the Azure storage infrastructure.
If your VMs are in an availability set, instead of replicating disks of all VMs into one storage account, we highly recommend migrating multiple VMs multiple times. That way, the VMs in the same availability set do not share a single storage account. Use the Enable Replication pane to set up a destination storage account for each VM, one at a time.
You can choose a post-failover deployment model according to your need. If you choose Azure Resource Manager as your post-failover deployment model, you can fail over a VM (Resource Manager) to a VM (Resource Manager), or you can fail over a VM (classic) to a VM (Resource Manager).
Step 8: Run a test failover
To check whether your replication is complete, select your Site Recovery instance and then select Settings > Replicated Items. You will see the status and percentage of your replication process.
After initial replication is complete, run a test failover to validate your replication strategy. For detailed steps of a test failover, see Run a test failover in Site Recovery.
Note
Before you run any failover, make sure that your VMs and replication strategy meet the requirements. For more information about running a test failover, see Test failover to Azure in Site Recovery.
You can see the status of your test failover in Settings > Jobs > YOUR_FAILOVER_PLAN_NAME. In the pane, you can see a breakdown of the steps and success/failure results. If the test failover fails at any step, select the step to check the error message.
Step 9: Run a failover
After the test failover is completed, run a failover to migrate your disks to Premium Storage and replicate the VM instances. Follow the detailed steps in Run a failover.
Be sure to select Shut down VMs and synchronize the latest data. This option specifies that Site Recovery should try to shut down the protected VMs and synchronize the data so that the latest version of the data will be failed over. If you don't select this option or the attempt doesn't succeed, the failover will be from the latest available recovery point for the VM.
Site Recovery will create a VM instance whose type is the same as or similar to a Premium Storage-capable VM. You can check the performance and price of various VM instances by going to Windows Virtual Machines Pricing or Linux Virtual Machines Pricing.
Post-migration steps
Configure replicated VMs to the availability set if applicable. Site Recovery does not support migrating VMs along with the availability set. Depending on the deployment of your replicated VM, do one of the following:
- For a VM created through the classic deployment model: Add the VM to the availability set in the Azure portal. For detailed steps, go to Add an existing virtual machine to an availability set.
- For a VM created through the Resource Manager deployment model: Save your configuration of the VM and then delete and re-create the VMs in the availability set.
Delete old VMs and disks. Make sure that the Premium disks are consistent with source disks and that the new VMs perform the same function as the source VMs. Delete the VM and delete the disks from your source storage accounts in the Azure portal. If there's a problem in which the disk is not deleted even though you deleted the VM, see Troubleshoot storage resource deletion errors.
Clean the Azure Site Recovery infrastructure. If Site Recovery is no longer needed, you can clean its infrastructure. Delete replicated items, the configuration server, and the recovery policy, and then delete the Azure Site Recovery vault.
Troubleshooting
- Monitor and troubleshoot protection for virtual machines and physical servers
- Microsoft Q&A question page for Microsoft Azure Site Recovery
Next steps
For specific scenarios for migrating virtual machines, see the following resources:
- Migrate Azure Virtual Machines between Storage Accounts
- Create and upload a Windows Server VHD to Azure
- Migrating Virtual Machines from Amazon AWS to Microsoft Azure
Also, see the following resources to learn more about Azure Storage and Azure Virtual Machines:
Feedback
Coming soon: Throughout 2024 we will be phasing out GitHub Issues as the feedback mechanism for content and replacing it with a new feedback system. For more information see: https://aka.ms/ContentUserFeedback.
Submit and view feedback for