Configure forced tunneling for Virtual WAN Point-to-site VPN
Forced tunneling allows you to send all traffic (including Internet-bound traffic) from remote users to Azure. In Virtual WAN, forced tunneling for Point-to-site VPN remote users signifies that the 0.0.0.0/0 default route is advertised to remote VPN users.
Create a Virtual WAN hub
The steps in this article assume that you've already deployed a virtual WAN with one or more hubs.
To create a new virtual WAN and a new hub, use the steps in the following articles:
Set up Point-to-site VPN
The steps in this article also assume that you already deployed a Point-to-site VPN gateway in the Virtual WAN hub. It also assumes you have created Point-to-site VPN profiles to assign to the gateway.
To create the Point-to-site VPN gateway and related profiles, see Create a Point-to-site VPN gateway.
Advertise default route to clients
There are a couple ways to configure forced-tunneling and advertise the default route (0.0.0.0/0) to your remote user VPN clients connected to Virtual WAN.
- You can specify a static 0.0.0.0/0 route in the defaultRouteTable with next hop Virtual Network Connection. This will force all internet-bound traffic to be sent to a Network Virtual Appliance deployed in that spoke Virtual Network. For more detailed instructions, consider the alternate workflow described in Route through NVAs.
- You can use Azure Firewall Manager to configure Virtual WAN to send all internet-bound traffic via Azure Firewall deployed in the Virtual WAN hub. For configuration steps and a tutorial, see the Azure Firewall Manager documentation Securing virtual hubs. Alternatively, this can also be configured via using an Internet Traffic Routing Policy. For more information, see Routing Intent and Routing Policies.
- You can use Firewall Manager to send internet traffic via a third-party security provider. For more information on this capability, see Trusted security providers.
- You can configure one of your branches (Site-to-site VPN, ExpressRoute circuit) to advertise the 0.0.0.0/0 route to Virtual WAN.
After configuring one of the above four methods, make sure the EnableInternetSecurity flag is turned on for your Point-to-site VPN gateway. This flag must be set to true for your clients to be properly configured for forced-tunneling.
To turn on the EnableInternetSecurity flag, use the following PowerShell command, substituting the appropriate values for your environment.
Update-AzP2sVpnGateway -ResourceGroupName "sampleRG" -Name "p2sgwsamplename" -EnableInternetSecurityFlag
Download the Point-to-site VPN profile
To download the Point-to-site VPN profile, see global and hub profiles. The information in the zip-file downloaded from Azure portal is critical to properly configuring your clients.
Configure forced-tunneling for Azure VPN clients (OpenVPN)
The steps to configure forced-tunneling are different, depending on the operating system of the end user device.
Windows clients
Note
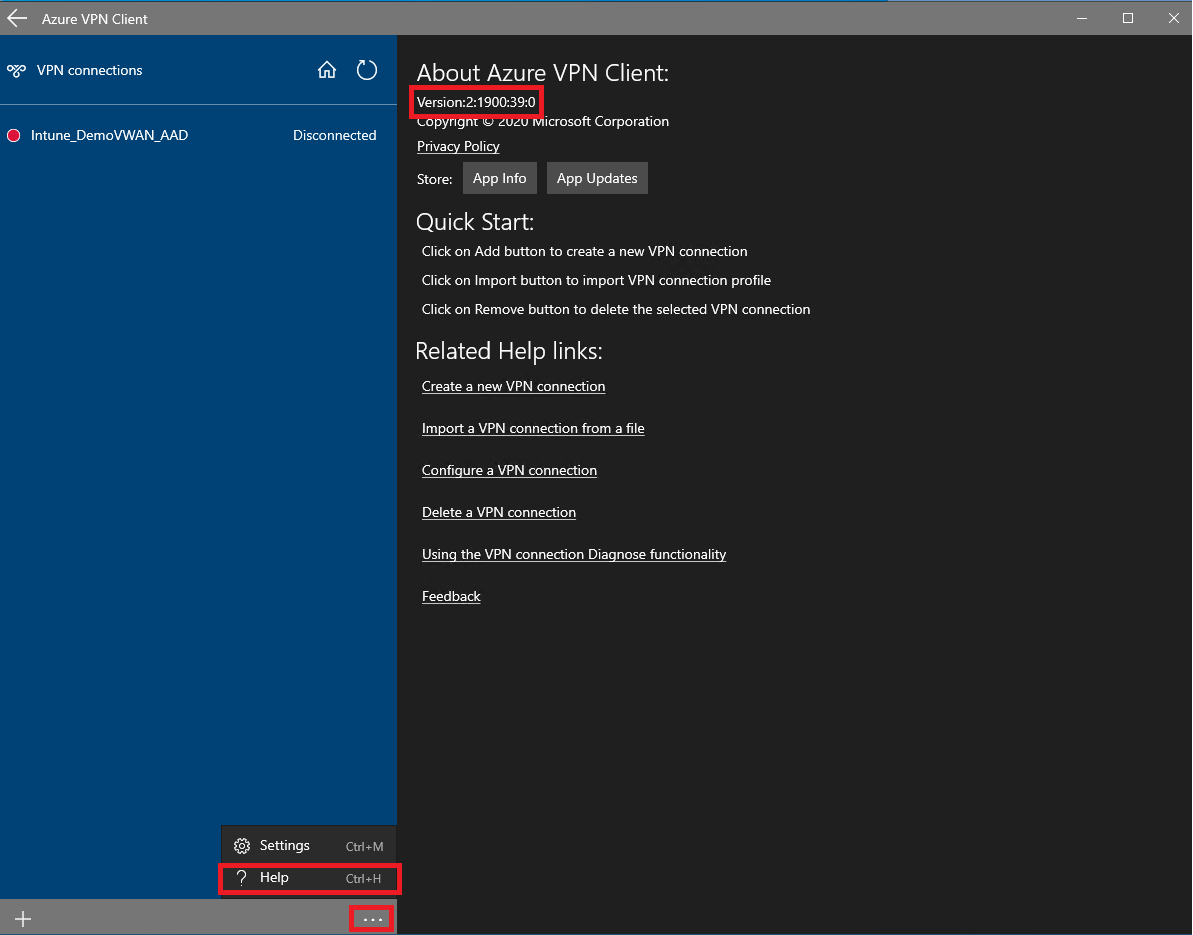
For Windows clients, forced tunneling with the Azure VPN client is only available with software version 2:1900:39.0 or newer.
Validate the version of your Azure VPN client is compatible with forced tunneling. To do this, click on the three dots at the bottom of the Azure VPN client, and click on Help. Alternatively, the keyboard short cut to navigate to Help is Ctrl-H. The version number can be found towards the top of the screen. Ensure your version number is 2:1900:39.0 or later.
Open the zip-file downloaded from the previous section. You should see a folder titled AzureVPN. Open the folder and open azurevpnconfig.xml in your favorite XML editing tool.
In azureconfig.xml, there's a field called version. If the number between the version tags is 1, change the version number to 2.
<version>2</version>Import the profile into the Azure VPN client. For more information on how to import a profile, see Azure VPN client import instructions.
Connect to the newly added connection. You are now force-tunneling all traffic to Azure Virtual WAN.

MacOS clients
Once a macOS client learns the default route from Azure, forced tunneling is automatically configured on the client device. There are no extra steps to take. For instructions on how to use the macOS Azure VPN client to connect to the Virtual WAN Point-to-site VPN gateway, see the macOS Configuration Guide.
Configuring forced-tunneling for IKEv2 clients
For IKEv2 clients, you cannot directly use the executable profiles downloaded from Azure portal. To properly configure the client, you'll need to run a PowerShell script or distribute the VPN profile via Intune.
Based on the authentication method configured on your Point-to-site VPN gateway, use a different EAP Configuration file. Sample EAP Configuration files are provided below.
IKEv2 with user certificate authentication
To use user certificates to authenticate remote users, use the sample PowerShell script below. To properly import the contents of the VpnSettings and EAP XML files into PowerShell, navigate to the appropriate directory before running the Get-Content PowerShell command.
# specify the name of the VPN Connection to be installed on the client
$vpnConnectionName = "SampleConnectionName"

# get the VPN Server FQDN from the profile downloaded from Azure Portal
$downloadedXML = [xml] (Get-Content VpnSettings.xml)
$vpnserverFQDN = $downloadedXML.VpnProfile.VpnServer

# use the appropriate EAP XML file based on the authentication method specified on the Point-to-site VPN gateway
$EAPXML = [xml] (Get-Content EapXML.xml)

# create the VPN Connection
Add-VpnConnection -Name $vpnConnectionName -ServerAddress $vpnserverFQDN -TunnelType Ikev2 -AuthenticationMethod Eap -EapConfigXmlStream $EAPXML

# enabled forced tunneling
Set-VpnConnection -Name $vpnConnectionName -SplitTunneling $false
The following example shows an EAP XML file for user-certificate based authentication. Replace the IssuerHash field with the Thumbprint of the Root Certificate to ensure your client device selects the correct certificate to present to the VPN server for authentication.
<EapHostConfig xmlns="http://www.microsoft.com/provisioning/EapHostConfig">
    <EapMethod>
        <Type xmlns="http://www.microsoft.com/provisioning/EapCommon">13</Type>
        <VendorId xmlns="http://www.microsoft.com/provisioning/EapCommon">0</VendorId>
        <VendorType xmlns="http://www.microsoft.com/provisioning/EapCommon">0</VendorType>
        <AuthorId xmlns="http://www.microsoft.com/provisioning/EapCommon">0</AuthorId>
    </EapMethod>
    <Config xmlns="http://www.microsoft.com/provisioning/EapHostConfig">
        <Eap xmlns="http://www.microsoft.com/provisioning/BaseEapConnectionPropertiesV1">
            <Type>13</Type>
            <EapType xmlns="http://www.microsoft.com/provisioning/EapTlsConnectionPropertiesV1">
                <CredentialsSource>
                    <CertificateStore>
                        <SimpleCertSelection>true</SimpleCertSelection>
                    </CertificateStore>
                </CredentialsSource>
                <ServerValidation>
                    <DisableUserPromptForServerValidation>false</DisableUserPromptForServerValidation>
                    <ServerNames></ServerNames>
                </ServerValidation>
                <DifferentUsername>false</DifferentUsername>
                <PerformServerValidation xmlns="http://www.microsoft.com/provisioning/EapTlsConnectionPropertiesV2">false</PerformServerValidation>
                <AcceptServerName xmlns="http://www.microsoft.com/provisioning/EapTlsConnectionPropertiesV2">false</AcceptServerName>
                <TLSExtensions xmlns="http://www.microsoft.com/provisioning/EapTlsConnectionPropertiesV2">
                    <FilteringInfo xmlns="http://www.microsoft.com/provisioning/EapTlsConnectionPropertiesV3">
                        <CAHashList Enabled="true">
                            <IssuerHash> REPLACE THIS WITH ROOT CERTIFICATE THUMBPRINT </IssuerHash>
                        </CAHashList>
                    </FilteringInfo>
                </TLSExtensions>
            </EapType>
        </Eap>
    </Config>
</EapHostConfig>
IKEv2 with machine certificate authentication
To use machine certificates to authenticate remote users, use the sample PowerShell script below. To properly import the contents of the VpnSettings and EAP XML files into PowerShell, navigate to the appropriate directory before running the Get-Content PowerShell command.
# specify the name of the VPN Connection to be installed on the client
$vpnConnectionName = "UserCertVPNConnection"

# get the VPN Server FQDN from the profile downloaded from Azure portal
$downloadedXML = [xml] (Get-Content VpnSettings.xml)
$vpnserverFQDN = $downloadedXML.VpnProfile.VpnServer

# create the VPN Connection
Add-VpnConnection -Name $vpnConnectionName -ServerAddress $vpnserverFQDN -TunnelType Ikev2 -AuthenticationMethod MachineCertificate

# enabled forced tunneling
Set-VpnConnection -Name $vpnConnectionName -SplitTunneling $false
IKEv2 with RADIUS server authentication with username and password (EAP-MSCHAPv2)
To use username and password-based RADIUS authentication (EAP-MASCHAPv2) to authenticate remote users, use the sample PowerShell script below. To properly import the contents of the VpnSettings and EAP XML files into PowerShell, navigate to the appropriate directory before running the Get-Content PowerShell command.
# specify the name of the VPN Connection to be installed on the client
$vpnConnectionName = "SampleConnectionName"

# get the VPN Server FQDN from the profile downloaded from Azure portal
$downloadedXML = [xml] (Get-Content VpnSettings.xml)
$vpnserverFQDN = $downloadedXML.VpnProfile.VpnServer

# use the appropriate EAP XML file based on the authentication method specified on the Point-to-site VPN gateway
$EAPXML = [xml] (Get-Content EapXML.xml)

# create the VPN Connection
Add-VpnConnection -Name $vpnConnectionName -ServerAddress $vpnserverFQDN -TunnelType Point-to-sitev2 -AuthenticationMethod Eap -EapConfigXmlStream $EAPXML

# enabled forced tunneling
Set-VpnConnection -Name $vpnConnectionName -SplitTunneling $false
An example EAP XML file is the following.
<EapHostConfig xmlns="http://www.microsoft.com/provisioning/EapHostConfig">
    <EapMethod>
        <Type xmlns="http://www.microsoft.com/provisioning/EapCommon">26</Type>
        <VendorId xmlns="http://www.microsoft.com/provisioning/EapCommon">0</VendorId>
        <VendorType xmlns="http://www.microsoft.com/provisioning/EapCommon">0</VendorType>
        <AuthorId xmlns="http://www.microsoft.com/provisioning/EapCommon">0</AuthorId>
    </EapMethod>
    <Config xmlns="http://www.microsoft.com/provisioning/EapHostConfig">
        <Eap xmlns="http://www.microsoft.com/provisioning/BaseEapConnectionPropertiesV1">
            <Type>26</Type>
            <EapType xmlns="http://www.microsoft.com/provisioning/MsChapV2ConnectionPropertiesV1">
                <UseWinLogonCredentials>false</UseWinLogonCredentials>
            </EapType>
        </Eap>
    </Config>
</EapHostConfig>
IKEv2 with RADIUS server authentication with user certificates (EAP-TLS)
To use certificate-based RADIUS authentication (EAP-TLS) to authenticate remote users, use the sample PowerShell script below. Note that in order to import the contents of the VpnSettings and EAP XML files into PowerShell, you'll have to navigate to the appropriate directory before running the Get-Content PowerShell command.
# specify the name of the VPN Connection to be installed on the client
$vpnConnectionName = "SampleConnectionName"

# get the VPN Server FQDN from the profile downloaded from Azure portal
$downloadedXML = [xml] (Get-Content VpnSettings.xml)
$vpnserverFQDN = $downloadedXML.VpnProfile.VpnServer

# use the appropriate EAP XML file based on the authentication method specified on the Point-to-site VPN gateway
$EAPXML = [xml] (Get-Content EapXML.xml)

# create the VPN Connection
Add-VpnConnection -Name $vpnConnectionName -ServerAddress $vpnserverFQDN -TunnelType Ikev2 -AuthenticationMethod Eap -EapConfigXmlStream $EAPXML

# enabled forced tunneling
Set-VpnConnection -Name $vpnConnectionName -SplitTunneling $false
Below is a sample EAP XML file. Change the TrustedRootCA field to the thumbprint of your Certificate Authority's certificate and the IssuerHash to be the thumbprint of the Root Certificate.
<EapHostConfig xmlns="http://www.microsoft.com/provisioning/EapHostConfig">
    <EapMethod>
        <Type xmlns="http://www.microsoft.com/provisioning/EapCommon">13</Type>
        <VendorId xmlns="http://www.microsoft.com/provisioning/EapCommon">0</VendorId>
        <VendorType xmlns="http://www.microsoft.com/provisioning/EapCommon">0</VendorType>
        <AuthorId xmlns="http://www.microsoft.com/provisioning/EapCommon">0</AuthorId>
    </EapMethod>
    <Config xmlns="http://www.microsoft.com/provisioning/EapHostConfig">
        <Eap xmlns="http://www.microsoft.com/provisioning/BaseEapConnectionPropertiesV1">
            <Type>13</Type>
            <EapType xmlns="http://www.microsoft.com/provisioning/EapTlsConnectionPropertiesV1">
                <CredentialsSource>
                    <CertificateStore>
                        <SimpleCertSelection>false</SimpleCertSelection>
                    </CertificateStore>
                </CredentialsSource>
                <ServerValidation>
                    <DisableUserPromptForServerValidation>false</DisableUserPromptForServerValidation>
                    <ServerNames></ServerNames>
                    <TrustedRootCA> CERTIFICATE AUTHORITY THUMBPRINT </TrustedRootCA>
                </ServerValidation>
                <DifferentUsername>true</DifferentUsername>
                <PerformServerValidation xmlns="http://www.microsoft.com/provisioning/EapTlsConnectionPropertiesV2">true</PerformServerValidation>
                <AcceptServerName xmlns="http://www.microsoft.com/provisioning/EapTlsConnectionPropertiesV2">true</AcceptServerName>
                <TLSExtensions xmlns="http://www.microsoft.com/provisioning/EapTlsConnectionPropertiesV2">
                    <FilteringInfo xmlns="http://www.microsoft.com/provisioning/EapTlsConnectionPropertiesV3">
                        <CAHashList Enabled="true">
                            <IssuerHash> ROOT CERTIFCATE THUMBPRINT  </IssuerHash>
                        </CAHashList>
                    </FilteringInfo>
                </TLSExtensions>
            </EapType>
        </Eap>
    </Config>
</EapHostConfig>
Next steps
For more information about Virtual WAN, see the FAQ.
Feedback
Coming soon: Throughout 2024 we will be phasing out GitHub Issues as the feedback mechanism for content and replacing it with a new feedback system. For more information see: https://aka.ms/ContentUserFeedback.
Submit and view feedback for