Configure a P2S VPN gateway for Microsoft Entra ID authentication
This article helps you configure your Microsoft Entra tenant and point-to-site (P2S) VPN Gateway settings for Microsoft Entra ID authentication. For more information about point-to-site protocols and authentication, see About VPN Gateway point-to-site VPN. To authenticate using Microsoft Entra ID authentication, you must include the OpenVPN tunnel type in your point-to-site configuration.
Note
Microsoft Entra authentication is supported only for OpenVPN® protocol connections and requires the Azure VPN Client.
Prerequisites
The steps in this article require a Microsoft Entra tenant. If you don't have a Microsoft Entra tenant, you can create one using the steps in the Create a new tenant article. Note the following fields when creating your directory:
- Organizational name
- Initial domain name
If you already have an existing P2S gateway, the steps in this article help you configure the gateway for Microsoft Entra ID authentication. You can also create a new VPN gateway. The link to create a new gateway is included in this article.
Create Microsoft Entra tenant users
Create two accounts in the newly created Microsoft Entra tenant. For steps, see Add or delete a new user.
- Global administrator account
- User account
The global administrator account will be used to grant consent to the Azure VPN app registration. The user account can be used to test OpenVPN authentication.
Assign one of the accounts the Global administrator role. For steps, see Assign administrator and non-administrator roles to users with Microsoft Entra ID.
Authorize the Azure VPN application
Sign in to the Azure portal as a user that is assigned the Global administrator role.
Next, grant admin consent for your organization. This allows the Azure VPN application to sign in and read user profiles. Copy and paste the URL that pertains to your deployment location in the address bar of your browser:
Public
https://login.microsoftonline.com/common/oauth2/authorize?client_id=41b23e61-6c1e-4545-b367-cd054e0ed4b4&response_type=code&redirect_uri=https://portal.azure.com&nonce=1234&prompt=admin_consentAzure Government
https://login.microsoftonline.us/common/oauth2/authorize?client_id=51bb15d4-3a4f-4ebf-9dca-40096fe32426&response_type=code&redirect_uri=https://portal.azure.us&nonce=1234&prompt=admin_consentMicrosoft Cloud Germany
https://login-us.microsoftonline.de/common/oauth2/authorize?client_id=538ee9e6-310a-468d-afef-ea97365856a9&response_type=code&redirect_uri=https://portal.microsoftazure.de&nonce=1234&prompt=admin_consentMicrosoft Azure operated by 21Vianet
https://login.chinacloudapi.cn/common/oauth2/authorize?client_id=49f817b6-84ae-4cc0-928c-73f27289b3aa&response_type=code&redirect_uri=https://portal.azure.cn&nonce=1234&prompt=admin_consentNote
If you're using a global admin account that is not native to the Microsoft Entra tenant to provide consent, replace "common" with the Microsoft Entra tenant ID in the URL. You may also have to replace "common" with your tenant ID in certain other cases as well. For help with finding your tenant ID, see How to find your Microsoft Entra tenant ID.
Select the account that has the Global administrator role if prompted.
On the Permissions requested page, select Accept.
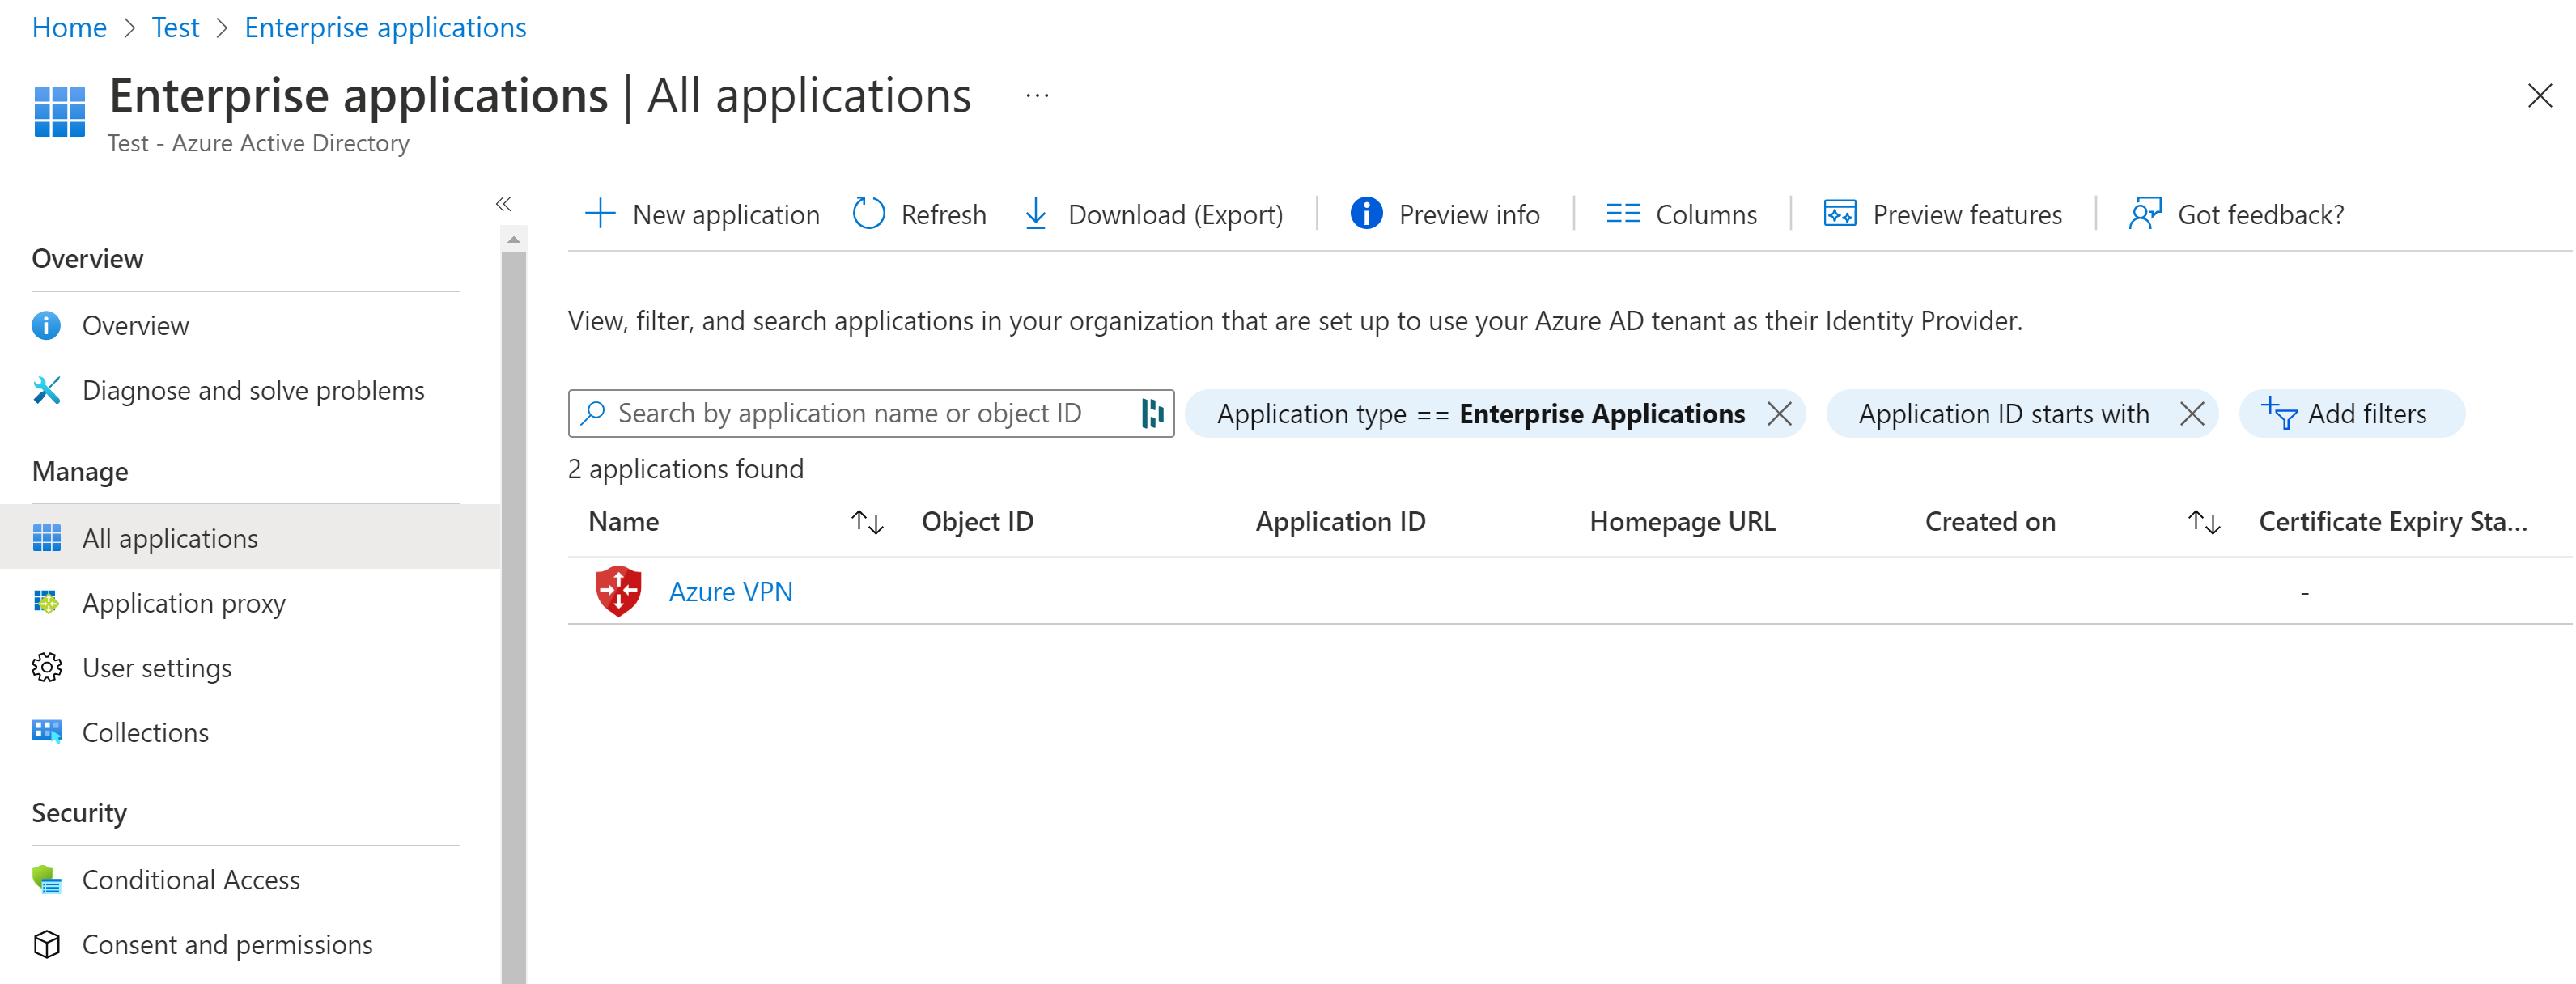
Go to Microsoft Entra ID. In the left pane, click Enterprise applications. You'll see Azure VPN listed.

Configure the VPN gateway
Important
The Azure portal is in the process of updating Azure Active Directory fields to Entra. If you see Microsoft Entra ID referenced and you don't see those values in the portal yet, you can select Azure Active Directory values.
Locate the tenant ID of the directory that you want to use for authentication. It's listed in the properties section of the Active Directory page. For help with finding your tenant ID, see How to find your Microsoft Entra tenant ID.
If you don't already have a functioning point-to-site environment, follow the instruction to create one. See Create a point-to-site VPN to create and configure a point-to-site VPN gateway. When you create a VPN gateway, the Basic SKU isn't supported for OpenVPN.
Go to the virtual network gateway. In the left pane, click Point-to-site configuration.
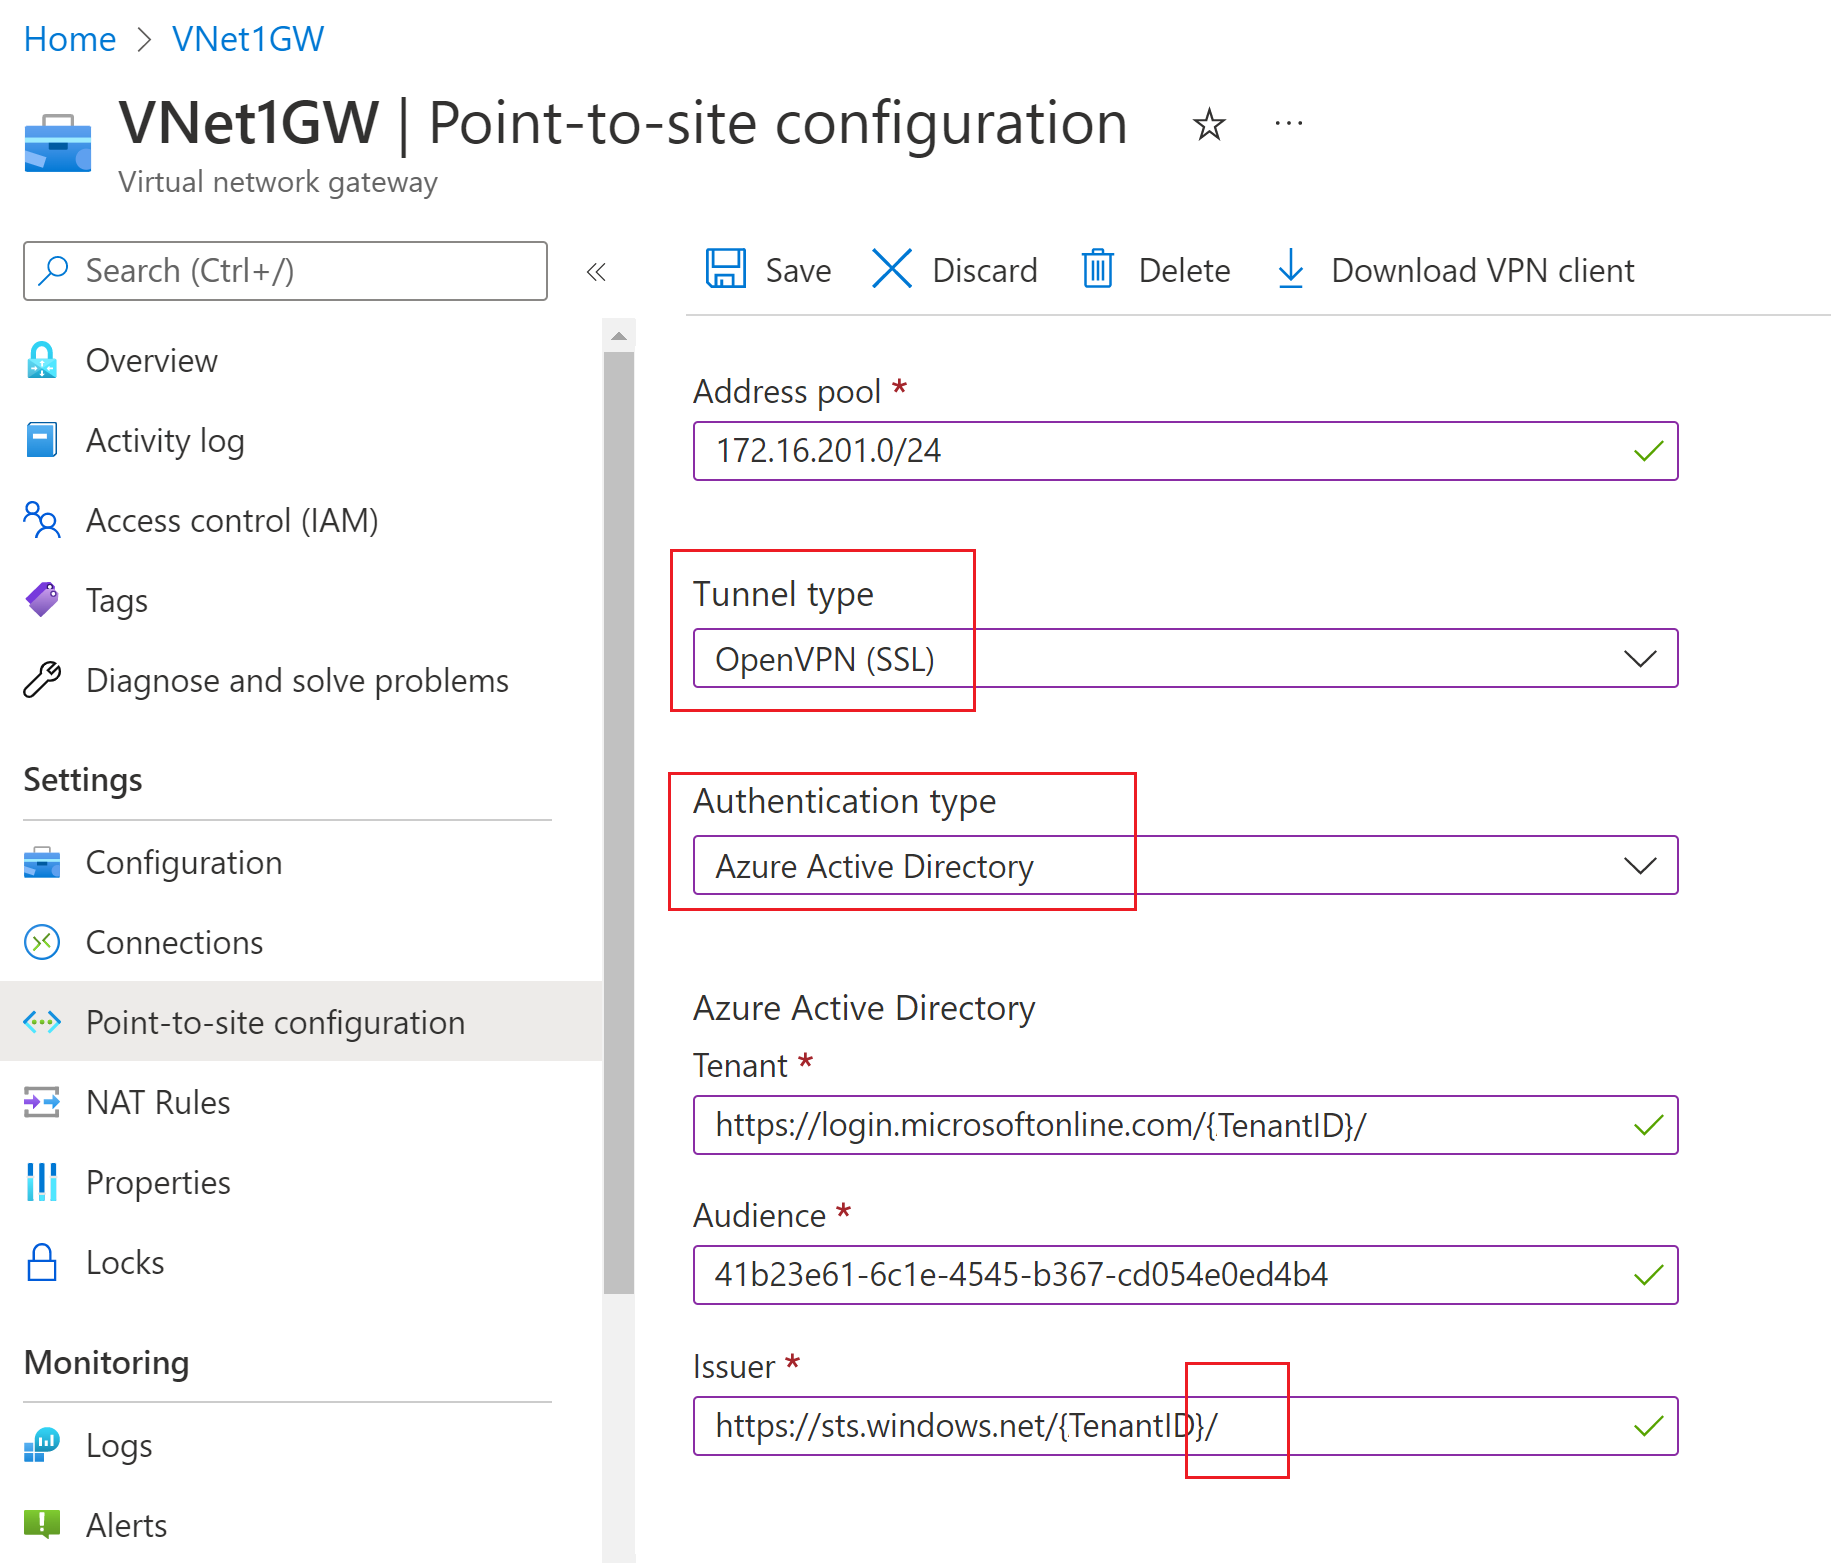
Configure the following values:
- Address pool: client address pool
- Tunnel type: OpenVPN (SSL)
- Authentication type: Microsoft Entra ID
For Microsoft Entra ID values, use the following guidelines for Tenant, Audience, and Issuer values. Replace {TenantID} with your tenant ID, taking care to remove {} from the examples when you replace this value.
Tenant: TenantID for the Microsoft Entra tenant. Enter the tenant ID that corresponds to your configuration. Make sure the Tenant URL doesn't have a
\(backslash) at the end. Forward slash is permissible.- Azure Public AD:
https://login.microsoftonline.com/{TenantID} - Azure Government AD:
https://login.microsoftonline.us/{TenantID} - Azure Germany AD:
https://login-us.microsoftonline.de/{TenantID} - China 21Vianet AD:
https://login.chinacloudapi.cn/{TenantID}
- Azure Public AD:
Audience: The Application ID of the "Azure VPN" Microsoft Entra Enterprise App.
- Azure Public:
41b23e61-6c1e-4545-b367-cd054e0ed4b4 - Azure Government:
51bb15d4-3a4f-4ebf-9dca-40096fe32426 - Azure Germany:
538ee9e6-310a-468d-afef-ea97365856a9 - Microsoft Azure operated by 21Vianet:
49f817b6-84ae-4cc0-928c-73f27289b3aa
- Azure Public:
Issuer: URL of the Secure Token Service. Include a trailing slash at the end of the Issuer value. Otherwise, the connection might fail. Example:
https://sts.windows.net/{TenantID}/
Once you finish configuring settings, click Save at the top of the page.
Download the Azure VPN Client profile configuration package
In this section, you generate and download the Azure VPN Client profile configuration package. This package contains the settings that you can use to configure the Azure VPN Client profile on client computers.
At the top of the Point-to-site configuration page, click Download VPN client. It takes a few minutes for the client configuration package to generate.
Your browser indicates that a client configuration zip file is available. It's named the same name as your gateway.
Extract the downloaded zip file.
Browse to the unzipped "AzureVPN" folder.
Make a note of the location of the “azurevpnconfig.xml” file. The azurevpnconfig.xml contains the setting for the VPN connection. You can also distribute this file to all the users that need to connect via e-mail or other means. The user will need valid Microsoft Entra credentials to connect successfully. For more information, see Azure VPN client profile config files for Microsoft Entra authentication.
Next steps
- To connect to your virtual network, you must configure the Azure VPN client on your client computers. See Configure a VPN client for P2S VPN connections.
- For frequently asked questions, see the Point-to-site section of the VPN Gateway FAQ.
Feedback
Coming soon: Throughout 2024 we will be phasing out GitHub Issues as the feedback mechanism for content and replacing it with a new feedback system. For more information see: https://aka.ms/ContentUserFeedback.
Submit and view feedback for