Use a polling trigger for Microsoft Power Automate
A polling trigger is basically an event that periodically makes a call to your service to look for new data. Polling triggers differ from webhooks in that a polling trigger initiates an event to determine if new data is available, whereas webhooks respond to a push of new data from the service. Once the flow determines that new data is available, you can then perform an action with that data. This tutorial demonstrates how to use a polling trigger to proactively retrieve new data.
Prerequisites
- A Power Automate subscription.
- Basic experience building flows and custom connectors.
- The free Postman app (for testing your trigger).
How polling triggers work
A polling trigger starts by setting a state, then periodically checks for updates over an interval. The trigger then requests all the new data since the last state update. In addition, the trigger also maintains the state context between requests.
The following example provides a basic overview of how a polling trigger acquires new data.
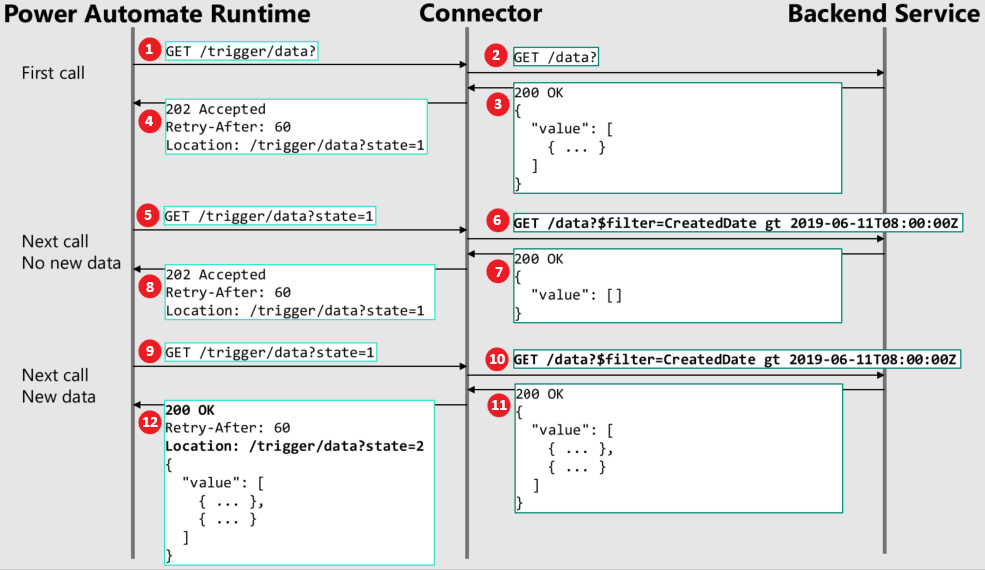
The flow runtime invokes an initial call on the trigger to the API in the connector.
The connector will then call the backend service.
The backend service then returns all of the current data back to the connector.
The connector in turn returns a 202 Accepted message, a retry interval, and a location header that includes the current state. The retry interval is in seconds. This first call is always used to establish the preliminary state of the data.
After the retry interval has timed out, the flow runtime makes another call to the connector using the location header and current state, which in this example is equal to 1.
The connector now knows, because this state is now equal to 1, to call the proper API that will do the appropriate filtering so the correct set of data is returned. In this example, the connector translates it into a filtered query that says the create date is greater than a certain timestamp.
In this example, there's no new data since the create date, so an empty set of values is sent back to the connector.
The connector then returns a 202 Accepted message, a retry interval, and a location header in which the state hasn't changed.
After the retry interval times out again, the flow runtime makes another call to the connector using the same location header and state.
Again, the connector does the appropriate filtering using the create date.
This time, new data has become available since the create date, so the backend returns the values of all the new data back to the connector.
The connector then returns a 200 OK message, a retry interval, the location with a new state value, and an array of values containing all of the new data that became available after the create date. At this point, the flow will start.
Create polling triggers from the UI
This section demonstrates how to create a polling trigger in the Power Automate UI. In this procedure, you'll use the example TripPin service as a starting point. The TripPin service is a very simple REST API that contains a list of people and what trips they have made.
To use the TripPin service, you'll first need to dynamically create the URLs required for the service. Enter https://services.odata.org/TripPinRESTierService in your browser's address bar. This will return the metadata required for this demonstration. Copy and save the metadata to a file for later use.
To set up the TripPin service and create the polling trigger:
In Power Automate, select the Data > Custom connectors tab.
In the Custom connectors pane, select New custom connector, and then select Create from blank.
In the Create a custom connector dialog, enter the name of your custom connector (in this example, you can use Polling Test), and then select Continue.
On the General page, specify a description and host. In this example, you'll use the services.odata.org URL that was returned in the TripPin metadata as the host.
Parameter Value Description "TripPin is an example travel website." Host "services.odata.org" 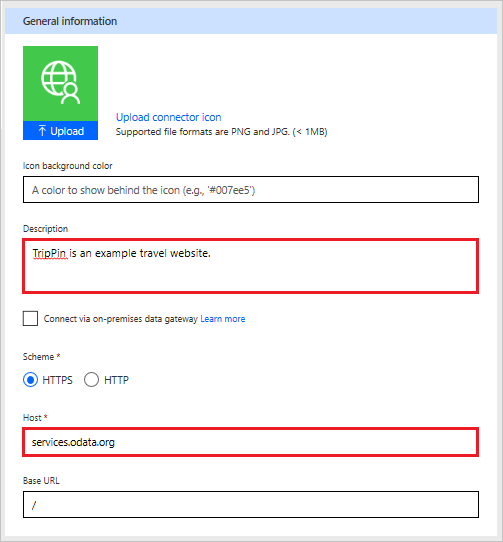
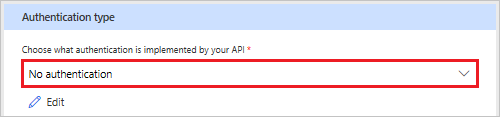
On the Security page, choose No authentication as the authentication type.
On the Definition page, choose + New trigger, and fill out the description for your trigger. In this example, you'll create a trigger that fires when a new trip is added to a person's itinerary.
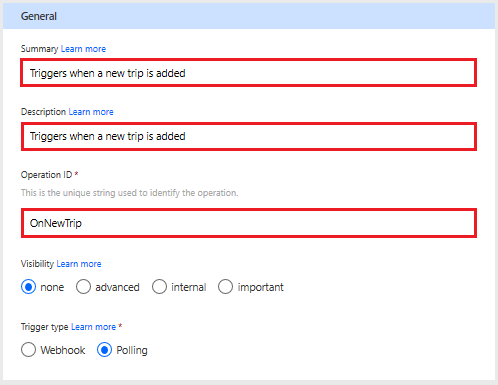
Parameter Value Summary "Triggers when a new trip is added" Description "Triggers when a new trip is added" Operation ID "OnNewTrip" Visibility "none" (see list below for more information) Trigger type "Polling" The Visibility property for operations and parameters in a flow has the following options:
- none: displayed normally in the flow
- advanced: hidden under an additional menu
- internal: hidden from the user
- important: always shown to the user first
The Request area displays information based on the HTTP request for the action. Choose Import from sample.

In the Import from sample pane, you'll define the request for the polling trigger. For the verb, select GET. From the metadata you received when you dynamically created the URLs required for the service, copy the URL address in the metadata to URL in the Import from sample pane. After the address, add
/People('{Person}')/Trips?$filter=TripId gt 0&$orderby=TripId desc. For example:https://services.odata.org/TripPinRESTierService/(S(<service number>))/People('{Person}')/Trips?$filter=TripId gt 0&$orderby=TripId descNote
Be sure to use the actual number from your metadata instead of <service number> in the URL.
In this URL example, you're creating a request for an individual person, and
{Person}is a runtime variable that a user can specify in the flow. Next, you're specifying that you want to get the trips for the specific person the user enters.But, you don't want to get all of the trips; you only want to get the trips that are new since the last time they were polled. The
$filter=TripId gt 0expression gets the new trips by returning the TripIds of any trips that are greater than the previously polled TripIds. The number0that is used here will be automatically updated every time a polling trigger occurs.Also, the
$orderby=TripId descexpression indicates that the order of the data is returned as the TripId in descending order. Being returned in descending order is required by the trigger. That is, the results returned by the backend service must be reverse sorted in the trigger parameter so that the most recent parameter (such as the TripId in this example) is the first value returned in the data array.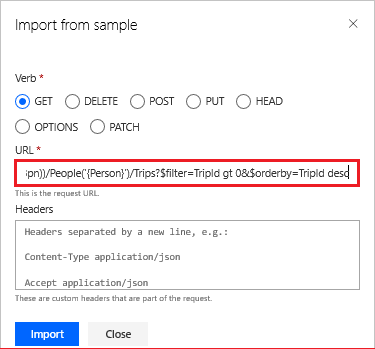
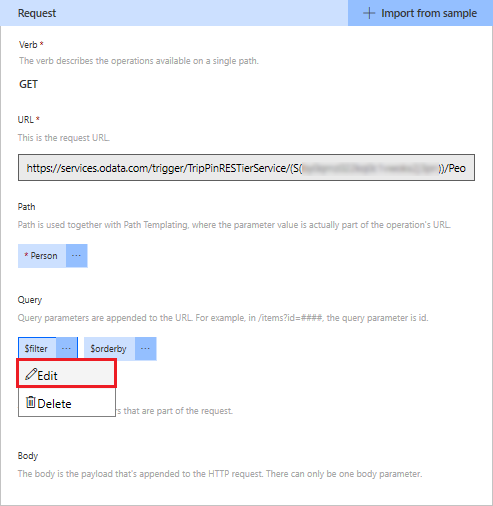
Select the Import button to import the sample data. The request area now displays the verb, the URL, the path, and the query parameters.
In the request area, select the $filter query parameter, and then choose Edit to bring up the Parameter dialog.
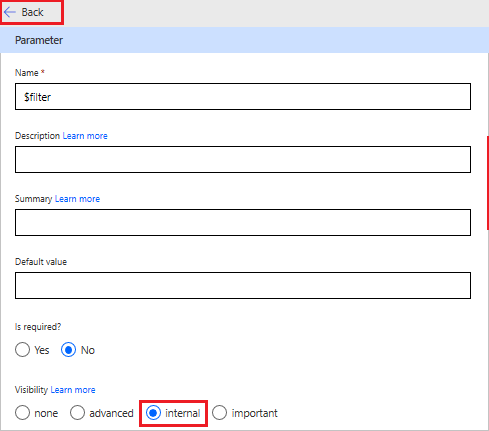
In the Parameter dialog for
$filter, set the Visibility selection to internal. This parameter is only used internally by the connector, which prevents the user from making any changes. For more information about the visibility settings, see the x-ms-visibility OpenAPI extension.Select Back to return to the request area.
In the request area, select the $orderby query parameter, and then choose Edit to bring up the Parameter dialog.
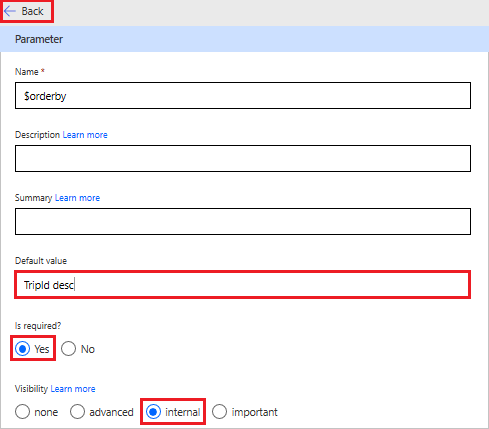
In the Parameter dialog for
$orderby, set the Is required? selection to Yes and the Visibility selection to internal. Again, these settings will prevent the user from making any changes to this parameter.In addition, enter TripId desc as the value in the Default value box. These settings will ensure that the results are given in reverse order.
Select Back to return to the previous area.
The Response area displays information based on the HTTP response for the action. Select Add default response.

Define the response for the polling trigger, then choose Import. Use the sample provided below for the response body, which will automatically build a schema for the response.
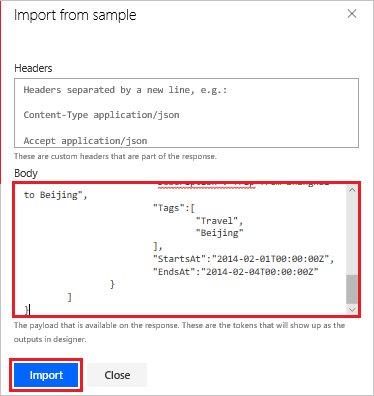
{
    "@odata.context":"https://services.odata.org/TripPinRESTierService/(S(<service number>))/$metadata#Collection(Microsoft.OData.Service.Sample.TrippinInMemory.Models.Trip)",
    "value":[
	    {
		    "TripId":2,
		    "ShareId":"9ce142c3-5fd6-4a71-848e-220ebf1e9f3",
		    "Name":"Honeymoon",
		    "Budget":2650,
		    "Description":"Happy honeymoon trip",
		    "Tags":[
			    "Travel",
			    "honeymoon"
		    ],
		    "StartsAt":"2014-02-01T00:00:00Z",
		    "EndsAt":"2014-02-04T00:00:00Z"
	    },
	    {
		    "TripId":1,
		    "ShareId":"f94e9116-8bdd-4dac-ab61-08438d0d9a71",
		    "Name":"Trip in Beijing",
		    "Budget":2000,
		    "Description":"Trip from Shanghai to Beijing",
		    "Tags":[
			    "Travel",
			    "Beijing"
		    ],
		    "StartsAt":"2014-02-01T00:00:00Z",
		    "EndsAt":"2014-02-04T00:00:00Z"
	    }
    ]
}
Note
Be sure to use the actual number from your metadata instead of <service number> in the URL.
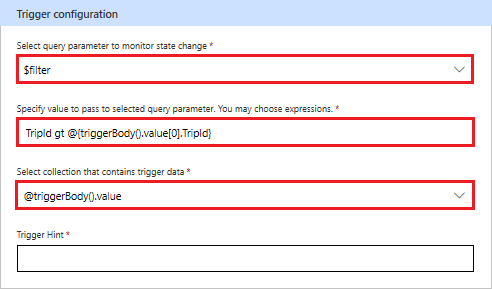
In the Trigger configuration area, select the parameter that is used to monitor the state change from TripPin. In this example, the parameter to enter is
$filter.In this example, use the following expression in the Specify value to pass to selected query parameter:
TripId gt @{triggerBody().value[0].TripId}This expression is used to get the latest results whenever the trigger runs. In the expression you're using here, when
TripIdis greater than the value returned by the rest of the expression, the trigger will run. IfTripIdisn't greater that the value returned by the rest of the expression, no trigger will occur.In the Select collection that contains trigger data selection, choose @triggerBody().value. This is the array that contains the trigger data that is returned by the backend service.
At the top of the wizard, select Create connector.
Use the polling trigger
Now that you've got everything configured, you can use the polling trigger in a flow. In this section, you'll create a flow that will poll the backend service for changes whenever a new trip is recorded for a specific person.
In flow.microsoft.com, on the left side of the page, choose Create.
Under Start from blank, choose Instant flow.
In the Build an instant flow dialog, select the Skip button.
In the search box, enter Triggers when a new trip is added.
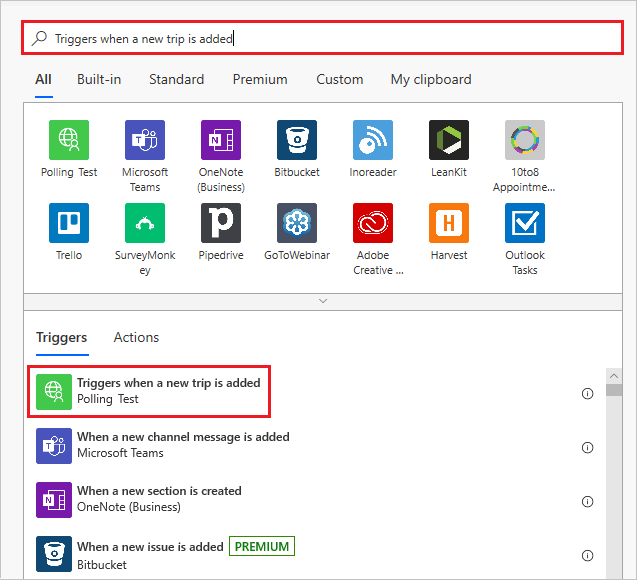
Choose the item in the list to use it as a trigger.
In the Person flow box, enter russellwhyte for the person whose trips you'll examine, and then select + New step.

In the Choose an action dialog, select the Built-in tab, and then select Date Time.
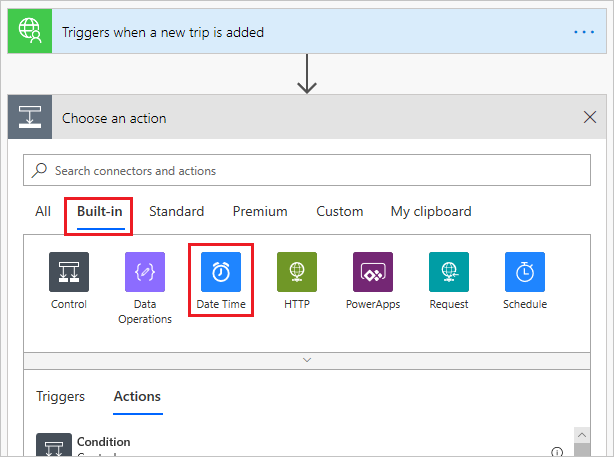
From Date Time, select Current time.

Select Save to save the new flow.
Verification and troubleshooting
To verify everything is set up correctly, choose My flows, then choose the Triggers when a new trip is added -> Current time flow to view the run history. Since the flow hasn't yet been run, nothing should currently show up in the history.
To test the flow, you'll need to open the Postman application to add new data to TripPin.
In Postman, select the + icon next to the Launchpad tab.
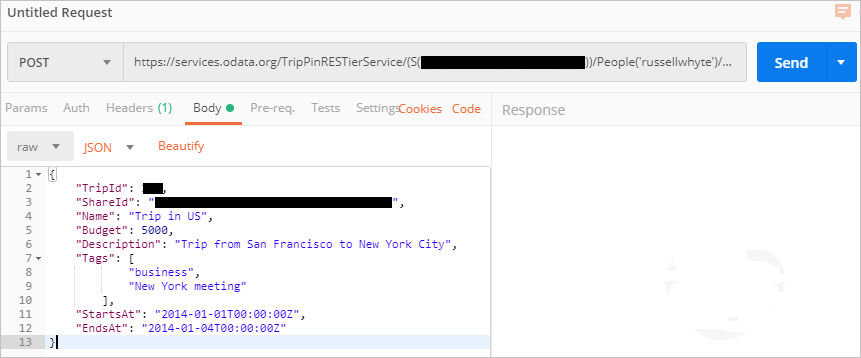
In the untitled request, select POST from the drop-down box on the left, and then enter the following address in Enter request URL box:
https://services.odata.org/TripPinRESTierService/(S(<Service number))/People('russellwhyte')/TripsNote
Be sure to use the actual number from your metadata instead of <service number> in the URL.
Under the POST request, select the Body tab, and then choose raw. In the dropdown to the right of raw, choose JSON.
Enter the following text in the text box:
{
     "TripId": 190,
     "ShareId": "9d9b2fa0-efbf-490e-a5e3-bac8f7d47354",
     "Name": "Trip in US",
     "Budget": 5000,
     "Description": "Trip from San Francisco to New York City",
     "Tags": [
         "business",
         "New York meeting"
     ],
     "StartsAt": "2014-01-01T00:00:00Z",
     "EndsAt": "2014-01-04T00:00:00Z"
}
Select Send to send the POST message to the TripPin site.
The response should return with a status of
201 Created.
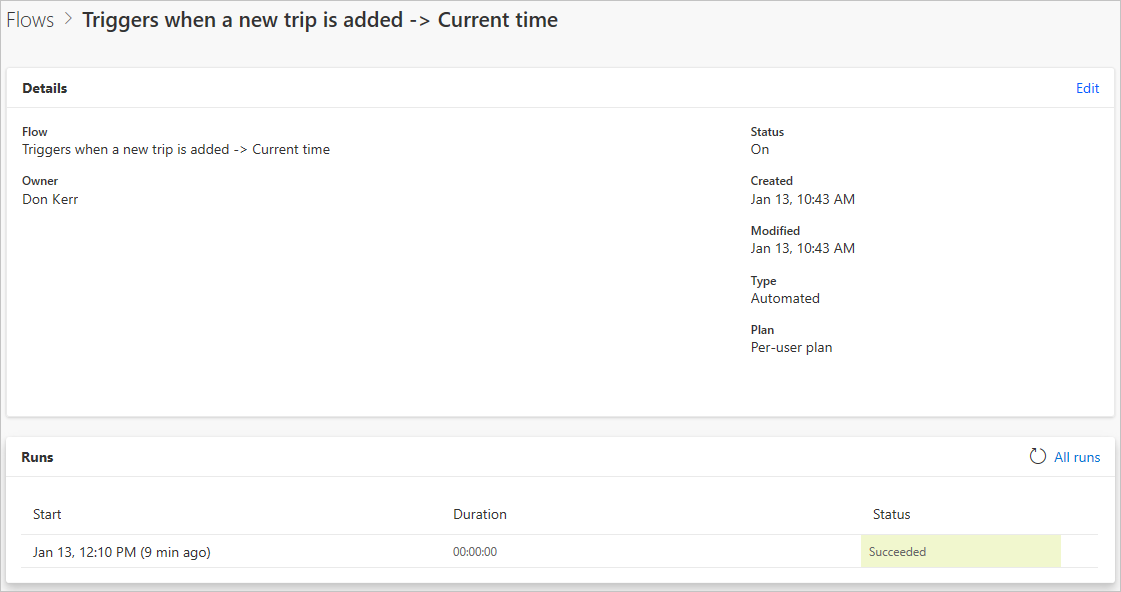
Now when you open My flows, then choose the Triggers when a new trip is added -> Current time flow, you'll see in the run history that a trigger has occurred.
Note
If you run another POST request in Postman for the same person, you'll need to change the TripId value in the JSON body. Otherwise, a 409 Conflict error will occur.
Summary
If everything is correctly configured, you'll now receive notifications in Microsoft Power Automate whenever a new trip is added to TripPin.
Next steps
Provide feedback
We greatly appreciate feedback on issues with our connector platform, or new feature ideas. To provide feedback, go to Submit issues or get help with connectors and select your feedback type.