How to: Create a C++ Project from Existing Code
In Visual Studio, you can port existing code files into a C++ project using the Create New Project From Existing Code Files wizard. This wizard creates a project solution that uses the MSBuild system to manage source files and build configuration. It works best with relatively simple projects that do not have complex folder hierarchies. The wizard isn't available in older Express editions of Visual Studio.
Porting existing code files into a C++ project enables the use of native MSBuild project management features built into the IDE. If you prefer to use your existing build system, such as nmake makefiles, CMake, or alternatives, you can use the Open Folder or CMake options instead. For more information, see Open Folder projects for C++ or CMake projects in Visual Studio. Both options let you use IDE features such as IntelliSense and Project Properties.
To create a C++ project from existing code
On the File menu, select New > Project From Existing Code.
Specify your project location, the directory for your source files, and the kinds of files the wizard imports into the new project. Choose Next to continue.
Setting Description Project file location Specifies the directory path of the new project. This location is where the wizard deposits all the files (and subdirectories) of the new project.
Select Browse to display the Project file location dialog. Navigate to the right folder and specify the directory that contains the new project.Project name Specifies the name of the new project. Project files, which have file extensions such as .vcxproj adopts this name and existing code files keep their original name. Add files to the project from these folders Check to set the wizard to copy existing code files from their original directories (that are specified in the list box below this control) into the new project.
Check Add Subfolders to specify copying code files from all subdirectories into the project. The directories are listed in the Folder column.
- Select Add to display the Add files to the project from this folder dialog box, to specify directories the wizard searches for existing code files.
- Select Remove to delete the directory path selected in the list box.
In the File types to add to the project box, specify the kinds of files that the wizard adds to the new project based on the given file extensions. File extensions are preceded with the asterisk wildcard character and are delimited in the list of file extensions by a semicolon.Show all files in Solution Explorer Specifies that all files in the new project to be visible and displayed in the Solution Explorer window. This option is enabled by default. 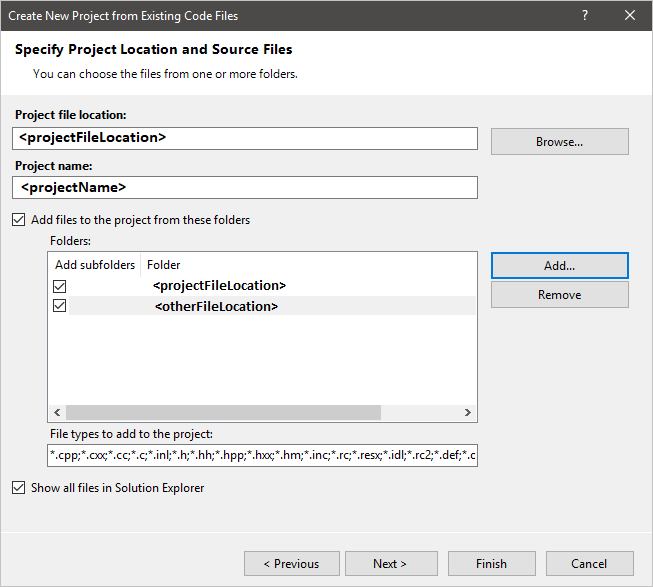
Specify the project settings to use such as the build environment for the new project and the build settings to match a specific type of new project to generate. Choose Next to continue.
Setting Description Use Visual Studio Specifies to use build tools that are included in Visual Studio for building the new project. This option is selected by default.
Select Project Type to specify the type of project the wizard generates. Choose Windows application project, Console application project, Dynamically linked library (DLL) project, or Static library (LIB) project.
Check Add support for ATL to add ATL support to the new project.
Check Add support for MFC to add MFC support to the new project.
Check Add support for the Common Language Runtime to add CLR programming support to the project. Choose the Common Language Runtime Support for compliance type, such as Common Language Runtime (old syntax) for compliance with Managed Extensions for C++ syntax, the CLR programming syntax before Visual Studio 2005.Use external build system Specifies to use build tools that aren't included in Visual Studio for building the new project. When this option is selected, you can specify build command lines on the Specify Debug Configuration Settings and Specify Release Configuration Settings pages. 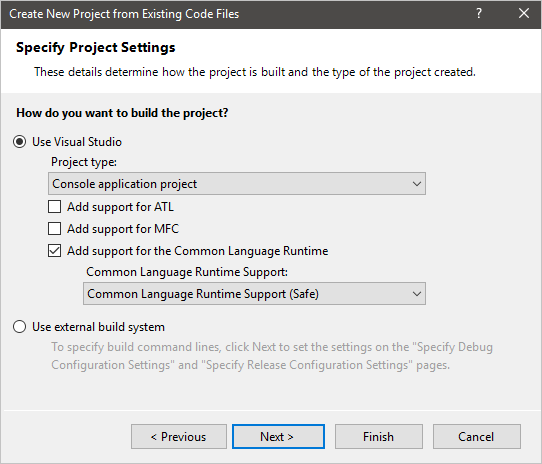
Note
When the Use External Build System option is checked, the IDE doesn't build the project, so the /D, /I, /FI, /AI, or /FU options aren't required for compilation. However, these options must be set correctly in order for IntelliSense to function properly.
Specify the Debug configuration settings to use. Choose Next to continue.
Setting Description Build command line Specifies the command line that builds the project. Enter the name of the compiler (plus any switches or arguments) or the build scripts that you want to use to build the project. Rebuild command line Specifies the command line that rebuilds the new project. Clean command line Specifies the command line to delete support files generated by the build tools for the project. Output (for debugging) Specifies the directory path of the output files for the Debug configuration of the project. Preprocessor definitions (/D) Defines preprocessor symbols for the project, see /D (Preprocessor Definitions). Include search path (/I) Specifies directory paths the compiler searches to resolve file references passed to preprocessor directives in the project, see /I (Additional Include Directories). Forced included files (/FI) Specifies header files to process when building the project, see /FI (Name Forced Include File). .NET assembly search path (/AI) Specifies the directory paths that the compiler searches to resolve .NET assembly references passed to preprocessor directives in the project, see /AI (Specify Metadata Directories). Forced using .NET assemblies (/FU) Specifies .NET assemblies to process when building the project, see /FU (Name Forced #using File). 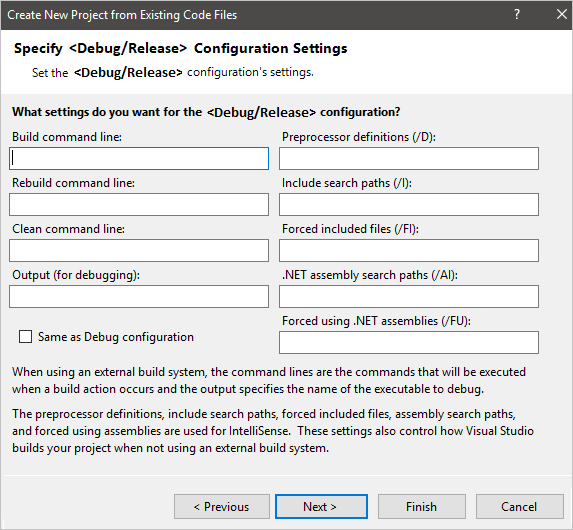
Note
The Build, Rebuild, Clean command line, and Output (for debugging) settings are only enabled if the Use external build system option is selected on the Specify Project Settings page.
Specify the Release configuration settings to use, these settings are the same as the Debug configuration settings. Choose Finish to generate the new project.
Note
Here you can check Same as Debug configuration to specify that the wizard will generate Release configuration project settings identical to Debug configuration project settings. This option is checked by default. All other options on this page are inactive unless you uncheck this box.
Feedback
Coming soon: Throughout 2024 we will be phasing out GitHub Issues as the feedback mechanism for content and replacing it with a new feedback system. For more information see: https://aka.ms/ContentUserFeedback.
Submit and view feedback for