Build an OpenGL ES application on Android and iOS
You can create Visual Studio solutions and projects for iOS apps and Android apps that share common code. This article guides you through a combined solution template. It creates both an iOS app, and an Android Native Activity app. The apps have C++ code in common that uses OpenGL ES to display the same animated rotating cube on each platform. OpenGL ES (OpenGL for Embedded Systems or GLES) is a 2D and 3D graphics API. It's supported on many mobile devices.
Requirements
Important
OpenGL support is no longer available. It was last available in Visual Studio 17.3.
Here are the system requirements to create an OpenGL ES app for iOS and Android. If you haven't already, install the Mobile Development with C++ workload in the Visual Studio Installer. To get the OpenGL ES templates, and to build for iOS, include the optional C++ iOS development tools. To build for Android, install the C++ Android development tools and the required third-party tools: Android NDK, Apache Ant, and Google Android Emulator.
For better emulator performance on Intel platforms, one option is to install the Intel Hardware Accelerated Execution Manager (HAXM). For detailed instructions, see Install cross-platform mobile development with C++.
To build and test the iOS app, you'll need a Mac computer. Set it up according to the installation instructions. For more information about how to set up for iOS development, see Install and configure tools to build using iOS.
Create a new OpenGLES Application project
In this tutorial, you first create a new OpenGL ES Application project. and then build and run the default app in an Android emulator. Next you build the app for iOS and run the app on an iOS device.
In Visual Studio, choose File > New > Project.
In the New Project dialog box, under Templates, choose Visual C++ > Cross Platform, and then choose the OpenGLES Application (Android, iOS) template.
Give the app a name like MyOpenGLESApp, and then choose OK.

Visual Studio creates the new solution and opens Solution Explorer.

In Visual Studio, choose File > New > Project.
In the Create a new project dialog box, select the OpenGLES Application (Android, iOS) template, and then choose Next.
In the Configure your new project dialog box, enter a name like MyOpenGLESApp in Project name, and then choose Create.
Visual Studio creates the new solution and opens Solution Explorer.
The new OpenGL ES Application solution includes three library projects and two application projects. The Libraries folder includes a shared code project. And, two platform-specific projects that reference the shared code:
MyOpenGLESApp.Android.NativeActivitycontains the references and glue code that implements your app as a Native Activity on Android. The entry points from the glue code are implemented in main.cpp, which includes the common shared code inMyOpenGLESApp.Shared. Precompiled headers are in pch.h. This Native Activity app project is compiled into a shared library (.so) file, which is picked up by theMyOpenGLESApp.Android.Packagingproject.MyOpenGLESApp.iOS.StaticLibrarycreates an iOS static library (.a) file that contains the shared code inMyOpenGLESApp.Shared. It's linked to the app created by theMyOpenGLESApp.iOS.Applicationproject.MyOpenGLESApp.Sharedcontains the shared code that works across platforms. It uses preprocessor macros for conditional compilation of platform-specific code. The shared code is picked up by project reference in bothMyOpenGLESApp.Android.NativeActivityandMyOpenGLESApp.iOS.StaticLibrary.
The solution has two projects to build the apps for the Android and iOS platforms:
MyOpenGLESApp.Android.Packagingcreates the .apk file for deployment on an Android device or emulator. This file contains the resources and AndroidManifest.xml file where you set manifest properties. It also contains the build.xml file that controls the Ant build process. It's set as the startup project by default, so that it can be deployed and run directly from Visual Studio.MyOpenGLESApp.iOS.Applicationcontains the resources and Objective-C glue code to create an iOS app that links to the C++ static library code inMyOpenGLESApp.iOS.StaticLibrary. This project creates a build package that is transferred to your Mac by Visual Studio and the remote agent. When you build this project, Visual Studio sends the files and commands to build and deploy your app on the Mac.
Build and run the Android app
The solution created by the template sets the Android app as the default project. You can build and run this app to verify your installation and setup. For an initial test, run the app on one of the device profiles installed by the emulator for Android. If you prefer to test your app on another target, you can load the target emulator. Or, connect a device to your computer.
To build and run the Android Native Activity app
If it isn't already selected, choose x86 from the Solution Platforms drop-down list.

Use x86 to target the emulator. To target a device, choose the solution platform based on the device processor. If the Solution Platforms list isn't displayed, choose Solution Platforms from the Add/Remove Buttons list, and then choose your platform.
In Solution Explorer, open the shortcut menu for
MyOpenGLESApp.Android.Packagingproject and then choose Build.
The Output window displays the output of the build process for the Android shared library and the Android app.

Choose one of the emulated Android device profiles as your deployment target.

You may have installed other emulators, or connected an Android device. You can choose them in the deployment target dropdown list. To run the app, the built Solution Platform must match the platform of the target device.
Press F5 to start debugging, or Shift+F5 to start without debugging.
Visual Studio starts the emulator, which takes several seconds to load and deploy your code. Here's how the app appears in the emulator:

Once your app has started, you can set breakpoints and use the debugger to step through code, examine locals, and watch values.
Press Shift+F5 to stop debugging.
The emulator is a separate process that continues to run. You can edit, compile, and deploy your code multiple times to the same emulator. Your app appears in the app collection on the emulator, and it can be started from there directly.
The generated Android Native Activity app and library projects put the C++ shared code in a dynamic library. It includes "glue" code to interface with the Android platform. Most of the app code is in the library. The manifest, resources, and build instructions are in the packaging project. The shared code is called from main.cpp in the NativeActivity project. For more information about how to program an Android Native Activity, see the Android Developer NDK Concepts page.
Visual Studio builds Android Native Activity projects by using the Android NDK. It uses Clang as the platform toolset. Visual Studio maps the project's properties into the compile, link, and debug commands on the target platform. For details, open the Property Pages dialog for the MyOpenGLESApp.Android.NativeActivity project. For more information about the command-line switches, see the Clang Compiler User's Manual.
Build and run the iOS app on an iOS device
You create and edit the iOS app project in Visual Studio. Because of licensing restrictions, it must be built and deployed from a Mac. Visual Studio communicates with a remote agent running on the Mac to transfer project files and execute build, deployment, and debugging commands. Set up and configure your Mac and Visual Studio to communicate before you can build the iOS app. For detailed instructions, see Install and configure tools to build using iOS. Run the remote agent on your Mac, and pair it with Visual Studio. Then you can build and run the iOS app to verify your installation and setup.
To deploy your app to an iOS device, first set up automatic signing in Xcode. Automatic signing creates a provisioning profile to sign a build of the app.
To set up automatic signing on Xcode
If you haven't already, install Xcode on your Mac.
Open the Xcode app on your Mac.
Create a new Single View Application Xcode project. Fill in the required fields during project creation. The values can be arbitrary, as the project is only used to create a provisioning profile that's used later to sign a build of the app.
Add your Apple ID that's enrolled in an Apple Developer Program account to Xcode. Your Apple ID is used as a signing identity to sign apps. To add your signing identity in Xcode, open the Xcode menu and choose Preferences. Select Accounts and click the Add button (+) to add your Apple ID. For detailed instructions, see Add your Apple ID account.
From the Xcode project's "General" settings, change the value of Bundle Identifier to
com.<NameOfVSProject>, where<NameOfVSProject>is the same name as the Visual Studio solution project you created. For example, if you created a project calledMyOpenGLESAppon Visual Studio, then set Bundle Identifier tocom.MyOpenGLESApp.
To enable automatic signing, check. Automatically manage signing**.

Select the team name of the Apple ID you added as the development Team.

To build and run the iOS app on an iOS device
Run the remote agent on your Mac, and verify that Visual Studio is paired to the remote agent. To start the remote agent, open a Terminal app window and enter
vcremote. For more information, see Configure the remote agent in Visual Studio.
Attach an iOS device to your Mac. When you attach your device to a computer for the first time, an alert asks whether you trust the computer to access your device. Enable the device to trust the Mac computer.
On Visual Studio, if it isn't already selected, choose the solution platform from the Solution Platforms drop-down list based on your device processor. In this example, it's an ARM64 processor.

In Solution Explorer, open the shortcut menu for the MyOpenGLESApp.iOS.Application project and choose Unload Project to unload the project.
Again, open the shortcut menu for the unloaded MyOpenGLESApp.iOS.Application project and choose Edit project.pbxproj to edit the project file. In the
project.pbxprojfile, look for thebuildSettingsattribute and addDEVELOPMENT_TEAMusing your Apple Team ID. The screenshot below shows an example value of123456ABCfor the Apple Team ID. You can find the value of your Apple Team ID from Xcode. Go to Build Settings and hover over your development team name to show a tooltip. The tooltip shows your team ID.
Close the
project.pbxprojfile, then open the shortcut menu for the unloaded MyOpenGLESApp.iOS.Application project and choose Reload Project to reload the project.Now build the MyOpenGLESApp.iOS.Application project by opening the shortcut menu for the project and choosing Build.

The Output window displays the output of the build process. It shows results for the iOS static library and the iOS app. On the Mac, the Terminal window running the remote agent shows the command and file transfer activity.
On your Mac computer, you may be prompted to allow codesign to access your keychain. Choose Allow to continue.
Choose your iOS device on the toolbar to run the app on your device attached to your Mac. If the app doesn't start, verify that the device gives permission for your deployed application to execute on the device. This permission can be set by going to Settings > General > Device Management on the device. Select your Developer App account, trust your account, and verify the app. Try to run the app again from Visual Studio.

Once your app has started, you can set breakpoints and use the Visual Studio debugger to examine locals, see the call stack, and watch values.

Press Shift+F5 to stop debugging.
The generated iOS app and library projects put the C++ code in a static library that implements only the shared code. Most of the application code is in the
Applicationproject. The calls to the shared library code in this template project are made in the GameViewController.m file. To build your iOS app, Visual Studio uses the Xcode platform toolset, which requires communication with a remote client that is running on a Mac.Visual Studio transfers the project files to the remote client. Then it sends commands to build the app using Xcode. The remote client sends build status information back to Visual Studio. When the app has built successfully, Visual Studio can send commands to run and debug the app. The debugger in Visual Studio controls the app running on your iOS device attached to your Mac. Visual Studio maps project properties to the options used to compile, link, and debug on the target iOS platform. For compiler command-line option details, open the Property Pages dialog for the MyOpenGLESApp.iOS.StaticLibrary project.
Customize your apps
You can modify the shared C++ code to add or change common functionality. Change the calls to the shared code in the MyOpenGLESApp.Android.NativeActivity and MyOpenGLESApp.iOS.Application projects to match. You can use preprocessor macros to specify platform-specific sections in your common code. The preprocessor macro __ANDROID__ is predefined when you build for Android. The preprocessor macro __APPLE__ is predefined when you build for iOS.
To see the IntelliSense for a particular project platform, choose the project in the context switcher dropdown. It's in the Navigation bar at the top of the editor window.
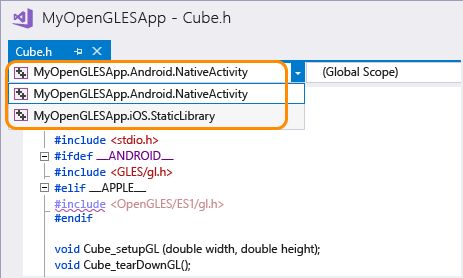
IntelliSense issues in code that's used by the current project are marked with a red wavy line. A purple wavy line marks issue in other projects. Visual Studio doesn't support code colorization or IntelliSense for Java or Objective-C files. However, you can still modify the source files and resources. Use them to set your application name, icon, and other implementation details.
Feedback
Coming soon: Throughout 2024 we will be phasing out GitHub Issues as the feedback mechanism for content and replacing it with a new feedback system. For more information see: https://aka.ms/ContentUserFeedback.
Submit and view feedback for