Linux projects are supported in Visual Studio 2017 and later. To see the documentation for these versions, set the Visual Studio Version selector control for this article to Visual Studio 2017 or Visual Studio 2019. It's found at the top of the table of contents on this page.
You can use the Visual Studio IDE on Windows to create, edit, and debug C++ projects that execute on a remote Linux system, virtual machine, or the Windows Subsystem for Linux.
You can work on your existing code base that uses CMake without having to convert it to a Visual Studio project. If your code base is cross-platform, you can target both Windows and Linux from within Visual Studio. For example, you can edit, build, and debug your code on Windows using Visual Studio. Then, quickly retarget the project for Linux to build and debug in a Linux environment. Linux header files are automatically copied to your local machine. Visual Studio uses them to provide full IntelliSense support (Statement Completion, Go to Definition, and so on).
For any of these scenarios, the Linux development with C++ workload is required.
Visual Studio setup
Type "Visual Studio Installer" in the Windows search box:
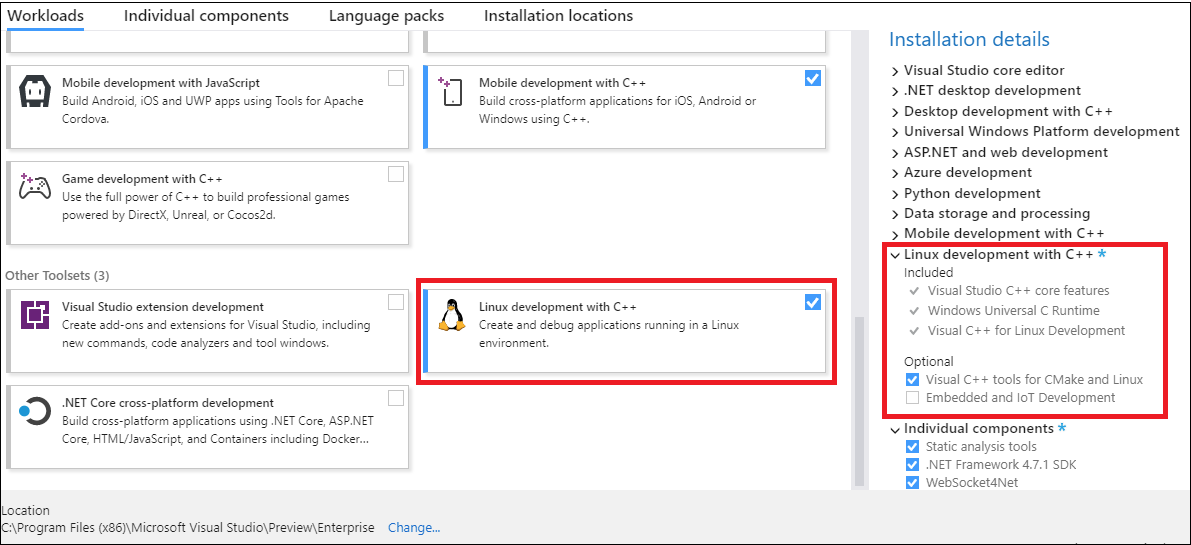
Look for the installer under the Apps results and double-click it. When the installer opens, choose Modify, and then click on the Workloads tab. Scroll down to Other toolsets and select the Linux development with C++ workload.
The Linux Development workload is selected. The Installation details pane is highlighted, which lists what's included in the workload. Which includes: Visual Studio C++ core features, Windows Universal C runtime, Visual C++ for Linux development. An optional component is also selected: Visual C++ tools for CMake and Linux.
If you're targeting IoT or embedded platforms, go to the Installation details pane on the right. Under Linux development with C++, expand Optional Components, and choose the components you need. CMake support for Linux is selected by default.
Linux projects in Visual Studio require the following dependencies to be installed on your remote Linux system or WSL:
A compiler - Visual Studio 2019 and later have full support for GCC and Clang.
gdb - Visual Studio automatically launches gdb on the Linux system, and uses the front end of the Visual Studio debugger to provide a full-fidelity debugging experience on Linux.
rsync and zip - the inclusion of rsync and zip allows Visual Studio to extract header files from your Linux system to the Windows filesystem for use by IntelliSense.
make
openssh-server (remote Linux systems only) - Visual Studio connects to remote Linux systems over a secure SSH connection.
ninja-build (CMake projects only) - Ninja is the default generator for Linux and WSL configurations in Visual Studio 2019 version 16.6 or later.
The following commands assume you're using g++ instead of clang.
Linux projects in Visual Studio require the following dependencies to be installed on your remote Linux system or WSL:
gcc - Visual Studio 2017 has full support for GCC.
gdb - Visual Studio automatically launches gdb on the Linux system and uses the front end of the Visual Studio debugger to provide a full-fidelity debugging experience on Linux.
rsync and zip - the inclusion of rsync and zip allows Visual Studio to extract header files from your Linux system to the Windows filesystem to use for IntelliSense.
make
openssh-server - Visual Studio connects to remote Linux systems over a secure SSH connection.
When you're targeting WSL, there's no need to add a remote connection or configure SSH to build and debug. zip and rsync are required for automatic syncing of Linux headers with Visual Studio for Intellisense support. ninja-build is only required for CMake projects. If the required applications aren't already present, you can install them using this command:
Bash
sudo apt-get install g++ gdb make ninja-build rsync zip
Ubuntu on remote Linux systems
The target Linux system must have openssh-server, g++, gdb, and make installed. ninja-build is required for CMake projects only. The ssh daemon must be running. zip and rsync are required for automatic syncing of remote headers with your local machine for Intellisense support. If these applications aren't already present, you can install them as follows:
At a shell prompt on your Linux computer, run:
Bash
sudo apt-get install openssh-server g++ gdb make ninja-build rsync zip
You might be prompted for your root password to run the sudo command. If so, enter it and continue. Once complete, the required services and tools are installed.
Ensure the ssh service is running on your Linux computer by running:
Bash
sudo service ssh start
This command starts the service and runs it in the background, ready to accept connections.
Fedora on WSL
Fedora uses the dnf package installer. To download g++, gdb, make, rsync, ninja-build, and zip, run:
Bash
sudo dnf install gcc-g++ gdb rsync ninja-build make zip
zip and rsync are required for automatic syncing of Linux headers with Visual Studio for Intellisense support. ninja-build is only required for CMake projects.
Fedora on remote Linux systems
The target machine running Fedora uses the dnf package installer. To download openssh-server, g++, gdb, make, ninja-build, rsync, and zip, and restart the ssh daemon, follow these instructions. ninja-build is only required for CMake projects.
At a shell prompt on your Linux computer, run:
Bash
sudo dnf install openssh-server gcc-g++ gdb ninja-build make rsync zip
You might be prompted for your root password to run the sudo command. If so, enter it and continue. Once complete, the required services and tools are installed.
Ensure the ssh service is running on your Linux computer by running:
Bash
sudo systemctl start sshd
This command starts the service and runs it in the background, ready to accept connections.
Next Steps
You're now ready to create or open a Linux project and configure it to run on the target system. For more information, see:
In this module, you learn how to use the Windows Subsystem for Linux (WSL) with Visual Studio Code (VS Code). We explore the installation process and the basics of using WSL. Additionally, we install and utilize the Visual Studio Code WSL extension. Finally, we demonstrate how to debug and run Python code in VS Code within our WSL environment.
Build end-to-end solutions in Microsoft Azure to create Azure Functions, implement and manage web apps, develop solutions utilizing Azure storage, and more.