Walkthrough: Host a WPF Clock in Win32
To put WPF inside Win32 applications, use HwndSource, which provides the HWND that contains your WPF content. First you create the HwndSource, giving it parameters similar to CreateWindow. Then you tell the HwndSource about the WPF content you want inside it. Finally, you get the HWND out of the HwndSource. This walkthrough illustrates how to create a mixed WPF inside Win32 application that reimplements the operating system Date and Time Properties dialog.
Prerequisites
See WPF and Win32 Interoperation.
How to Use This Tutorial
This tutorial concentrates on the important steps of producing an interoperation application. The tutorial is backed by a sample, Win32 Clock Interoperation Sample, but that sample is reflective of the end product. This tutorial documents the steps as if you were starting with an existing Win32 project of your own, perhaps a pre-existing project, and you were adding a hosted WPF to your application. You can compare your end product with Win32 Clock Interoperation Sample.
A Walkthrough of Windows Presentation Framework Inside Win32 (HwndSource)
The following graphic shows the intended end product of this tutorial:
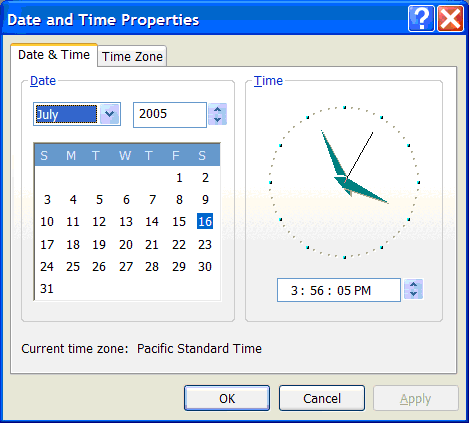
You can recreate this dialog by creating a C++ Win32 project in Visual Studio, and using the dialog editor to create the following:
(You do not need to use Visual Studio to use HwndSource, and you do not need to use C++ to write Win32 programs, but this is a fairly typical way to do it, and lends itself well to a stepwise tutorial explanation).
You need to accomplish five particular substeps in order to put a WPF clock into the dialog:
Enable your Win32 project to call managed code (/clr) by changing project settings in Visual Studio.
Create a WPFPage in a separate DLL.
Put that WPFPage inside an HwndSource.
Use Win32 to decide where to place the HWND within the larger Win32 application
/clr
The first step is to turn this unmanaged Win32 project into one that can call managed code. You use the /clr compiler option, which will link to the necessary DLLs you want to use, and adjust the Main method for use with WPF.
To enable the use of managed code inside the C++ project: Right-click on win32clock project and select Properties. On the General property page (the default), change Common Language Runtime support to /clr.
Next, add references to DLLs necessary for WPF: PresentationCore.dll, PresentationFramework.dll, System.dll, WindowsBase.dll, UIAutomationProvider.dll, and UIAutomationTypes.dll. (Following instructions assume the operating system is installed on C: drive.)
Right-click win32clock project and select References..., and inside that dialog:
Right-click win32clock project and select References....
Click Add New Reference, click Browse tab, enter C:\Program Files\Reference Assemblies\Microsoft\Framework\v3.0\PresentationCore.dll, and click OK.
Repeat for PresentationFramework.dll: C:\Program Files\Reference Assemblies\Microsoft\Framework\v3.0\PresentationFramework.dll.
Repeat for WindowsBase.dll: C:\Program Files\Reference Assemblies\Microsoft\Framework\v3.0\WindowsBase.dll.
Repeat for UIAutomationTypes.dll: C:\Program Files\Reference Assemblies\Microsoft\Framework\v3.0\UIAutomationTypes.dll.
Repeat for UIAutomationProvider.dll: C:\Program Files\Reference Assemblies\Microsoft\Framework\v3.0\UIAutomationProvider.dll.
Click Add New Reference, select System.dll, and click OK.
Click OK to exit the win32clock Property Pages for adding references.
Finally, add the STAThreadAttribute to the _tWinMain method for use with WPF:
[System::STAThreadAttribute]
int APIENTRY _tWinMain(HINSTANCE hInstance,
                     HINSTANCE hPrevInstance,
                     LPTSTR    lpCmdLine,
                     int       nCmdShow)
This attribute tells the common language runtime (CLR) that when it initializes Component Object Model (COM), it should use a single threaded apartment model (STA), which is necessary for WPF (and Windows Forms).
Create a Windows Presentation Framework Page
Next, you create a DLL that defines a WPFPage. It’s often easiest to create the WPFPage as a standalone application, and write and debug the WPF portion that way. Once done, that project can be turned into a DLL by right-clicking the project, clicking on Properties, going to the Application, and changing Output type to Windows Class Library.
The WPF dll project can then be combined with the Win32 project (one solution that contains two projects) – right-click on the solution, select Add\Existing Project.
To use that WPF dll from the Win32 project, you need to add a reference:
Right-click win32clock project and select References....
Click Add New Reference.
Click the Projects tab. Select WPFClock, click OK.
Click OK to exit the win32clock Property Pages for adding references.
HwndSource
Next, you use HwndSource to make the WPFPage look like an HWND. You add this block of code to a C++ file:
namespace ManagedCode
{
    using namespace System;
    using namespace System::Windows;
    using namespace System::Windows::Interop;
    using namespace System::Windows::Media;

    HWND GetHwnd(HWND parent, int x, int y, int width, int height) {
        HwndSource^ source = gcnew HwndSource(
            0, // class style
            WS_VISIBLE | WS_CHILD, // style
            0, // exstyle
            x, y, width, height,
            "hi", // NAME
            IntPtr(parent)        // parent window
            );

        UIElement^ page = gcnew WPFClock::Clock();
        source->RootVisual = page;
        return (HWND) source->Handle.ToPointer();
    }
}
}
This is a long piece of code that could use some explanation. The first part is various clauses so that you do not need to fully qualify all the calls:
namespace ManagedCode
{
    using namespace System;
    using namespace System::Windows;
    using namespace System::Windows::Interop;
    using namespace System::Windows::Media;
Then you define a function that creates the WPF content, puts an HwndSource around it, and returns the HWND:
HWND GetHwnd(HWND parent, int x, int y, int width, int height) {
First you create an HwndSource, whose parameters are similar to CreateWindow:
HwndSource^ source = gcnew HwndSource(
    0, // class style
    WS_VISIBLE | WS_CHILD, // style
    0, // exstyle
    x, y, width, height,
    "hi", // NAME
    IntPtr(parent) // parent window
);
Then you create the WPF content class by calling its constructor:
UIElement^ page = gcnew WPFClock::Clock();
You then connect the page to the HwndSource:
source->RootVisual = page;
And in the final line, return the HWND for the HwndSource:
return (HWND) source->Handle.ToPointer();
Positioning the Hwnd
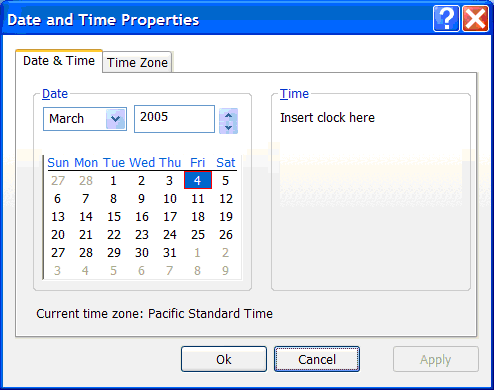
Now that you have an HWND that contains the WPF clock, you need to put that HWND inside the Win32 dialog. If you knew just where to put the HWND, you would just pass that size and location to the GetHwnd function you defined earlier. But you used a resource file to define the dialog, so you are not exactly sure where any of the HWNDs are positioned. You can use the Visual Studio dialog editor to put a Win32 STATIC control where you want the clock to go ("Insert clock here"), and use that to position the WPF clock.
Where you handle WM_INITDIALOG, you use GetDlgItem to retrieve the HWND for the placeholder STATIC:
HWND placeholder = GetDlgItem(hDlg, IDC_CLOCK);
You then calculate the size and position of that placeholder STATIC, so you can put the WPF clock in that place:
RECT rectangle;
GetWindowRect(placeholder, &rectangle);
int width = rectangle.right - rectangle.left;
int height = rectangle.bottom - rectangle.top;
POINT point;
point.x = rectangle.left;
point.y = rectangle.top;
result = MapWindowPoints(NULL, hDlg, &point, 1);
Then you hide the placeholder STATIC:
ShowWindow(placeholder, SW_HIDE);
And create the WPF clock HWND in that location:
HWND clock = ManagedCode::GetHwnd(hDlg, point.x, point.y, width, height);
To make the tutorial interesting, and to produce a real WPF clock, you will need to create a WPF clock control at this point. You can do so mostly in markup, with just a few event handlers in code-behind. Since this tutorial is about interoperation and not about control design, complete code for the WPF clock is provided here as a code block, without discrete instructions for building it up or what each part means. Feel free to experiment with this code to change the look and feel or functionality of the control.
Here is the markup:
<Page x:Class="WPFClock.Clock"
    xmlns="http://schemas.microsoft.com/winfx/2006/xaml/presentation"
    xmlns:x="http://schemas.microsoft.com/winfx/2006/xaml"
    >
    <Grid>
        <Grid.Background>
            <LinearGradientBrush StartPoint="0,0" EndPoint="0,1">
              <GradientStop Color="#fcfcfe" Offset="0" />
              <GradientStop Color="#f6f4f0" Offset="1.0" />
            </LinearGradientBrush>
        </Grid.Background>

        <Grid Name="PodClock" HorizontalAlignment="Center" VerticalAlignment="Center">
            <Grid.Resources>
                <Storyboard x:Key="sb">
                    <DoubleAnimation From="0" To="360" Duration="12:00:00" RepeatBehavior="Forever"
                        Storyboard.TargetName="HourHand"
                        Storyboard.TargetProperty="(Rectangle.RenderTransform).(RotateTransform.Angle)"
                        />
                    <DoubleAnimation From="0" To="360" Duration="01:00:00" RepeatBehavior="Forever"
                        Storyboard.TargetName="MinuteHand"
                        Storyboard.TargetProperty="(Rectangle.RenderTransform).(RotateTransform.Angle)"
                        />
                    <DoubleAnimation From="0" To="360" Duration="0:1:00" RepeatBehavior="Forever"
                        Storyboard.TargetName="SecondHand"
                        Storyboard.TargetProperty="(Rectangle.RenderTransform).(RotateTransform.Angle)"
                        />
                </Storyboard>
            </Grid.Resources>

          <Ellipse Width="108" Height="108" StrokeThickness="3">
            <Ellipse.Stroke>
              <LinearGradientBrush>
                <GradientStop Color="LightBlue" Offset="0" />
                <GradientStop Color="DarkBlue" Offset="1" />
              </LinearGradientBrush>
            </Ellipse.Stroke>
          </Ellipse>
          <Ellipse VerticalAlignment="Center" HorizontalAlignment="Center" Width="104" Height="104" Fill="LightBlue" StrokeThickness="3">
            <Ellipse.Stroke>
              <LinearGradientBrush>
                <GradientStop Color="DarkBlue" Offset="0" />
                <GradientStop Color="LightBlue" Offset="1" />
              </LinearGradientBrush>
            </Ellipse.Stroke>
          </Ellipse>
            <Border BorderThickness="1" BorderBrush="Black" Background="White" Margin="20" HorizontalAlignment="Right" VerticalAlignment="Center">
                <TextBlock Name="MonthDay" Text="{Binding}"/>
            </Border>
            <Canvas Width="102" Height="102">
                <Ellipse Width="8" Height="8" Fill="Black" Canvas.Top="46" Canvas.Left="46" />
                <Rectangle Canvas.Top="5" Canvas.Left="48" Fill="Black" Width="4" Height="8">
                    <Rectangle.RenderTransform>
                        <RotateTransform CenterX="2" CenterY="46" Angle="0" />
                    </Rectangle.RenderTransform>
                </Rectangle>
                <Rectangle Canvas.Top="5" Canvas.Left="49" Fill="Black" Width="2" Height="6">
                    <Rectangle.RenderTransform>
                        <RotateTransform CenterX="2" CenterY="46" Angle="30" />
                    </Rectangle.RenderTransform>
                </Rectangle>
                <Rectangle Canvas.Top="5" Canvas.Left="49" Fill="Black" Width="2" Height="6">
                    <Rectangle.RenderTransform>
                        <RotateTransform CenterX="2" CenterY="46" Angle="60" />
                    </Rectangle.RenderTransform>
                </Rectangle>
                <Rectangle Canvas.Top="5" Canvas.Left="48" Fill="Black" Width="4" Height="8">
                    <Rectangle.RenderTransform>
                        <RotateTransform CenterX="2" CenterY="46" Angle="90" />
                    </Rectangle.RenderTransform>
                </Rectangle>
                <Rectangle Canvas.Top="5" Canvas.Left="49" Fill="Black" Width="2" Height="6">
                    <Rectangle.RenderTransform>
                        <RotateTransform CenterX="2" CenterY="46" Angle="120" />
                    </Rectangle.RenderTransform>
                </Rectangle>
                <Rectangle Canvas.Top="5" Canvas.Left="49" Fill="Black" Width="2" Height="6">
                    <Rectangle.RenderTransform>
                        <RotateTransform CenterX="2" CenterY="46" Angle="150" />
                      </Rectangle.RenderTransform>
                    </Rectangle>
                    <Rectangle Canvas.Top="5" Canvas.Left="48" Fill="Black" Width="4" Height="8">
                      <Rectangle.RenderTransform>
                        <RotateTransform CenterX="2" CenterY="46" Angle="180" />
                    </Rectangle.RenderTransform>
                </Rectangle>
                <Rectangle Canvas.Top="5" Canvas.Left="49" Fill="Black" Width="2" Height="6">
                    <Rectangle.RenderTransform>
                        <RotateTransform CenterX="2" CenterY="46" Angle="210" />
                    </Rectangle.RenderTransform>
                </Rectangle>
                <Rectangle Canvas.Top="5" Canvas.Left="49" Fill="Black" Width="2" Height="6">
                    <Rectangle.RenderTransform>
                        <RotateTransform CenterX="2" CenterY="46" Angle="240" />
                    </Rectangle.RenderTransform>
                </Rectangle>
                <Rectangle Canvas.Top="5" Canvas.Left="48" Fill="Black" Width="4" Height="8">
                    <Rectangle.RenderTransform>
                        <RotateTransform CenterX="2" CenterY="46" Angle="270" />
                      </Rectangle.RenderTransform>
                    </Rectangle>
                    <Rectangle Canvas.Top="5" Canvas.Left="49" Fill="Black" Width="2" Height="6">
                      <Rectangle.RenderTransform>
                        <RotateTransform CenterX="2" CenterY="46" Angle="300" />
                    </Rectangle.RenderTransform>
                </Rectangle>
                <Rectangle Canvas.Top="5" Canvas.Left="49" Fill="Black" Width="2" Height="6">
                    <Rectangle.RenderTransform>
                        <RotateTransform CenterX="2" CenterY="46" Angle="330" />
                    </Rectangle.RenderTransform>
                </Rectangle>


                <Rectangle x:Name="HourHand" Canvas.Top="21" Canvas.Left="48"
                            Fill="Black" Width="4" Height="30">
                    <Rectangle.RenderTransform>
                        <RotateTransform x:Name="HourHand2" CenterX="2" CenterY="30" />
                    </Rectangle.RenderTransform>
                </Rectangle>
                <Rectangle x:Name="MinuteHand" Canvas.Top="6" Canvas.Left="49"
                        Fill="Black" Width="2" Height="45">
                    <Rectangle.RenderTransform>
                        <RotateTransform CenterX="1" CenterY="45" />
                    </Rectangle.RenderTransform>
                </Rectangle>
                <Rectangle x:Name="SecondHand" Canvas.Top="4" Canvas.Left="49"
                        Fill="Red" Width="1" Height="47">
                    <Rectangle.RenderTransform>
                        <RotateTransform CenterX="0.5" CenterY="47" />
                    </Rectangle.RenderTransform>
                </Rectangle>
            </Canvas>
        </Grid>
    </Grid>
</Page>
And here is the accompanying code-behind:
using System;
using System.Windows;
using System.Windows.Controls;
using System.Windows.Data;
using System.Windows.Documents;
using System.Windows.Media;
using System.Windows.Media.Animation;
using System.Windows.Shapes;
using System.Windows.Threading;

namespace WPFClock
{
    /// <summary>
    /// Interaction logic for Clock.xaml
    /// </summary>
    public partial class Clock : Page
    {
        private DispatcherTimer _dayTimer;

        public Clock()
        {
            InitializeComponent();
            this.Loaded += new RoutedEventHandler(Clock_Loaded);
        }

        void Clock_Loaded(object sender, RoutedEventArgs e) {
            // set the datacontext to be today's date
            DateTime now = DateTime.Now;
            DataContext = now.Day.ToString();

            // then set up a timer to fire at the start of tomorrow, so that we can update
            // the datacontext
            _dayTimer = new DispatcherTimer();
            _dayTimer.Interval = new TimeSpan(1, 0, 0, 0) - now.TimeOfDay;
            _dayTimer.Tick += new EventHandler(OnDayChange);
            _dayTimer.Start();

            // finally, seek the timeline, which assumes a beginning at midnight, to the appropriate
            // offset
            Storyboard sb = (Storyboard)PodClock.FindResource("sb");
            sb.Begin(PodClock, HandoffBehavior.SnapshotAndReplace, true);
            sb.Seek(PodClock, now.TimeOfDay, TimeSeekOrigin.BeginTime);
        }

        private void OnDayChange(object sender, EventArgs e)
        {
            // date has changed, update the datacontext to reflect today's date
            DateTime now = DateTime.Now;
            DataContext = now.Day.ToString();
            _dayTimer.Interval = new TimeSpan(1, 0, 0, 0);
        }
    }
}
The final result looks like:
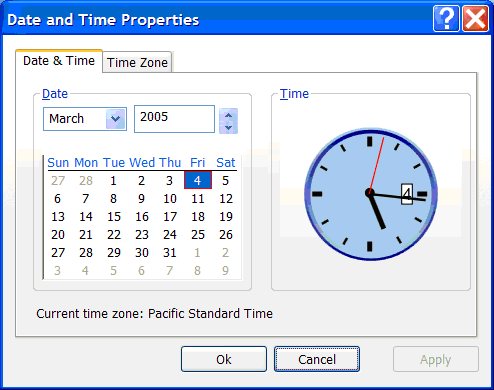
To compare your end result to the code that produced this screenshot, see Win32 Clock Interoperation Sample.
See also
.NET Desktop feedback
Feedback
Coming soon: Throughout 2024 we will be phasing out GitHub Issues as the feedback mechanism for content and replacing it with a new feedback system. For more information see: https://aka.ms/ContentUserFeedback.
Submit and view feedback for