Install .NET for Apache Spark on Jupyter Notebooks on Azure HDInsight Spark clusters
This article teaches you how to install .NET for Apache Spark on Jupyter Notebooks on Azure HDInsight Spark clusters. You can deploy .NET for Apache Spark on Azure HDInsight clusters through a combination of the command line and the Azure portal (for more information, see how to deploy a .NET for Apache Spark application to Azure HDInsight), but notebooks provide a more interactive and iterative experience.
Azure HDInsight clusters already come with Jupyter Notebooks, so all you have to do is configure the Jupyter Notebooks to run .NET for Apache Spark. To use .NET for Apache Spark in your Jupyter Notebooks, a C# REPL is needed to execute your C# code line-by-line and to preserve execution state when necessary. Try .NET has been integrated as the official .NET REPL.
To enable .NET for Apache Spark through the Jupyter Notebooks experience, you need to follow a few manual steps through Ambari and submit script actions on the HDInsight Spark cluster.
Note
This feature is experimental and is not supported by the HDInsight Spark team.
Warning
.NET for Apache Spark targets an out-of-support version of .NET (.NET Core 3.1). For more information, see the .NET Support Policy.
Prerequisites
If you don't already have one, create an Azure HDInsight Spark cluster.
Visit the Azure portal and select + Create a Resource.
Create a new Azure HDInsight cluster resource. Select Spark 2.4 and HDI 4.0 during cluster creation.
Install .NET for Apache Spark
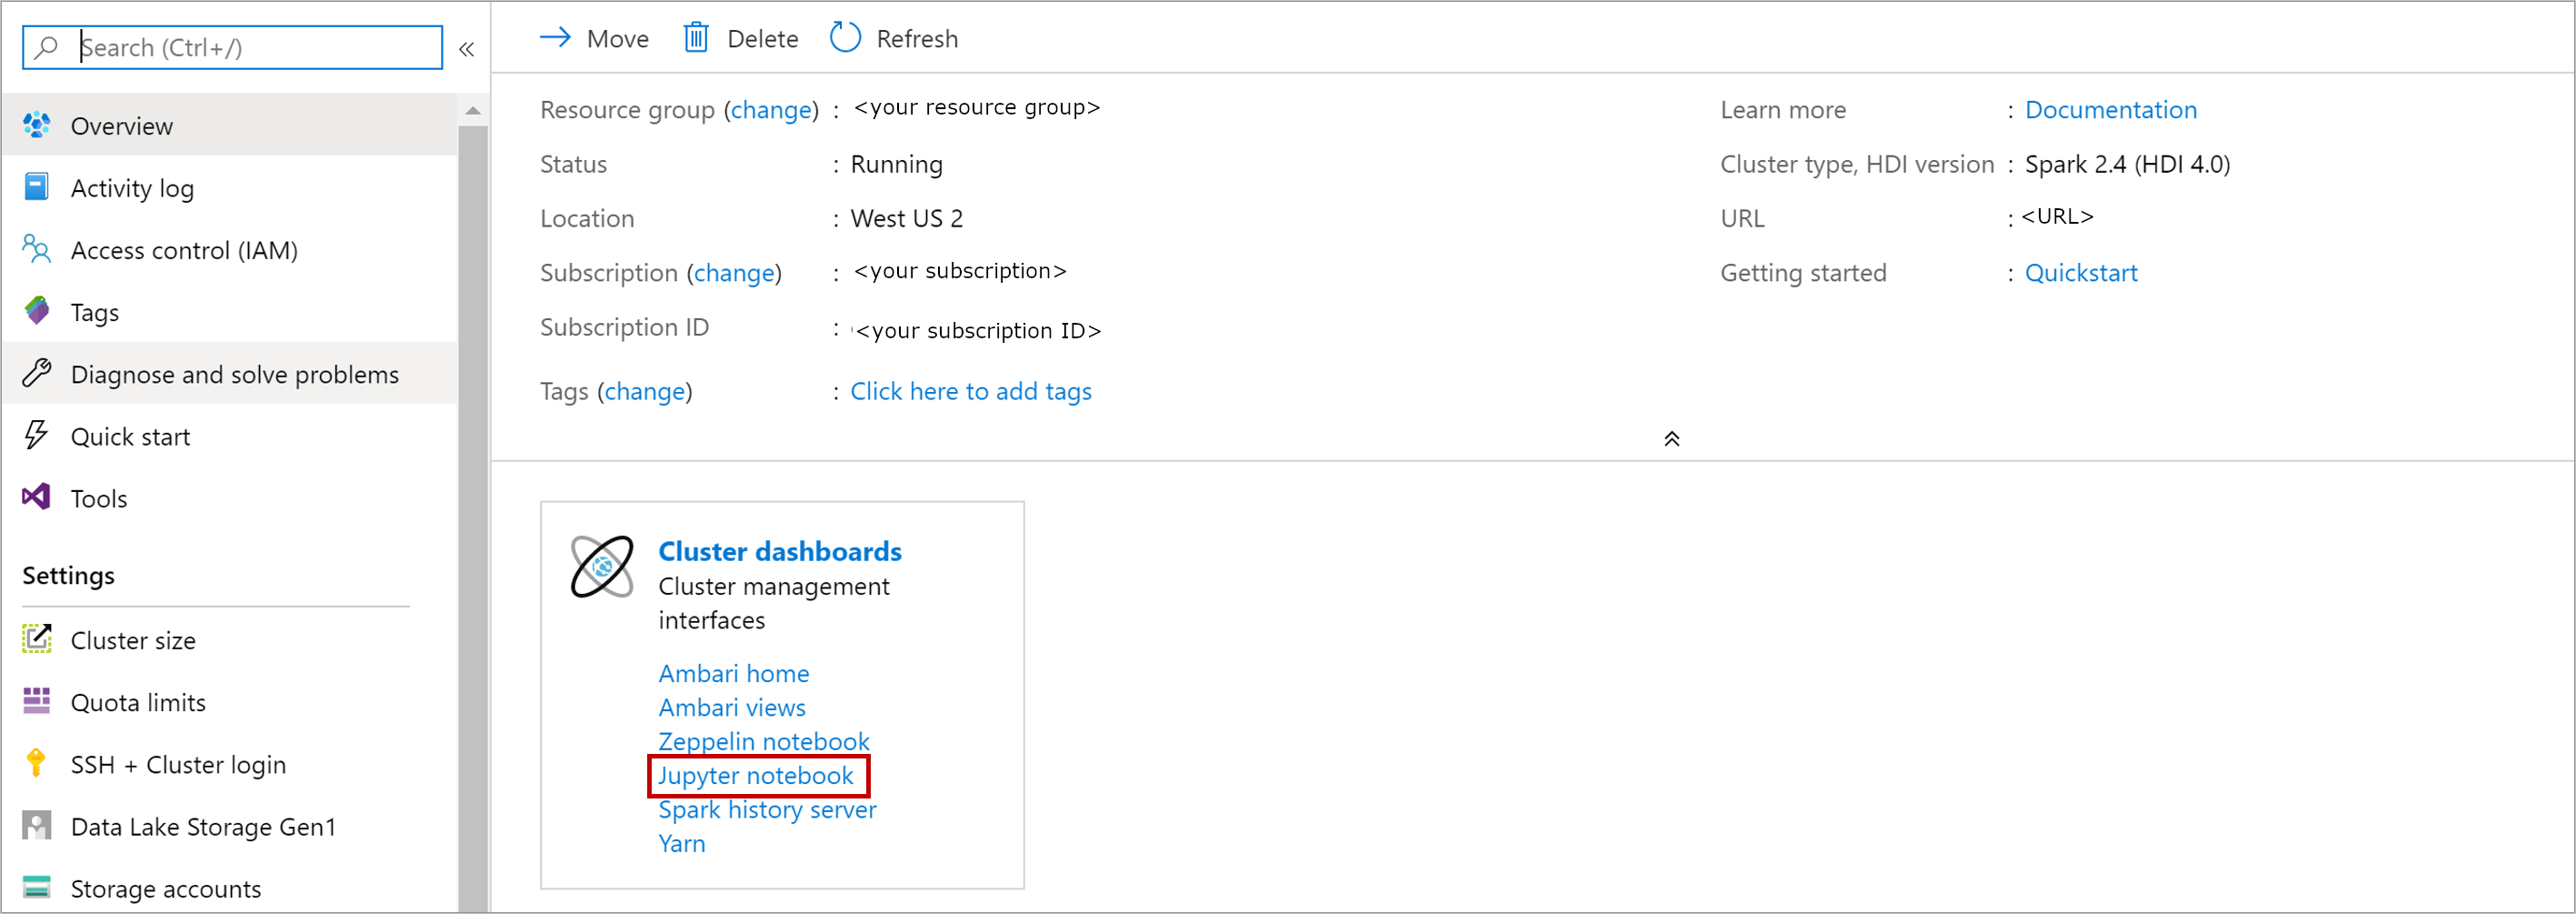
In the Azure portal, select the HDInsight Spark cluster you created in the previous step.
Stop the Livy server
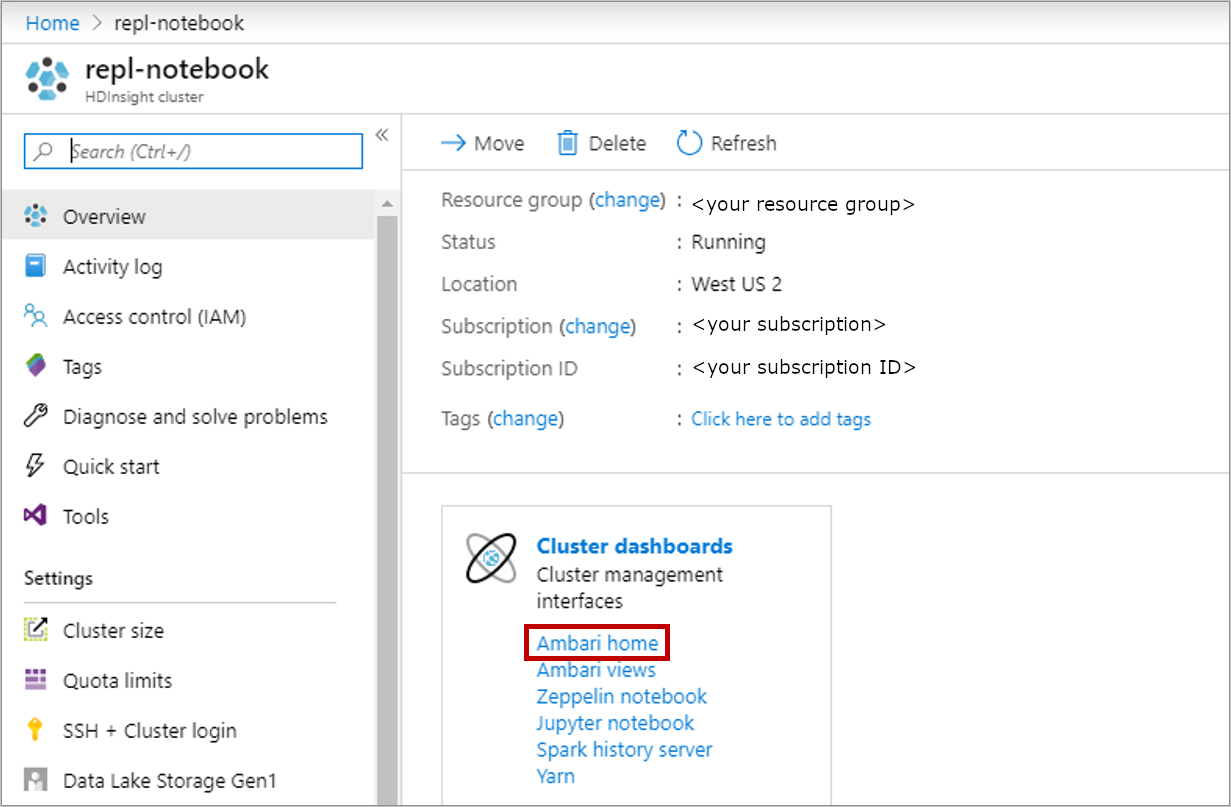
From the portal, select Overview, and then select Ambari home. If prompted, enter the login credentials for the cluster.
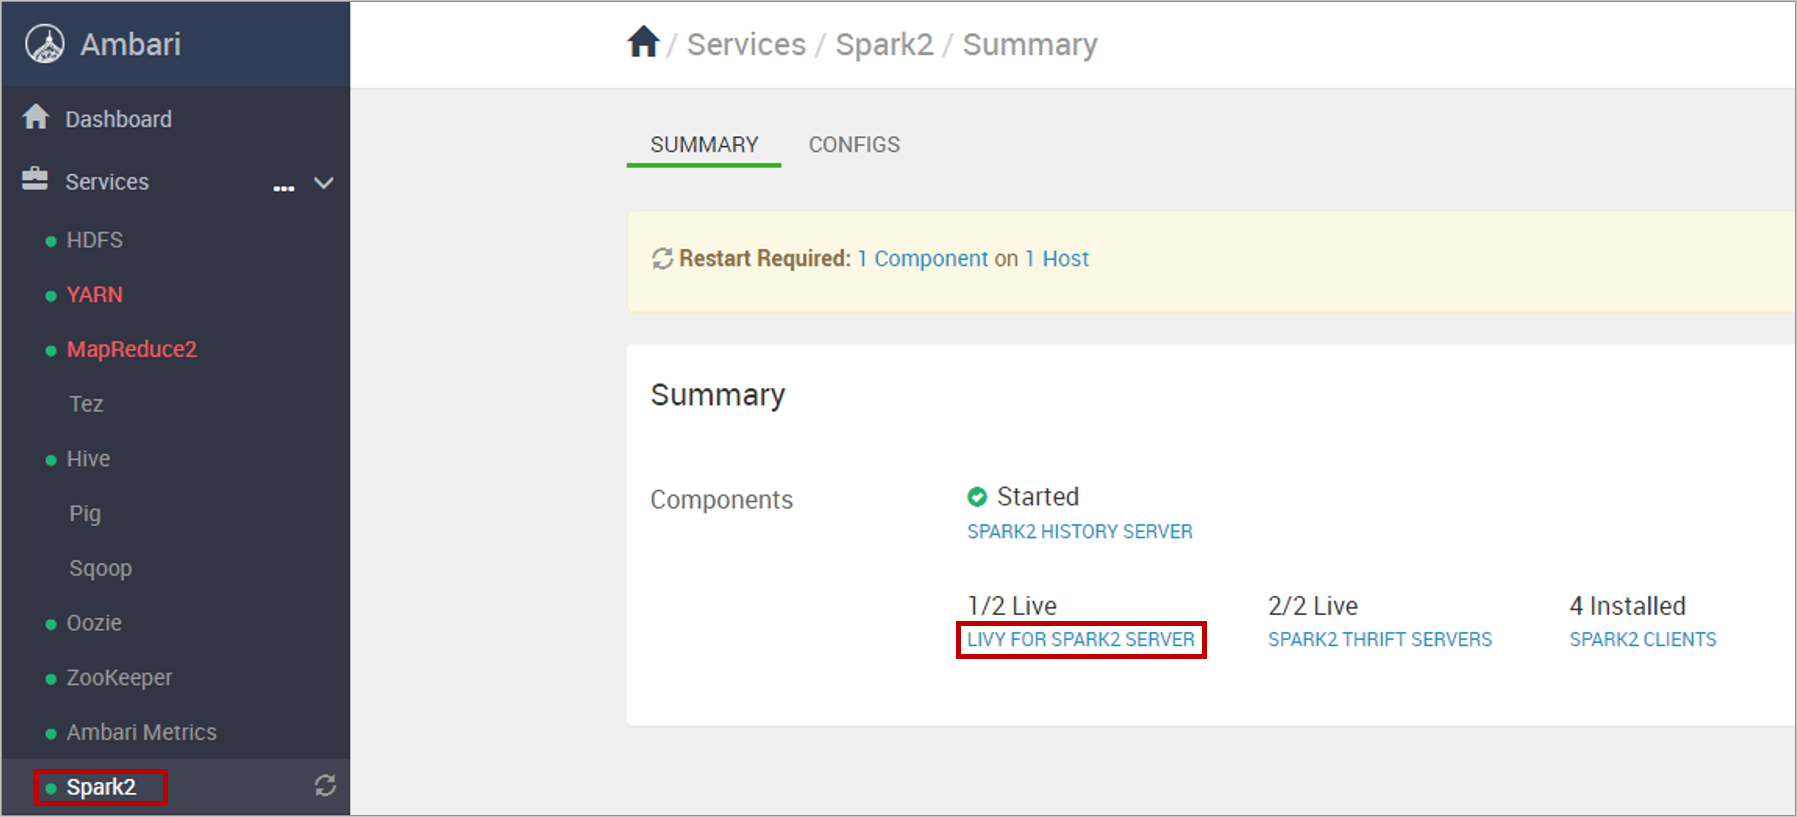
Select Spark2 from the left navigation menu, and select LIVY FOR SPARK2 SERVER.
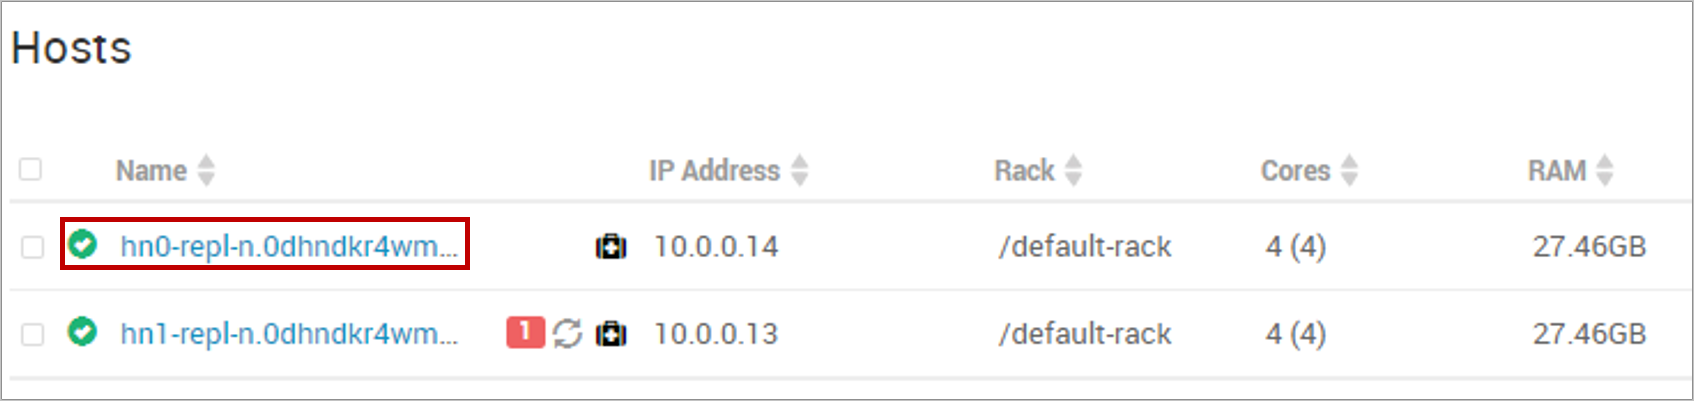
Select hn0... host.
Select the ellipsis next to Livy for Spark2 Server and select Stop. When prompted, select OK to proceed.
Stop Livy for Spark2 Server.
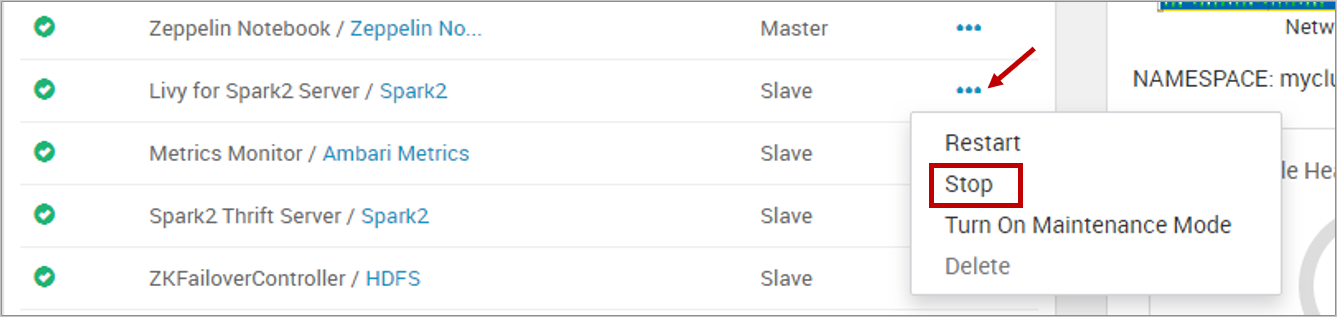
Repeat the previous steps for hn1... host.
Submit an HDInsight script action
The
install-interactive-notebook.shis a script that installs .NET for Apache Spark and makes changes to Apache Livy and sparkmagic. Before you submit a script action to HDInsight, you need to create and uploadinstall-interactive-notebook.sh.Create a new file named install-interactive-notebook.sh in your local computer and paste the contents of install-interactive-notebook.sh contents.
Upload the script to a URI that's accessible from the HDInsight cluster. For example,
https://<my storage account>.blob.core.windows.net/<my container>/<some dir>/install-interactive-notebook.sh.Run
install-interactive-notebook.shon the cluster using HDInsight Script Actions.Return to your HDI cluster in the Azure portal, and select Script actions from the options on the left. You submit one script action to deploy the .NET for Apache Spark REPL on your HDInsight Spark cluster. Use the following settings:
Property Description Script type Custom Name Install .NET for Apache Spark Interactive Notebook Experience Bash script URI The URI to which you uploaded install-interactive-notebook.sh.Node type(s) Head and Worker Parameters .NET for Apache Spark version. You can check .NET for Apache Spark releases. For example, if you want to install Sparkdotnet version 1.0.0 then it would be 1.0.0.Move to the next step when green checkmarks appear next to the status of the script action.
Start the Livy server
Follow the instructions in the Stop Livy server section to Start (rather than Stop) the Livy for Spark2 Server for hosts hn0 and hn1.
Set up Spark default configurations
From the portal, select Overview, and then select Ambari home. If prompted, enter the cluster login credentials for the cluster.
Select Spark2 and CONFIGS. Then, select Custom spark2-defaults.
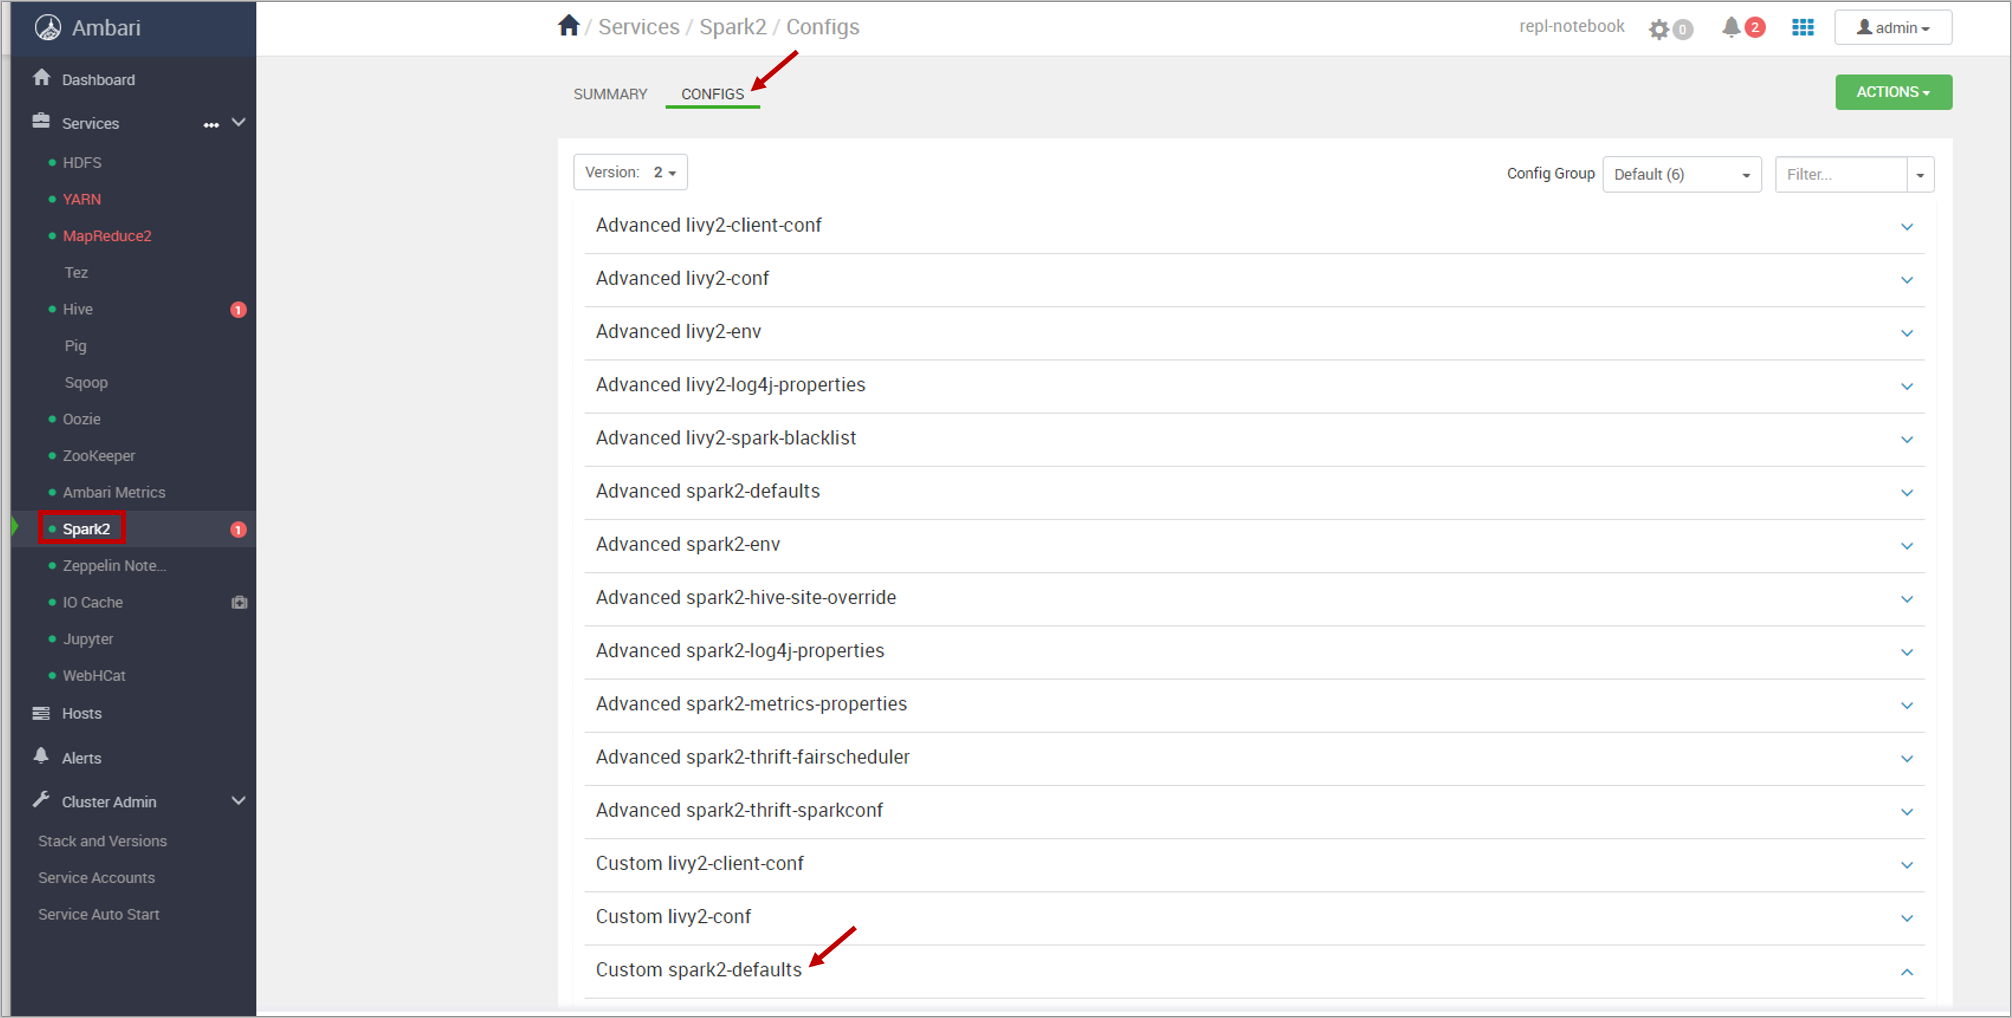
Select Add Property to add Spark default settings.

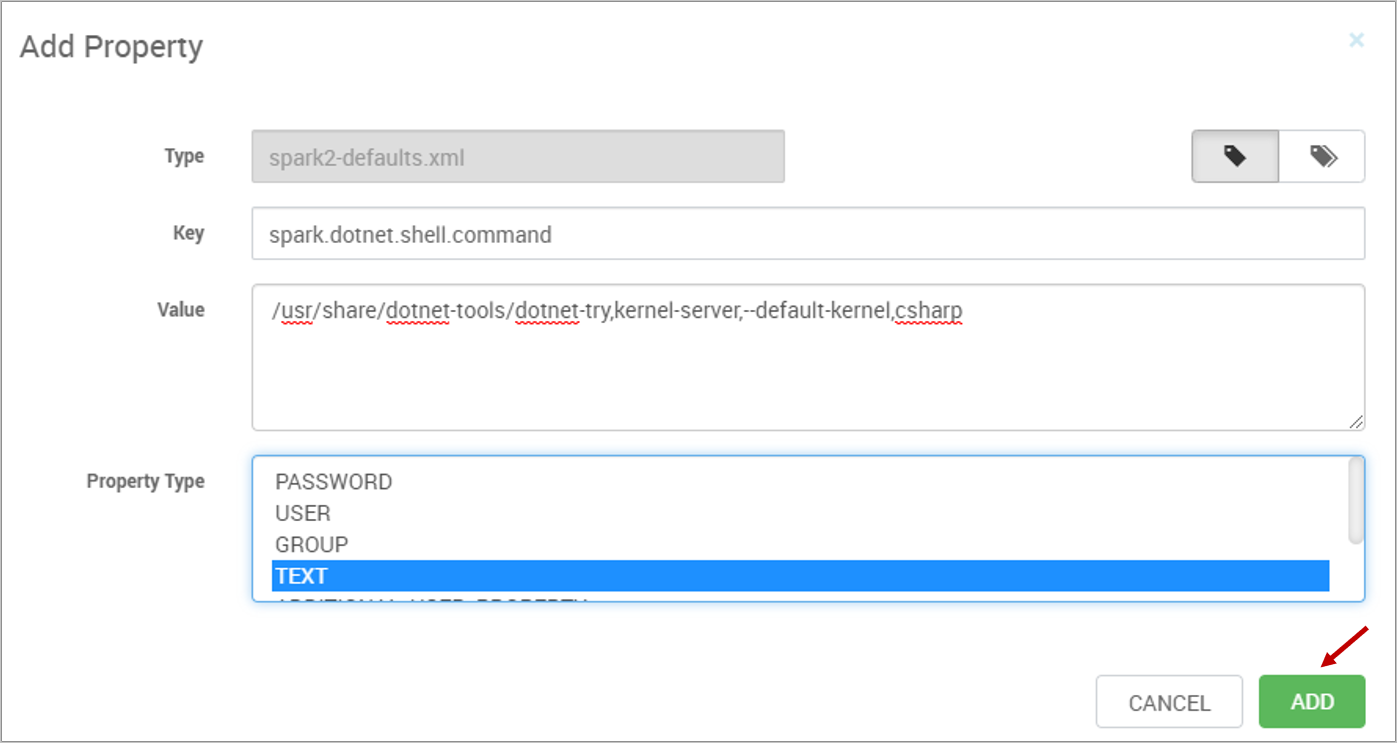
There are three individual properties. Add them one at a time using the TEXT property type in Single property add mode. Check that you don't have any extra spaces before or after any of the keys/values.
Property 1
- Key:
spark.dotnet.shell.command - Value:
/usr/share/dotnet-tools/dotnet-try,kernel-server,--default-kernel,csharp
- Key:
Property 2 Use the version of .NET for Apache Spark which you had included in the previous script action.
- Key:
spark.dotnet.packages - Value:
["nuget: Microsoft.Spark, 1.0.0", "nuget: Microsoft.Spark.Extensions.Delta, 1.0.0"]
- Key:
Property 3
- Key:
spark.dotnet.interpreter - Value:
try
- Key:
For example, the following image captures the setting for adding property 1:
After adding the three properties, select SAVE. If you see a warning screen of config recommendations, select PROCEED ANYWAY.
Restart affected components.
After adding the new properties, you need to restart components that were affected by the changes. At the top, select RESTART, and then Restart All Affected from the drop-down.
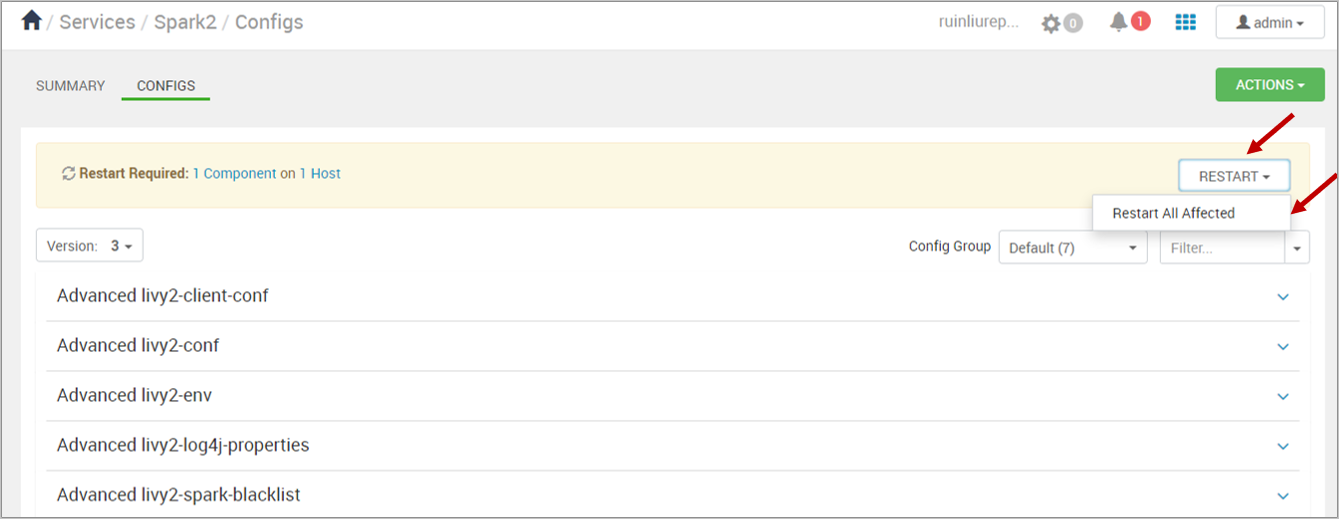
When prompted, select CONFIRM RESTART ALL to continue, then click OK to finish.
Submit jobs through a Jupyter Notebook
After finishing the previous steps, you can now submit your .NET for Apache Spark jobs through Jupyter Notebooks.
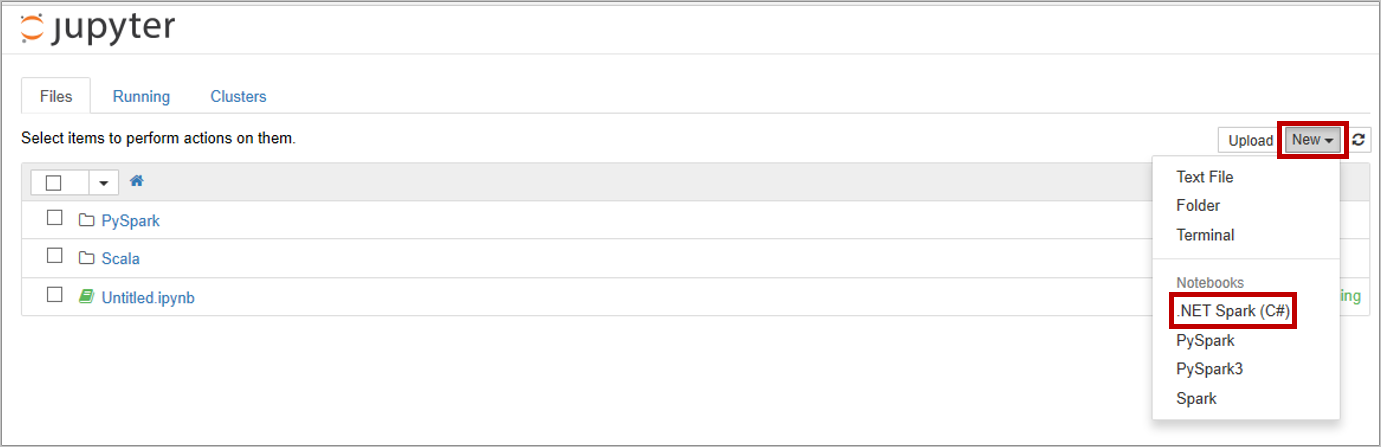
Create a new .NET for Apache Spark notebook. Launch a Jupyter Notebook from your HDI cluster in the Azure portal.
Then, select New > .NET Spark (C#) to create a notebook.
Submit jobs using .NET for Apache Spark.
Use the following code snippet to create a DataFrame:
var df = spark.Range(0,5);
df.Show();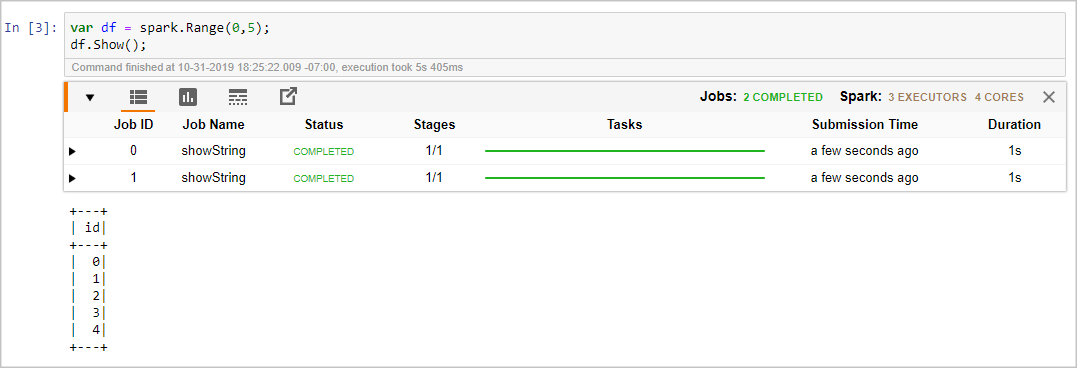
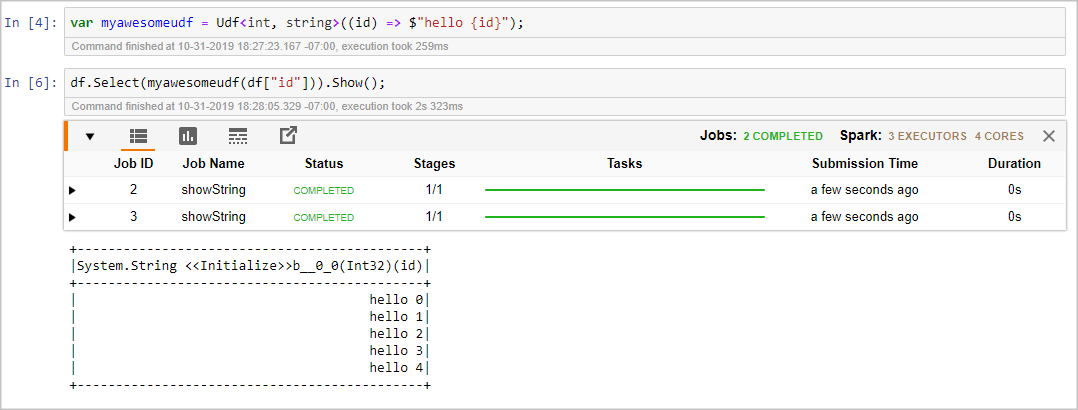
Use the following code snippet to register a user-defined function (UDF) and use the UDF with DataFrames:
var myawesomeudf = Udf<int, string>((id) => $"hello {id}");
df.Select(myawesomeudf(df["id"])).Show();