Events
Microsoft Cloud for Sustainability Technical Summit November 4-7
Nov 4, 11 PM - Nov 7, 11 PM
Gain insights from expert-led sessions, interactive demos, and live Q&A!
Register nowThis browser is no longer supported.
Upgrade to Microsoft Edge to take advantage of the latest features, security updates, and technical support.
When the user hits Get started on their Home page, a checklist is revealed inside the banner. The checklist provides users with an overview of their onboarding activities, while allowing them to learn and explore at their own pace. The checklist serves as a platform for surfacing page tours, guiding users in the product interface, and teaching users how to use the app in context. The checklist provides a sense of progression, nudging users to complete onboarding activities. Users can navigate between the tasks of the checklist at their own pace. Checklist tasks can point to pages or objects in Business Central or point to external URLs. Read more about the checklist content in the Prerequisites for creating checklist items section.
As the user progresses through the checklist by either completing or skipping the steps, the banner title and status indication will change accordingly to nudge and encourage users to finish. At any point, the user can minimize the banner by hitting X and resume when ready. The following illustration shows the checklist with the suggested setup and learning material.
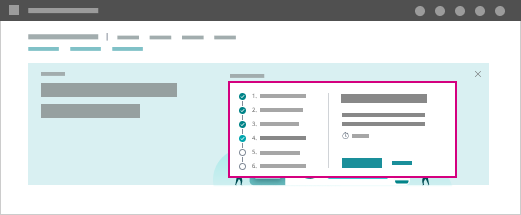
The checklist provides an overview of the tasks to complete as well as a detailed description of the ongoing task.
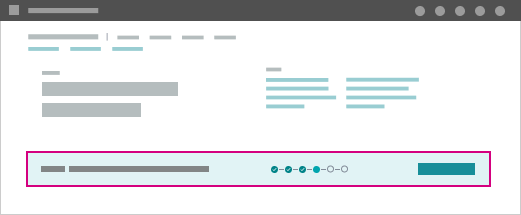
The following illustration shows a Business Central Home page with a collapsed banner, which indicates the completion progress as well as providing a clear call-to-action to resume with the checklist activities.
Checklists are meant to assist users in finalizing setup and help users get started with using the application. Checklists are not meant to provide a full list of tasks necessary to set up Business Central from scratch. What goes into the checklist depends on several factors, but consider bringing Configuration Packages with as much base setup as possible so the checklist only consists of things where the customer needs to make tweaks and decisions necessary to support their business. Automation APIs can help you with automating the delivery of the setup for a customer's industry or segment and applying your IP from AppSource. Using these APIs you should be able to automate much of the deployment process, including data for the checklist, which enables you to hand over completion of the setup for the customer. Consider bringing Assisted Setup wizards for the things that are added to the checklist.
Based on the configuration choices made by the customer in Assisted Setups, you can download additional modular Configuration Packages necessary to complete the setup. This gives you a lot of flexibility to provide setup based on customer choices at different stages of the implementation, with the key advantage for you and the customer that you can spend less time on the actual implementation.
Note
The checklist has different purposes in evaluation and non-evaluation companies. Consider this when you add content to the checklist. For more information, see Onboard New Users with the Welcome Banner].
Important
If you use the signup context to create customer centric onboarding experiences, you have decided to control the entire onboarding experience, and the standard checklist items will not be added. This is because you control the context, so you must add all relevant checklist items for both evaluation and non-evaluation companies. For more information about the signup context and creating customer centric onboarding experiences, see Create customer centric onboarding experiences.
The data model of the checklist consists of the following tables. There are more in the data model but these are the ones you need to know about to provide onboarding experiences to customers.
| ID | Name | Purpose |
|---|---|---|
| 1991 | Checklist Item | Represents the checklist item itself. |
| 1992 | Checklist Item Role | Represents the mapping of checklist items to roles. |
| 1993 | Checklist Item User | Represents the mapping of checklist items to named users. |
Before you can make a checklist item point to an entity or URL you must add a record to the Guided Experience Item table that refers to the desired entity.
From the Dynamics 365 Business Central 2021 release wave 1 the records in Manual Setup and Assisted Setup are migrated to a new table, Guided Experience Item. This table has a field, Type, that determines the type of each record:
Assisted Setup
This is where all assisted setup wizards now reside.
Manual Setup
This is where all manual setup records now reside.
Learn
Records of type Learn point to an external URL.
Tour
Records of type Tour point to a tour of the role center. Currently, these can only be added by Microsoft in the Business Central platform. We are considering enabling AL developers to add and control these tours in time.
Spotlight Tour
Records of type Spotlight Tour point to a special kind of tour where Business Central opens a page in a special mode that suppresses other tours and shines a bright spotlight on core capabilities, such as Open in Excel or Share to Teams. Use the spotlight tour in sales and evaluation scenarios to show off key capabilities that will get customers excited about the product. Consider how you can use these spotlights for your own or other features. The following illustration shows a spotlight tour that calls out Teams and Excel integration on a page.
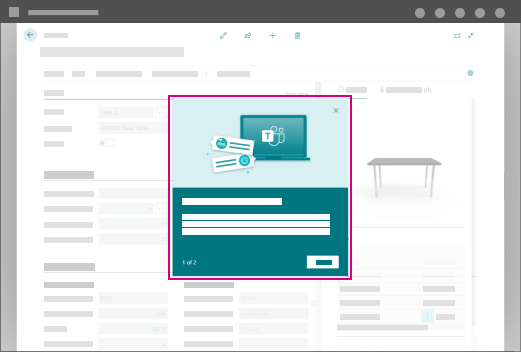
The spotlight tour suppresses teaching tips on the page and immediately calls out Teams and Excel integration features as shown in the following illustration.
Video
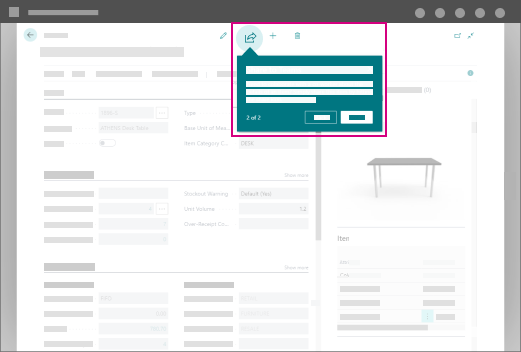
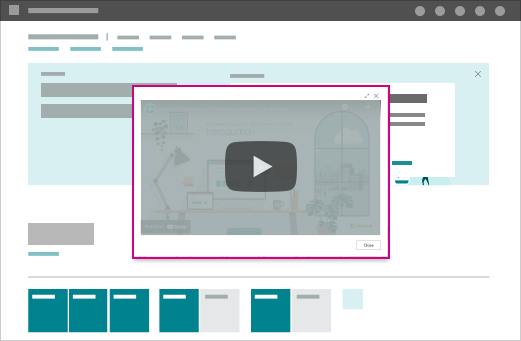
Records of type Video enables the user to watch a video provided by a custom URL. The video will play in a window inside Business Central. Consider how you can utilize video to explain a feature or capability. Video is normally used in a sales/evaluation scenario but could also be used for training purposes in an onboarding case. The following illustration shows a video player that is started from the checklist.
Application Feature
Records of type Application Feature enables a checklist task to open any page inside Business Central. Similar to Manual Setup this opens a page and will display a page tour if any is defined.
Checklist items can be based on records in the Guided Experience Item table, which means that before you surface a task on the checklist, you must first add it to Guided Experience Item.
To insert a record in the Guided Experience Item table use the façade functions in the Guided Experience codeunit:
InsertManualSetupInsertAssistedSetupInsertLearnLinkInsertTourInsertSpotlightTourInsertVideoInsertApplicationFeatureFor example, let's say that you have the page My ISV Solution Setup where the user can configure your app. You want to invite the business manager to access this page from the checklist. In this example, you must insert a new record in the Guided Experience Item table with the type Manual Setup and provide the metadata as data (title, descriptions, and so on) as described below.
After having created this record, it can now be referenced from and inserted into a checklist.
Do:
Keep the list short (preferably 6 items or less) to avoid a scrollbar and to ensure a successful start for users.
Keep checklist titles and descriptions short and to the point.
When writing the description, it's good practice to include the benefit of doing the task. But be brief.
Tip
If the task points to a page that comes from the manual setup list, the ShortTitleChecklist is picked from there. Those titles consist of nouns such as User permissions.
If the task points to wizards that comes from the assisted setup list, the LongerTitleCard is picked from there. Those titles usually contain a verb such as Update users.
Don't:
Don't overwhelm the user with a long list of checklist tasks
Don't use too long titles as they're harder to understand and space becomes an issue.
Checklist: ShortTitleChecklist: Max 34 characters before truncation.
Checklist: LongerTitleCard: Max 53 characters before truncation.
Checklist: CardDescription: Max 180 characters before truncation
Checklist: ShortTitleChecklist: Max 34 characters before truncation.
Checklist: LongerTitleCard: Max 53 characters before truncation.
Checklist: CardDescription: A scrollbar appears if the description renders as more than 4 lines.
Add support for auto-completion when possible, such as for wizards, as this automatically makes the checklist move to the next task and provides the user with a good sense of progress.
Provide a realistic time stamp of the estimated completion time and strive for tasks that take less than 5 minutes to complete.
Important
The expected duration of a checklist task is always minutes, keep this in mind when creating your Guided Experience Items.
Teaching tips and in-app tours for onboarding users
Onboarding experiences in Business Central
Events
Microsoft Cloud for Sustainability Technical Summit November 4-7
Nov 4, 11 PM - Nov 7, 11 PM
Gain insights from expert-led sessions, interactive demos, and live Q&A!
Register nowTraining
Module
Set up onboarding experiences in Dynamics 365 Business Central - Training
Learn how to set up onboarding experiences in Dynamics 365 Business Central.
Certification
Microsoft Certified: Dynamics 365 Business Central Functional Consultant Associate - Certifications
As a functional consultant, you implement core application setup processes for small and medium businesses. You configure the application in collaboration with the implementation team to provide the business with manageability and ease of use.