Remove duplicates in each table for data unification
The Deduplication rules step of unification finds and removes duplicate records for a customer from a source table so that each customer is represented by a single row in each table. Each table is deduplicated separately using rules to identify the records for a given customer.
Rules are processed in order. After all rules have been run on all the records in a table, match groups that share a common row are combined into a single match group.
Define deduplication rules
A good rule identifies a unique customer. Consider your data. It might be enough to identify customers based on a field such as email. However, if you want to differentiate customers that share an email, you might choose to have a rule with two conditions, matching on Email + FirstName. For more information, see Deduplication concepts and scenarios.
On the Deduplication rules page, select a table and select Add rule to define the deduplication rules.
Tip
If you enriched tables on the data source level to help improve your unification results, select Use enriched tables at the top of the page. For more information, see Enrichment for data sources.

In the Add rule pane, enter the following information:
- Select field: Choose from the list of available fields from the table that you want to check for duplicates. Choose fields that are likely unique for every single customer. For example, an email address, or the combination of name, city, and phone number.
- Normalize: Select normalization options for the column. Normalization only impacts the matching step, and doesn't change the data.
- Numerals: Converts many Unicode symbols that represent numbers to simple numbers.
- Symbols: Removes many common symbols such as !"#$%&'()*+,-./:;<=>?@[]^_`{|}~. For example, Head&Shoulder becomes HeadShoulder.
- Text to lower case: Converts all character to lower case. "ALL CAPS and Title Case" become "all caps and title case."
- Type (Phone, Name, Address, Organization): Standardizes names, titles, phone numbers, addresses, etc.
- Unicode to ASCII: Converts Unicode characters to their ASCII equivalent. For example, the accented ề converts to the e character.
- Whitespace: Removes all spaces. Hello World becomes HelloWorld.
- Precision: Set the level of precision. Precision is used with fuzzy matching, and determines how close two strings need to be in order to be considered a match.
- Basic: Choose from Low (30%), Medium (60%), High (80%), and Exact (100%). Select Exact to only match records that match 100 percent.
- Custom: Set a percentage that records need to match. The system only matches records passing this threshold.
- Name: Name for the rule.
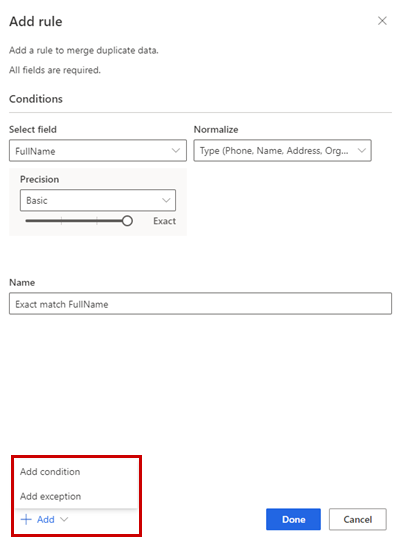
Optionally, select Add > Add condition to add more conditions to the rule. Conditions are connected with a logical AND operator and thus only executed if all conditions are met.
Optionally, Add > Add exception to add exceptions to the rule. Exceptions are used to address rare cases of false positives and false negatives.
Select Done to create the rule.
Optionally, add more rules.
Select a table and then Edit merge preferences.
In the Merge preferences pane:
Choose one of three options to determine which record to keep if a duplicate is found:
- Most filled: Identifies the record with most populated columns as the winner record. It's the default merge option.
- Most recent: Identifies the winner record based on the most recency. Requires a date or a numeric field to define the recency.
- Least recent: Identifies the winner record based on the least recency. Requires a date or a numeric field to define the recency.
If there's a tie, the winner record is the one with the MAX(PK) or the larger primary key value.
Optionally, to define merge preferences on individual columns of a table, select Advanced at the bottom of the pane. For example, you can choose to keep the most recent email AND the most complete address from different records. Expand the table to see all its columns and define which option to use for individual columns. If you choose a recency-based option, you also need to specify a date/time field that defines the recency.
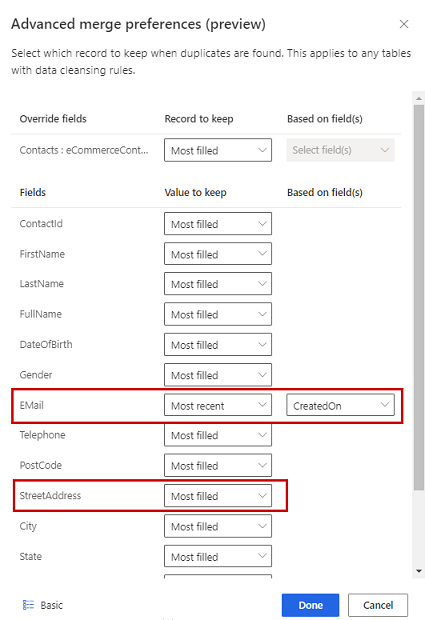
Select Done to apply your merge preferences.
After defining the deduplication rules and merge preferences, select Next.
