Subscription churn prediction sample guide
This guide will walk you through an end-to-end example of subscription churn prediction using sample data. We recommend that you try this prediction in a new environment.
Scenario
Contoso is a company that produces high-quality coffee and coffee machines. They sell the products through their Contoso Coffee website. They recently started a subscription business for their customers to get coffee on a regular basis. Their goal is to understand which subscribed customers might cancel their subscription in the next few months. Knowing which of their customers is likely to churn can help them save marketing efforts by focusing on keeping them.
Prerequisites
- At least Contributor permissions in Dynamics 365 Customer Insights - Data.
Task 1 - Ingest data
Review the articles about data ingestion and connecting to a Power Query data source. The following information assumes you are familiar with ingesting data in general.
Ingest customer data from eCommerce platform
Create a Power query data source named eCommerce and select the Text/CSV connector.
Enter the URL for eCommerce contacts https://aka.ms/ciadclasscontacts.
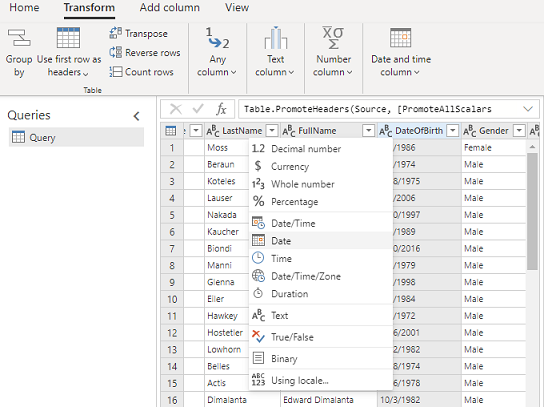
While editing the data, select Transform and then Use first row as headers.
Update the datatype for the columns listed below:
- DateOfBirth: Date
- CreatedOn: Date/Time/Zone
In the Name field on the right-hand pane, rename your data source to eCommerceContacts
Save the data source.
Ingest customer data from loyalty schema
Create a data source named LoyaltyScheme and select the Text/CSV connector.
Enter the URL for loyalty customers https://aka.ms/ciadclasscustomerloyalty.
While editing the data, select Transform and then Use first row as headers.
Update the datatype for the columns listed below:
- DateOfBirth: Date
- RewardsPoints: Whole Number
- CreatedOn: Date/Time
In the Name field on the right-hand pane, rename your data source to loyCustomers.
Save the data source.
Ingest subscription information
Create a data source named SubscriptionHistory and select the Text/CSV connector.
Enter the URL for subscriptions https://aka.ms/ciadchurnsubscriptionhistory.
While editing the data, select Transform and then Use first row as headers.
Update the datatype for the columns listed below:
- SubscriptioID: Whole Number
- SubscriptionAmount: Currency
- SubscriptionEndDate: Date/Time
- SubscriptionStartDate: Date/Time
- TransactionDate: Date/Time
- IsRecurring: True/False
- Is_auto_renew: True/False
- RecurringFrequencyInMonths: Whole Number
In the Name field on the right-hand pane, rename your data source to SubscriptionHistory.
Save the data source.
Ingest customer data from website reviews
Create a data source named Website and select the Text/CSV connector.
Enter the URL for website reviews https://aka.ms/ciadclasswebsite.
While editing the data, select Transform and then Use first row as headers.
Update the datatype for the columns listed below:
- ReviewRating: Whole Number
- ReviewDate: Date
In the Name field on the right-hand pane, rename your data source to webReviews.
Task 2 - Data unification
Review the article about data unification. The following information assumes you are familiar with data unification in general.
After ingesting the data, begin the data unification process to create a unified customer profile. For more information, see Data unification.
Describe the customer data to be unified
After ingesting the data, map contacts from eCommerce and Loyalty data to common data types. Go to Data > Unify.
Select the tables that represent the customer profile – eCommerceContacts and loyCustomers.
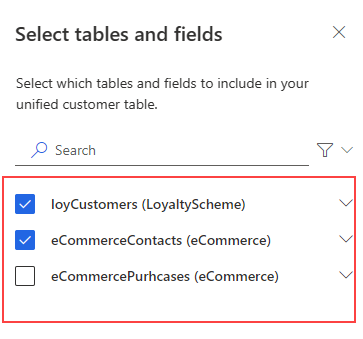
Select ContactId as the primary key for eCommerceContacts and LoyaltyID as the primary key for loyCustomers.
Select Next. Skip duplicate records and select Next.
Define matching rules
Choose eCommerceContacts : eCommerce as the primary table and include all records.
Choose loyCustomers : LoyaltyScheme and include all records.
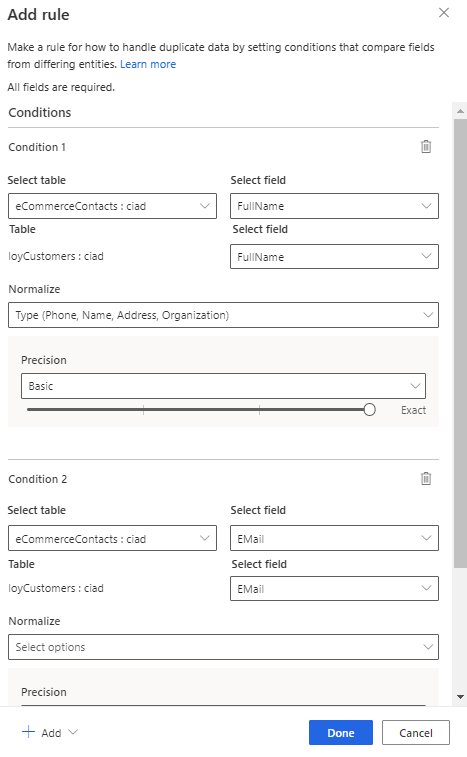
Add a rule:
- Select FullName for both eCommerceContacts and loyCustomers.
- Select Type (Phone, Name, Address, ...) for Normalize.
- Set Precision Level: Basic and Value: High.
Add a second condition for email address:
- Select Email for both eCommerceContacts and loyCustomers.
- Leave Normalize blank.
- Set Precision Level: Basic and Value: High.
- Enter FullName, Email for the name.
Select Done.
Select Next.
View unified data
Rename the ContactId for loyCustomers table to ContactIdLOYALTY to differentiate it from the other IDs ingested.
Select Next to review and then select Create customer profiles.
Task 3 - Create transaction history activity
Review the article about customer activities. The following information assumes you are familiar with creating activities in general.
Create activities with the Subscription table and the Reviews:Website table.
For Subscription, select Subscription for the Activity Type and CustomerId for the Primary key.
For Reviews:Website, select Review for the Activity Type and ReviewID for the Primary key.
Enter the following information for the subscription activity:
- Activity name: SubscriptionHistory
- Timestamp: SubscriptionEndDate
- Event activity: SubscriptionType
- Transaction ID: TransactionID
- Transaction date: TransactionDate
- Subscription ID: SubscriptionID
- Subscription start date: SubscriptionStartDate
- Subscription end date: SubscriptionEndDate
Enter the following information for the web review activity:
- Activity name: WebReviews
- Timestamp: ReviewDate
- Event activity: ActivityTypeDisplay
- Additional detail: ReviewRating
Create a relationship between SubscriptionHistory:Subscription and eCommerceContacts:eCommerce with CustomerID as the foreign key to connect the two tables.
Create a relationship between Website and eCommerceContacts with UserId as the foreign key.
Review your changes and then select Create activities.
Task 4 - Configure the subscription churn prediction
With the unified customer profiles in place and activity created, run the subscription churn prediction. For detailed steps, see Subscription churn prediction.
Go to Insights > Predictions.
On the Create tab, select Use model on the Customer churn model tile.
Select Subscription for the type of churn and then Get started.
Name the model OOB Subscription Churn Prediction and the output table OOBSubscriptionChurnPrediction.
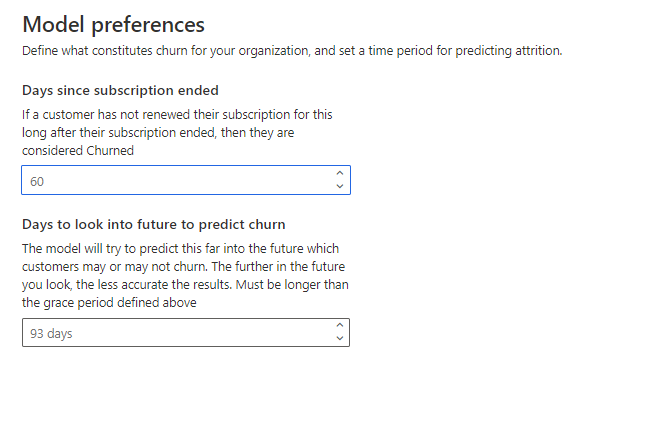
Define model preferences:
- Days since subscription ended: 60 days to indicate that a customer is considered churned if they don't renew the subscription in this period after their subscription ended.
- Days to look into future to predict churn: 93 days which is the duration the model predicts which customers might churn. The further in the future you look, the less precise the results.
Select Next.
In the Required Data step, select Add data to provide subscription history.
Select Subscription and the SubscriptionHistory table and select Next. The required data is automatically filled in from the activity. Select Save.
Under Customer Activities, select Add data.
For this example, add the web review activity.
Select Next.
In the Data updates step, select Monthly for the model schedule.
After reviewing all the details, select Save and Run.
Task 5 - Review model results and explanations
Let the model complete the training and scoring of the data. Review the subscription churn model explanations. For more information, see View prediction results.
Task 6 - Create a segment of high churn-risk customers
Running the model creates a new table, which is listed on Data > Tables. You can create a new segment based on the table created by the model.
On the results page, select Create segment.
Create a rule using the OOBSubscriptionChurnPrediction table and define the segment:
- Field: ChurnScore
- Operator: greater than
- Value: 0.6
Select Save and Run the segment.
You now have a segment that is dynamically updated which identifies high churn-risk customers for this subscription business. For more information, see Create and manage segments.
Tip
You can also create a segment for a prediction model from the Insights > Segments page by selecting New and choosing Create from > Insights. For more information, see Create a new segment with quick segments.