Performance SDK and multiuser testing in on-premises environments
This article explains how to use the Performance software development kit (SDK) to do multiuser load testing in an on-premises environment.
Important
Visual Studio 2019 is the last version of Visual Studio that includes web performance and load testing features and will be deprecated in the future. We suggest using Apache JMeter for performance testing. For more information, see JMeter.
Prerequisites
An on-premises environment that has volume data
A development environment that has the following characteristics:
- Microsoft Visual Studio Enterprise or a later version is installed.
- The Performance SDK is installed. (The SDK will likely be in K:\PerfSDK\PerfSDKLocalDirectory. However, depending on your environment, it might be in another location, such as C:\PerfSDK.)
- The on-premises environment can be accessed in a web browser. (The development virtual machine [VM] might be in the same domain as the on-premises environment, or the on-premises environment might have a publicly registered domain name.)
Create a single-user C# test from an XML recording
Use Task recorder to create a recording of the scenario that you want to test.
Important
Your task recording must start on the default dashboard page. Otherwise, the test won't be able to run.
Start Microsoft Visual Studio as an administrator, and build the PerfSDKSample project. This project is in the PerfSDK folder. If you've already built the project, skip this step.
Select Dynamics 365 > Addins > Create C# perf test from recording.
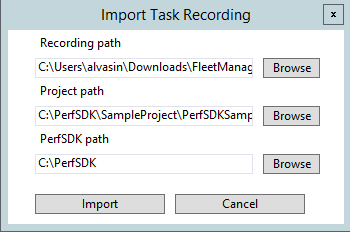
In the Import Task Recording dialog box, enter the required details, and then select Import.
A C# test is generated in the Generated folder for the project that you selected.
Note
The test that is generated might have to be edited to resolve any compilation issues.
Run a single-user test by using the Performance SDK
Prepare the development environment
Follow these steps in the development environment.
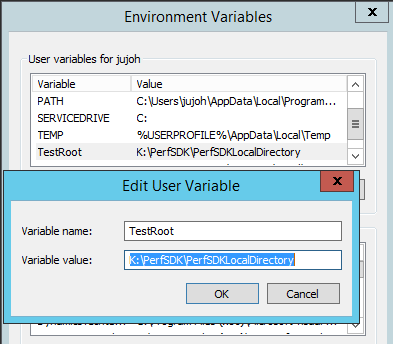
In Control Panel in Microsoft Windows, select System and Security > System > Advanced System Settings. Verify that the TestRoot environment variable is set to the path of the PerfSDK folder.
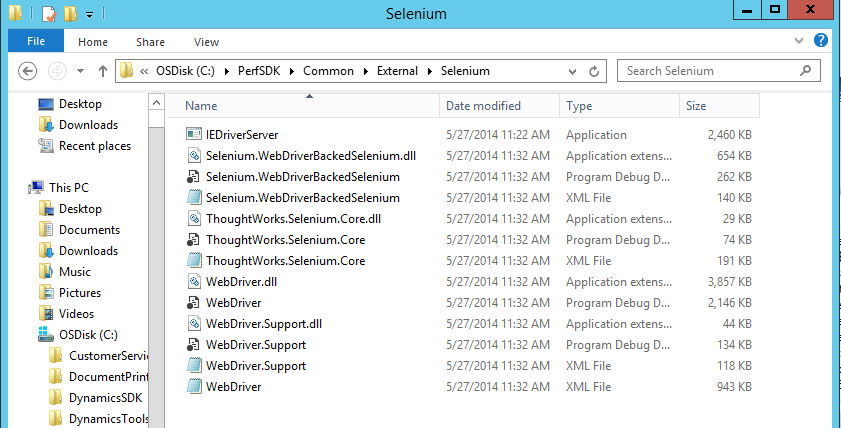
Download the selenium-dotnet-strongnamed-2.42.0.zip and IEDriverServer_Win32_2.42.0.zip files from https://selenium-release.storage.googleapis.com/index.html?path=2.42/, and extract the files.
Copy the dynamic-link libraries (DLLs) from the selenium-dotnet-strongnamed-2.42.0.zip\net40 folder to the PerfSDK\Common\External\Selenium folder. Also copy the IEDriverServer.exe from the IEDriverServer_Win32_2.42.0.zip to the PerfSDK\Common\External\Selenium folder.
Generate a certificate to use for authentication for the tests. To generate a certificate file, open a Command Prompt window as an administrator, and run the following commands. When you're prompted for a private key password, select None.
"C:\Program Files (x86)\Windows Kits\8.1\bin\x64\makecert" -n "CN=127.0.0.1" -ss Root -sr LocalMachine -a sha256 -len 2048 -cy end -r -eku 1.3.6.1.5.5.7.3.1 -sv c:\temp\authcert.pvk c:\temp\authcert.cer

"c:\Program Files (x86)\Windows Kits\8.1\bin\x64\pvk2pfx" -pvk c:\temp\authCert.pvk -spc c:\temp\authcert.cer -pfx c:\temp\authcert.pfx
Note the following elements in these commands:
- -n "CN=127.0.0.1" gives a human-readable name to the certificate. The name of this certificate must be 127.0.0.1. Otherwise, the single-user tests won't be able to run.
- -eku 1.3.6.1.5.5.7.3.1 gives the purpose of the certificate. It indicates that the certificate can be used as a Secure Sockets Layer (SSL) server certificate.
After the script has finished running, you should see the following files in C:\Temp:
- authcert.pfx
- authcert.cer
- authcert.pvk
Install the authcert.pfx certificate file. When you install the file, make sure that you select Local Machine.
Copy the authcert.pfx file to the PerfSDK folder.
Open a Microsoft Windows PowerShell window as an administrator, and run the following commands to get the thumbprint of the installed certificate.
cd Cert:\LocalMachine\My

Get-ChildItem | Where-Object { $_.Subject -like "CN=127.0.0.1" }
In Visual Studio, open the PerfSDKSample project that is in the PerfSDK folder.
In the Visual Studio project, add a reference to the WebDriver.dll file in the PerfSDK\Common\External\Selenium folder.
Open the CloudEnvironment.Config file, and replace the contents with the following template.
<?xml version="1.0" encoding="utf-8"?>
<EnvironmentalConfigSettings xmlns:xsi="http://www.w3.org/2001/XMLSchema-instance" xmlns:xsd="http://www.w3.org/2001/XMLSchema">
    <EnvironmentalConfigSettingsCollection>
        <EnvironmentalConfigSetting ConfigName="DEVFABRIC">
            <!-- NOTE: the HostName value needs to be specified -->
            <ExecutionConfigurations Key="HostName" Value="[yourD365FOdomain]/namespaces/AXSF" />
            <ExecutionConfigurations Key="SoapHostName" Value="[yourD365FOdomain]/namespaces/AXSF" />
            <ExecutionConfigurations Key="SelfSigningCertificateThumbprint" Value="[ThumbprintFromPowerShell]" />
            <ExecutionConfigurations Key="AdminAuthenticatorConfigurationId" Value="SelfMintingAdminUser" />
            <ExecutionConfigurations Key="DefaultBrowser" Value="InternetExplorer" />
            <ExecutionConfigurations Key="FederationRealm" Value="spn:00000015-0000-0000-c000-000000000000" />
            <ExecutionConfigurations Key="DefaultDispatcher" Value="Microsoft.Dynamics.TestTools.Dispatcher.JsDispatcher, Microsoft.Dynamics.TestTools.Dispatcher.JsDispatcher" />
            <ExecutionConfigurationsNodes ConfigurationName="SVC">
                <ConfigurationSpecificDetails Key="AppConfig" Value="DEVFABRIC.Config" />
            </ExecutionConfigurationsNodes>
            <ExecutionConfigurationsNodes ConfigurationName="PRF">
                <ConfigurationSpecificDetails Key="IsAdfs" Value="True" />
                <ConfigurationSpecificDetails Key="UserCount" Value="2" />
                <ConfigurationSpecificDetails Key="UserFormat" Value="[AdminUserEmail]" />
                <ConfigurationSpecificDetails Key="UserPassword" Value="[AdminUserPassword]" />
                <ConfigurationSpecificDetails Key="UserRole" Value="-SYSADMIN-" />
                <ConfigurationSpecificDetails Key="ThinkTime" Value="0" />
                <ConfigurationSpecificDetails Key="Company" Value="USMF" />
            </ExecutionConfigurationsNodes>
        </EnvironmentalConfigSetting>
    </EnvironmentalConfigSettingsCollection>
    <AuthenticatorConfigurationCollection>
        <AuthenticatorConfiguration Id="SelfMintingRunnerUser" Class="MS.Dynamics.TestTools.CloudCommonTestUtilities.Authentication.SelfMintedTokenAuthenticator">
            <Credentials IsFromKeyVault="false" Username="daxrunneruser@daxmdsrunner.com" NetworkDomain="urn:Microsoft:Dynamics:Cloud:DaxRunner" />
        </AuthenticatorConfiguration>
        <AuthenticatorConfiguration Id="SelfMintingSysUser" Class="MS.Dynamics.TestTools.CloudCommonTestUtilities.Authentication.SelfMintedTokenAuthenticator">
            <Credentials IsFromKeyVault="false" Username="testuser@microsoft.com" />
        </AuthenticatorConfiguration>
        <AuthenticatorConfiguration Id="SelfMintingAdminUser" Class="MS.Dynamics.TestTools.CloudCommonTestUtilities.Authentication.SelfMintedTokenAuthenticator">
            <!-- NOTE: admin username needs to be specified -->
            <Credentials IsFromKeyVault="false" Username="[AdminUserEmail]" NetworkDomain="[AdfsUrl]" />
        </AuthenticatorConfiguration>
    </AuthenticatorConfigurationCollection>
</EnvironmentalConfigSettings
In the CloudEnvironment.Config file, specify values for the following keys. These values replace the placeholder values in square brackets in the template.
HostName – Specify the URL that is used to access your on-premises environment. The URL should be [yourD365FOdomain]/namespaces/AXSF.
SoapHostName – Specify the same URL that you specified for HostName.
SelfSigningCertificateThumbprint – Specify the thumbprint that you retrieved from Windows PowerShell in step 7.
UserFormat – Specify the email address of a user who has the System Administrator role in your on-premises environment. The user must be an Active Directory Federation Services (AD FS) user.
UserPassword – Specify the password of the user whose email address you specified for UserFormat.
Username – Specify the same email address that you specified for UserFormat.
NetworkDomain – Specify the URL of the AD FS identity provider. You can find this value by running the following SQL query against the AXDB database of your on-premises deployment.
select NETWORKDOMAIN, NETWORKALIAS from USERINFO where NETWORKALIAS='[AdminUserEmail]'
Prepare the on-premises environment
Follow these steps on each Application Object Server (AOS) VM in the on-premises deployment.
Copy the authcert.cer file that you created in the Prepare the development environment section of this article to the AOS VM.
Install the authcert.cer certificate file. When you install the certificate, make sure that you select Local Machine. Also make sure that you put the certificate in the Trusted Root Certification Authorities store.
Open the wif.config file in a text editor. The path of the file will resemble C:\ProgramData\SF\AOS1\Fabric\work\Applications\AXSFType_App19\AXSF.Code.1.0.20180717001108.
Note
In the file path, the AOS number (AOS1 in this example) will vary, depending on the AOS node that you're on. Additionally, the ProgramData folder is a hidden folder. Therefore, to see the folder in File Explorer, you must enable hidden items.
In the wif.config file, find the authority that is named
https://fakeacs.accesscontrol.windows.net. In the list of thumbprints for this authority, add the thumbprint of the certificate that you created in the Prepare the development environment section. In the following example, the fourth thumbprint has been added to thehttps://fakeacs.accesscontrol.windows.netauthority.<authority name="https://fakeacs.accesscontrol.windows.net/"> <keys> <add thumbprint="9567B0F32F4B312FEE44ACE88A9CAAA13B7FBB86" /> <add thumbprint="B8F659E2FDD2A6811CD72BE753FF7ACB64351AC1" /> <add thumbprint="B51C394E6EE9578D8C54AE0A9927D8B6DCEFF84B" /> <add thumbprint="F9112DE3D4DE65CBE39601EBDC7FBB1F8F525DED" /> </keys> <validIssuers> <add name="https://fakeacs.accesscontrol.windows.net/" /> </validIssuers> </authority>Open the AXService.exe.config file in a text editor. You can find this file in the same directory as the wif.config file.
Search the AXService.exe.config file for "Aos.AosRole". Replace the line that contains "Aos.AosRole" with the following line.
<add key="Aos.AosRole" value="AosRoleUnknown" />Note
Setting the AosRole to AosRoleUnknown disables the limit on the number of web sessions per user. This is necessary to complete load testing with a large user load because the load test will create many sessions for a single user. Once you are finished with your load testing, reset this value to "AosRoleWeb".
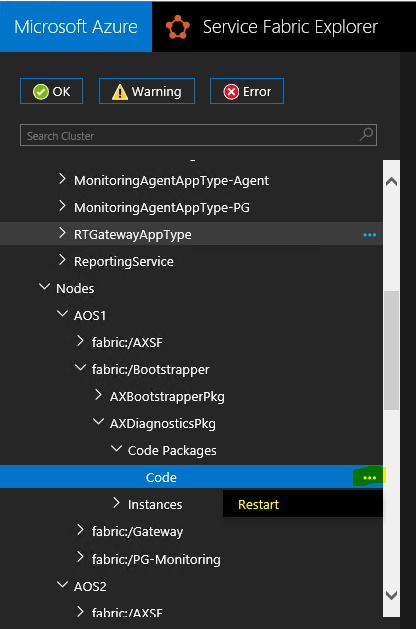
In Service Fabric Explorer, find the Code package for the AOS node, select the ellipse button (...), and then select Restart to restart the application.
Run the single-user test
In the PerfSDKSample project, find the PurchaseReq.cs file. This file is a sample single-user test. In the file, comment out the following lines.
if (this.TestContext !=null)
{
    timerProvider = new TimerProvider(this.TestContext);
}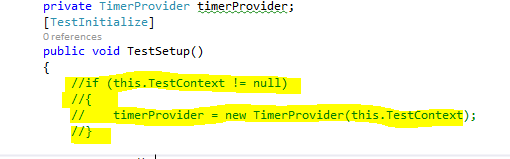
Select Test > Test settings, set the Default processor architecture field to x64, and then build the solution.
Select Test > Windows > Test Explorer to view the list of tests.
Note
Sometimes, Visual Studio might not update the list of tests after you create a test script from a task recording. In this case, restart Visual Studio, and then reopen Test Explorer.
Run the sample single-user test by right-clicking CreatePurchReq. Alternatively, you can run the test that you created from your task recording. When you run the test, Microsoft Edge should be started, and it should replay the scenario that you recorded.
Run a multiuser load test by using the Performance SDK
Create a multiuser test from a single-user test
After you create a single-user test by using the information earlier in this article, you can convert it to a multiuser test. Add MS.Dynamics.TestTools.UIHelpers.Core; to your test script, and find the following line in the TestSetup method.
Client = DispatchedClient.DefaultInstance;
Replace that line with the following lines.
DispatchedClientHelper helper = new DispatchedClientHelper();
Client = helper.GetClient();
The test script that was generated by the Task Importer might contain a line that resembles the following line.
UserContextRole _context = new UserContextRole(UserManagement.AdminUser);
Remove this line from any tests that will be run as load tests. This code is required only for single-user tests and has a negative effect on the performance of load tests.
Make sure that the values that you entered when you made the task recording are randomized.
Run the multiuser load test
In the Visual Studio editor, open the ProcureToPay.cs file, and append the following lines in the TestSetup method.
var testroot = System.Environment.GetEnvironmentVariable("DeploymentDir");
if (string.IsNullOrEmpty(testroot))
{
    testroot = System.IO.Directory.GetCurrentDirectory();
}
Environment.SetEnvironmentVariable("testroot", testroot);
Download the installer (.msi) file for Microsoft ODBC Driver 13 for SQL Server from https://www.microsoft.com/download/details.aspx?id=50420. (Select the 64-bit version of the .msi file.) Put the file in the Visual Studio Online folder in the PerfSDK directory.
Modify the contents of the setup.cmd file in the Visual Studio Online folder so that they match the following code.
setx testroot "%DeploymentDirectory%"
ECHO Installing D365 prerequisites
ECHO MSIEXEC /a %DeploymentDirectory%\msodbcsql /passive /norestart IACCEPTMSODBCSQLLICENSETERMS=YES
MSIEXEC /a %DeploymentDirectory%\msodbcsql /passive /norestart IACCEPTMSODBCSQLLICENSETERMS=YES
%windir%\sysnative\windowspowershell\v1.0\powershell.exe -File %DeploymentDirectory%\install-wif.ps1
Md %DeploymentDirectory%\Common\Team\Foundation\Performance\Framework
%DeploymentDirectory%\CloudCtuFakeACSInstall.cmd %DeploymentDirectory%\authcert.pfx
Modify the contents of the CloudCtuFakeACSInstall.cmd file so that the Import command has an empty string instead of 'password'. The third line of the script should resemble the following line.
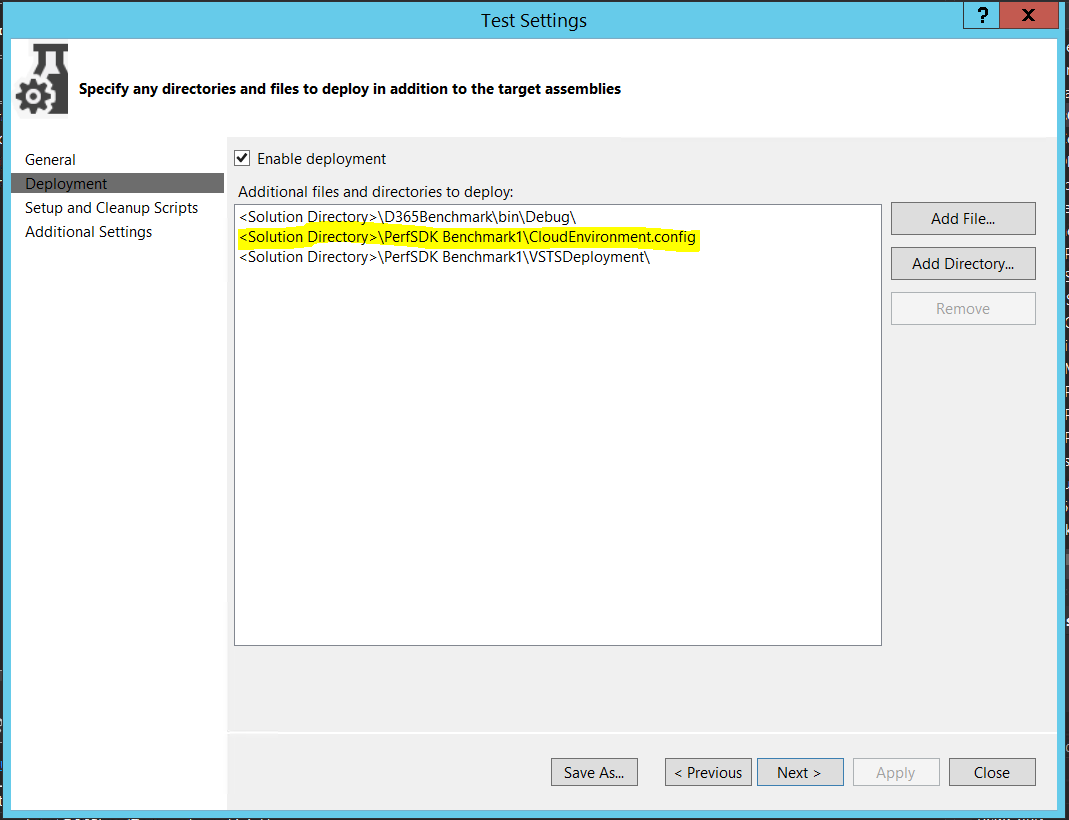
set MyStoreInstallCmd= .... $pfxcert.Import('%TestCertPath%', '', 'Exportable,PersistKeySet')....In your solution files, double-click the vsonline.testsettings file to modify the test settings.
In the Test Settings dialog box, on the General tab, set the Test run location field to Run tests using local computer or a test controller.
On the Deployment tab, use the following settings:
Select the Enable deployment check box.
In the Additional files and directories to deploy field, make sure that the following files and directories are listed:
- <Solution Directory>\PerfSDKSample\bin\Debug\
- C:\PerfSDK\CloudEnvironment.Config
- C:\PerfSDK\authcert.pfx
- C:\PerfSDK\MS.Dynamics.Test.Team.Foundation.WebClient.InteractionService.dll.config
- C:\PerfSDK\Visual Studio Online\
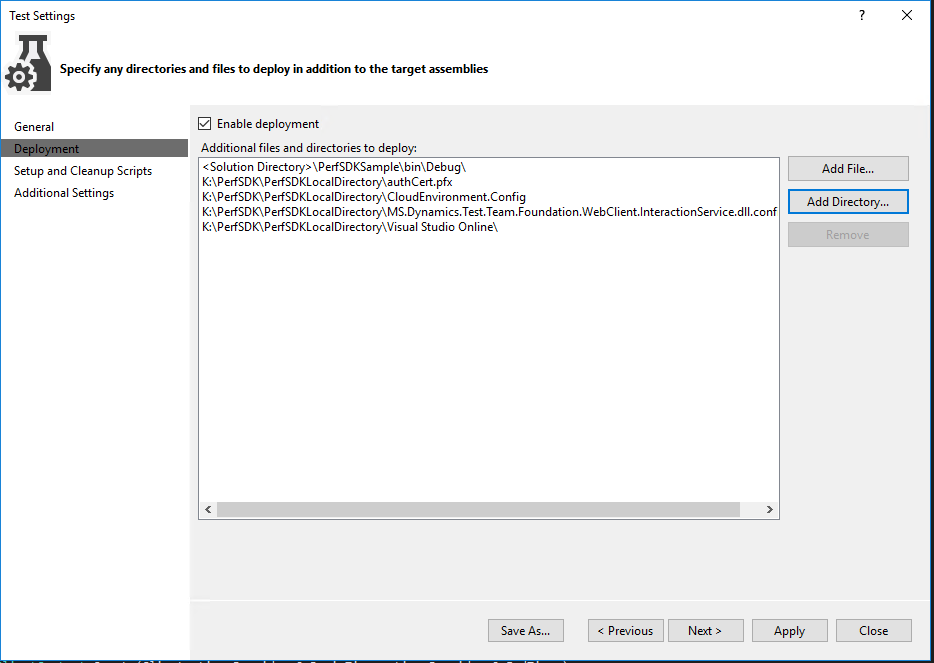
Note
Your PerfSDK folder might differ.
On the Setup and Cleanup Scripts tab, select the setup.cmd file that is in the Visual Studio Online folder in the PerfSDK directory.
On the Hosts tab, select Run tests in 64 bit process on 64 bit machine.
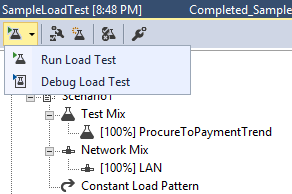
To run the test, open the SampleLoadTest.loadtest file, and select Run Load Test.
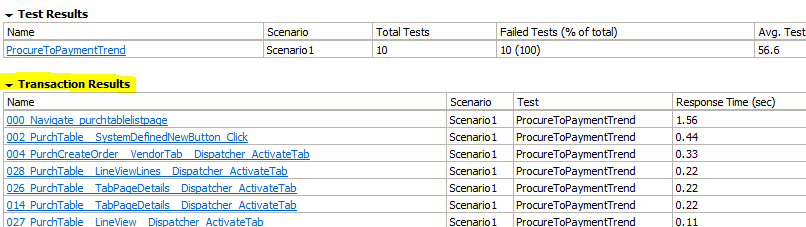
When the test has finished running, you should see a summary that shows transaction results. Here is an example.
To view various indicators for the test controller and test scenario, you can switch to the Graphs view.
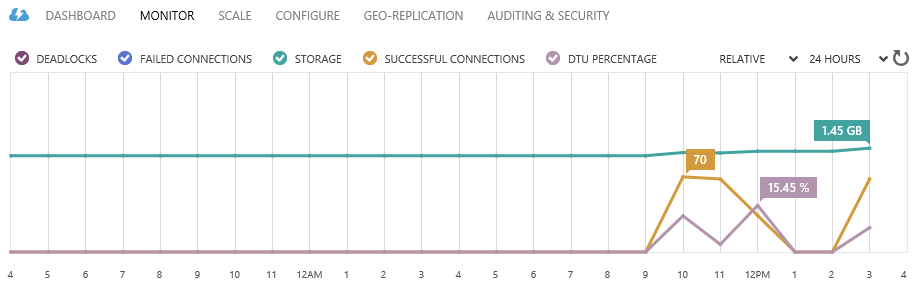
Note
While tests are being run, information about your system isn't available in this view. To access this information, you must use Microsoft Dynamics Lifecycle Services (LCS) to monitor the CPU and memory usage of your AOS machine. Alternatively, you can set up perfmon directly on the AOS machine and set up the Microsoft Azure portal to monitor Microsoft SQL Server usage of Database Transaction Units (DTUs).
Troubleshooting
Zoom factor
This issue affects only single-user tests.
Error example
Initialization method <Test class name>.TestSetup threw exception. System.InvalidOperationException: System.InvalidOperationException: Unexpected error launching Internet Explorer. Browser zoom level was set to 200%. It should be set to 100% (NoSuchDriver).
Solution
In Internet Explorer, you can change the zoom factor to 100 percent by changing the following registry keys:
- Computer\HKEY_CURRENT_USER\SOFTWARE\Microsoft\Internet Explorer\Zoom\ResetZoomOnStartup = 0
- Computer\HKEY_CURRENT_USER\SOFTWARE\Microsoft\Internet Explorer\Zoom\ResetZoomOnStartup2 = 0
- Computer\HKEY_CURRENT_USER\SOFTWARE\Microsoft\Internet Explorer\Zoom\Zoomfactor = 80000
Depending on the version of the local machine that is used, before you start the Remote Desktop Protocol (RDP) session, you might have to select Change the size of text, apps and other items. This field is available in Display settings in Windows.
If those steps don't work, try to change the size of your remote desktop before you start the RDP session, so that the default zoom level in Internet Explorer is 100 percent.
Certificate thumbprint errors
Error example
Initialization method MS.Dynamics.Performance.Application.TaskRecorder.TestRecord1Base.TestSetup threw exception.
System.TypeInitializationException: System.TypeInitializationException: The type initializer for
'MS.Dynamics.TestTools.CloudCommonTestUtilities.Authentication.UserManagement' threw an exception. -->
MS.Dynamics.TestTools.CloudCommonTestUtilities.Exceptions.WebAuthenticationException:
Failed finding the certificate for minting tokens by thumbprint: b4f01d2fc42718198852cd23957fc60a3e4bca2e
Solution
You might receive the error message for several reasons:
The certificate thumbprint that you copied into the CloudEnvironment.Config and wif.config files includes invisible Unicode characters. To determine whether the thumbprint contains invisible Unicode characters, paste it into a Unicode code converter, and see whether extra characters appear in the HTML/XML field. For example, you can use the Unicode converter that is available at https://r12a.github.io/apps/conversion/.

The certificate wasn't installed correctly on the AOS machine. To verify that the certificate can be found on the AOS machine, run the following Windows PowerShell script.
cd Cert:\LocalMachine\My
Get-ChildItem | Where-Object { $_.Subject -like "CN=127.0.0.1" }
If the thumbprint doesn't appear in the Windows PowerShell console after you run the script, the certificate can't be found. To fix the issue, copy and install the .cer file that you created earlier in this article to the AOS machine.
If this issue occurs when you run load tests, the setup scripts might not have installed the corresponding .pfx file correctly. Verify that the password that is specified in the CloudCtuFakeACSInstall.cmd file matches the password that was set when the certificate was created.

No endpoint is listening
Error example
The tests process fails, and the following error message is shown.
System.TypeInitializationException: The type initializer for 'MS.Dynamics.TestTools.CloudCommonTestUtilities.Authentication.UserManagement' threw an exception. ---> System.ServiceModel.EndpointNotFoundException: There was no endpoint listening at <web address> that could accept the message. This is often caused by an incorrect address or SOAP action.
Solution
This issue occurs when the host that is specified in the CloudEnvironment.Config file can't be accessed from the machine that is trying to run the tests or create users.
In the CloudEnvironment.Config file, review the values that are specified for the following keys:
- <ExecutionConfigurations Key="HostName" Value="<web address of host>" />
- <ExecutionConfigurations Key="SoapHostName" Value="<web address of SOAP>" />
The web addresses that are specified by these keys must be the environment that you're testing. In a web browser on your developer machine, make sure that you can open the web address that is specified for the HostName key.
Users can't be enumerated
This issue can occur when you run multiuser tests, or when you create users by using MS.Dynamics.Performance.CreateUsers.exe.
Error example
System.TypeInitializationException: The type initializer for 'MS.Dynamics.TestTools.CloudCommonTestUtilities.Authentication.UserManagement' threw an exception. ---> System.InvalidOperationException: Could not enumerate AX users ---> System.ServiceModel.FaultException'1[System.ComponentModel.Win32Exception]: Forbidden
Solution
Two scenarios can cause this error:
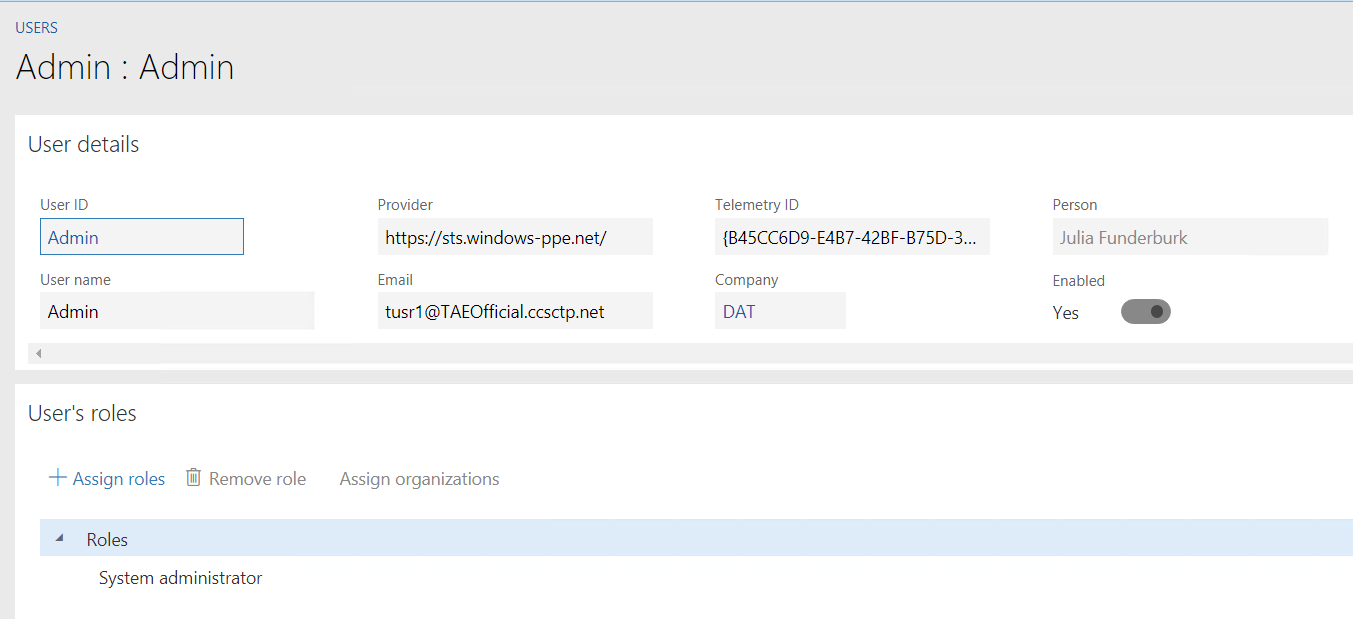
The user who is specified as SelfMintingAdminUser in the CloudEnvironment.Config file must have the System Administrator role. This issue occurs when the System Administrator role isn't assigned to the user who is specified as SelfMintingAdminUser. To verify that you've specified the correct user, you can sign in to the endpoint and view the user's roles.
An incorrect NetworkDomain value was specified for the user who is specified as SelfMintingAdminUser in the CloudEnvironment.Config file. You can find the correct value by running the following SQL query against the AXDB database of your on-premises deployment.
select NETWORKDOMAIN, NETWORKALIAS from USERINFO where NETWORKALIAS='[AdminUserEmail]'
At least one security token in the message could not be validated
This issue can occur when you run multiuser tests, or when you create users by using MS.Dynamics.Performance.CreateUsers.exe. It tends to occur when the AOS machine differs from the developer machine.
Error example
System.TypeInitializationException: The type initializer for 'MS.Dynamics.TestTools.CloudCommonTestUtilities.Authentication.UserManagement' threw an exception. ---> System.ServiceModel.Security.MessageSecurityException: An unsecured or incorrectly secured fault was received from the other party. See the inner FaultException for the fault code and detail. ---> System.ServiceModel.FaultException: At least one security token in the message could not be validated.
Solution
This issue occurs when the AOS endpoint can't validate the thumbprint of the certificate that you created. There are three possible causes:
- In the CloudEnvironment.Config file, either a value isn't specified for the IsAdfs key, or the value is set to False. Make sure that the value for the IsAdfs key is set to True.
- The certificate wasn't installed on the AOS machine. To fix the issue, copy the .cer file that you created earlier in this article to the AOS machine, and install the certificate.
- The thumbprint of the certificate wasn't added to the wif.config file on the AOS machine. To fix the issue, see step 8 in the Run a single-user test by using the Performance SDK section for information about how to add the certificate to the wif.config file. After you modify the wif.config file, be sure to restart the application through Service Fabric Explorer.
MS.Dynamics.Test.Team.Foundation.WebClient.InteractionService.dll.config is missing from the deployment items
This issue usually occurs only when you run load tests.
Error example
<Test class name>.TestSetup threw exception. System.InvalidOperationException: System.InvalidOperationException: Could not find endpoint element with name 'ClientCommunicationManager' and contract 'Microsoft.Dynamics.Client.InteractionService.Communication.Reliable.IReliableCommunicationManager' in the ServiceModel client configuration section. This might be because no configuration file was found for your application, or because no endpoint element matching this name could be found in the client element.. at System.ServiceModel.Description.ConfigLoader.LoadChannelBehaviors(ServiceEndpoint serviceEndpoint, String configurationName)
Solution
This issue occurs when the system can't find the MS.Dynamics.Test.Team.Foundation.WebClient.InteractionService.dll.config file when the load tests are run, because the file wasn't added as a deployment item. Verify that the MS.Dynamics.Test.Team.Foundation.WebClient.InteractionService.dll.config file is in the Out folder for the test run:
<solution path>\TestResults\<your test run>\Out
If the file is missing, add it to the deployment items in the test settings.
Important
There are two files that have very similar names. The name of one file ends in *.dll, and the name of the other file ends in *.dll.config. The *.dll.config file must be in the deployment items in the test settings.
CloudEnvironment.Config is missing from the deployment items
This issue usually occurs only when you run load tests.
Error example
Initialization method <Test class name>.TestSetup threw exception.
System.TypeInitializationException: System.TypeInitializationException: The type initializer for 'MS.Dynamics.TestTools.CloudCommonTestUtilities.Authentication.UserManagement' threw an exception. ---> MS.Dynamics.TestTools.TestLogging.EvaluateException: Assert.Fail failed. DateTime="10/13/2017 14:42:55" "The type initializer for 'MS.Dynamics.TestTools.CloudCommonTestUtilities.Authentication.SecretSettingsHelper' threw an exception.".
Solution
This issue occurs when the CloudEnvironment.Config file isn't present when the tests are run. The issue typically occurs when you run load tests and the CloudEnvironment.Config file wasn't added as a deployment item. Verify that the CloudEnvironment.Config file is in the Out folder for the test run:
<solution path>\TestResults\<your test run>\Out
If the file is missing, add it to the deployment items in the test settings.
InteractiveClientId wasn't specified in the settings
Error example
The type initializer for 'MS.Dynamics.TestTools.CloudCommonTestUtilities.Authentication.SecretSettingsHelper' threw an exception. --->
Microsoft.CE.VaultSDK.SecretProviderException: InteractiveClientId was not specified in settings
Solution
This issue occurs when no value is specified for the SelfSigningCertificateThumbprint key in the CloudEnvironment.Config file. In the CloudEnvironment.Config file, find the following line, and paste in the thumbprint of the certificate that you created and installed.
<ExecutionConfigurations Key="SelfSigningCertificateThumbprint" Value="" />
The remote host forcibly closed an existing connection
Error example
System.TypeInitializationException: System.TypeInitializationException: The type initializer for
'MS.Dynamics.TestTools.CloudCommonTestUtilities.Authentication.UserManagement' threw an exception. --->
System.ServiceModel.CommunicationException: An error occurred while making the HTTP request to
<Host name>/Services/AxUserManagement/Service.svc/ws2007FedHttp. This could be due to the fact
that the server certificate is not configured properly with HTTP.SYS in the HTTPS case. This could also be caused
by a mismatch of the security binding between the client and the server.** ---> System.Net.WebException:
The underlying connection was closed: An unexpected error occurred on a send. ---> System.IO.IOException:
Unable to read data from the transport connection: An existing connection was forcibly closed by the remote host. --->
System.Net.Sockets.SocketException: An existing connection was forcibly closed by the remote host.
Solution
Run the following Windows PowerShell script on the development machine.
Set-ItemProperty HKLM:\SOFTWARE\Microsoft\.NETFramework\v4.0.30319 -Name SchUseStrongCrypto -Value 1 -Type dword -Force -Confirm:$false
if ((Test-Path HKLM:\SOFTWARE\Wow6432Node\Microsoft\.NETFramework\v4.0.30319))
{
    Set-ItemProperty HKLM:\SOFTWARE\Wow6432Node\Microsoft\.NETFramework\v4.0.30319 -Name SchUseStrongCrypto -Value 1 -Type dword -Force -Confirm:$false
}
The w3svc service wasn't found on the computer
This error only occurs when you run load tests by using Microsoft Visual Studio Online.
Error example
Test method MS.Dynamics.Performance.Application.GFM.PDLTrend.ProcureToPayTrend.ProcureToPaymentTrend threw exception:
System.TypeInitializationException: The type initializer for 'MS.Dynamics.TestTools.CloudCommonTestUtilities.Authentication.UserManagement' threw an exception. ---> System.InvalidOperationException: Service w3svc was not found on computer '.'. ---> System.ComponentModel.Win32Exception: The specified service does not exist as an installed service
Solution
A hotfix is available that resolves this issue. The Microsoft Knowledge Base (KB) number is 4095640.
Feedback
Coming soon: Throughout 2024 we will be phasing out GitHub Issues as the feedback mechanism for content and replacing it with a new feedback system. For more information see: https://aka.ms/ContentUserFeedback.
Submit and view feedback for