Events
Power BI DataViz World Championships
Feb 14, 4 PM - Mar 31, 4 PM
With 4 chances to enter, you could win a conference package and make it to the LIVE Grand Finale in Las Vegas
Learn moreThis browser is no longer supported.
Upgrade to Microsoft Edge to take advantage of the latest features, security updates, and technical support.
In this lab you’ll create a Master Details form and apply the appropriate form pattern and subpatterns. A Master Details form shows primary data that has many fields. For example, the form that you create will show customer information.
For this tutorial, you will need to access the environment using Remote Desktop, and be provisioned as an administrator on the instance. For more information, see Access Instances.
To create the form, you’ll start from the existing form, FmtCustomer. The form represents the old Master Details template. As a part of the tutorial, you’ll apply the Master Details pattern, which will enforce a consistent structure for this form type. The following illustration shows the FmtCustomer starting artifact.

Use Visual Studio to import the tutorial project. The tutorial project includes the artifacts you will use to complete this tutorial. Use Visual Studio to open the FMTutorial project and load the data for the tutorial. You will use the FMTDataHelper class to load data for the Fleet Management tutorial. If this is the first tutorial you are working on, review Access Instances and make sure you provision your administrator user if you’re working on a local VM.
Use Visual Studio to open the FMTutorial project. If you have Visual Studio open and have already loaded the FMTutorial project, you can continue to the next section.
Use Visual Studio to create the FmtCustomer form. You’ll use a template to create a new master details form. The data source for this tutorial is provided by the starter form. However, you’ll add fields to the grid and details view and apply the Master Details form pattern.
In Solution Explorer, right-click the FMTutorial project, point to Add, and then click Existing Item.
In the Add Existing Item window, browse to C:\FmLab, select AxForm_FmtCustomer, and then click Add. The FmtCustomer form appears at the bottom of the FMTutorial project in Solution Explorer.
In Solution Explorer, double-click FmtCustomer. The form opens in the form designer.
In the Form designer, click Design. In the Properties window, specify the following values.
| Property | Value |
|---|---|
| Data Source | FmtCustomer |
| Caption | Customers |
In the Form designer, click Design > GridDetailsTab > TabPageGrid > MainGrid, and then click MainGrid.
In the Properties window, click Data Source, and then select FmtCustomer to bind the FmtCustomer table to the grid. You can now use the fields from the data source to add columns to the grid.
Click Data sources > FmtCustomer > Fields to add fields to the grid.
Click FirstName, press and hold the Ctrl key, and then select the following additional fields in the order shown:
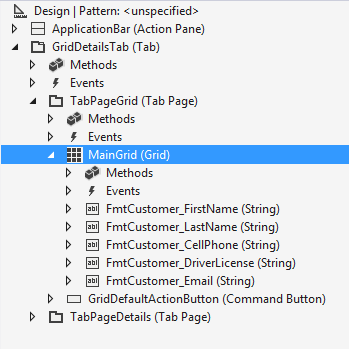
Drag the highlighted fields to Design > GridDetailsTab> TabPageGrid > MainGrid. The following illustration shows the grid after expanding the grid node and adding the fields.
Click Save.
Click Design > GridDetailsTab > TabPageDetails > TitleGroup to add the record header to the details view.
Click HeaderTitle. In the Properties window, specify the following values.
| Property | Value |
|---|---|
| Data Source | FmtCustomer |
| Data Method | titleFields |
Click Design > GridDetailsTab > TabPageDetails > DetailsBodyTab > General to add content to the details view.
Click FmtCustomer > Data sources > FmtCustomer > Fields, press and hold the Ctrl key, and then select the following fields:
Drag the highlighted fields onto General, and then click Save.
Run the form to verify that it loads correctly.
Use Visual Studio to apply the Master Details form pattern to the Customer form. Applying a form pattern ensures your form has the expected structure. It also simplifies the design experience by automatically setting the values of properties in the nodes that are part of the pattern.
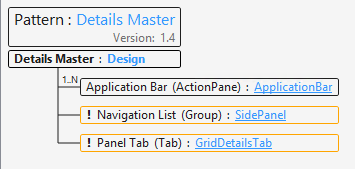
Right-click Design, point to Apply pattern, and then click Details Master.


Add the missing Navigation List group. The red highlighting in the Patterns Information Panel indicates that this control is missing.
Click Design again. The yellow highlighting around the Navigation List and the Panel Tab indicate that there are problems that need to be resolved under each of these nodes before the pattern can be successfully applied.

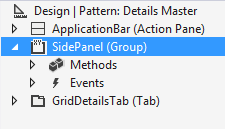
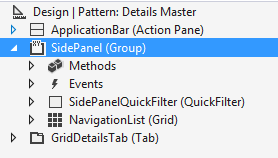
In the Patterns Information Panel, click SidePanel.
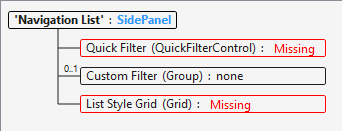
Add the missing controls.
Right-click SidePanel, point to New, and then click QuickFilter.
In the Properties window, specify the following values.
| Property | Value |
|---|---|
| Name | SidePanelQuickFilter |
| Target Control | MainGrid This QuickFilter should have the same columns available for filtering as the main grid on the form |
Right-click SidePanel, point to New, and then click Grid.
| Property | Value |
|---|---|
| Name | NavigationList |
| Datasource | FmtCustomer |
Add identifying fields to the Navigation list. Right-click NavigationList, point to New, and then click String.
In the Properties window, specify the following values.
| Property | Value |
|---|---|
| DataSource | FmtCustomer |
| DataMethod | fullName |
| Name | FmtCustomer_FullName |
Expand Data Sources > FmtCustomer > Fields to add phone numbers to the Simple list.
Drag the CellPhone field onto the grid under Design > SidePanel > NavigationList.
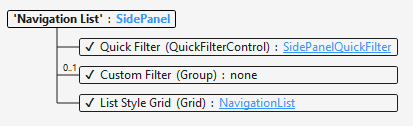
Click SidePanel. Notice the Patterns Information Panel is now indicating that the controls in this subtree are in full compliance with the pattern.
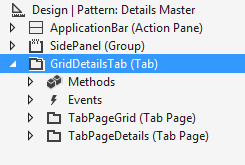
Click Design > GridDetailsTab. The yellow highlighting around the subnodes indicates that there are problems that need to be resolved under both nodes before the form pattern can be successfully applied.
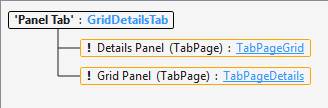
Notice that the pattern expects the Grid Panel to be after the Details Panel. Click TabPageGrid and press Alt+Down to move that tab below the Details Panel.
Click GridDetailsTab. The TabPageDetails tab page now adheres to the pattern. However, the TabPageGrid tab page needs additional attention.


Click TabPageGrid. Focus in the designer is now on TabPageGrid, and the Patterns Information Panel has been updated.


The Patterns Information Panel now indicates a missing Group control at the top of the TabPageGrid container.
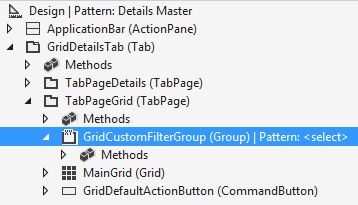
The pattern is looking for a subpattern to be applied to GridCustomFilterGroup. Right-click GridCustomFilterGroup, point to Apply pattern, and then click Custom and Quick Filters.

The Custom and Quick Filters subpattern requires a QuickFilter control.
Right-click GridCustomFilterGroup, point to New, and then click QuickFilter.
In the Properties window, specify the following values.
| Property | Value |
|---|---|
| Name | MainGridQuickFilter |
| Target Control | MainGrid |
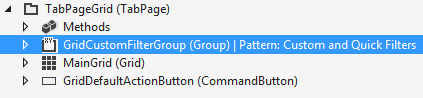
Browse up the control tree to design and notice how the Patterns Information Panel now shows no issues under each of the controls.
Press Ctrl+S to save the form.
Run the form to see the Details view and the Grid view.
In Visual Studio, in the Form designer, right-click FmtCustomer, point to Addins, and then select Form statistics.
The Form Statistics add-in provides several useful data points about the state of the form. This includes:
To complete pattern coverage for this form, the Pattern=Unspecified count should be zero. Use the Visual Studio form search to find all instances of “unspecified “in the form.

Because the General tab page contains only input controls and no custom layout is required for this FastTab, the Fields and Field Groups pattern should be applied to guarantee a responsive layout. Right-click General, point to Apply pattern, and then select Fields and Field Groups.
On the far right of the screen, click Clear search.

Press Ctrl+S to save the form.
Repeat step 1 to run the Form Statistics add-in a second time to verify the form is fully covered by patterns.
Press Ctrl+F5 to run the project and see the updated form.
Click Adrian to go to the details view. The following illustration shows how the details view now appears after applying the Fields and Field Groups subpattern so that the fields lay out responsively. By changing the browser width, you’ll see how the field layout adjusts to better fill the width of the browser.
Return to Visual Studio
Click Finance and operations, point to Addins, and then select Run form patterns report.
A notification dialog will be shown when the form patterns report has been generated.
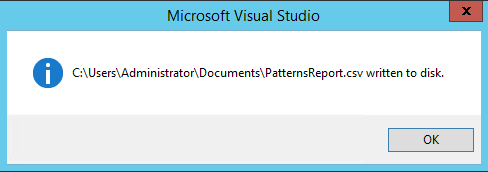
Open the PatternsReport file in Excel.
Filter the report to the Fleet Management Tutorial model.
Click Data > Filter.
Filter the Model column to FleetMgmntTutorial.

The report shows pattern-related information regarding the forms in this model including the top-level form pattern currently applied, and the percentage of controls on the form covered by patterns. This can be used to track the remaining patterns work in one or more models.
Events
Power BI DataViz World Championships
Feb 14, 4 PM - Mar 31, 4 PM
With 4 chances to enter, you could win a conference package and make it to the LIVE Grand Finale in Las Vegas
Learn moreTraining
Module
Build Forms and Optimize Form Performance in Finance and Operations Apps - Training
Forms are created and managed in Visual Studio and will display to the user as web pages. This module explains how forms are created and managed in the finance and operations apps developer environment, along with how to optimize the performance of forms.
Certification
Microsoft Certified: Power Platform Functional Consultant Associate - Certifications
Demonstrate the use of Microsoft Power Platform solutions to simplify, automate, and empower business processes for organizations in the role of a Functional Consultant.
Documentation
User interface development home page - Finance & Operations | Dynamics 365
Access links to topics about developing user interface elements, including tutorials, forms, controls, and form pattern guidelines.
Navigation concepts - Finance & Operations | Dynamics 365
Learn about the primary navigation concepts including the dashboard, the new navigation search feature, the navigation pane, workspaces, and tiles.
Develop and customize home page - Finance & Operations | Dynamics 365
Access links to topics about development, including an overview for finance and operations apps enabling enterprise resource planning applications.