Build the Rental Charge Type form
In this lab you’ll create a Simple List form. A Simple List form can show reference or secondary data that has six or fewer fields. For example, the form that you create will list and describe the types of rental charges.
Prerequisites
For this tutorial, you’ll need to access the environment using Remote Desktop, and be provisioned as an administrator on the instance. For more information, see Access Instances.
Overview
To create the form, you’ll start from the existing form, FmtChargeType. This form uses the Simple List pattern. The following illustration shows the FmtChargeType form with the required controls from the Simple List pattern.
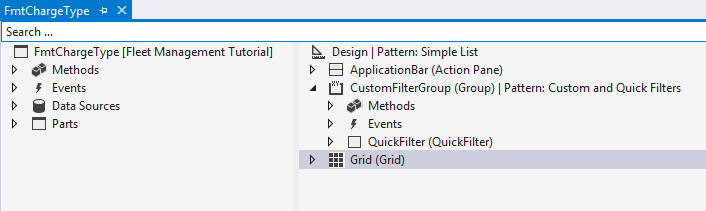
Adhering to the form pattern ensures that this Simple List form has the same structure and layout as other Simple List forms.
Key concepts
- Create a Simple List form using a pattern.
- Bind a table to the form.
- Add controls to the form.
- View the form using Visual Studio and a browser.
Setup
Import the tutorial project and transactional data
Use Visual Studio to import the tutorial project. The tutorial project includes the artifacts that you’ll use to complete this tutorial. Use Visual Studio to open the FMTutorial project and load the data for the tutorial. You’ll use the FMTDataHelper class to load data for the Fleet Management tutorial. If this is the first tutorial you’re working on, review Access Microsoft Instances and make sure you provision your administrator user if you’re working on a local VM.
Download the Fleet Management sample from https://github.com/Microsoft/FMLab, save it to C:\, and unzip it.
On the desktop, double-click the Visual Studio shortcut to open the development environment.
On the Finance and operations menu, click Import Project.
In the Import Project window, next to the Filename text box, click the ellipsis button.
In the Select the file to import window, browse to C:\FMLab, click FMTutorialDataModel.axpp, and then click Open.
In the Project file location text box, enter C:\FMLab.
Select the Overwrite Elements option, and the Current solution radio button. The following illustration shows the completed Import Project dialog box.
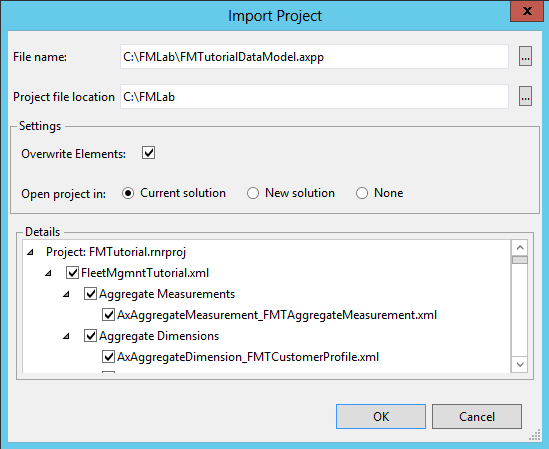
Click OK.
In Solution Explorer, expand Classes, and under the FMTutorial project, right-click FMTDataHelper, and then click Set as Startup Object.
On the Build menu, click Rebuild Solution. Use the rebuild to make sure that all of the files in the project are built regardless of timestamps. You can view the build progress in the Output window.
After the build completes, press Ctrl+F5 to run the project. The browser will open and run the class that imports the data.
Open the FMTutorial project
Use Visual Studio to open the FMTutorial project. If you have Visual Studio open and have already loaded the FMTutorial project, you can continue to the next section.
- If the development environment isn’t already open, on the desktop, double-click the Visual Studio shortcut to open the development environment.
- On the File menu, click Open > Project/Solution.
- In the Open Project dialog box, browse to C:\FmLab\FMTutorial, select the FMTutorial solution, and then click Open
- The FMTutorial project appears in Solution Explorer.
Use a template to create the form
Use Visual Studio to create the FmtChargeType form. You’ll use a template for building the Simple List form. You’ll also add a data source to the form and add fields to the data grid.
In Solution Explorer, right-click the FMTutorial project, point to Add, and then click Existing Item.
In the Add Existing Item window, browse to C:\FmLab, click AxForm_FmtChargeType, and then click Add. The FmtChargeType form appears at the bottom of the FMTutorial project in Solution Explorer.
In Solution Explorer, double-click FmtChargeType. The form opens in the Form designer.
Add the FmtChargeType table as the data source for the form. Right-click Data Sources, and then click New Data Source. A data source node is added.
Click the data source node from the previous step. In the Properties window, populate the following properties with the specified values.
Property Value Table FMTChargeType Name FMTChargeType Be sure to specify the value for the Table property first. This property will automatically update to use that same value. The following illustration shows Data Sources after you add the FMTChargeType table.

In the Form designer, click Design. In the Properties window, populate the following properties with the specified values.
Property Value Caption Rental charge types This is the label that appears at the top of the form. Data Source FMTChargeType Use this property to specify the data source for the form. In the Form designer, click Design > Grid.
Bind the FMTChargeType data source to the grid that appears in the simple list form. In the Properties window, in Data Source, enter FMTChargeType.
You have to specify the data source before you add fields to the grid. You can then use the fields from the data source to add columns to the grid. Add two fields from the data source to the grid. The fields you add will appear as columns on the Simple List form. Expand the FMTChargeType data source Fields node in the left pane. Press Ctrl and then click the following fields:
- ChargeType
- Description
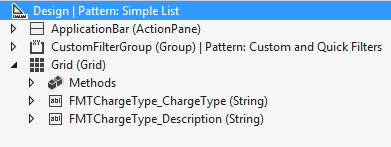
Drag the selected fields to Design > Grid in the right pane. The following illustration shows the grid after the grid node is expanded and the two fields are added.
In the Form designer, click Design > CustomFilterGroup > QuickFilter.
In the Properties window, click TargetControl, and then select Grid to bind the QuickFilter control to the grid on the form.
Click File > Save FmtChargeType.
View the form
Use Visual Studio to build and run the FmtChargeType form.
In Solution Explorer, right-click the FmtChargeType form, and then click Set as Startup Object.
Press Ctrl+F5 to build and run the form.
The form opens in Microsoft Edge.
To add a rental charge type, click New in the Action Pane at the top of the form. Add the following information.
Rental Charge Type Description cleaning Cleaning fee In the Action Pane, click Save.
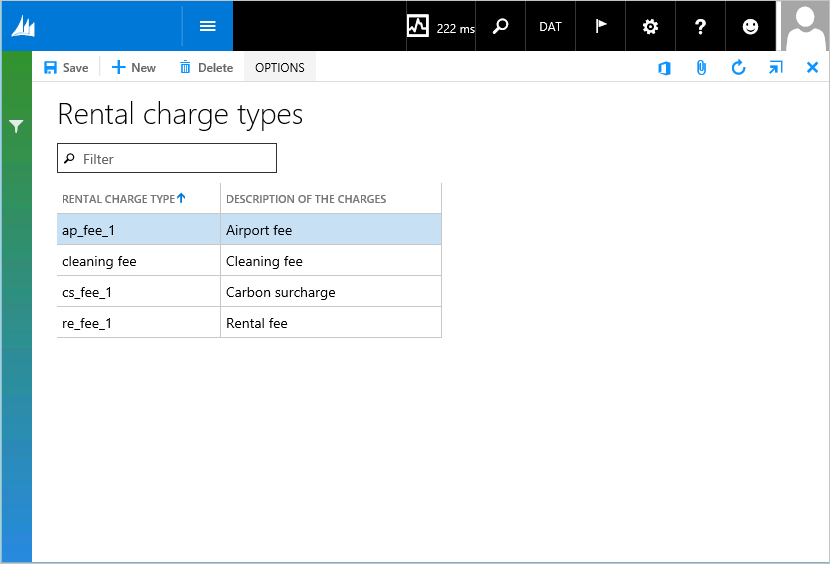
Refresh the browser to see the new record in the list. The following illustration shows how the form should look.
The form opens in view mode. Click Edit in the Action Pane to switch the form into edit mode. To return to view mode, click Options and then Read mode.
Feedback
Coming soon: Throughout 2024 we will be phasing out GitHub Issues as the feedback mechanism for content and replacing it with a new feedback system. For more information see: https://aka.ms/ContentUserFeedback.
Submit and view feedback for