Finalizing registration for paid events in outbound marketing
Note
Dynamics 365 Marketing and Dynamics 365 Customer Insights are now Customer Insights - Journeys and Customer Insights - Data. For more information, see Dynamics 365 Customer Insights FAQs
New Customer Insights - Journeys customers receive real-time journeys features only. For more information, see Default real-time journeys installation.
Note
Azure Active Directory is now Microsoft Entra ID. Learn more
Important
This article only applies to outbound marketing.
This topic walks you through the process of developing a .NET Core application that authenticates against Dynamics 365 Customer Insights - Journeys and triggers a custom action that finalizes the registration process for paid events. Before going through the topic, make sure that you read and understand Set up online payments for events.
In this topic, we use OAuth as an authentication mechanism and Dynamics 365 Web API to trigger the custom action. This approach works universally with most of the programming languages and frameworks, which means that you’re not forced to use C# or .NET Core for building the service that finalize the paid registrations.
Note
If you choose to use .NET Framework for developing your service, you can use the XRM tooling library to authenticate and connect to the organization service. This library makes it more convenient to communicate with Dynamics 365 Customer Insights - Journeys. More information: Authenticate with .NET Framework applications
Prerequisites
Create a .NET Core CLI project.
Install all the required dependencies.
Install the following NuGet package:
- Newtonsoft.Json is used to serialize and deserialize the data.
If you are using the Microsoft Entra ID Authentication Library, follow the migration guide to upgrade to the Microsoft Authentication Library (MSAL).
Important
The Microsoft.IdentityModel.Clients.ActiveDirectory NuGet package has been deprecated. No new features have been added since June 30, 2020. We strongly encourage you to upgrade, see the migration guide for more details.
Step 1: Register your application
Before we start to authenticate against Dynamics 365 Customer Insights - Journeys, we need to register the application in Microsoft Entra ID to get the authentication credentials. More information: How to register an application in Microsoft Entra ID
Follow these steps to register your application:
Navigate to Microsoft 365 Admin center by expanding the Admin centers tab in the left navigation pane, and select Microsoft Entra ID.
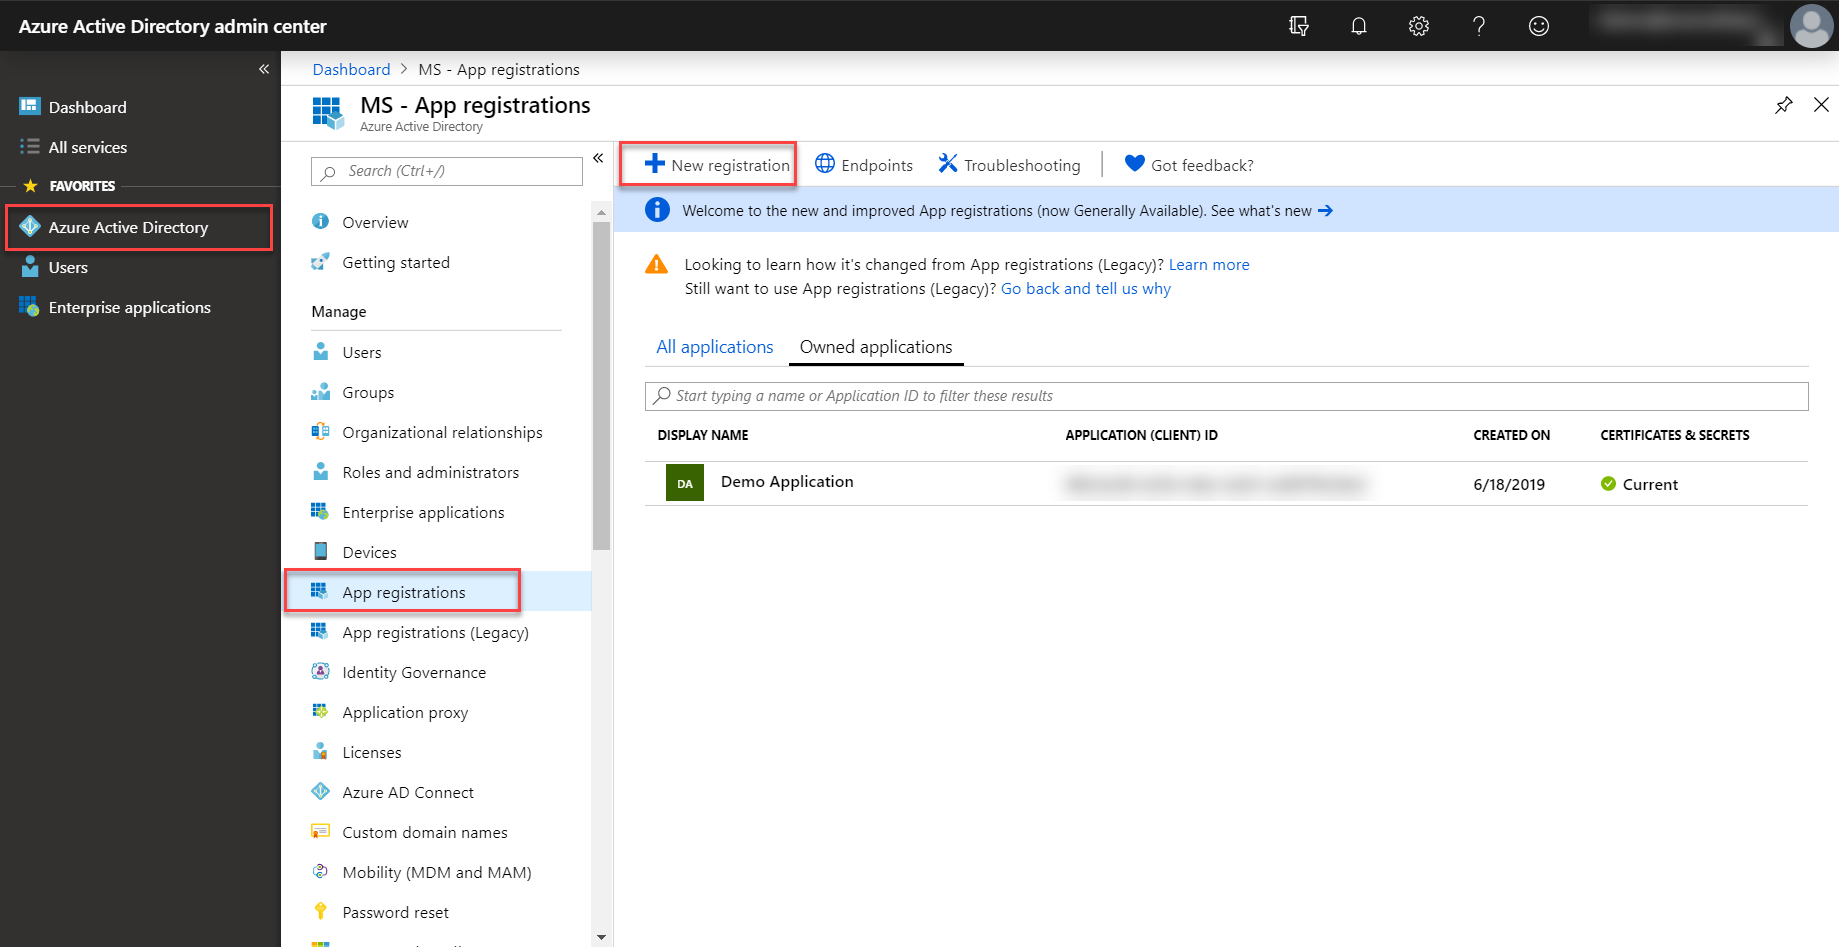
Navigate to Microsoft Entra ID, select App registrations, and then select New registration.

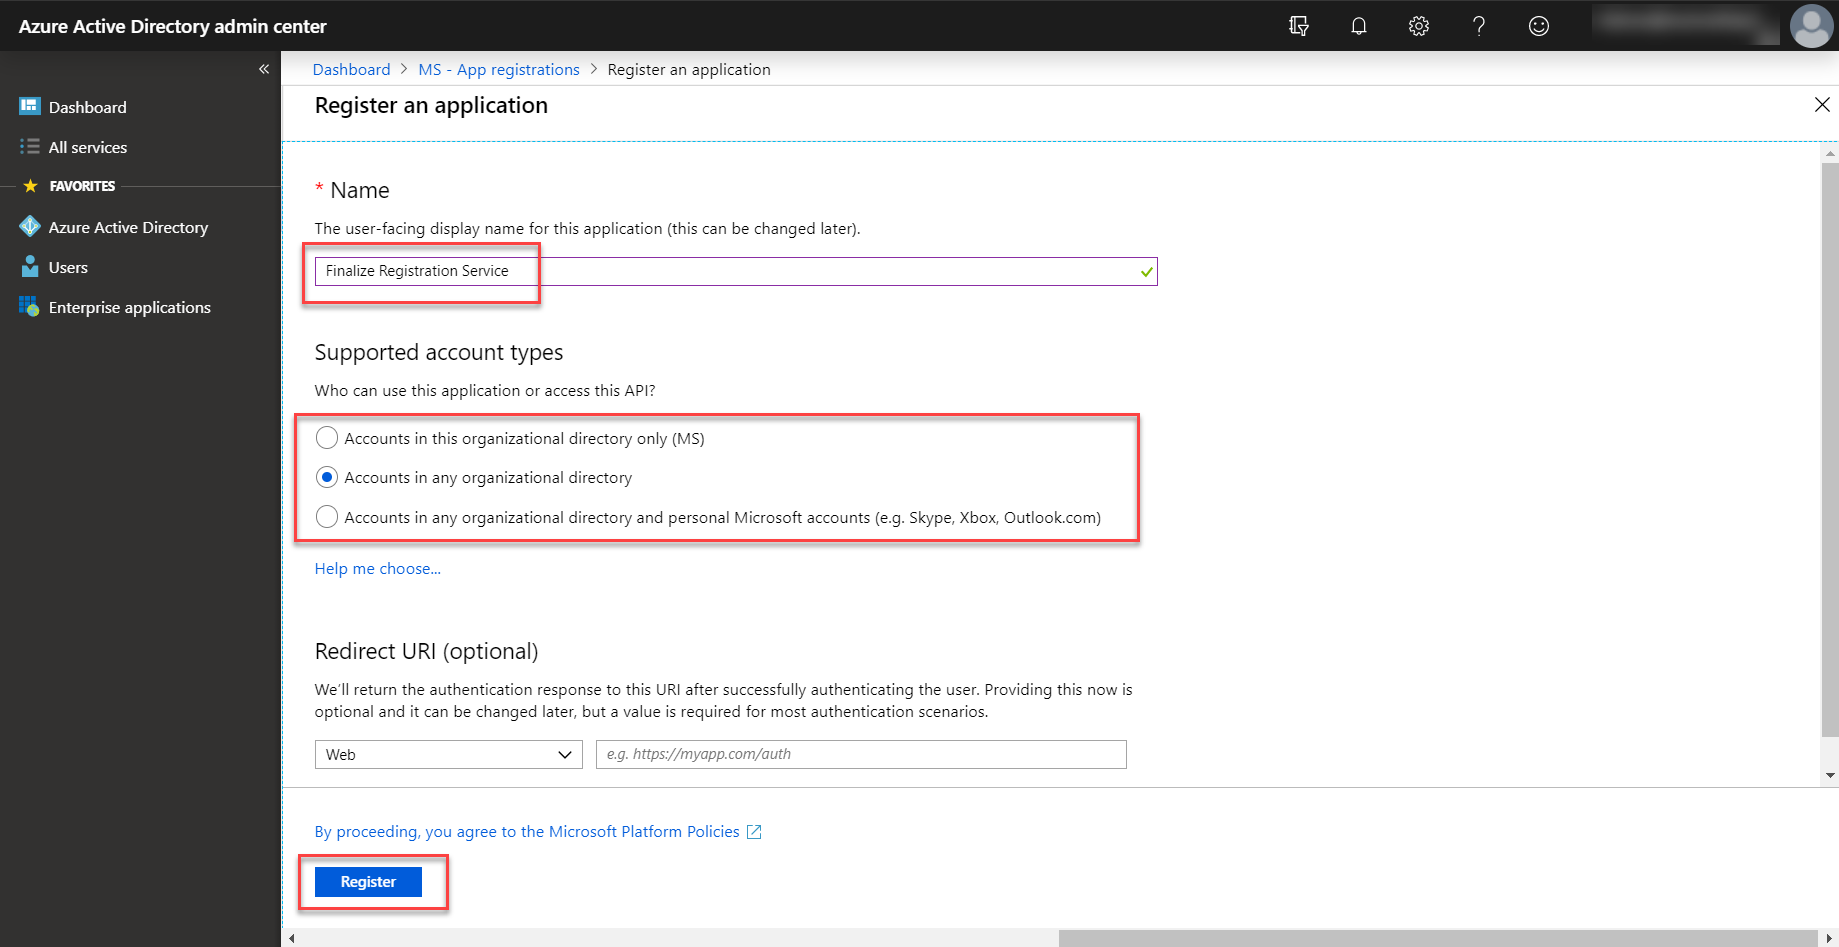
Enter a name for your application. Select the Accounts in any organizational directory option in the Supported account types section. You don’t need to add a redirect URI.

Select Register.
After the application is registered, you should be redirected to the Overview page. Look for the application ID and tenant ID values and save them.
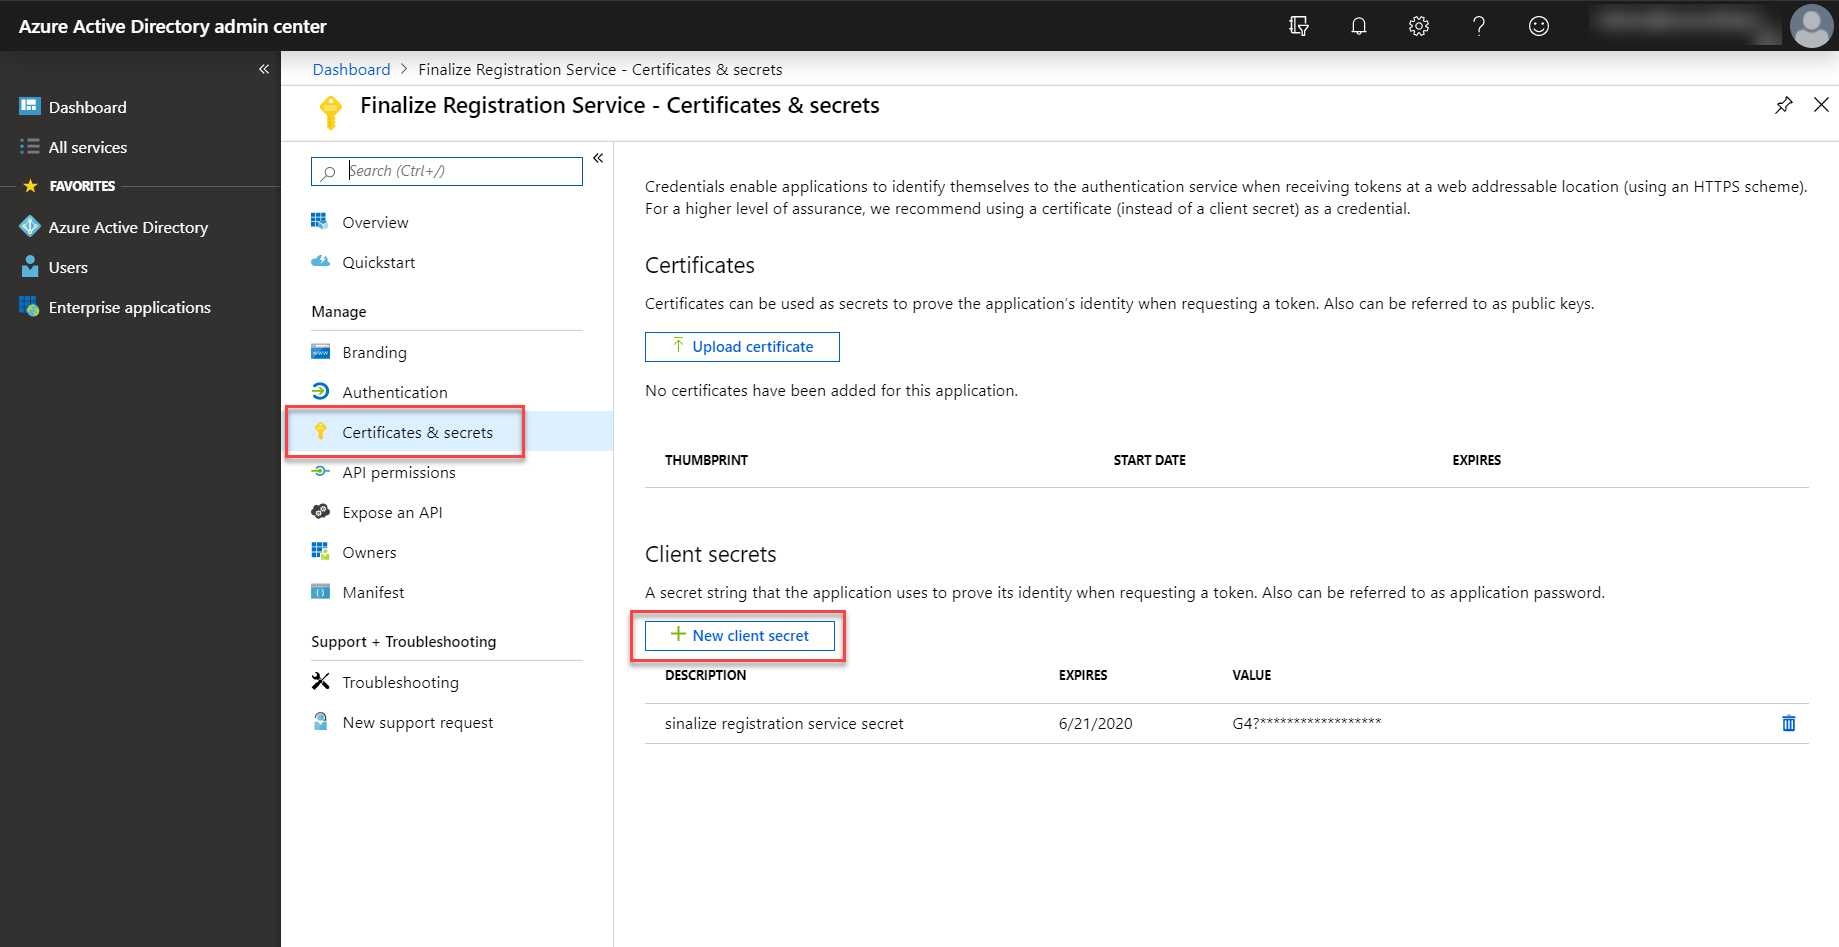
Navigate to Certificates & secrets and select New client secret. Make note of the client secret value.

Step 2: Create an application user
In this step, create an application user and associate the application user with the created application. More information: Application user creation
Go to your Dynamics 365 Customer Insights - Journeys instance and navigate to Settings > Security and then select Users.

Switch the view to Application Users and select New.

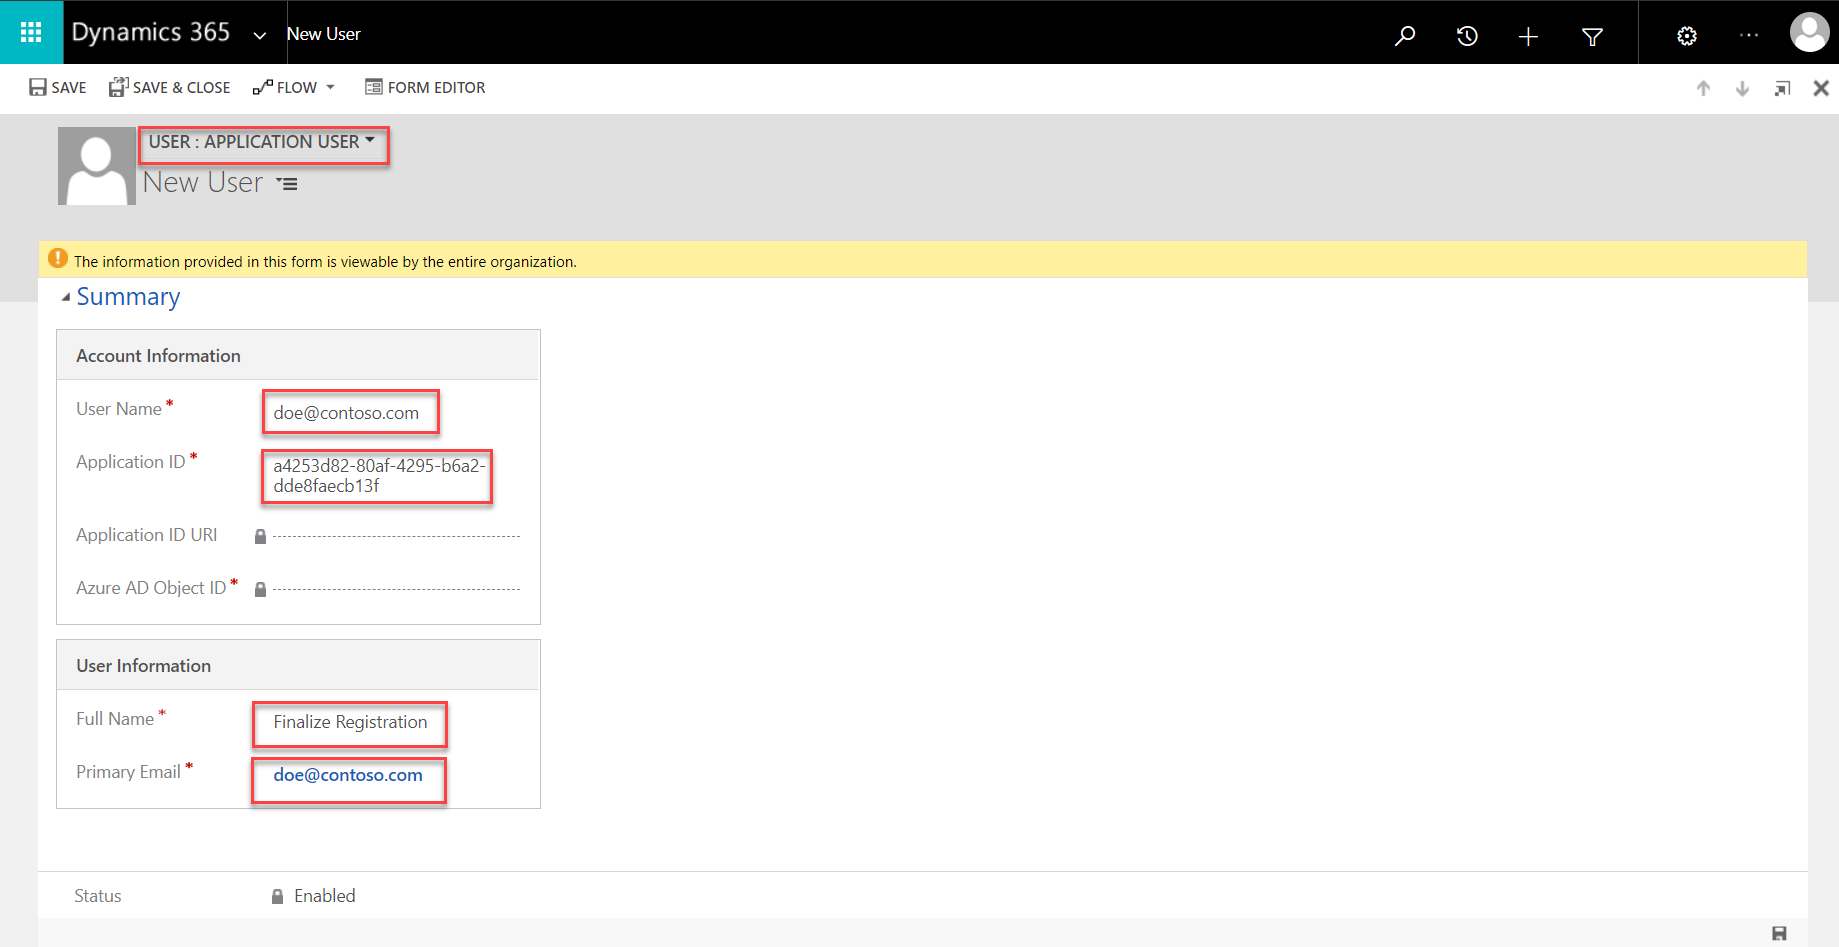
Make sure the User: Application User view is selected. If not, select the drop-down arrow, select Application User, and then enter the User Name, Application ID, Full Name and Primary Email values.

Select Save. After you save the record, the Application ID URI and Microsoft Entra ID Object ID values should be automatically filled. If not, make sure that you entered the correct application ID and that you registered your application correctly.
Step 3: Assigning a security role to an application user
The next step is to assign the required security roles to the application user. You have to create a security group on your own. You need the following privileges:
Note
In the upcoming August 2019 release, a new security role that contains all the required privileges to finalize the registration will be introduced. To assign this role, select Manage roles and then select Finalize RegistrationService.
    <RolePrivilege name="prvAppendContact" level="Global" />
    <RolePrivilege name="prvAppendLead" level="Global" />
    <RolePrivilege name="prvAppendmsevtmgt_AttendeePass" level="Global" />
    <RolePrivilege name="prvAppendmsevtmgt_customregistrationfield" level="Global" />
    <RolePrivilege name="prvAppendmsevtmgt_eventpurchasepass" level="Global" />
    <RolePrivilege name="prvAppendmsevtmgt_EventRegistration" level="Global" />
    <RolePrivilege name="prvAppendmsevtmgt_registrationresponse" level="Global" />
    <RolePrivilege name="prvAppendmsevtmgt_Session" level="Global" />
    <RolePrivilege name="prvAppendmsevtmgt_SessionRegistration" level="Global" />
    <RolePrivilege name="prvAppendmsevtmgt_waitlistitem" level="Global" />
    <RolePrivilege name="prvAppendToAccount" level="Global" />
    <RolePrivilege name="prvAppendToContact" level="Global" />
    <RolePrivilege name="prvAppendToLead" level="Global" />
    <RolePrivilege name="prvAppendTomsevtmgt_customregistrationfield" level="Global" />
    <RolePrivilege name="prvAppendTomsevtmgt_Event" level="Global" />
    <RolePrivilege name="prvAppendTomsevtmgt_eventadministration" level="Global" />
    <RolePrivilege name="prvAppendTomsevtmgt_eventpurchasepass" level="Global" />
    <RolePrivilege name="prvAppendTomsevtmgt_EventRegistration" level="Global" />
    <RolePrivilege name="prvAppendTomsevtmgt_pass" level="Global" />
    <RolePrivilege name="prvAppendTomsevtmgt_registrationresponse" level="Global" />
    <RolePrivilege name="prvAppendTomsevtmgt_Session" level="Global" />
    <RolePrivilege name="prvAppendTomsevtmgt_SessionRegistration" level="Global" />
    <RolePrivilege name="prvAppendTomsevtmgt_waitlistitem" level="Global" />
    <RolePrivilege name="prvCreateAccount" level="Global" />
    <RolePrivilege name="prvCreateContact" level="Global" />
    <RolePrivilege name="prvCreateLead" level="Global" />
    <RolePrivilege name="prvCreatemsevtmgt_AttendeePass" level="Global" />
    <RolePrivilege name="prvCreatemsevtmgt_bucket" level="Global" />
    <RolePrivilege name="prvCreatemsevtmgt_customregistrationfield" level="Global" />
    <RolePrivilege name="prvCreatemsevtmgt_eventmanagementconfiguration" level="Global" />
    <RolePrivilege name="prvCreatemsevtmgt_eventpurchasepass" level="Global" />
    <RolePrivilege name="prvCreatemsevtmgt_EventRegistration" level="Global" />
    <RolePrivilege name="prvCreatemsevtmgt_registrationresponse" level="Global" />
    <RolePrivilege name="prvCreatemsevtmgt_SessionRegistration" level="Global" />
    <RolePrivilege name="prvCreatemsevtmgt_waitlistitem" level="Global" />
    <RolePrivilege name="prvCreateSharePointData" level="Global" />
    <RolePrivilege name="prvReadAccount" level="Global" />
    <RolePrivilege name="prvReadAsyncOperation" level="Global" />
    <RolePrivilege name="prvReadAttribute" level="Global" />
    <RolePrivilege name="prvReadContact" level="Global" />
    <RolePrivilege name="prvReadEntity" level="Global" />
    <RolePrivilege name="prvReadLead" level="Global" />
    <RolePrivilege name="prvReadmsevtmgt_AttendeePass" level="Global" />
    <RolePrivilege name="prvReadmsevtmgt_bucket" level="Global" />
    <RolePrivilege name="prvReadmsevtmgt_customregistrationfield" level="Global" />
    <RolePrivilege name="prvReadmsevtmgt_EntityCounter" level="Global" />
    <RolePrivilege name="prvReadmsevtmgt_Event" level="Global" />
    <RolePrivilege name="prvReadmsevtmgt_eventadministration" level="Global" />
    <RolePrivilege name="prvReadmsevtmgt_eventcustomregistrationfield" level="Global" />
    <RolePrivilege name="prvReadmsevtmgt_eventmanagementconfiguration" level="Global" />
    <RolePrivilege name="prvReadmsevtmgt_eventpurchasepass" level="Global" />
    <RolePrivilege name="prvReadmsevtmgt_EventRegistration" level="Global" />
    <RolePrivilege name="prvReadmsevtmgt_pass" level="Global" />
    <RolePrivilege name="prvReadmsevtmgt_registrationresponse" level="Global" />
    <RolePrivilege name="prvReadmsevtmgt_Session" level="Global" />
    <RolePrivilege name="prvReadmsevtmgt_SessionRegistration" level="Global" />
    <RolePrivilege name="prvReadmsevtmgt_waitlistitem" level="Global" />
    <RolePrivilege name="prvReadmsevtmgt_webinarconfiguration" level="Global" />
    <RolePrivilege name="prvReadmsevtmgt_WebinarProvider" level="Global" />
    <RolePrivilege name="prvReadmsevtmgt_WebinarType" level="Global" />
    <RolePrivilege name="prvReadmsevtmgt_websiteentityconfiguration" level="Global" />
    <RolePrivilege name="prvReadOptionSet" level="Global" />
    <RolePrivilege name="prvReadPluginAssembly" level="Global" />
    <RolePrivilege name="prvReadRelationship" level="Global" />
    <RolePrivilege name="prvReadSdkMessage" level="Global" />
    <RolePrivilege name="prvReadSharePointData" level="Global" />
    <RolePrivilege name="prvReadSharePointDocument" level="Global" />
    <RolePrivilege name="prvReadTransactionCurrency" level="Global" />
    <RolePrivilege name="prvReadUserSettings" level="Global" />
    <RolePrivilege name="prvReadWorkflow" level="Global" />
    <RolePrivilege name="prvWriteAccount" level="Global" />
    <RolePrivilege name="prvWriteContact" level="Global" />
    <RolePrivilege name="prvWriteLead" level="Global" />
    <RolePrivilege name="prvWritemsevtmgt_bucket" level="Global" />
    <RolePrivilege name="prvWritemsevtmgt_customregistrationfield" level="Global" />
    <RolePrivilege name="prvWritemsevtmgt_EntityCounter" level="Global" />
    <RolePrivilege name="prvWritemsevtmgt_Event" level="Global" />
    <RolePrivilege name="prvWritemsevtmgt_eventadministration" level="Basic" />
    <RolePrivilege name="prvWritemsevtmgt_eventmanagementconfiguration" level="Global" />
    <RolePrivilege name="prvWritemsevtmgt_eventpurchasepass" level="Global" />
    <RolePrivilege name="prvWritemsevtmgt_EventRegistration" level="Global" />
    <RolePrivilege name="prvWritemsevtmgt_registrationresponse" level="Global" />
    <RolePrivilege name="prvWritemsevtmgt_Session" level="Global" />
    <RolePrivilege name="prvWritemsevtmgt_SessionRegistration" level="Global" />
    <RolePrivilege name="prvWritemsevtmgt_waitlistitem" level="Global" />
    <RolePrivilege name="prvWritemsevtmgt_webinarconfiguration" level="Global" />
    <RolePrivilege name="prvWriteSharePointData" level="Global" />
Step 4: Authenticate against Dynamics 365 Customer Insights - Journeys
Implement the custom logic to authenticate against Dynamics 365 Customer Insights - Journeys. The outcome of the authentication should be an access token. If you’re not able to retrieve an access token, check your configuration.
Note
For a fully working example, check the code from the Sample Code section. More information: Authenticate using OAuth
public static string GetToken()
{
    // Get Dataverse access token - https://docs.microsoft.com/power-apps/developer/data-platform/authenticate-oauth#use-the-accesstoken-with-your-requests
}
Step 5: Calling custom action to finalize registration
After the access token is successfully retrieved, we can call the custom action msevtmgt_FinalizeExternalRegistrationRequest.
Note
If you’re using a solution version prior to the April 2019 release, the custom action is called adx_FinalizeExternalRegistrationRequest (different prefix). More information: Calling custom actions with Web API
private static HttpResponseMessage FinalizeRegistration(string accessToken)
{
    using (var client = new HttpClient())
    {
        client.BaseAddress = new Uri(organizationUrl);
        client.DefaultRequestHeaders.Accept.Add(new MediaTypeWithQualityHeaderValue("application/json"));

        var request = CreateFinalizeRegistrationRequest(accessToken);

        return client.SendAsync(request).Result;
    }
}

public static HttpRequestMessage CreateFinalizeRegistrationRequest(string accessToken)
{
    var finalizeRegistrationData = new Dictionary<string, string>
    {
        { "PurchaseId", "<purchase-id-as-guid>" },
        { "ReadableEventId", "<readable-event-id" },
        { "UserId", "<optional-user-id>" }
    };

    var encodedRequestBody = JsonConvert.SerializeObject(finalizeRegistrationData);

    var request = new HttpRequestMessage(HttpMethod.Post, FINALIZE_REGISTRATION_ROUTE);
    request.Content = new StringContent(encodedRequestBody, Encoding.UTF8, "application/json");
    request.Headers.Authorization = new AuthenticationHeaderValue("Bearer", accessToken);

    return request;
}
Sample Code
The following sample code shows how to authenticate and trigger the custom action to finalize the registration process for paid events.
Important
In this example we have hard coded the finalizeRegistrationData method. In a real application, this data should be retrieved from the event website through the payment gateway to finalize registration service.
Note
You should not enter either client ID or client secret values directly in code. This is only done to improve the readability of the sample code.
using Microsoft.Identity.Client;
using Newtonsoft.Json;
using System;
using System.Collections.Generic;
using System.Net.Http;
using System.Net.Http.Headers;
using System.Text;

namespace TriggerFinalizeRegistration
{
    class Program
    {
        /// <summary>
        /// The route to trigger the `msevtmgt_FinalizeExternalRegistrationRequest` custom action.
        /// </summary>
        private const string FINALIZE_REGISTRATION_ROUTE = "/api/data/v9.0/msevtmgt_FinalizeExternalRegistrationRequest";

        /// <summary>
        /// The base URL of your organization.
        /// E.g.: https://contoso.crm.dynamics.com/
        /// </summary>
        static string organizationUrl = "<org-url>";

        /// <summary>
        /// The tenant ID (GUID) of your application. Can be retrieved from the overview section of your application in
        /// Microsoft Entra ID.
        /// </summary>
        static string tenantId = "<tenant-id>";

        /// <summary>
        /// The client ID (GUID) of your application which is used for authentication against Dynamics 365.
        /// Can be retrieved from the overview section of your application in Microsoft Entra ID.
        /// </summary>
        static string clientId = "<client-id>";

        /// <summary>
        /// The client secret that can be generated in the certificates & client secrets section in your
        /// Microsoft Entra ID.
        /// </summary>
        static string clientSecret = "<client-secret>";

        static void Main(string[] args)
        {
            var accessToken = GetToken();
            var response = FinalizeRegistration(accessToken);

            if (response.IsSuccessStatusCode)
            {
                var result = response.Content.ReadAsStringAsync().Result;
                // Handle response.
                // The respones contains an attribute called 'status' which indicates
                // if the registration was successful or not.
            }
            else
            {
                // Something went wrong.
                // This most probably means that there is an issue with your configuration.
            }

            Console.WriteLine(response.StatusCode);
        }

        public static string GetToken()
        {
            // Get Dataverse access token - https://docs.microsoft.com/power-apps/developer/data-platform/authenticate-oauth#use-the-accesstoken-with-your-requests
        }


        private static HttpResponseMessage FinalizeRegistration(string accessToken)
        {
            using (var client = new HttpClient())
            {
                client.BaseAddress = new Uri(organizationUrl);
                client.DefaultRequestHeaders.Accept.Add(new MediaTypeWithQualityHeaderValue("application/json"));

                var request = CreateFinalizeRegistrationRequest(accessToken);

                return client.SendAsync(request).Result;
            }
        }

        public static HttpRequestMessage CreateFinalizeRegistrationRequest(string accessToken)
        {
            var finalizeRegistrationData = new Dictionary<string, string>
            {
                { "PurchaseId", "ab62525b-7a63-47c0-b6e8-17ad1a2c67a6" },
                { "ReadableEventId", "Paid_Event1479011247" },
                { "UserId", "" }
            };

            var encodedRequestBody = JsonConvert.SerializeObject(finalizeRegistrationData);
            var request = new HttpRequestMessage(HttpMethod.Post, FINALIZE_REGISTRATION_ROUTE);
            request.Content = new StringContent(encodedRequestBody, Encoding.UTF8, "application/json");
            request.Headers.Authorization = new AuthenticationHeaderValue("Bearer", accessToken);

            return request;
        }
    }
}