View and manage records in focused view
Focused view allows you to view and manage account, contact, lead, opportunity, and other records and their associated activities on one page. This view makes it easier for you to stay focused on your tasks and reduces the need to navigate between multiple screens. It also allows you to better organize and prioritize your tasks, thus saving time and effort.
Focused view is now available for all entities, including custom entities. However, your administrator must enable it for you to access it. More information: Enable focused view and set it as the default view.
Note
- Focused view is similar to the sales accelerator workspace view. Learn how to prioritize your sales pipeline through work lists.
- To view the latest updates and features of focused view, you must opt in for early access updates. Contact your administrator to enable early access updates for you. More information: Opt in to early access updates.
Open the focused view
Focused view is a centralized place to view all your open records that have activities that are due or pending, without having to navigate through multiple screens. By default, the lead entity grid opens in focused view. However, an administrator must enable and set other entities such as Account, Contact, Opportunity, and custom as default. More information: Enable focused view and set it as the default view.
From the sitemap, select an entity such as lead, account, contact, or opportunity. The entity grid opens in the focused view.
If you open an entity grid in the focused or list view and then close it within the same view, the application will remember to open the grid in the same view when you access it the next time. For example, if you open the Account entity grid in the focused view and then close it, the next time you open the Account entity grid, it will open in the focused view.
Note
Focused view is not available for the Activities entity.
Understand the focused view
The following image is an example of focused view for the Lead entity:
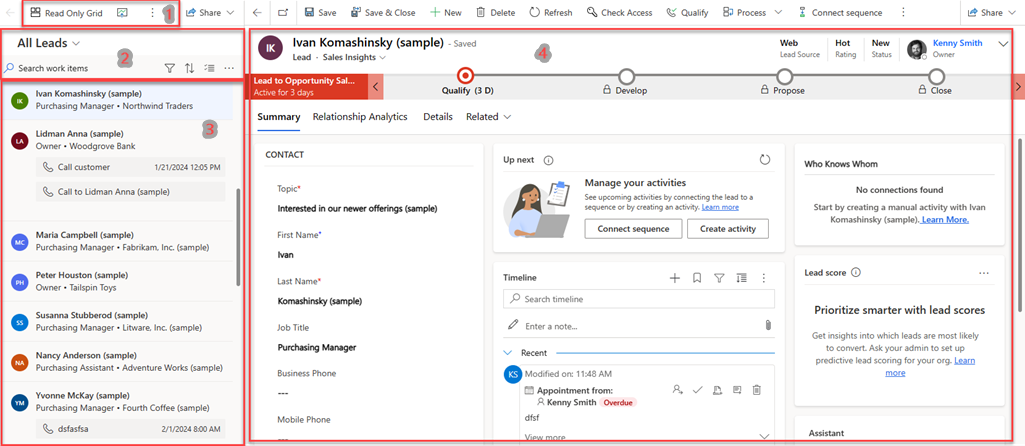
Focused view is categorized into the following sections.
Switch view and command bar:
- Switching a View: This action allows you to change from the focused view to the list view. To do this, select the Read Only Grid option. The Read Only Grid option is only available if you have one control for the entity. If you have multiple controls, the Show As option is displayed instead. Select Show As and then choose an option to change to the required view.
If you have opted in for early access updates, the Show As option is displayed as first option on the command bar. - Command bar: This feature contains actions that help you perform bulk actions on multiple records. To use it, select More options. You can then choose the records that you want to work with and perform the required actions.
- Switching a View: This action allows you to change from the focused view to the list view. To do this, select the Read Only Grid option. The Read Only Grid option is only available if you have one control for the entity. If you have multiple controls, the Show As option is displayed instead. Select Show As and then choose an option to change to the required view.
Work list actions:
Search, filter, and sort: These options are displayed at the top of the work list item view. You can search, filter, and sort the records that you want to view in the list to quickly identify only the records that you want to work with. You can also switch between focused view and list view. The attributes available in the view are displayed as filters and sort. These attributes include fields added through workspace customizations in the sales accelerator, and any new fields added to the work list card through card customization.
Note
The following attributes types are not supported in filter and sort—Owner, Lookup, Customer, Uniqueidentifier, related entities, and advanced filter that are created through workspace customizations.
For lead and opportunity entities, filters might display deprecated attribute options. To remove these filters, go to work list card customization and remove the Predictive scoring field.
If you want to add more filters to the view, you can create an advanced filter.
- Advanced filter: Create an advanced filter option using the expression builder to refine the content displayed in the work list. You can have only one advanced filter defined for an entity in focused view. Select Edit filters to open the expression builder. In the expression builder, create the conditions as required and then select Apply. When the advanced filter is applied, the filter icon is filled with a blue color, and the advanced filter tag is displayed under the filter options.
Select multiple records: To perform bulk actions on multiple records, select the Select multiple records option. You can choose the records that you want to work with and then perform the required actions. On the command bar, select More options to perform the bulk actions.
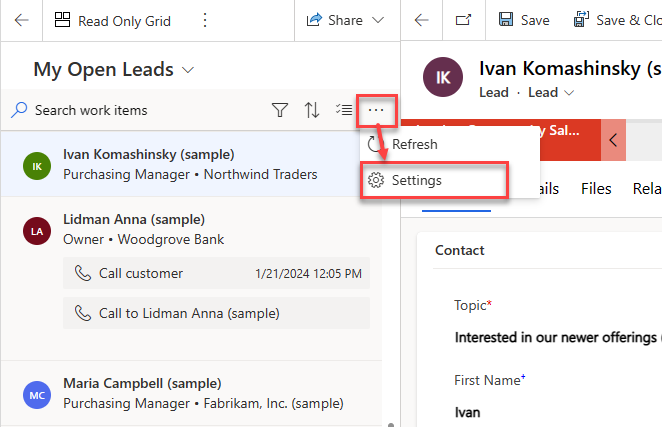
Refresh and Settings: Select More options to perform list refresh and configure the work list card through settings.
- Refresh: Select Refresh to refresh the list of records.
- Customize work list card: Select Settings to customize the work list card. More information: Customize the work list card
Records list: All records for the selected entity, including records with no associated activities, are displayed in a card format. You can perform and complete the activities, whether manual or automated, on these cards from the current date and from previous dates. Each card displays information such as the name of the record, the primary contact name, and the next best action.
- Next best actions: These include the top two activities with the latest due date. To complete the next best action, hover over the action and then select the action icon.
- No action items: When no action items are available for the record, the record displays information such as the name and contact details.
- Predictive scoring: When predictive scoring is enabled in your organization, the list also displays the score for that lead or opportunity at the upper-right corner of the card. Learn more about prioritizing leads through scores and prioritizing opportunities through scores.
Record details: Select a record in the work list to open a detailed view of the record on the same page.
Customize the work list card
You can customize the work list card to display the information that you want to see. When sales accelerator is enabled, the customizations you make here are also reflected in the sales accelerator work list items. More information: Customize the appearance of work items in sales accelerator
The customization that you make to the work list card is specific to the entity type. For example, if you customize the work list card for the Lead entity, the customization is applied only to the Lead entity. The customization isn't applied to the Account, Contact, Opportunity, or other entities. These customizations also affect the sales accelerator workspace view.
Note
You need to have read permissions for the Work list user setting entity to see the Settings icon and customize the work list card. Contact your administrator to provide the required permissions.
In the focused view page, on the work list pane, select More options and then select Settings.
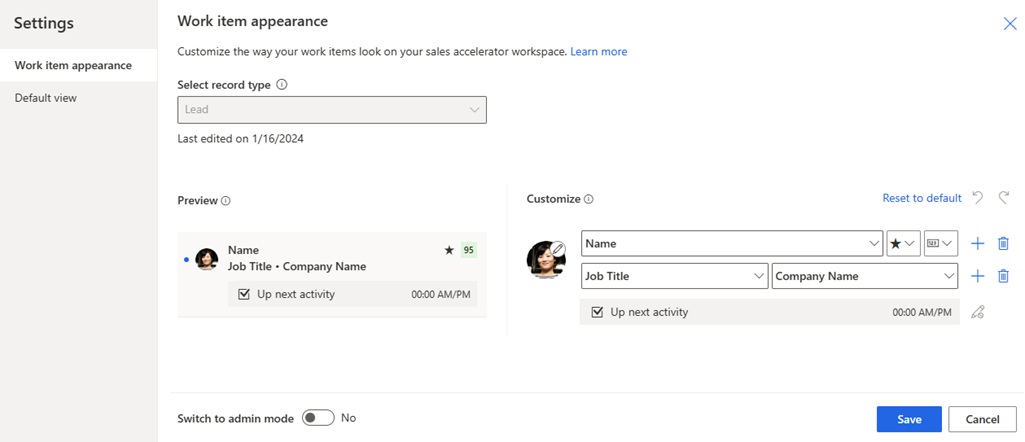
In the Settings dialog box, select Work item appearance.
The following are the considerations to keep in mind when customizing the work list card in focused view:
- The Switch to admin mode and Lock customization options are available only for administrators.
- If the customization is disabled, contact your administrator to turn off the customization lock.
- When admin mode is turned on, you can customize work items for all users within your organization. When turned off, you can customize work items only for yourself. If admin mode is turned off, contact your administrator to turn it on. More information: Lock or unlock customization for other user roles
- You can't customize the action items in the work list card. Also, in preview mode, the More options icon isn't visible to select action items that are configured in the sales accelerator workspace view.
Under the Customize section, use the following options to customize:
To change the icon that appears on a work item, select the pencil icon, and then choose one of the following options:
- Record image: A photo of the contact, if one is available.
- Record initials: The contact’s first and last initials.
- Record type: The icon associated with the record type.
- Activity type: The icon associated with the current activity on the record.
To change the content of work items, select the fields or attributes to display:
- To change an existing attribute, select a different one in its place from the list.
- To add an attribute in the same row, hover over an existing attribute and select More options > Add a field. You can show up to three fields in a row.
- To add an icon in the same row, hover over an existing attribute and select More options > Add an icon. You can show up to three icons in a row.
- To add a row, select the add icon (+). You can show up to four rows of information in a work item.
- To delete a field or an icon, hover over it and select More options > Remove.
Note
Currently, the Follow indicator option doesn't work in focused view.
To remove all customizations and restore work items to their original appearance, select Reset to default.
The Preview section displays a preview of the work list card based on the customizations that you make.
Select Save.
Increase the number of records displayed in focused view
You can configure the number of records that are displayed per page in the focused view. By default, 50 records are displayed, but you can increase this number up to a maximum of 250. To do so, go to your personalization settings, and under the General tab configure the Set the number of rows shown per page in any list of rows option to increase the number of records displayed per page in focused view. More information: Set personal options
See also
Enable focused view and set it as default
Prioritize sales pipeline with work lists
Work with opportunities in the Kanban view
Customize work items
Focused view FAQs
Feedback
Coming soon: Throughout 2024 we will be phasing out GitHub Issues as the feedback mechanism for content and replacing it with a new feedback system. For more information see: https://aka.ms/ContentUserFeedback.
Submit and view feedback for