Copy data between Dynamics AX companies
Important
This content is archived and is not being updated. For the latest documentation, see Microsoft Dynamics 365 product documentation. For the latest release plans, see Dynamics 365 and Microsoft Power Platform release plans.
Applies To: Microsoft Dynamics AX 2012 R3
You can use the Microsoft Dynamics AX 2012 Data Import/Export Framework to copy an entity, such as customers, from one Microsoft Dynamics AX legal entity (company) to another. In this example, we will export customers in a specific customer group from the CEU company to the CEC company in the Contoso data set.
Note: This walkthrough is not intended for users of the versions of the Data Import/Export Framework that ship with cumulative update 7 for Microsoft Dynamics AX 2012 R2 or Microsoft Dynamics AX 2012 R3. Those users should refer to the topic Copy and compare entity data between companies. This walkthrough illustrates the following tasks:
- Define the format of your source data
- Define a processing group
- Process data from source to staging
- Switch companies to copy data to another legal entity
- Validate the data in staging
- Validate the data in target
The following diagram illustrates the path that data takes during the export and import processes. 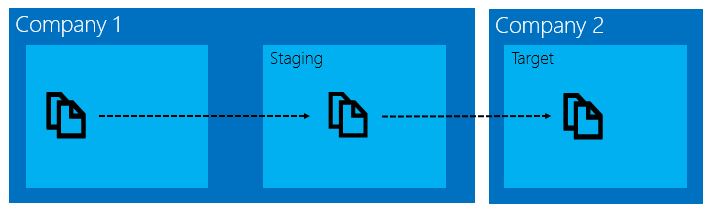
Prerequisites
To complete this walkthrough you will need:
- Microsoft Dynamics AX 2012 or Microsoft Dynamics AX 2012 R2
- Data Import/Export Framework
- Demo data for Microsoft Dynamics AX 2012 or Microsoft Dynamics AX 2012 R2
Define the format of your source data
- Open Data Import/Export Framework > Setup > Source data formats.
- Click New, enter a name and a description, and then select AX from the Type list.
Define a processing group to export data from Microsoft Dynamics AX
- Change the company to CEU.
- In Data Import/Export Framework, click Common > Processing group, and then click New to create a new processing group.
- Set the group name to Export-Cust and add a description.
- Click Entities to select the entities to include in the processing group.
- In the Select entities for processing group form, click New, and then, for an entity name, select Customer.
- In the Source data format field, select the Microsoft Dynamics AX source data format that you created.
- Click Select, and then in the DMFCustomerTargetEntity form, on the Range tab, for Field, select Customer group, and for Criteria, select 20, and then click OK.
- Close the Select entities for processing group form.
Process data from source to staging
- In the Processing group form, select the Export-Cust group that you created, and click Get staging data. The Create a job ID for the staging data job form opens.
- By default, an ID for the job is generated. If needed, you can modify the ID and add a description. Click OK. The Staging data execution form opens.
- In the Get data from source to staging form, click OK to run immediately. The source data is copied to the staging tables.
Validate the data in staging
- In Data Import/Export Framework, click Common > Processing group > Execution history, and then select the job that ran.
- Click View staging data.
- Review the staging data to validate that it matches the source.
- Click Validate all to verify that all the related reference data is correct and present in the system.
Switch companies to copy data to another company
- Switch to the CEC company.
- In Data Import/Export Framework, click Common > Processing group, and then select the processing group to work with.
- Click Copy data to target. The Select a job ID to run form opens.
- Select a job and click OK. The Target data execution form opens.
- Click Run, and then click OK. The data is copied to the target entity.
Validate the data in target
Verify that the customer data from the original company is displayed in either of the following ways:
- View staging data:
- In Data Import/Export Framework, click Common > Processing group > Execution history > View staging data, and then select the job that ran.
- Review the staging data to validate that it matches the source.
- Click Validate all to verify that all the related reference data is correct and present in the system.
- Verify that the customer data from the CEU company is now displayed in the All Customers form. Click Accounts receivable > Common > Customer > **All Customers **form.