Note
Access to this page requires authorization. You can try signing in or changing directories.
Access to this page requires authorization. You can try changing directories.
Use Choose Your Own Telephony Provider (CYOT) to deliver SMS and voice authentication through your organization's telephony provider. With CYOT, you purchase a supported provider offer through Microsoft Security Store, deploy the integration in your Azure subscription, and configure Microsoft Entra to route SMS or voice authentication through your provider.
This article walks you through the end-to-end setup in the Microsoft Entra admin center, including purchasing your provider offer, deploying the integration, configuring the authentication method policy, and testing the experience before moving to production.
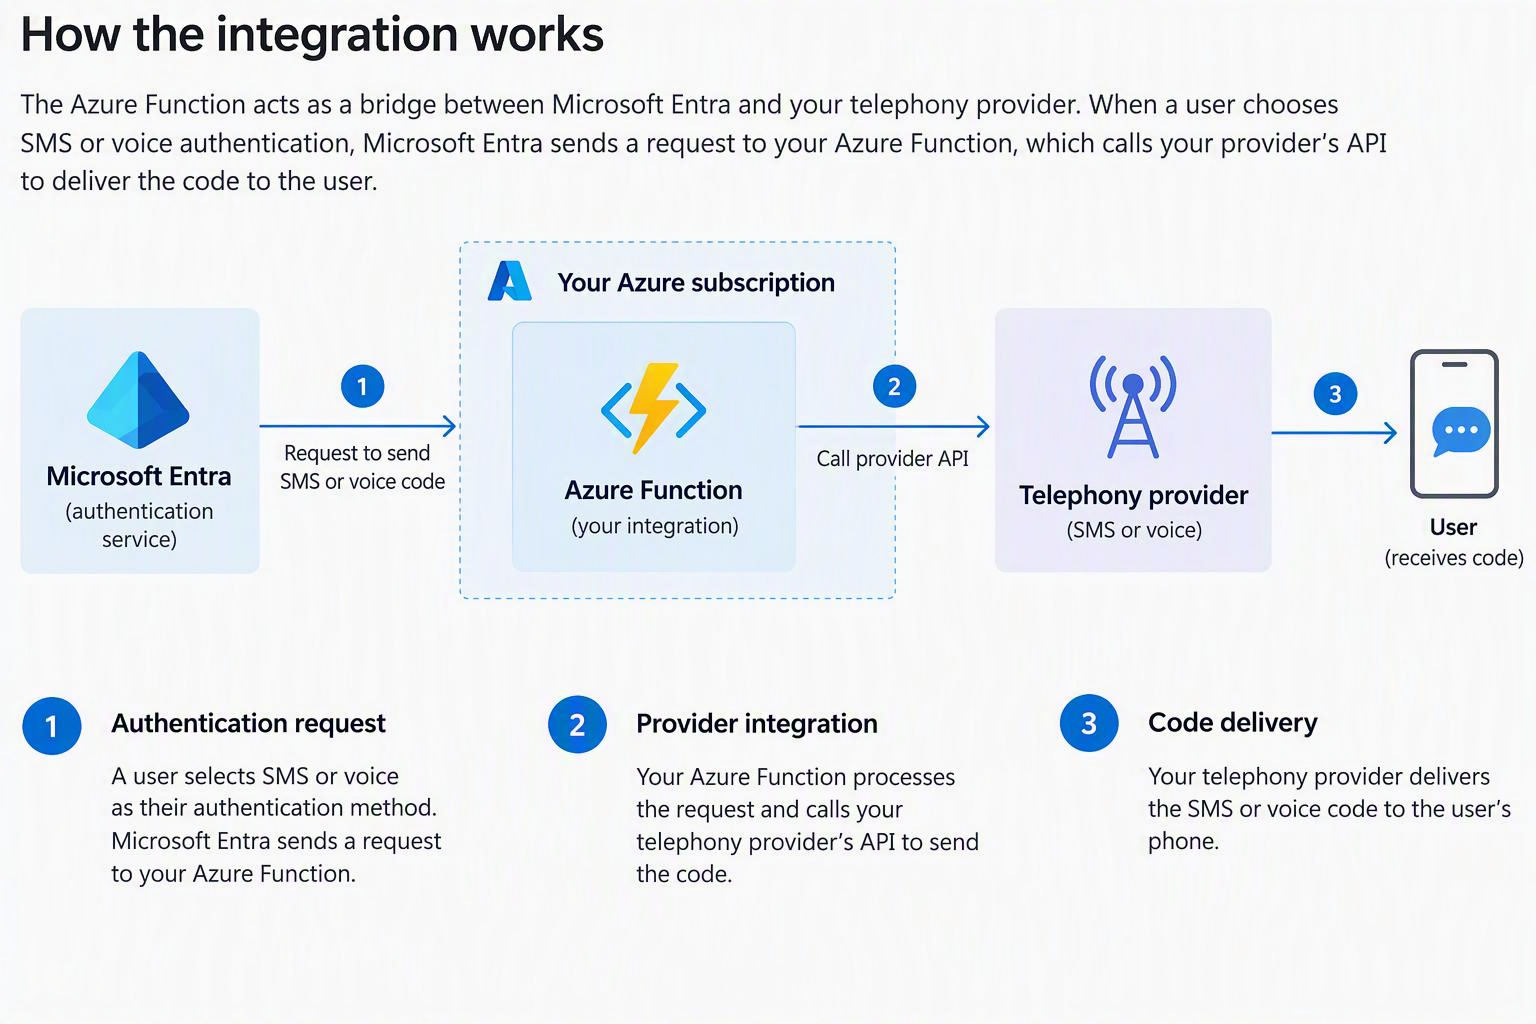
How the integration works
CYOT uses an Azure Function in your Azure subscription to connect Microsoft Entra with your telephony provider. The Azure Function processes SMS or voice requests from Microsoft Entra and sends them to your provider for delivery.
Prerequisites
Before you begin, prepare:
- A Microsoft Entra workforce tenant.
- An Azure subscription with a valid payment method to host the integration and subscribe to your provider. See Security Store purchasing prerequisites.
- Azure Cloud Shell in PowerShell mode (recommended), or PowerShell 7.0+ with Azure CLI 2.61+ for integration deployment.
- A test user with a phone number registered for SMS or voice authentication.
Required permissions
Use accounts with the following permissions:
| Task | Required access | Why it's needed |
|---|---|---|
| Create the application during deployment | Permission to register applications in the customer tenant. | Lets setup create the application that securely connects Microsoft Entra to your integration. |
| Deploy Azure resources | Subscription Owner, or Contributor + Role Based Access Control Administrator at the required scope. | Lets setup deploy the integration in your subscription. |
| Grant directory access during deployment | Privileged Role Administrator. | Lets setup grant the directory permissions that Microsoft Entra needs to route requests to your integration. |
| Configure authentication method profiles | Authentication Policy Administrator. | Allows you to review existing SMS or voice settings and configure the integration in the Microsoft Entra admin center. |
Important
Before you begin, confirm that your Microsoft Entra policies allow the setup script to create the application and credentials it needs. If you use app management policies for credentials, multitenant apps, or custom Application ID URIs, review them with your Microsoft Entra administrator.
Step 1: Purchase and activate your telephony provider
Sign in to the Microsoft Entra admin center as an Authentication Policy Administrator.
Go to Entra ID > Authentication methods > Policies and select Add telecom profile. The Set up an SMS or voice provider page guides you through subscription, integration, and profile setup.
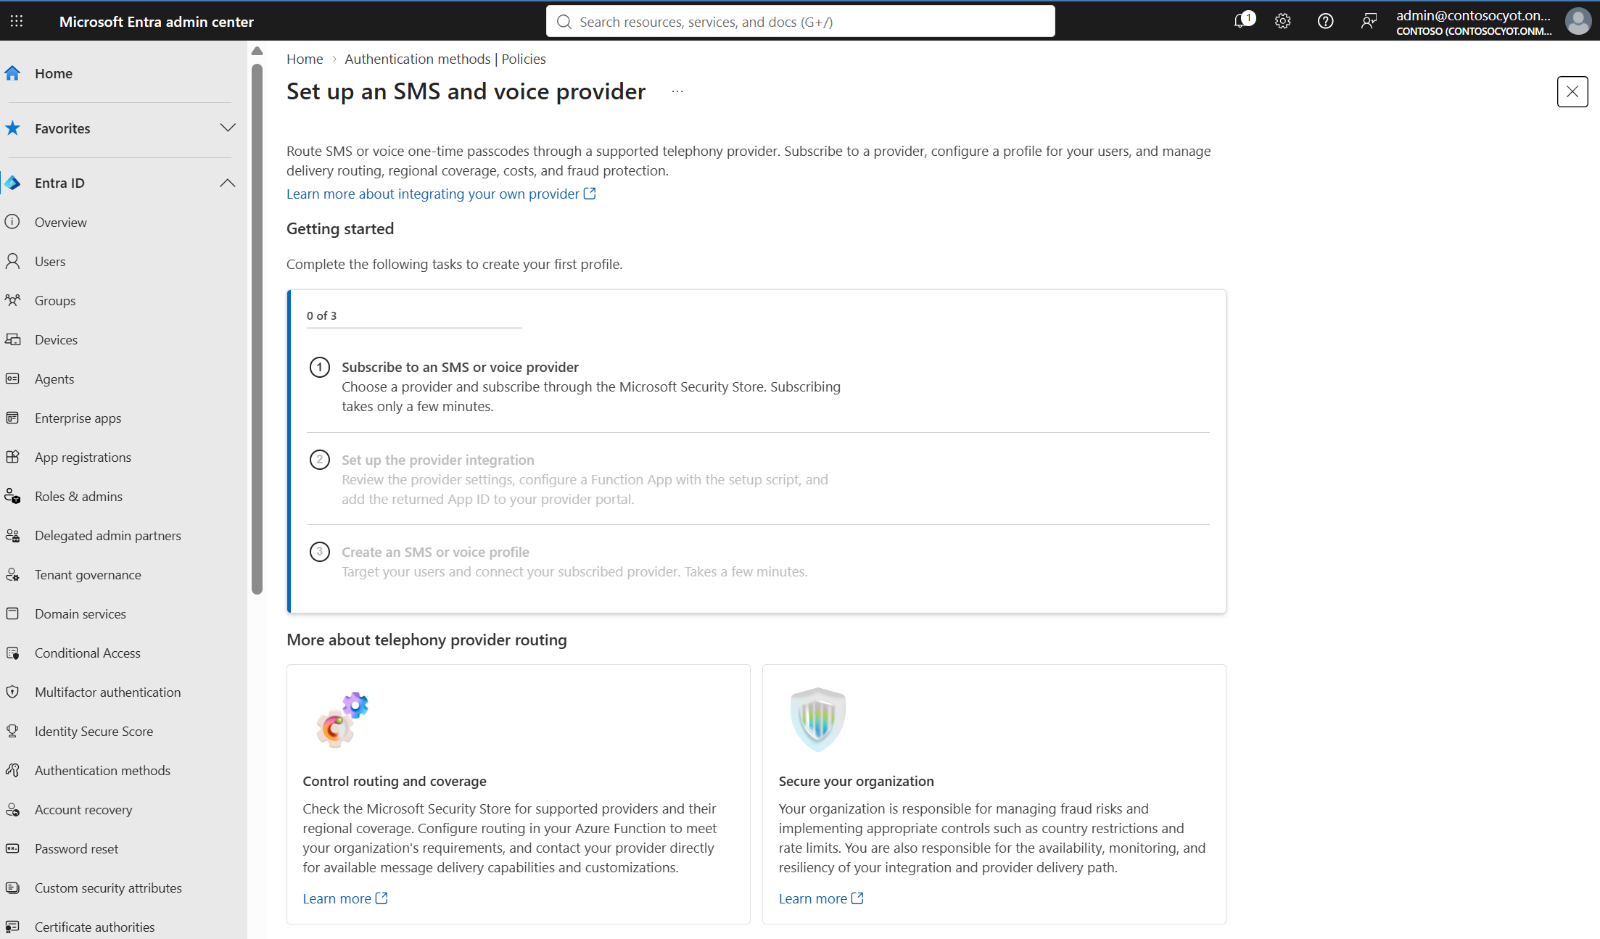
Select Subscribe to an SMS or voice provider and choose a supported telephony provider. Use Get solution to open its offer in Microsoft Security Store, or select an existing subscription with Select details. See Available telephony providers.
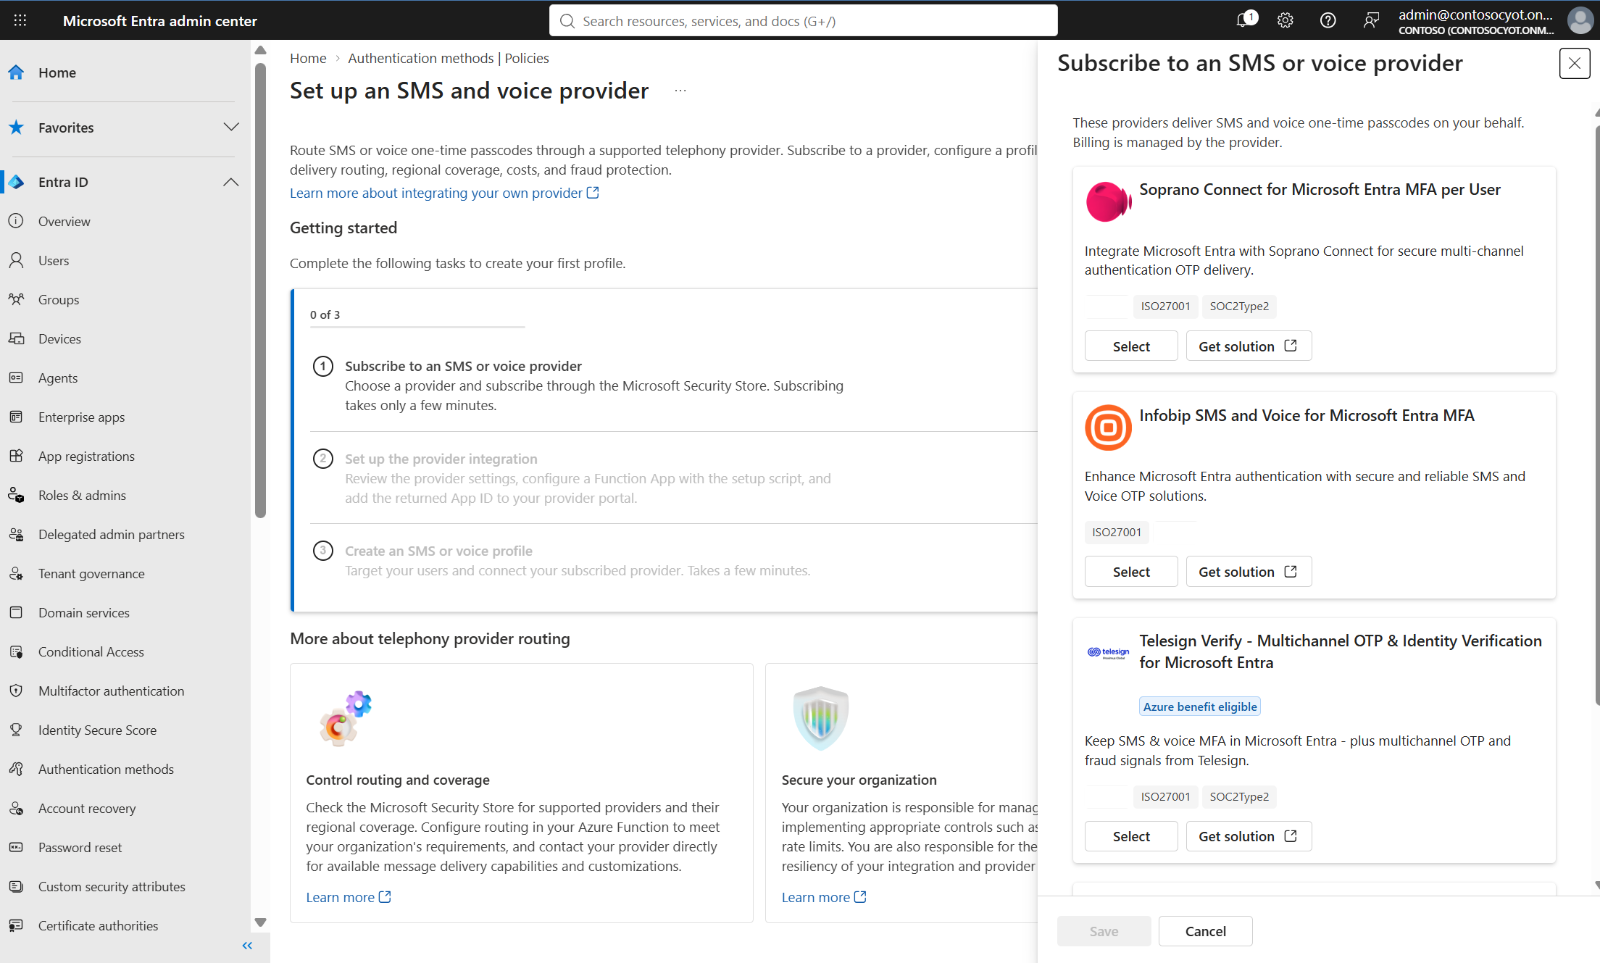
Purchase your provider's offer. For detailed purchasing instructions, see Purchase and deploy a SaaS solution from Security Store.
After you Place Order, select Configure Account Now and follow your provider's registration instructions.
Keep your provider's registration page open, but leave the Application (client) ID field blank. The setup script creates this ID in step 2.
Return to the Microsoft Entra setup page and continue to step 2.
Important
Don't enter any other ID in the provider's Application (client) ID field, such as your tenant ID, subscription ID, or an existing app's ID. Use only the Application (client) ID from the step 2 deployment summary.
Step 2: Deploy the integration
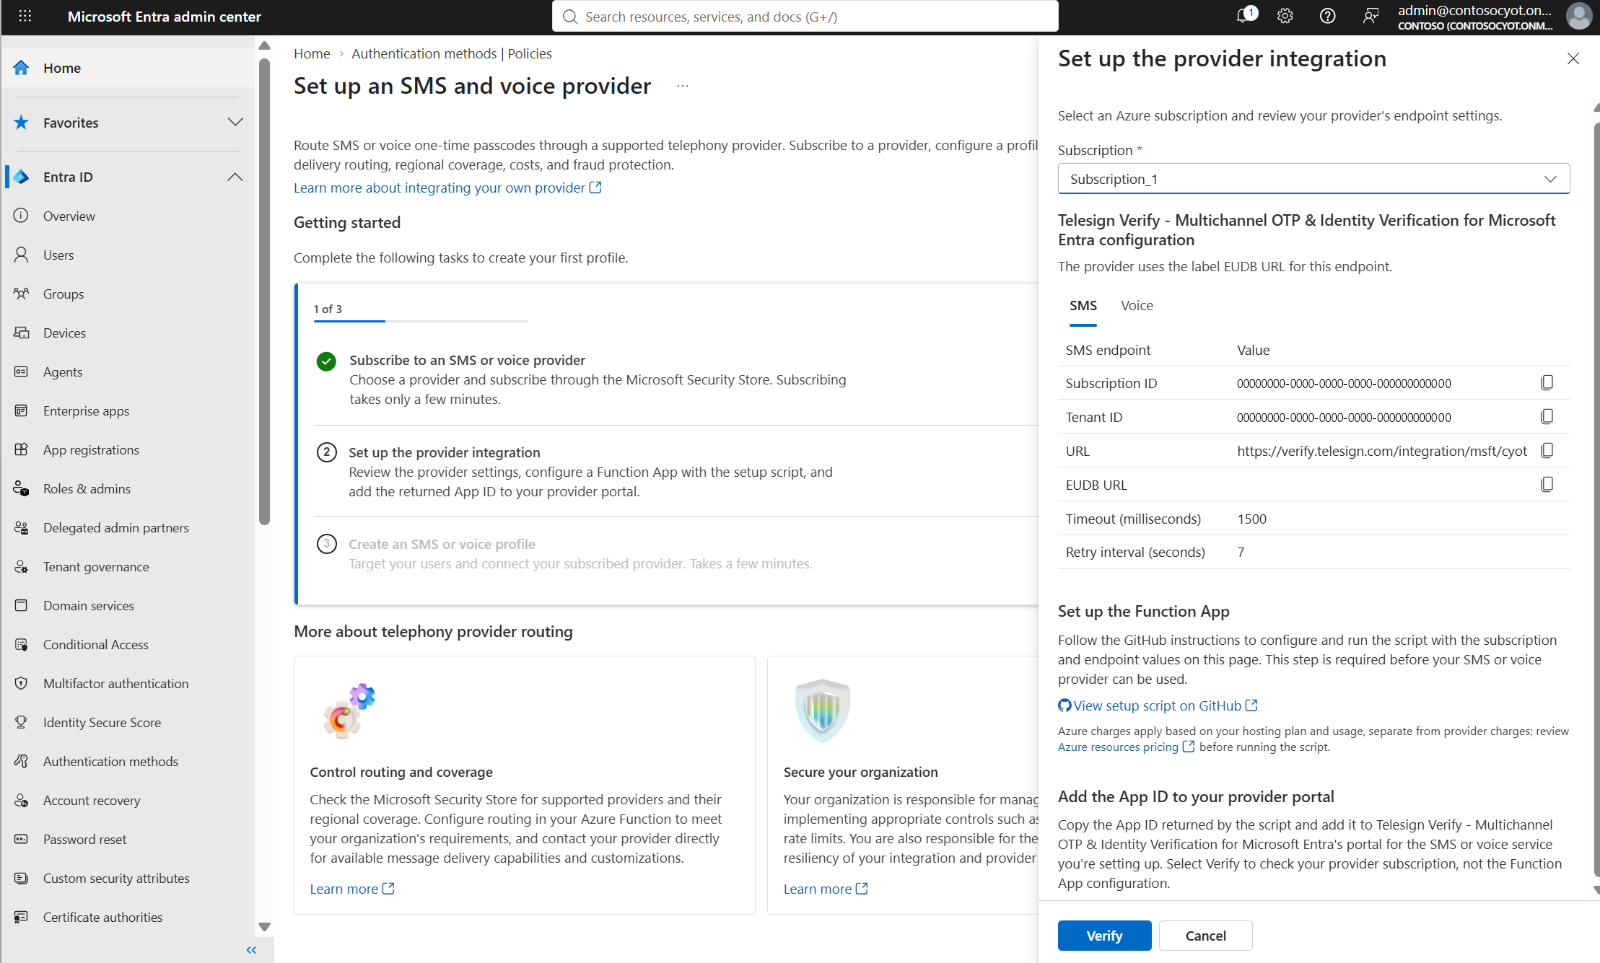
On Set up an SMS or voice provider, select Set up the provider integration. Select the Azure hosting subscription and review the telephony provider configuration populated in the pane.
What the setup script does
The setup script deploys everything needed to connect Microsoft Entra ID to your telephony provider, so you don't have to create Azure resources by hand. It walks you through a few choices, then shows the full deployment plan. Nothing is created until you approve it.
After you approve, the script creates the Microsoft Entra application, deploys and secures the Azure resources, and applies your provider's configuration. Deployment usually takes a few minutes.
Costs
Important
The integration runs on Azure resources in your subscription, billed based on your configuration and usage. To plan your budget, see Estimate telephony-provider and Azure hosting costs before you deploy.
Run the setup script
Select View setup script on GitHub in the integration pane and review the setup instructions.
Sign in to the Azure portal and select the Cloud Shell icon (>_) in the top toolbar. You can also go directly to https://shell.azure.com.
Select PowerShell. If Cloud Shell opens in Bash, select Switch to PowerShell in the toolbar.
If this is your first time, select No storage account required, choose your subscription, and then select Apply.
Download the setup script:
Invoke-WebRequest -Uri 'https://raw.githubusercontent.com/Azure-Samples/ExternalPhoneProvider-AzureFunction-Sample/main/setup/Setup-Epp.ps1' `
    -OutFile '.\Setup-Epp.ps1'
Run the script.
.\Setup-Epp.ps1Follow the prompts to select the customer tenant, hosting subscription, Azure region, telephony provider, runtime, and hosting plan. Use the configuration shown in the integration pane and approve the deployment plan.
Tip
Choose region and plan for performance. Deploy the Function App in the Azure region closest to your tenant's Microsoft Entra region. For low latency, use the Flex Consumption plan with one always-ready instance to avoid cold starts.
Save the deployment summary, including its tenant ID, endpoint URL, and Application (client) ID. You need these values to complete provider registration and configure your profile.
Important
Copy these values before you leave the Cloud Shell window. Cloud Shell sessions are temporary and can end when you navigate away, and the output isn't saved.
Step 3: Complete telephony provider registration
After deployment completes, return to your telephony provider's registration page to complete the provider setup.
- Provide the Application (client) ID created by the setup script when requested by your telephony provider.
- Complete any additional registration steps required by the provider.
- In Microsoft Security Store, go to Management > My Solutions and confirm that the Subscription status is 'Subscribed' before continuing.
- Return to Set up the provider integration in the Microsoft Entra admin center and select Verify to check the telephony provider subscription.
Step 4: Update the authentication method policy
Create a profile for each intended channel. The wizard carries over the current channel's targets and populates the endpoint and application ID when you select the deployed Function App. Start in Evaluation, validate the integration, and then gradually move delivery to your telephony provider.
Warning
Target users are shared with your existing SMS or voice policy, so any change here also affects users who sign in with SMS or voice today. Keep the current selections during rollout, and use a test tenant to try different users or groups.
Configure CYOT settings
On Set up an SMS or voice provider, select Create an SMS or voice profile.
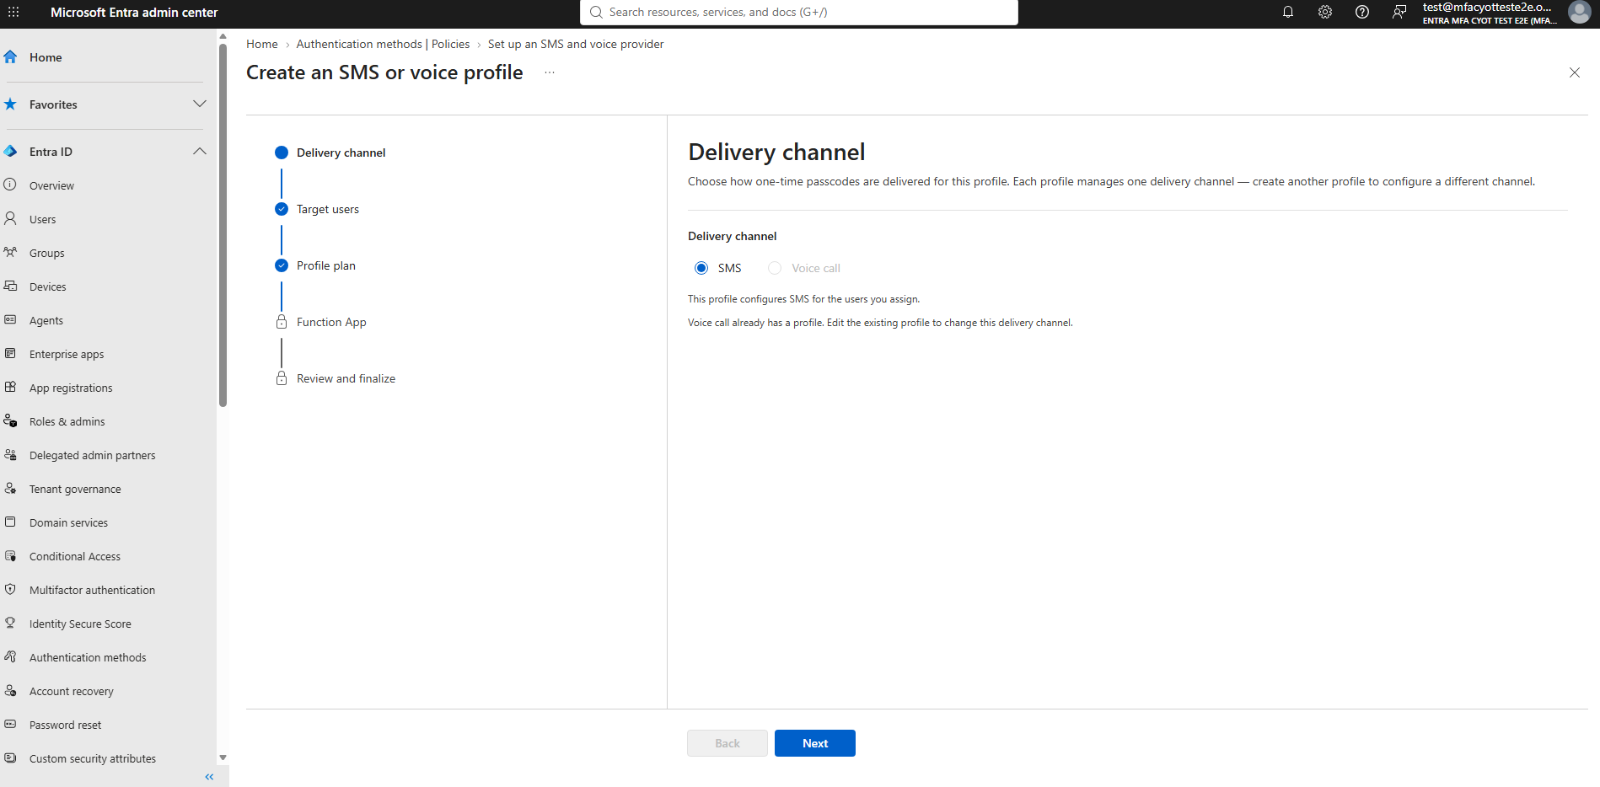
On Delivery channel, select SMS or Voice call, then select Next. Each profile configures one delivery channel.
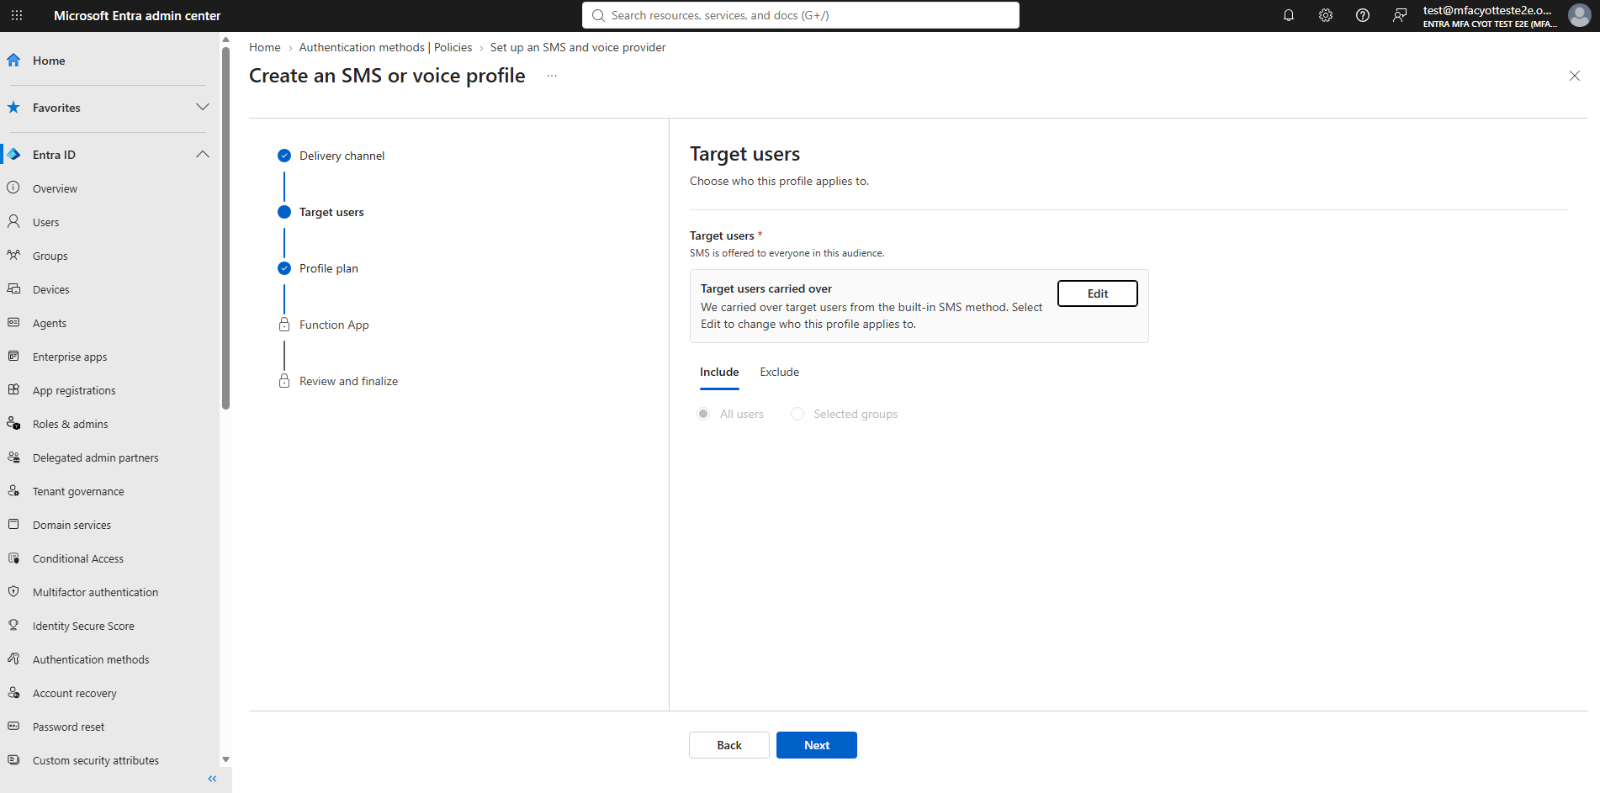
On Target users, review the targets carried over from the built-in channel configuration. Preserve the existing production Include and Exclude selections, then select Next.
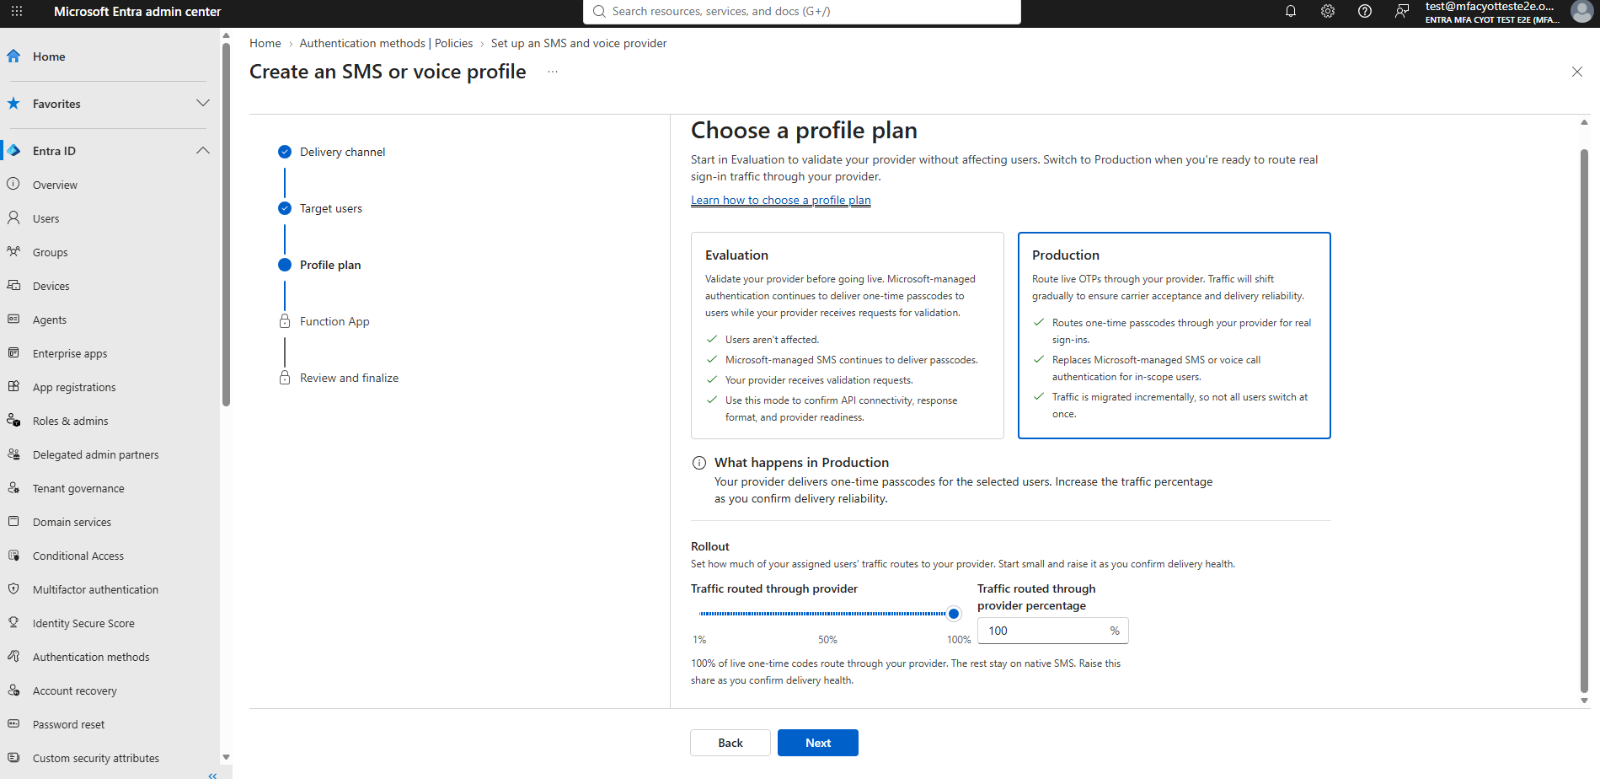
Start in evaluation mode
On Profile plan, select Evaluation. Review the Evaluation sampling percentage, then select Next.
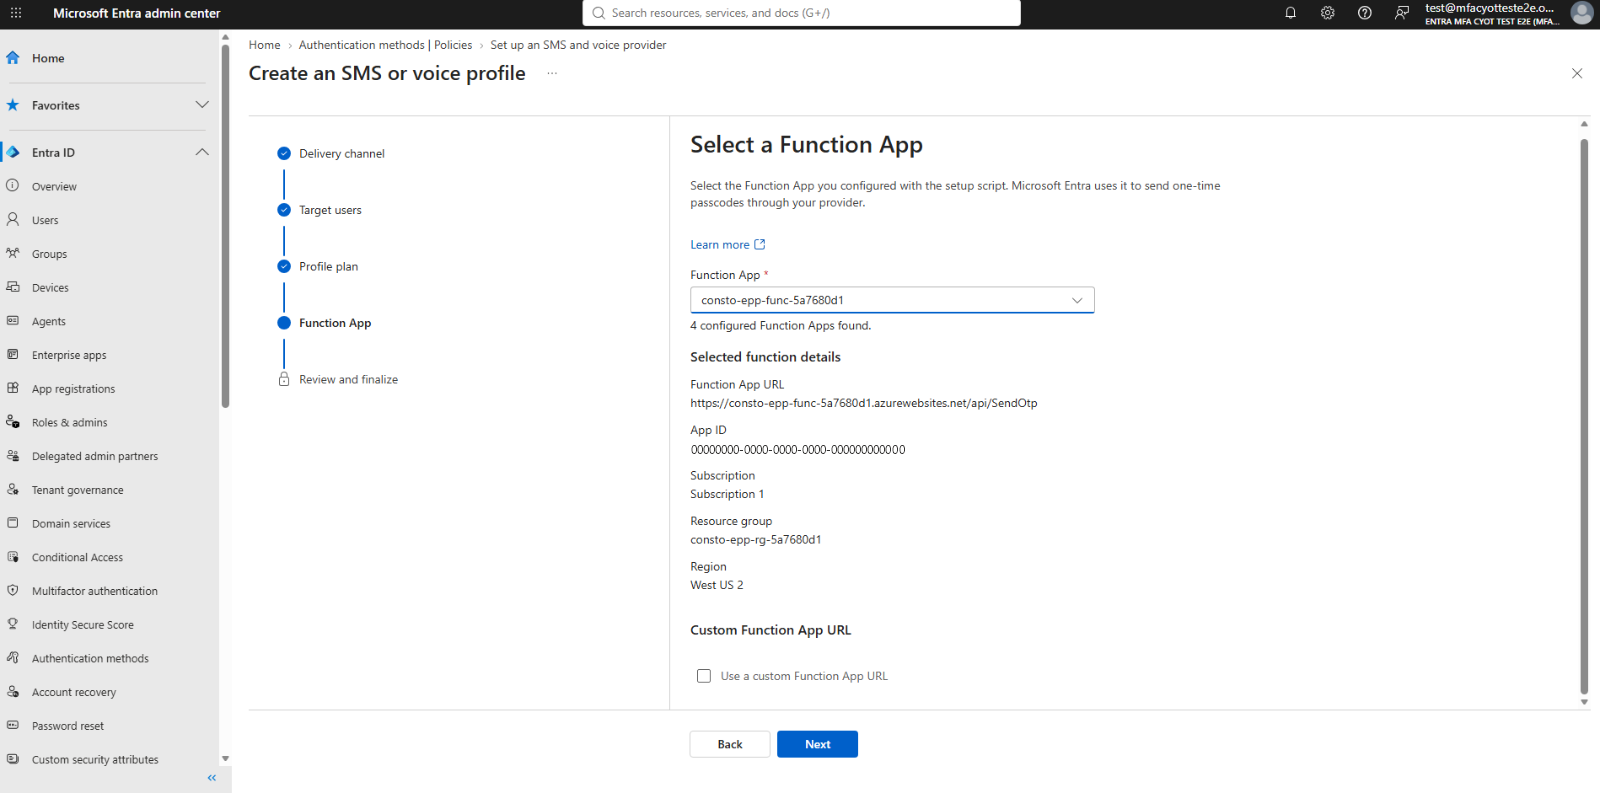
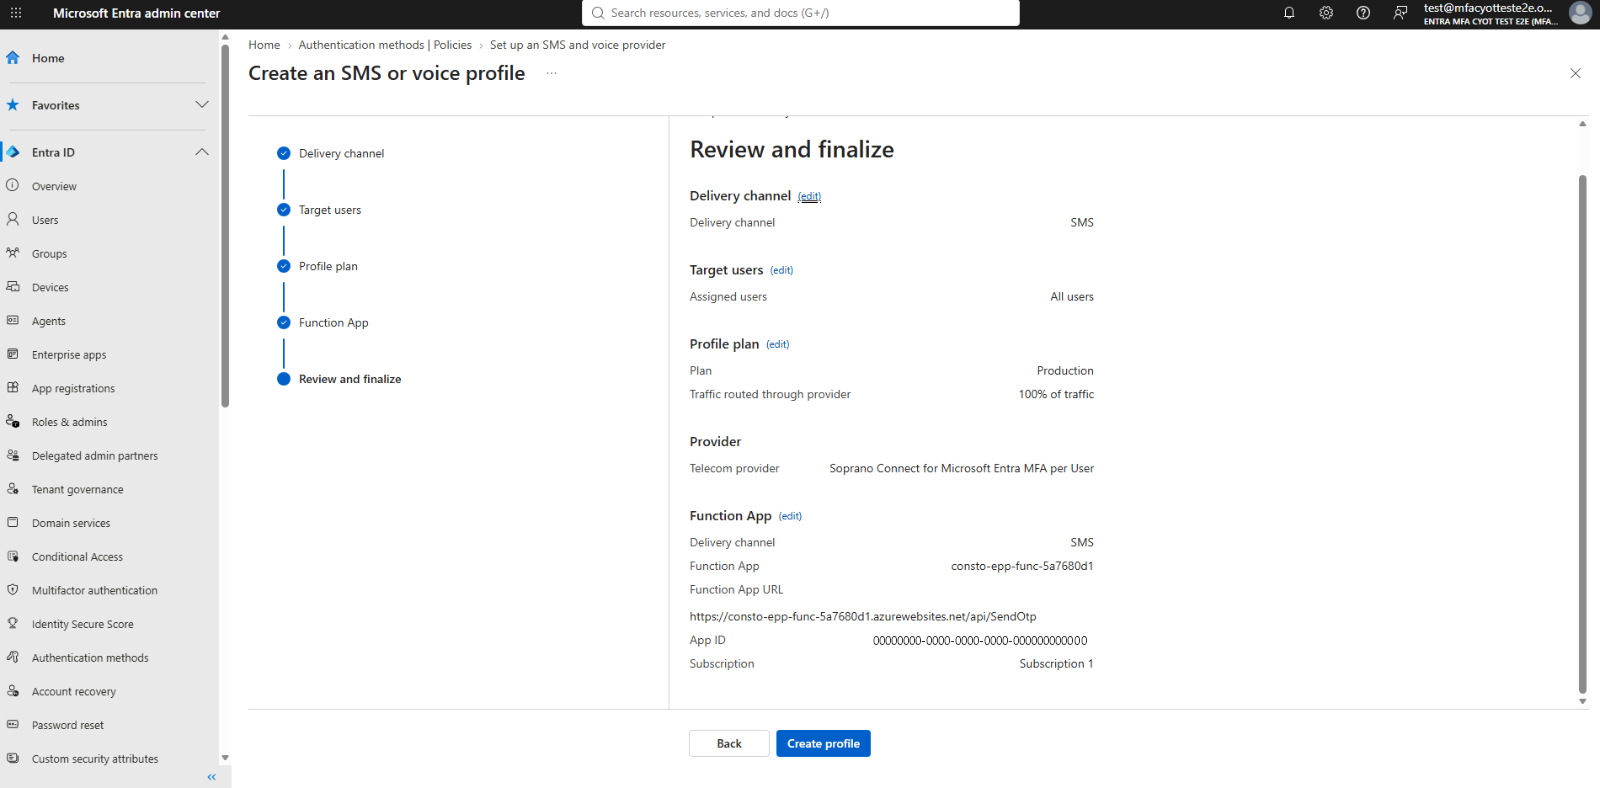
On Function App, select the Function App deployed for the channel's integration. The wizard populates its Function App URL and App ID, along with subscription and resource details. Compare the endpoint and application client ID with the deployment summary, then select Next.
On Review and finalize, confirm the delivery channel, existing targets, Evaluation plan, and selected Function App, then select Create profile.
Note
Changes to the authentication method policy can take up to an hour to take effect. Wait before you start testing.
Complete the evaluation-mode tests in step 5.
Saving applies the selected plan and targets to the channel. In Evaluation, Microsoft-managed telephony continues delivering authentication messages while the integration processes validation requests. Repeat profile configuration for each channel you intend to support.
Move to production mode
After evaluation succeeds:
Open the saved SMS or voice profile from Authentication methods > Policies and return to its Profile plan settings.
Select Production and set Traffic routed through provider percentage to your initial traffic percentage.
Keep the existing production targets and selected Function App unchanged.
Review and save the profile changes. Confirm the saved plan, percentage, endpoint, application ID, and targets.
Test telephony provider delivery before increasing traffic.
Increase traffic gradually
- Keep the profile in Production.
- Increase Traffic routed through provider percentage in increments until you reach
100. - Keep the endpoint URL, application client ID, and existing production targets unchanged while updating the traffic percentage.
- Validate authentication and telephony provider delivery after every percentage change.
- Increase the percentage after each stage validates successfully. To investigate an issue, hold at the current percentage and see Monitor and troubleshoot.
Important
When each stage validates successfully, continue to 100 percent without delay. Completing your rollout early helps ensure uninterrupted authentication for your users. For dates, see Passkeys by default and retirement of Microsoft-provided SMS and voice authentication.
Step 5: Test the integration
Use a test user with a phone number registered for SMS or voice.
Test in Evaluation
- In an InPrivate browser session, sign in as the test user and complete an SMS or voice authentication.
- In the Azure portal, go to your Function App → Functions → SendOtp → Invocations and open the latest transaction. In Invocation details, confirm Evaluation request completed with HTTP
200. - In the Microsoft Entra admin center, go to Monitoring & health > Audit logs and filter by Service: Azure MFA. Open the latest entry and confirm DeliveryMethod is
CyotEvaluation.
Test provider delivery
After evaluation succeeds, switch to Production and set your initial traffic percentage.
- In a new InPrivate browser session, sign in as the test user. Confirm the SMS or voice code arrives and authentication completes.
- In the Azure portal, go to your Function App → Functions → SendOtp → Invocations and open the latest transaction. In Invocation details, confirm the request completed with HTTP
200. - In the Microsoft Entra admin center, go to Audit logs and filter by Service: Azure MFA. Open the latest entry and confirm Delivery Method is
Cyot. - In your provider's portal, confirm the message was delivered.
At a partial percentage, only some requests route through your provider, so make a few attempts. If something doesn't look right, see Monitor and troubleshoot your own telephony provider.
Troubleshooting
To diagnose integration issues, use the troubleshooting guide to identify whether the issue is with the Microsoft Entra configuration, Azure Function, telephony provider, or authentication flow.
See Monitor and troubleshoot your own telephony provider for diagnostic steps, logs, common issues, and remediation guidance.